Additional motorcycle lights allow you to see more
Ensuring your safety on the road means not only undergoing maintenance on time and monitoring the serviceability of the vehicle. Of great importance while driving is how well the driver sees the terrain being crossed. It all depends on the optics installed on the vehicle. As standard, the motorcycle has one headlight. This is not enough for good visibility at night. Installing an additional headlight will solve this problem. It will increase the illumination area, allowing you to see the road in detail and illuminate the side of the road.
Additional light headlight for a motorcycle or ATV
In this review I will talk about an additional headlight for a motorcycle. Unlike most similar headlights, the light beam of this headlight is not just directed forward as a bright solid spot, but has a certain cut-off boundary. More details below. As usual, I will start my story with packaging and packaging. The headlight came in this cardboard box.
Another box
Included we have:
1. Mount on the steering wheel, or on some other pipe with a diameter of 22-23 mm. If you remove the spacers, the internal diameter of the mount will be 31.7 mm. The mount has rubber inserts installed inside. The inner part of the fastening and the outer part of the elastic have notches that coincide with each other, thanks to which the rubber inserts will not rotate, and the sides on these inserts will not allow them to jump out to the left or right. By the way, the mount is aluminum. Unfortunately, there are no screws for connecting it in the kit; you will have to purchase additional ones. The screw required is M5x12.
2. Instructions, which contain detailed pictures and instructions on how to install and connect the headlight. It’s good that it is indicated which wire is used for what. The previous headlight, which I reviewed earlier, also had three wires, and to figure out which one was for what, I had to disassemble the driver.
3. A fastening kit consisting of two bolts with nuts, screws and washers. There is also an intermediate link between the steering wheel mount and the headlight housing.
4. Well, the headlight itself.
The headlight is made in a massive aluminum housing, which also serves as a radiator. There is a driver inside the headlight; I will show its presence and operation a little further. In front of the headlight we see protective glass, under which there are three lenses: one in the center and two at the edges.
On the back of the headlight housing there is a USB connector that can provide a maximum charging current of up to 2A (according to the description). In practice, it turned out even a little more.
The connector has a plug with a rubber seal, thanks to which a high degree of moisture protection is achieved. There is an O-ring where the power wire exits the housing. The degree of protection here is declared IP65.
The headlight housing has some semblance of fins, which should improve cooling.
First of all, I tested how many degrees the headlight housing would heat up to, if we did not take into account that it would be cooled by air currents while driving. In 45 minutes, the headlight housing heated up to 79.4 °C, and the crystal heated up to 110.6 °C. Heating was carried out at an ambient temperature of 26°C. It is worth saying that in real conditions such temperature values will definitely not be achieved.
Thermograms with scale
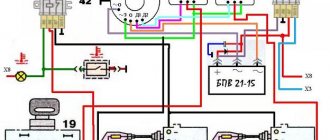
As I already said, three wires are used to connect the headlight. Green is general, blue is plus. A button is supposed to be installed in the gap of the blue wire, with which the headlight will turn on. The brown wire is used to activate the USB port; this wire must be connected to the power positive. I would recommend installing a 6 ampere fuse at the break of both wires, blue and brown. And it is advisable to connect them to the power supply after the ignition switch. I talked in more detail about where I connected these wires in my last review.
Declared characteristics of the headlight:
Power:
: 20 W
Supply voltage:
9-85V DC
Luminous flux:
2000 lm
Service life:
30000 hours
Certification:
CE E9 ROHS
Lighting range:
25 m
Protection class:
IP65
I measured the power consumption of the lamp in the voltage range 9-85V. As you can see from the following table and graph, the driver maintains power consumption at 21-22 W.
Now let's take a look inside.
There were some difficulties when disassembling the lamp. Two screws were too tight and had to be drilled out. The headlight housing is quite massive, the weight of the headlight is 400 grams.
There is a seal between the halves of the headlight housing. Inside we see three lenses that are installed on three LED matrices. Each matrix is located on its own piece of the printed circuit board. The boards, in turn, are attached using, I hope, heat-conducting sealant to the racks that are part of the case. Mainly through them, heat is removed from the LED matrices.
In the following photographs you can see the structure on which the lenses are installed.
The driver board is located at the bottom of the case.
By the way, the lenses are all plastic. The cut-off line is formed thanks to these three lenses and the protective glass. The refraction of the protective glass is not uniform and varies greatly closer to the edges.
The dimensions of the headlight can be seen in the following picture.
Now let's look at how the headlight works.
To begin with, I will compare this headlight with a motorcycle headlight that has a 55W halogen lamp installed. On the left is an LED headlight for additional light, on the right is a headlight with a halogen lamp.
In the following pictures, there is an additional headlight on the left, and an additional headlight on the right together with the standard headlight. The LED additional headlight has a barely noticeable cut-off line around the edges. I combined the stg of the additional headlight with the stg of the standard headlight. We see that in this case the boundaries of the light beam of the additional headlight extend beyond the limits of the headlight with a halogen lamp. This tells us that this headlight cannot be used as a direct replacement for a headlight.
However, when installing an additional headlight just below the headlight, the light beam of the additional headlight can be directed to the floor, unlike most similar lamps. In this case, we get a brightly lit area in front of the vehicle, within a radius of about 5-7 meters. And as you can see in the photographs, in this case the light beam of the additional headlight does not extend beyond the cut-off line of the standard headlight with a halogen lamp.
Well, I’ll give a couple more examples of light directed into the distance. On the left is an additional LED headlight, on the right is a standard headlight with a halogen lamp.
All photographs were taken at the same shutter speed, with the same aperture and the same ISO value. For those who doubt it, here are a few original photographs. If you need more, write, I will add more.
Original photographs
Photo one Photo two Photo three
If you install this headlight on the protective arches and adjust the light beam below the height of the trouser headlight, then the illuminated area in front of the vehicle will be only a couple of meters. Therefore, it is better to install the headlight a little higher, but not higher than the headlight.
And the next photo shows the operation of an additional headlight together with a standard headlight. In all photographs, the standard headlight was tested only in low beam mode.
In the following photos 1 to 4, I changed the angle of the additional headlight, just for clarity.
Video version of the review:
Thanks for your interest in the review.
The product was provided for writing a review by the store. The review was published in accordance with clause 18 of the Site Rules.
What optics are suitable for motor vehicles as additional lighting?
There are 3 light sources in headlights: halogen, xenon and diode. Halogen appliances produce radiation when the filament heats up. Their lighting, compared to other types, is quite faded and does not provide good illumination of a given direction.
Xenon is the next step in the evolution of auto lighting. Its operation is based on supplying a pulse from electrodes that ignite the mixture of gases in the flask. The light of such equipment is quite bright. It lasts longer than halogen, but at the same time:
- the cost of high-quality xenon is quite high;
- the maximum brightness of the radiation is not achieved immediately (it takes about 20 seconds);
- Over time, the light dims.
LEDs are a modern, innovative development. Their advantageous differences compared to the previous ones are:
- ultra-economical energy consumption, with high lighting brightness;
- the maximum level of luminous flux intensity, the diodes reach in a fraction of a second after switching on;
- resistance to shaking;
- protection against moisture ingress;
- the longest operating time among existing types of auto lighting (at least 30,000 hours).
According to auto experts, if you install additional lights on a motorcycle, then only LED ones. So you can be sure that the optics will not let you down in any situation.
In this review I will talk about an additional headlight for a motorcycle. Unlike most similar headlights, the light beam of this headlight is not just directed forward as a bright solid spot, but has a certain cut-off boundary. I’ll say right away that at the end of the text there is a video version, if you’re too lazy to read, you can watch it.
As usual, I will start my story with packaging and packaging. The headlight came in this cardboard box.
Included we have:
1. Mount on the steering wheel, or on some other pipe with a diameter of 22-23 mm. If you remove the spacers, the internal diameter of the mount will be 31.7 mm. The mount has rubber inserts installed inside. The inner part of the fastening and the outer part of the elastic have notches that coincide with each other, thanks to which the rubber inserts will not rotate, and the sides on these inserts will not allow them to jump out to the left or right. By the way, the mount is aluminum. Unfortunately, there are no screws for connecting it in the kit; you will have to purchase additional ones. The screw required is M5x12.
2. Instructions, which contain detailed pictures and instructions on how to install and connect the headlight. It’s good that it is indicated which wire is used for what. The previous headlight, which I reviewed earlier, also had three wires, and to figure out which one was for what, I had to disassemble the driver.
3. A fastening kit consisting of two bolts with nuts, screws and washers. There is also an intermediate link between the steering wheel mount and the headlight housing.
4. Well, the headlight itself.
The headlight is made in a massive aluminum housing, which also serves as a radiator. There is a driver inside the headlight; I will show its presence and operation a little further. In front of the headlight we see protective glass, under which there are three lenses: one in the center and two at the edges.
On the back of the headlight housing there is a USB connector that can provide a maximum charging current of up to 2A (according to the description). In practice, it turned out even a little more.
The connector has a plug with a rubber seal, thanks to which a high degree of moisture protection is achieved. There is an O-ring where the power wire exits the housing. The degree of protection here is declared IP65.
The headlight housing has some semblance of fins, which should improve cooling.
First of all, I tested how many degrees the headlight housing would heat up to, if we did not take into account that it would be cooled by air currents while driving. In 45 minutes, the headlight housing heated up to 79.4 °C, and the crystal heated up to 110.6 °C. Heating was carried out at an ambient temperature of 26°C. It is worth saying that in real conditions such temperature values will definitely not be achieved.
As I already said, three wires are used to connect the headlight. Green is general, blue is plus. A button is supposed to be installed in the gap of the blue wire, with which the headlight will turn on. The brown wire is used to activate the USB port; this wire must be connected to the power positive. I would recommend installing a 6 ampere fuse at the break of both wires, blue and brown. And it is advisable to connect them to the power supply after the ignition switch. I talked in more detail about where I connected these wires in my last review.
Declared characteristics of the headlight:
Power: 20 W Supply voltage: 9-85V DC Luminous flux: 2000 lm Service life: 30,000 hours Certification: CE E9 ROHS Lighting range: 25 m Protection class: IP65
I measured the power consumption of the lamp in the voltage range 9-85V. As you can see from the following table and graph, the driver maintains power consumption at 21-22 W.
Now let's take a look inside.
There were some difficulties when disassembling the lamp. Two screws were too tight and had to be drilled out. The headlight housing is quite massive, the weight of the headlight is 400 grams.
There is a seal between the halves of the headlight housing. Inside we see three lenses that are installed on three LED matrices. Each matrix is located on its own piece of the printed circuit board. The boards, in turn, are attached using, I hope, heat-conducting sealant to the racks that are part of the case. Mainly through them, heat is removed from the LED matrices.
In the following photographs you can see the structure on which the lenses are installed.
The driver board is located at the bottom of the case.
By the way, the lenses are all plastic. The cut-off line is formed thanks to these three lenses and the protective glass. The refraction of the protective glass is not uniform and varies greatly closer to the edges.
The dimensions of the headlight can be seen in the following picture.
Now let's look at how the headlight works.
To begin with, I will compare this headlight with a motorcycle headlight that has a 55W halogen lamp installed. On the left is an LED headlight for additional light, on the right is a headlight with a halogen lamp.
In the following pictures, there is an additional headlight on the left, and an additional headlight on the right together with the standard headlight. The LED additional headlight has a barely noticeable cut-off line around the edges. I combined the stg of the additional headlight with the stg of the standard headlight. We see that in this case the boundaries of the light beam of the additional headlight extend beyond the limits of the headlight with a halogen lamp. This tells us that this headlight cannot be used as a direct replacement for a headlight.
However, when installing an additional headlight just below the headlight, the light beam of the additional headlight can be directed to the floor, unlike most similar lamps. In this case, we get a brightly lit area in front of the vehicle, within a radius of about 5-7 meters. And as you can see in the photographs, in this case the light beam of the additional headlight does not extend beyond the cut-off line of the standard headlight with a halogen lamp.
Well, I’ll give a couple more examples of light directed into the distance. On the left is an additional LED headlight, on the right is a standard headlight with a halogen lamp.
All photographs were taken at the same shutter speed, with the same aperture and the same ISO value. For those who doubt it, here are a few original photographs. If you need more, write, I will add more.
Photo 1 Photo 2 Photo 3
If you install this headlight on the protective arches and adjust the light beam below the level of the standard headlight, then the illuminated area in front of the vehicle will be only a couple of meters. Therefore, it is better to install the headlight a little higher, but not higher than the headlight.
And the next photo shows the operation of an additional headlight together with a standard headlight. In all photographs, the standard headlight was tested only in low beam mode.
In the following photos 1 to 4, I changed the angle of the additional headlight, just for clarity.
Video version of the review:
That's all I have. Thanks for your interest in the review.
Where to buy reliable, certified LED optics?
In the Avtosvet online store you can choose any additional headlights for a motorcycle of any power and type of lighting. All equipment has a certificate of compliance with the GOST R standard and is approved for use on Russian roads. We work directly with the manufacturer, so we do not inflate prices.
Purchasing the product will not be difficult. When viewing the catalog, select a model, add it to your cart and click the “order” button. Enter your delivery address and we will deliver your order anywhere in Russia. You can pay upon receipt.
You can ask questions and get professional advice from store specialists using a special contact form.
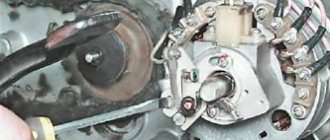
Installing LED optics on a motorcycle
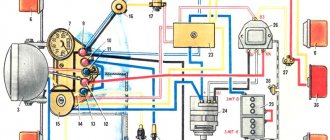
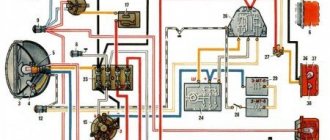
Motorcycle lighting
Lighting in transport plays an important role, it is especially necessary at night and in poor visibility. Driving on public roads without/with faulty lighting equipment is prohibited by the rules, as its absence can cause an accident. Many motorcyclists, for the sake of a better view or to give their bike a “zest”, change the standard lighting equipment to diode ones. Turn signals are especially often modified. Motorcycle turn signals come in front and rear. They are attached to different places depending on the model. Some front signals are mounted on the sides
or
built into plastic
, others are mounted
on the mirrors
.
The hind ones are usually located on the sides of the tail or built into its plastic. There are universal turn signals with fasteners that allow you to fix them on almost any part of the motorcycle. Most often, this part requires replacement after an accident, fall, or due to damage to the relay. If your turn signal breaks or stops working, you need to replace it. Nowadays, many bikers change their lighting equipment not only when it breaks down, but also for tuning. This spare part can be not just a source of warning light, but also a beautiful addition that makes the motorcycle more catchy and memorable. With the help of tuning, you can make your bike more noticeable to other road users. About turn signals
The choice of turn signals on the market is very large: from original OEM manufacturers to Chinese ones.
Now LED turn signals are gaining great popularity, as they consume much less energy (which is especially suitable for small-capacity equipment), are distinguished by their bright light and long service life. In addition, LEDs have a shorter response time than conventional lamps. This means that drivers behind you will know about your braking sooner and can react faster. These signals have different designs that improve the appearance of the bike and make it more modern. Thanks to these qualities, some motorcycle manufacturers are releasing new models with built-in LEDs. OEM parts are no different from those found on a motorcycle purchased from a store, so installing them should not cause any problems. But non-original turn signals often have rounded terminals. Such contacts must also be connected to the original input, but since their connectors are different, this will be difficult to do without special connectors. For direct installation, you will need to cut the terminals directly into the wiring. This method is undesirable, since the insulation of the wires may be damaged and in this case the risk of a short circuit will increase (for example, in rain). To avoid short circuits, use electrical tape, but this is a temporary solution. The connectors have one standard connector for standard wiring, and the second for a universal connector for non-original parts. Pay attention to low-quality Chinese spare parts, some of them have shortcomings, including poor sealing of the glass and case. Therefore, if you purchased a Chinese spare part and noticed these shortcomings, coat the gaps with transparent silicone. Another type of diode turn signals is flexible
.
When dropped, they bend and do not allow the plastic around them to crack; this property will help to avoid unnecessary expenses when replacing them. Modern motorcycles are increasingly using built-in indicators; they not only improve the appearance of the equipment, but also reduce wind resistance. There is less risk of breaking the plastic around the mounting point for built-in indicators. After you have purchased LED turn signals that are suitable for you and your bike, you should dismantle the old ones. Next, you can install new direction indicators. But be careful, installation according to the standard scheme intended for halogen bulbs will not lead to anything good. If the connection is incorrect, the turn signals will blink too quickly
or
not blink at all
.
The fact is that the resistance in an electrical network configured for standard incandescent lamps is higher than that of diodes. LED signals have lower power compared to conventional ones, so a large amount of incoming energy in a standard circuit simply destroys the diodes and causes a “burnt out light bulb” effect. This is incorrect and should be corrected. In this case, two methods
: installing a resistor or replacing the relay. Before purchasing these parts, install LED indicators on your motorcycle and check how they behave. If they blink correctly, then the equipment has a relay with three outputs, it is capable of working with diodes, if the operation is incorrect, then you have a regulator with two outputs, it is not suitable for diodes.
Resistors for turn signals
Some bikers use resistors to trick the system and avoid buying a new relay.
A resistor
is a passive element of an electrical circuit designed to linearly convert current into voltage and voltage into current, as well as limit current, absorb electrical energy, etc. In a motorcycle, it increases the load resistance and normalizes the blinking frequency.
Resistors are built into the circuit to correct the blinking frequency (at the rate of 1 resistor for each side of the motorcycle). Typically, resistors with a nominal value of 10÷20 Ohms
. Among the suitable ones: SQP-20 - with a cement body; AH-25 - made of a metal case with special holes for mounting; PEV-20 - made of ceramics. To install resistors correctly, it is advisable to use plastic wire connectors. They are installed on the wire going to the turn signal, and one resistor wire is connected to it. Next, the connector is closed using pliers. Do the same with the second pointer. Isolate the resistors from ground to eliminate the possibility of a short circuit. But be careful, this method is not as reliable as replacing it with a relay, because during operation the resistors become very hot and can melt everything around them. It is necessary to place them away from elements that do not like heat (plastic). To avoid this, install resistors in places where they will not be subject to mechanical stress or heating from internal combustion engine systems. Choose a place with the best ventilation - there the resistors will cool more strongly and will not melt anything. Some resistors do not withstand vibration well or spoil the energy-saving properties of diodes. In addition, their cost is almost the same as the cost of a relay.
How to choose resistors?
Selecting the correct resistor for the LED is very important.
After all, the operation of the diode will depend on this. If the resistor has a small resistance, then the LED can easily fail and burn out; if the resistance is too high, then it will burn very weakly. This happens due to the fact that ordinary relays are made for standard halogen lamps, the power of which varies in the range from 1W to 21W. LEDs consume much less - from 0.1 W to 6W. In this case, resistors (decoys) will help you. You can install the decoy according to a certain pattern. Let's consider the installation using the example of a standard motorcycle, which has 4 turn signal lamps - 2 in the front and 2 in the rear. Next you need to determine the type: usually it is a 21W bulb, in brake lights it is 5W. The formula is 4*21W+ 5W*2. The rated power of the relay is 94W. With it, the regulator turns on the turn signals approximately once every 0.5 seconds. When replacing only the front part, the relay will operate every 0.27 seconds, or 2 times more often, so the lighting equipment may not work correctly. 25W and 50W
resistors .
Therefore, it is necessary to supplement the circuit with them up to approximately 94W. Don't forget that resistors are installed on both sides (left and right). Let's take 2 resistors of average power 25W. After connecting the resistors to the circuit, the total power is calculated, if it is correct, the relay will operate 1 time every 0.52 seconds, which is almost the same as the original time. Installation of resistors in the circuit is carried out using the connectors included in the kit. They do not damage the wires and do not leave noticeable marks when dismantled. From the power source, through a switch (or relay), using 2 wires “+” and “–”, current is supplied to the lamp. The resistor is connected to the circuit in parallel - one of the resistor wires, thanks to the connector, is connected to “+”, the second resistor wire to “-”. As a result, a stable system is formed that ensures the correct operation of the turn signals. About the relay
Modern rotary relays are divided into two types: thermoelectromagnetic and electronic.
Each of these devices has its own pros and cons. Thermal electromagnetic
relays are based on a core with two contact groups and side armatures.
The winding is made of copper wire. The contacts leading to the light bulbs are connected to a thin nichrome wire, and the wire is connected to a plate that closes on the core. At a time when no current flows into the circuit, the plate is not adjacent to the base of the core. As the electrons move, the nichrome wire heats up, elongates, and shorts the plate. Thanks to this, the light bulbs light up. Further, the plate moves away again, the current changes direction, and the light bulbs practically do not light up. Since the cooling-heating process occurs quickly (1-2 times per second), the indicators begin to flash. Since the arrow-shaped light bulb located on the instrument panel is also connected to the circuit, it will also blink. This type of relay has been installed on all cars and motorcycles for quite some time, however it does have a drawback. Over time, the nichrome wire stretches, causing the turn signals to stop working. In addition, if one of the lamps burns out, the load on the others increases. Nowadays, thermoelectromagnetic relays are rarely used; they have been replaced by electronic breakers. Electronic
turn signal relays have the same device as thermoelectromagnetic ones, but instead of nichrome wire, an electronic circuit of transistors is used. The microcircuit contains a certain algorithm, with the help of which automatic pulses are produced that supply current to the core winding. After voltage is applied to the transistors, frequency pulses emanate from them, having oscillations specified by the program in the microcircuit. Passing through the circuit, the current attracts the armature, closes the contacts leading to the lighting fixtures and the light bulbs light up. Electronic breakers are much more reliable than thermal ones. If one of the lamps burns out, the others work without additional load. Unfortunately, such a relay has very little protection against short circuits; with a small voltage drop, the breaker may burn out. This relay may cause radio interference and affect the operation of various devices. The breaker operates on the principle of electronic relays, so when installing LED turn signals, the standard relay, which is not intended for diodes, must be replaced. Fortunately, installation will be quite simple, since most manufacturers produce the part with a special connector. Unlike resistors, LED relays do not overheat and are much more resistant to vibration and moisture.
LED brake lights
There are also rear turn signals integrated into the brake light. As a rule, a regular stopper is a halogen light bulb enclosed in a plastic housing with a red diffuser. The diode signal with pointers has a slightly different design - on the board the diodes are located in the electrical circuit itself. When you press the brake, a corresponding signal is given, the red light comes on, and when the turn signals are turned on, a signal will be given to turn on the yellow lights on the sides. If the standard indicator is replaced with a diode indicator with turn signals, the entire rear part is changed along with the brake light. If you are installing a diode brake light with integrated indicators, resistors or relays will only be needed to correct the blinking frequency of the turn signals. The advantage of installing an LED brake light is its visibility even in bright daylight and drivers’ response to your actions (braking or turning) earlier due to faster operation of the LEDs. Unlike incandescent lamps, LEDs last much longer. Due to the brightness and clarity of the diodes, you can use not only transparent, but also darkened brake lights, which will give your motorcycle an attractive appearance.
In custody
In this article, we tried to explain the principle of operation of LED optics on your motorcycle. If you follow all the recommendations, replacing standard turn signals and brake lights with LED ones will be easy and will save a lot of time. Decide for yourself which installation method to choose. Be more visible on the road and turn on your turn signals well in advance of your maneuver.