28.10.2016
Rust in the tank - this problem faces owners of mainly old motorcycles. Sooner or later it appears, especially if the equipment is used incorrectly. Yes, and in gasoline now you can find water and other troubles that affect the condition of the metal. So what should we do? We need to clean it! Of course, the filtration system will not allow any more or less large pieces of rust into the carburetors/injector, but sooner or later it will come out sideways!……So let’s look at options for cleaning the tank. I won’t say anything new, but I hope it will be useful to someone.
We clean the gas tank from rust yourself
Rust in the tank - this problem faces owners of mainly old motorcycles. Sooner or later it appears, especially if the equipment is used incorrectly. Yes, and in gasoline now you can find water and other troubles that affect the condition of the metal. So what should we do? We need to clean it! Of course, the filtration system will not allow any more or less large pieces of rust into the carburetors/injector, but sooner or later it will come out sideways!……So let’s look at options for cleaning the tank. I won’t say anything new, but I hope it will be useful to someone.
First, let's look at a couple of the most significant and common ones:
The first method is the “old-fashioned” one. I’ve seen it on many resources, so it’s generally accepted. Further actions depend on how deep the corrosion has eaten into the tank wall. If it is significantly covered with rust from the inside, then you can use a simple and reliable method.
It is necessary to remove the gas tank, drain the remaining gasoline from it, rinse it with water and pour a couple of handfuls of nuts (not large ones) into it. After which we stock up on patience and strength, and begin to shake the tank so that the nuts knock off all the rust from the walls. If desired, you can replace the nuts with pebbles or sand; sometimes the remaining rust is cleaned with sand after the initial treatment of the gas tank with nuts. Fill with gasoline for final rinsing. After washing, drain the mud and see what’s wrong with the tank. If there are still small rust residues left, you can use already proven orthophosphoric acid or special rust converters.
Wikipedia: “Orthophosphoric acid is also used to remove rust from metal surfaces. Forms a protective film on the treated surface, preventing further corrosion.”
Next option: Take the tank, drain the gasoline, blow out or dry the tank with the cap open. When everything is dry, take about 0.5 liters of any rust converter (chemicals), of which there are countless quantities in any auto shop. Alternatively, the same orthophosphoric acid. But be careful with it: don’t breathe or drip on the paintwork. Close the cap and twist the gas tank so that the liquid wets all the inner walls. We wait a little - from 25 minutes to an hour (depending on the temperature) and the whole mess. pour out what has formed. To clean the container from chemical residues, you can rinse it with plain water and baking soda. Soda neutralizes acid residues and softens the water, which washes absolutely everything. But do it carefully. We drain the remaining soda and rinse it with running water, and simply dry the tank.
As a folk remedy, some “Kulibins” take Coca-Cola or something like that (there’s plenty of nonsense), heat it to 35-40 degrees and leave it for a couple of hours. Why this water? The fact is that if you look at the chemical composition, cola also contains orthophosphoric acid, but it is slightly less than in the rust converter. But, as they say, they can eat away everything, including rust. Another interesting fact: all this machmala, along with rust, can be used to clean chrome or tiles with a toilet bowl well.
Let's return to the main options: the “scientific” method. Those who fumble around in physics will quickly grasp it, but the rest either don’t take risks or suffer. School physics course: resort to the help of electrolysis.
Attention - this work causes the release of harmful and flammable gases! They must be carried out in a well-ventilated area!
For this method, you will have to pour the electrolyte solution into the gas tank. Regular washing soda (sodium carbonate) is suitable as an electrolyte. If you can’t find it on sale, you can heat regular baking soda in the oven (160-180 degrees, for about 30-40 minutes). The output is sodium carbonate. Then pour water into the tank and stir the above-mentioned sodium carbonate into it. For 15 liters of gas tank volume you will need approximately five tablespoons.
An electrode is immersed in the resulting electrolyte solution (without touching the walls of the tank - to avoid a short circuit; it is not recommended to use a stainless steel electrode to avoid the release of particularly harmful gases during the electrolysis process). An ordinary ferrous metal, that is, a banal piece of iron or iron wire, will do as the electrode itself.
Then the minus is connected to the gas tank body, and the plus to the electrode. To the body is MINUS (this will be scientifically called CATHODE), and to the electrode is PLUS (ANODE). Rust will begin to disappear from the walls of the tank and materialize on the electrode. The main thing is not to confuse the polarity if you don’t want to corrode the tank into trash! Then we connect direct current and observe the result.
Hydrogen is released at the cathode and oxygen is released at the anode (hence the intense oxidation-corrosion of the electrode). The healing effect occurs due to hydrogen, firstly, it acts like sandblasting from the inside and removes soft rust even where sandblasting could not be reached, and secondly, due to hydrogen, the metal is restored from its oxide (iron oxide - rust), the restoration occurs better if heat is present.
Do not use stainless steel as an electrode, because During electrolysis, a by-product is released - hexavalent chromium, a very unhealthy thing, toxic, carcinogen.
Another option I found online was a guy’s reasoning (sorry, I didn’t write down his name): unscrew the faucet and insert a fitting with an air supply, but the stream should be strong, install a very fine mesh on the side of the tank lid. small. But before that, pour a small fraction of pebbles or sand into the tank. Well, turn it all on! I don’t know how much it will help, but it’s an option.
After cleaning the gas tank from rust using any method, it must be protected from repeated corrosion.
The popular method is epoxy resin. It is heated and poured into the tank, after which the tank is rotated by hand until the epoxy covers its inside walls with a thin layer. Once frozen, they form a coating similar in structure to glass. But this method also has a disadvantage - if the motorcycle touches the gas tank against something, the epoxy will break like real glass, and it will take a long and tedious time to remove the fragments from the gas tank. In addition, there have been cases where small fragments of cured epoxy resin entered the fuel system, and the consequences were not very pleasant. Therefore, you can look, again, for something from chemicals for anti-corrosion treatment, like “Kreem”. They have their own application features, but this is a topic for a whole separate article.
Other methods
Various acids can be used to clean the tank. Most often, to carry out such manipulations, motorists resort to the use of hydrochloric acid.
Phosphoric acid is also often used to flush dirt out of fuel tanks.
As a cleanser, you can use traditional methods, which are no less effective in helping to cope with the problem that has arisen.
It is recommended to wash outdoors, because many substances, when combined with rust and dirt, emit harmful fumes that are dangerous to human health.
How to wash the gas tank without removing it?
This is possible, but the effectiveness of removing rust and dirt is reduced. In addition, acids and other chemical compounds can enter the engine and cause irreparable damage to it. Therefore, to clean the tank, you need to remove it and not think about how to wash it without removing it.
Place the removed parts in a separate container so as not to lose them. To effectively clean it, you will need to empty the tank of any remaining fuel. Spent fuel contains sediment and other impurities.
- Acetone. To carry out the manipulation, buy 3 liters. Seal all holes in the tank with screws. Pour about 1 liter of product into the container and shake the container thoroughly. Pour the dirty liquid into a bucket and perform the procedure 2 more times.
- White vinegar contains an acid that can dissolve rust from inside the tank. It is poured into the container to the very brim. Leave it to act overnight, or even for a day. The next morning the product is poured out, but not all of it. Leave 1-2 liters and shake the reservoir vigorously. Then pour out the remaining liquid. Rinse the container.
- A great way to clean your fuel tank is to use laundry detergent. A small amount of washing powder is mixed with a sufficient amount of hot liquid. The container is filled to the brim with water. Leave the washing powder to sit for several hours. Then pour out the liquid and rinse the tank with hot water. The procedure can be repeated if it was not possible to wash off all the dirt the first time.
- Formic acid or phosphoric acid can also be used to clean the tank. Such cleaning products should be used with caution. Pour hot water into the tank, it should fill half the capacity. Add about half a gallon of acid. Close the container, but not completely, leave a small gap. After 2–4 hours, carefully pour out the product and rinse the container with clean water.
After washing, dry the container. You can use a hairdryer for this, since natural drying can take from 4 hours to a day.
After cleaning the tank, rinse it thoroughly with gasoline. Pour in 2–3 liters of clean fuel. Close the reservoir and shake well. The fuel must be allowed to sit for some time if acid has been used.
This will help remove particles of the products used to wash the container from the farthest corners of the gas tank. Gasoline eliminates acids. You cannot replace the tank immediately after washing. All sediment can get into the fuel system, and through it into the engine.
After completing the procedure, all that remains is to put the tank in place and enjoy the work done.
Sources of pollution and combating them
The gas tank is the starting point in the movement of fuel through the vehicle's systems. However, in its depths, in addition to gasoline, you can sometimes find something that shouldn’t be there. Contamination of the tank can lead to impure fuel, and sometimes no fuel at all, entering the engine, and this can lead to serious damage. Signs of a dirty gas tank are:
- problems starting the engine after parking,
- uneven engine operation,
- frequently clogged injectors and fuel filters.
One of the main threats to a car’s fuel system in general and the gas tank in particular is water. It gets into the gas tank with diluted gasoline at dubious gas stations, but even if you fill your car with exclusively high-quality fuel, you are not insured against water in the tank.
Preventing gas tank contamination
Cleaning the tank from water, dirt and rust with your own hands is quite simple. However, not every car enthusiast wants to do this. You can, of course, turn to professionals, but it costs money. It is much easier to prevent contamination of the tank and corrosion of its walls.
Epoxy against rust
Epoxy resins are used for anti-corrosion treatment of the inner surface of the gas tank. This coating is insoluble in water and gasoline, making it excellent for rust protection. To evenly apply the resin to all the walls of the tank, it must be poured through the neck, and then rotate the tank for a long time. When the epoxy has spread over all the walls of the tank, you can begin drying.
Anti-corrosion additives
Auto chemical stores sell anti-corrosion fuel additives. Among them there are very effective ones, but there are often cases when additives do not properly protect the gas tank from rust. Before choosing one of them, we recommend reading reviews on the Internet.
Smart car operation
The most reliable way to prevent contamination and corrosion of a gas tank is proper operation of the vehicle. A set of simple rules that, if followed, will save you from having to clean the gas tank:
- Monitor the quality of the fuel. Refuel only at approved gas stations.
- Monitor the amount of fuel. Try to keep the tank full. Be sure to fill it completely before parking for a long time. This will avoid the accumulation of water in the tank and its condensation on the walls.
- Try not to refuel in high humidity or foggy weather. If you still need to refuel, fill the tank full.
- With the onset of cold weather, add desiccant or alcohol to the tank in small quantities.
If a car's engine is its fiery heart, then the gas tank is its stomach, so it is very important for the health of the car to monitor its condition. Keep your tank clean and fill it with only quality gasoline, and your car will reward you with a smooth ride and long service life.
An air gun that reaches the bottom of the gas tank is very effective!
Dirt and rust often accumulate in grooves, depressions and welds. If the rust is covered in dirt, it will not respond to rust removal chemicals - you need to get rid of the dirt first. This is why it is so important to clean the inside of the gas tank before you begin removing rust.
Replacing the nozzle on your pressure washer hose with the optional conical nozzle nozzle will improve efficiency. If you don't have a high-pressure washer, you can make something similar using a simple garden hose - just make a hole in it for the spout of an air gun as shown in the photo above (about 50 mm from the end of the hose).
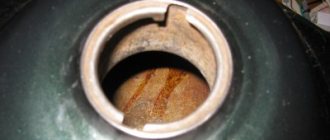
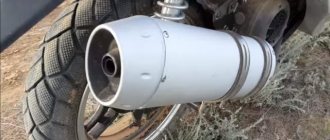
Cleaning a motorcycle tank from internal rust
In general, what can I tell you, friends. If you wash your motorcycle tank to remove rust, don’t repeat my mistakes. :))))) the tank is 25 years old, and apparently it stood empty and rusted for a long time.
So, I filled the tank with this hellish swill as hot as possible from the tap. Of course, first I dissolved all the powder in 2 liters of water (it will be a pain to dissolve in a tank). I left the full hot tank overnight. After 6 hours it had not yet cooled down, but it stood for about 14 hours. In the morning I successfully drained it. Typically, he poured in clear water and poured out yellow-brown water. I washed it with 10 liters of water, shook out the remaining peeling paint - and voila! There is no rust in the tank! only gray metal and remnants of paint. And before that, rust was everywhere. Glory to citric acid!
So! The correct procedure for cleaning a motorcycle tank is:
1. Drain the gasoline 2. Rinse with water, remove all dirt that has already peeled off and is floating, rinse again with water. 3. Pour a 3% hot (!) solution of citric acid overnight (or until it cools down). The best reaction is in a hot solution. Therefore, you can wrap the tank with a blanket or quilted pad so that it does not cool down so quickly. 4. Drain the acid, rinse the tank with water, possibly with the addition of soda. 5. wash with phosphoric acid or rust converter. Converter according to instructions. The acid creates a film on the surface of the iron that prevents oxidation of the metal (rusting). 6. rinse with water, dry and that’s it. You can use it.
On the forums it is generally recommended that after all these procedures, fill the inside of the tank with epoxy. Think. but even without this, the result exceeded expectations. Thanks to chemists and citric acid!
How to clean rust from a gas tank?
Here, as you understand, we will talk about cleaning the fuel tank from rust from the inside. After all, the whole difficulty lies in the fact that we only have access to the inner surface of the tank through the neck. So, let's start with the reasons why corrosion appears inside the tank. Hello to those who like to drive on an empty tank! It is one thing when in this case the vehicle is constantly in motion, and another when it is idle in a garage or in a parking lot. Most of the tank is not in contact with the fuel, and due to temperature changes, water vapor condenses on its walls. Therefore, if you have to park the vehicle in the garage for a long time, fill the fuel tank to capacity.
The car fuel filter is clogged with rust.
A good friend of mine who deals in used motorcycles often comes across rusty tanks. Before motorcycles are shipped from Japan, all gasoline must be drained at the marine terminal. A rather long period may pass after sending. And it also happens that even before the terminal it stood for a long time without fuel. The bottom line is that we have a rusty tank.
Further actions depend on how deep the corrosion has eaten into the tank wall. If it is significantly covered with rust from the inside, then you can use a simple and reliable method. We take the nuts, pour them inside and fill them with gasoline or kerosene. We close the tank. Shake thoroughly like a tambourine and pour out the resulting mixture. Fill in another portion of gasoline for final rinsing. Next, in order to remove small rust residues, you can use already proven orthophosphoric acid or special rust converters.
But as a rule, they penetrate so deeply that this can then affect the further restoration of the tank. No matter how hard you try to wash it, it will show itself on the outside during paint and varnish work. You can think for a long time why the paint swells. Well, this is if we are talking about motorcycle fuel tanks, which bikers paint with special trepidation. With automobiles, the situation is simpler, since the maximum that is required of them outside is to cover them with soil and bitumen mastic. In general, you need to act depending on the degree of corrosion on the tank walls.
Many people have heard that a drink such as Coca-Cola or Pepsi is used as a rust remover. The thing is that it contains the same orthophosphoric acid. Judging by the videos on Youtube, there are many examples of cleaning rust traces with this drink. Personally, I haven’t tried it, but I’ll have to try it.
Yes, and don’t forget about safety precautions when working with rust converters, because virtually all of them contain acids that can cause a reaction on exposed skin. Wear rubberized gloves.
An interesting method of cleaning tanks by electrolysis. To do this we need a 12 V battery, a couple of wires, soda and water. The photo below shows a 15 liter tank. Prepare a solution in the proportion of 100 grams of soda per 10 liters of water. Fill in the solution. We immerse the wire from the positive terminal (anode) inside the tank so that it does not touch the walls. We connect the wire from the negative terminal to the tank body. Leave it for a couple of days. Voila! The tank is clean.
Water pressure
If you carry out the event frequently, you don’t need to use detergents and acids. It is enough to take a Karcher and rinse the inside of the gas tank with strong water pressure.
This method will save fuel filters from quickly depleting.
How to clean the gas tank:
- Disconnect the tank. Before doing anything, you must disconnect it from your motorcycle or other equipment. Without disconnecting the tank, you will not be able to access it or clean it safely. Unfold the tank and remove the screws or bolts that secure it. For lawn mowers and similar items, the fuel line and spark plugs must be removed.
- Close the fuel line. After disconnecting the fuel line, you need to block the access to gasoline. Dirt or other objects can get into the fuel line and cause problems. Take some kind of smooth clamp and attach it to the line near the carburetor.
- Empty the tank. Pour the remaining fuel into a gasoline-safe container. If you can't get everything out, use a suction hose or similar device to remove the fuel from the tank. Let the tank dry completely. Without draining the remaining fuel you will not be able to clean properly.
- Inspect the tank. Take the time to examine the tank, looking for any problems that could compromise its integrity. Defects, rust, or other problems may pose a potential safety hazard or may jeopardize the proper operation of the engine.
- Turn on the Karcher and spray high pressure water into the tank. It is necessary to treat all surfaces of the gas tank.
At the end of the procedure, it is necessary to dry the container and replace it.
If you are performing the procedure for the first time, take a photo of the disassembly process to make it easier to assemble later.
Carbonated drinks are great for removing limescale and rust. Coca-Cola, Pepsi, Sprite and just sparkling water are suitable for this procedure.
It's better to use Coca-Cola. It contains phosphoric acid, which will clean the container in a matter of minutes.
How to flush the gas tank:
- You will need as much drink as the flammable mixture can accommodate. You can use any carbonated drinks containing phosphoric acid.
- The drink is poured into a container, which you don’t mind spoiling if something happens, and heated to 40 degrees. Warm Coca-Cola effectively removes rust.
- While the drink is on the stove, remove the gas tank and place it in the sun, it should also be warm.
- The heated liquid is poured into the container to the very edges.
- Leave for 2–4 hours. The holding time depends on the degree of contamination. If the gas tank is cleaned once a year, then you can leave the drink in it all night.
Finally, drain the sweet drink and rinse the reservoir.
Preparing for cleaning
To prevent rust from accumulating in the gas tank, it must be cleaned regularly. Professionals advise doing this at least 3 times a year.
Before you begin the main procedure for removing corrosion, you need to carry out several preparatory measures:
- Empty the tank. It should not contain gasoline. It must either be developed or drained.
- Remove the tank, open the cap and turn it over to remove any remaining gasoline from the lines and from the bottom.
- Place the container in such a way that it is convenient to pour the cleaning composition into it.
Even preparatory activities should take place in a well-ventilated area. Gasoline tends to evaporate, and its vapors are toxic to humans.
Phosphoric acid converter
Phosphoric acid is a potent chemical; it is recommended to use it outdoors, away from fire and heating appliances.
This converter is used with rubber gloves and safety glasses.
It is not recommended to use orthophosphoric acid in its pure form. If you do not comply with the proportions, you can cause irreparable damage to the fuel tank.
Cleaning the fuel tank yourself - step-by-step instructions for using the converter:
- First you will need to dismantle the tank. Follow this algorithm: remove the terminals from the battery, drain the remaining fuel from your gas tank, disconnect the fuel level sensor and disconnect the ventilation and fuel hoses. All that remains is to unscrew the screws and carefully remove the container. Place the gas tank on a level surface.
- First, wash the inside of the container with hot water. This will help remove large chunks of rust and dirt. Hot water is poured into the gas tank, closed and shaken vigorously. The dirty liquid is poured out and proceed to the next step.
- 500 ml of converter with orthophosphoric acid is poured into the container. The tank is closed and slowly rotated so that the liquid is distributed along the walls.
- Cleaning the gas tank will take 1-2 hours. After 1 hour, you can drain the converter and perform a final flush. If there is a lot of rust, the procedure is repeated.
- The final rinse involves filling the reservoir with water. 100 grams of baking soda are poured there per 10 liters of liquid.
- All that remains is to dry the tank. There should be no liquid left in the gas tank. Drying takes 3–4 hours.
You will have to devote almost the entire day to the procedure to thoroughly clean the gas tanks from rust.
After the converter has washed away all contaminants and the tank has been dried, you can install it in the car.
This method of washing will not leave any trace of corrosion. She won't appear for a long time.
You can clean away dirt in visible areas using annealed wire!
Annealed wire (or tying wire) is used for tying reinforcement and in other construction work. It comes in different thicknesses and is sold in hardware stores. The easiest way is to bend it in half, just take not the thinnest one, but a thicker one - a two or three. With its help you can reach contaminants in hard-to-reach places.
- 1: We are going to remove rust, but before that the gas tank must be thoroughly cleaned.
- 2: If you don't clean the inside of the gas tank, the rust remover chemicals won't be able to do their job.
- 3: If the rust is not exposed, the rust remover will simply not react with it.
- 4: Pressure washing is the most effective way to clean your gas tank.
If you leave your motorcycle's gas tank unattended for any length of time, you may find it in surprisingly poor condition. Gasoline in the tank degrades over time and is deposited in the form of resin and varnish. In such a situation, it will be difficult to clean the gas tank, let alone remove the rust.
Some amateur mechanics find out the hard way that the inside of the tank doesn't get any cleaner after they drain the old smelly gasoline and fill the tank with rust remover. Let us repeat once again - without preliminary cleaning, no chemical, even the most expensive and advanced, can remove rust.
Often the carburetor becomes clogged with dirty deposits from the tank, and not with rust, so you should not neglect cleaning the gas tank.
- Step 1: Drain the old gasoline
- Step 2: Turn the fuel valve (if equipped) to the OFF position.
- Step 3: Plug the faucet hole if you removed it.
- Step 4: Pour about 50 cm3 of neutral cleaner (like kitchen cleaner) into the tank and add hot water (about 60 degrees Celsius) to about halfway up the gas tank.
- Step 5: Close the filler cap and give the gas tank a good shake.
- Step 6: After this, add more warm water until the tank is full and close the filler cap.
- Step 7: Wrap the gas tank in a towel to keep the water warm and leave it for 24 hours.