How to remake the Ural: gas tank
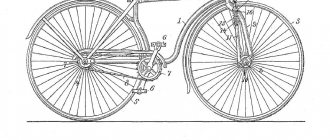
A gas tank on a motorcycle is an undoubtedly necessary detail, but the gas tank of a standard Dnepr is a very dull and undecorative thing. And the custom gas tank must comply with the canons of style and completely fit into the overall layout of the motorcycle. There are many types of tanks and, it should be noted that the most beautiful, stylish and unusual tanks are made not by factory stamping, but by hand.
Very good results are obtained when using drop-shaped tanks from K-750, IZH-49 motorcycles, standard nuclear weapons and similar tanks. It’s enough to go to a market that sells used spare parts (in Kharkov it’s the Blagoveshchensky Bazaar) and luck will definitely smile on you.
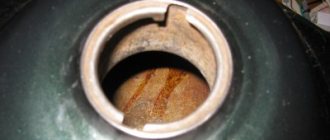
Working with an old tank has a number of features. First of all, you cannot trust the strength of old, thin metal. Typically, old tanks begin to rot from below in the area of the gas tap and also in the area of the rubber lining on the side (nigrips). But everything can be fixed. Let's look at the working methods using the example of expanding a tank. First of all, you need to clean the outside of the tank. This can be done with a grinder and a thin cutting wheel.
The tank fragments are thoroughly cleaned from the inside. Moreover, some tanks are coated with zinc on the inside and it is impossible to weld such metal efficiently. In this case, use a grinder to remove the zinc coating in the weld area.
The tank is then expanded to the required size and securely fixed in position using threaded rods or rods welded directly to the tank. All linings covering the cavities are made of sheet metal 1 mm thick. Then everything is welded. It is necessary to cook in short batches, always in different places, otherwise severe warping of the product cannot be avoided. After this, the various cavities and tunnels in the tank are made from sheet metal. The cover plate for the instrument tank is made of metal 1.5-2mm thick.
The most delicate point is sealing the finished tank. Of course, it is necessary to cook as carefully as possible. But even the most perfect seam will leak over time. This is due to the loss of mechanical properties of steel in the weld area with the formation of microcracks.
I have tried various sealing options. Tinning, for example, is a very labor-intensive and time-consuming process. The simplest and most reliable way is sealing with special sealants. Coating welds with epoxy glue and aluminum powder gives good results. The composition must be applied to a clean and well-degreased weld with a hard brush, rubbing it into the surface of the seam.
It is necessary to ensure that during further puttying of the tank the sealant layer is not damaged.
Bokeh in photography: creating different aperture shapes
Have you ever admired stunning blurs in the form of Christmas trees, hearts and other unusual shapes? In this article we will tell you the secret of creating such an effect.
How to make bokeh in a photo? Yes, it’s very simple: you don’t have to disassemble the optical device, you just need to acquire the following items:
- cardboard;
- a camera with a more or less fast lens;
- pencil;
- scissors;
- and tape.
Let's start making our accessory:
- Use a pencil to trace the edge of your camera lens.
- Surely you will get an even circle of the required diameter. You can also add small “ears” in order to later attach the structure to the lens.
- Now, strictly in the center, draw what you want to see in the picture instead of circles.
The only difficulty in this operation is that for different lenses and focal lengths you will have to make a slot of a certain size. If you make the figure too wide, you will not see the result at all. If, on the contrary, you make the slit not wide enough, you will get the effect of a DX lens: i.e. 100% vinentation at the edges.
But as practice shows, it is better to cut a hole that is too narrow and then expand it, than to overdo it and create the workpiece again.
To quickly check the correct bokeh, simply set the focus mode to manual and point the lens at the nearest object so that behind it there is something like a garland with many lights. If you have a magical shot with a blurry multi-colored background, then you can safely go in search of interesting shots on the evening streets, cafes and shopping centers - there you will find a large accumulation of lights, especially on New Year's holidays.
Selection of materials
There are several materials that are used to make sauna tanks.
Cast iron
The classic option for making sauna tanks is cast iron. However, this option has a number of both pros and cons. Despite the fact that this material is undoubtedly very strong and durable, heating water in such a container requires a large amount of fuel and time, but the high temperature of the water remains for a long time. Cast iron is not afraid of corrosion and temperature changes. One of the most significant disadvantages of cast iron is its large mass and the difficulty of making it yourself. In addition, it requires mandatory protection from exposure to high humidity.
Stainless steel
Stainless steel bath tanks are increasingly being used. Their popularity is due to the fact that they:
- do not need protection from high humidity and negative environmental influences;
- have a high percentage of heat conductivity, which ensures heating of water in a short time;
- practically do not give in to deformation under sudden temperature changes;
Enameled material
Sauna tanks made of enameled material are practically rust-resistant.
Also, enameled containers have one important limitation during installation - they should not be built into the surface of the oven. In principle, these are all the basic rules when choosing a container for a bath, following which will help you enjoy the washing process for a long time
In principle, these are all the basic rules when choosing a container for a bath, following which will help you enjoy the washing process for a long time.
Most likely, you just (or a week ago) saw on the Internet a beautiful photo with a completely unusual, one might even say “magical” effect, and now you passionately want to create the same thing with your camera.
Application options
Storage tanks are relevant in places where there are interruptions in water supply. Indoors, water tanks are most often installed in a horizontal position.
The tanks are used to store rainwater and tap water. With their help, you can organize an outdoor shower or keep them for fire safety purposes so that you can extinguish the fire.
They can store water for watering plants, gardens and vegetable gardens. Often round tanks are installed in a bathhouse to store water. There are many designs that can be round, rectangular or other shapes.
It is important to understand what the tank is for. If it is used inactively, the water in it promotes the growth of algae and microorganisms
Moreover, if the container is constantly located in an open area under the sun's rays.
Therefore, choosing the volume of the tank is one of the main tasks before starting its manufacture. Ferrous metal tanks must be primed and painted to prevent them from rusting.
Types of bokeh in photography
Bokeh can take on different shapes: from pentagons, various circles to all sorts of fancy shapes. In the classic version of bokeh, the number of faces of polygons directly depends on the number of aperture blades: the more blades there are, the more round the bokeh will be.
The degree of brightness also divides bokeh into three main types: low, uniform and high brightness.
- The first type is characterized by fairly bright edges and low brightness in the center of the frame.
- The second is a rather harmonious type of bokeh. It provides an equal distribution of brightness and a “loyal” color scheme. You can create a bokeh effect of this kind only with a high-quality lens.
- The latter is distinguished by faded edges and a high degree of brightness of the elements located in the center of the image.
Tips for choosing
Those who are choosing a fuel tank for a boat engine for the first time should familiarize themselves with several criteria:
Suitable options should be selected based on engine fuel consumption
An important factor is the average duration of boat trips. When choosing a tank, you need to pay attention to the quality of the components: fitting, hose, seals. The level of tightness of the fuel container will depend on their class. The material used to make the tank must be moderately elastic, durable and resilient.
Assessing the resistance of plastic products to mechanical damage is quite simple. Usually it is enough to press on their body several times. It is better to purchase fuel tanks with a textured bottom. The danger of condensate getting into the fuel system has already been mentioned above.
Made of stainless steel and aluminum
When making a stainless steel tank yourself, it is recommended to use 1.1-2 mm metal. To prevent swelling of the filled structure, expansion tanks must be installed to protect against excessive pressure.
You can use food or technical steel as a working material. It is clear that food grade stainless steel will cost more.
Common welding methods include working with tungsten electrodes in argon or ground electrodes. A semi-automatic argon welding option using stainless wire is possible.
Aluminum tanks can be welded independently, but the process involves fulfilling a number of technical conditions that are only subject to specialists:
- it is necessary to calculate the dimensions of the water tank;
- choose the right grade of stainless material;
- calculate the wall thickness to avoid swelling of the structure;
- when using a hatch or roof, determine its type;
- determine the presence of partitions, frame and edging;
- possess welding skills.
Much in this process depends on the welding machines used and the skill of the welder. If welding is done incorrectly, microscopic cracks may appear, through which liquid will leak over time.
Typically, water storage tanks are made from stainless steel. It is better to order containers for a bath made of stainless steel from a permanent production facility. There is no need to paint them, because when heated, the paint will evaporate, polluting the air and water.
If you nevertheless decide to carry out your plans on your own, you should take into account that the most suitable grades of steel for storing water in this case will be 08Х17 (aisi 430) and 8-12Х18Н10 (304).
As for the volume of the stainless structure, in a bathhouse designed for 2-3 people, it is more advisable to install a water tank from 50 to 80 liters. According to the formula, 25-30 liters of water per visitor.
Manufacturers usually offer 1 mm thick sheets for tanks. When welding yourself, it is recommended to use sheets with a thickness of 1.2-1.8 mm. Design options may vary in size and shape.
Welding water tanks made of aluminum is a complex process that requires the master to have practical skills in working with this metal, an understanding of the drawings and two hands that are friendly with the tool.
Making tanks for showers, baths and other needs can be done on your own, although desire alone is not enough. If something doesn’t work out, you can consult a person with welding skills.
Self-production allows you to get the most practical design, invaluable experience and save money.
To enjoy all the delights of a Russian bathhouse, it is not enough to install a high-quality and reliable stove; you also need to equip the bathhouse with a durable water tank. The capacity of the container, its location and material are selected based on the frequency of use of the bath, the number of washables and other significant indicators. If you decide to make a sauna tank with your own hands, you should first carefully prepare everything, choose the material, the method of supplying water to it and the heating method.
Welding stages
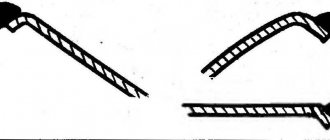
At the initial stage of welding, boards must be placed under the corners of the sheet, which will serve as the bottom.
It is important that the thickness of the substrate is the same. This will give an even plane along the entire length and in the corners of the structure.
During the welding process, it is necessary to constantly check that the sides do not extend beyond the base. You can immediately grab all sides together, then weld them to the base.
The sheets should fit tightly to each other. The next stage is the final welding of the seams. Welding can be done inside the tank or outside.
There should be no lack of penetration. Self-welding takes about 7-8 working hours.
You definitely need to put aside your laziness and check the structure for leaks.
. After completing the work, you should prepare a chalk solution and apply it to the seams from the inside.
When it dries, use a cloth soaked in kerosene to go along the seams of the tank from the outside. Purpose: identifying “lack of penetration” clogged with slag. It only takes a few minutes to control.
If the liquid does not appear, then everything is fine. If stains appear, the problem area should be boiled again. It is best to check and re-weld immediately before painting.
Installation can be done on pre-laid bricks, but it is better to use a stand. Next, fill the tank with water and observe for several days: no liquid appears on the walls of the structure.
The most popular types
Depending on the location, bath tanks are divided into built-in, mobile and pipe-mounted. Built-in tanks are installed separately from other structures. They are installed during the construction of the stove inside the heating system using various fasteners and installations. In built-in containers, water is heated directly from the fire, so the efficiency is quite high.
It is impossible not to mention that this reduces the heat transfer from the stove itself, since most of the energy is spent on heating the water in the tank. The volume of the built-in tank is determined by the size of the stove itself.
Do-it-yourself gas tank repair: four proven methods
Roads are not always perfect, and it is difficult to insure against breakdowns while driving on them. The most common problem is tire breakdown, but this problem is not so difficult to fix, especially if you have a spare tire with you. Much more questions arise when you need to repair the gas tank yourself if it suddenly turns out to be broken and fuel begins to pour out of it. It is not always possible to call a tow truck, and in some situations there is no need at all, since any driver with the appropriate knowledge can repair the gas tank on the spot using available means.
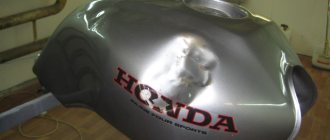
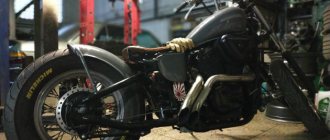
Updating the motorcycle: airbrushing the motorcycle tank
Regular motorcycle painting has a number of features, but this applies to painting any surfaces. For example, if you want to create some kind of image on the surface, the process will become more complicated. After all, such manipulations will require artistic skills, although you can paint a motorcycle without them. Here you will only need the necessary materials, with which ones - read below.
We will need:
- motorcycle gas tank; - paint of several colors; - paint remover; - lace, varnish, electrical tape, primer; - fine-grained sandpaper.
First, completely remove the old coating from your motorcycle gas tank. The author used a special paint remover for this purpose. Be sure to wear protective gloves when working with this product!
Step 2
If you have a gas tank with an imperfect surface, then at the same stage eliminate all irregularities and level the surface of the tank.
Now the author coats the gas tank with primer, he applies it in two layers. After this, wait until the primer dries, then sand the surface with fine-grit sandpaper. As a result, the surface of the tank will be quite smooth.
Step 4
The gas tank needs to be painted beautifully, so it needs to be divided into zones using electrical tape or ordinary masking tape - in general, whatever you have on hand at the moment.
Paint the sides black and wait until the paint dries. Then paint the top with silver paint. Of course, you can choose a paint of a different color and paint the tank in any order; it is not necessary to strictly follow the author’s advice at this point. Now the base coat of paint should dry completely, leave the gas tank for at least a few hours.
Now add texture in layers. To do this, cover the motorcycle tank with a piece of lace, tighten it tightly, otherwise the fabric will slip. Secure the ends of the lace fabric with sewing pins or tape. Paint the tank in zones from above, only paint in a mirror image.
After painting, carefully remove the lace and do not touch the gas tank until the paint has dried!
Step 7
That's almost all, the airbrushing of the motorcycle tank is almost finished. To secure a beautiful result, coat the tank with varnish.
Receive a selection of new homemade products by email. No spam, only useful ideas!
*By filling out the form you agree to the processing of personal data
How to make bokeh on a camera?
In order to get the bokeh effect in a photo, you must meet simple conditions:
- “open” diaphragm to the maximum;
- longest focal length;
- minimum distance between you and your subject;
- a very impressive distance from the selected object to the background (the greater this distance, the stronger the blur).
- It’s best to choose a less uniform background - the photo will be more interesting.
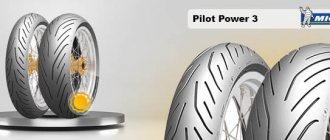
A lot also depends on the lens you're shooting with. It is best to choose a lens for bokeh with the smallest aperture number, in other words: with the largest aperture opening. In most cases, the lenses that come with DSLR cameras cannot allow you to get a pronounced effect. That’s why some photographic equipment manufacturers have released special lenses for bokeh.
A lens with a focal length of 55 mm and no zoom will contribute to a soft artistic blur of the background.