Hi all! As promised, I’m posting the entire process of building our snowmobile in one post.
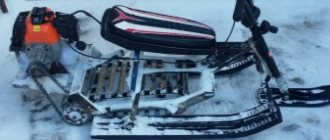
Let me start with a preface: this is the third snowmobile we are building. The first one was 13 horsepower and looked like this:
You can read more about its construction in this post: www.drive2.ru/c/1482657/ The driving performance of the snowmobile is demonstrated in the video:
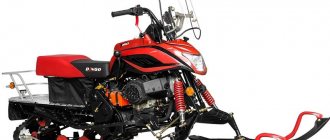
Later, the idea came to build another snowmobile, which would be lighter and more powerful (with a 15 horsepower engine).
It turned out like this:
He runs quite well:
A video blog about the construction was also filmed on this snowmobile and those who are interested can watch it
HERE:
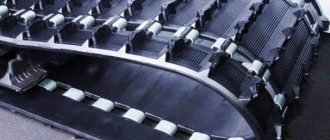
After a 15-horsepower snowmobile, the idea arose to build something radically new on a completely different frame, a longer track and, most importantly, with a more powerful motor. This project was called “Vepr”.
We'll talk about it today.
Construction began with the purchase of a motor. The American Briggs & Stratton Vanguard series engine turned up very successfully and for the right price. Used with 200 engine hours, he promised to give out his “non-Chinese” 22 horses. In many ways, this is what won us over.
Next, they began to figure out a frame with a completely new layout of the engine compartment, steering column and tracks. It was decided to place the engine as close to the track as possible, thereby improving weight distribution. All this is described in more detail in the first part of the video blog:
As they say, a start has been made!
Next, our ordered spare parts arrived from Rybinsk, the most important of which was the reverse gearbox.
Many in the comments to the first snowmobiles wrote: “Is there a reverse gear?” Why is it needed when the snowmobile weighs no more than 150 kg?
It won't be too difficult to jump down and spin it around in place. Well, they still decided to try it on Vepr. Meet us! Reverse gearbox manufactured in Rybinsk with interior from Buran:
Why did I call it the main spare part? Yes, because a lot depends on how compactly it can be installed in the engine compartment in tandem with the engine and variator. It weighs a lot and in order to maintain the lateral weight distribution we had to move the engine. All this will be discussed in more detail in the second part of the video blog:
After making the levers, we could begin making the steering column.
Because Since the engine is shifted closer to the driver, the column had to be made above it, which required making a subframe:
As a result, we got a design similar to those used on modern snowmobiles, only more simplified.
The shock absorption system on a snowmobile consists of rear and front suspension. I would like to focus my attention specifically on the front suspension, since there is not so much information regarding this unit. What are the challenges facing the nose suspension of a snowmobile? - This is, first of all, ensuring the smoothest possible ride so that the pilot does not feel any vibrations from moving over various uneven surfaces. We’ve sorted out the main function, now it’s worth considering the types of front suspensions.
Telescopic suspension
Perhaps this is one of the most common and simplest types of suspension based on the principle of operation. Most often, this suspension is used on snowmobiles of the “utilitarian” class. The design of the telescopic fork consists of a spring and shock absorber, which are located directly in the strut. Thus, the telescopic stand is able to smooth out shock-type loads. It is worth noting that the stroke of this type of suspension is limited according to the stroke of the shock absorber itself. As a rule, snowmobiles with such suspension have incredible maneuverability in dense forest conditions, since the ski base is small.
Also, one of the simplest and most common suspensions is the spring system. This engineering solution was used on the legendary domestic car "Buran". This model has one ski track, as a result of which the equipment does not have the necessary maneuverability. It is generally extremely difficult to enter the required turn at speed. But in general. The suspension performance itself is quite acceptable.
SAshoK763 › Blog › Building a homemade snowmobile | All the work done in one record
Hi all! As promised, I’m posting the entire process of building our snowmobile in one post.
Let me start with a preface: this is the third snowmobile we are building. The first one was 13 horsepower and looked like this:
You can read more about its construction in this post: www.drive2.ru/c/1482657/ The driving performance of the snowmobile is demonstrated in the video:
Later, the idea came to build another snowmobile, which would be lighter and more powerful (with a 15 horsepower engine).
It turned out like this:
DSA suspension
This suspension is characterized as the first long-travel system that was used in the construction of snowmobiles. To be more precise, it was installed on the F2000 and S2000 chassis. The shock absorbers and springs are located between the levers (arranged in parallel) and the chassis. The inclination of the springs and shock absorbers towards the central part of the snowmobile is maintained. Due to this, the travel of the suspension itself is greater than that of the shock absorber. The shock-absorbing system consists of a snow frame and a trailing arm to which two transverse arms are connected. Levers located transversely must have the same length. There are snowmobile models on which the length of the levers can be adjusted. This adjustment is relevant when it is necessary to overcome an icy section of the route. There is no point in adjusting the length of the levers when moving in deep snow. The disadvantage of this suspension is the lack of controllability of the snowmobile due to the horizontal movement of the skis.
Snowmobile front suspension - its types and schematic representation
The shock absorption system on a snowmobile consists of rear and front suspension. I would like to focus my attention specifically on the front suspension, since there is not so much information regarding this unit. What are the challenges facing the nose suspension of a snowmobile? - This is, first of all, ensuring the smoothest possible ride so that the pilot does not feel any vibrations from moving over various uneven surfaces. We’ve sorted out the main function, now it’s worth considering the types of front suspensions.
ADSA suspension
In essence, this is the same DSA type suspension, only in this case the length of the wishbones is different. There are snowmobile models where, due to the use of ADSA suspension, it is possible to adjust the camber angle. This type of suspension found its way onto the S2000 chassis. The ZX chassis already featured the next generation of suspension, called the ADSA ZX. It is characterized by the ability to adjust the camber, and the movement of the transversely located levers has also been significantly changed. Owners of snowmobiles using this suspension system unanimously note a high level of controllability compared to DSA.
What's new in Ski-Doo and Lynx utilitarian snowmobiles 2021
The once popular Lynx 59 Yeti 600 ACE and Ski-Doo Skandic WT 550F coped well with utilitarian tasks. But progress does not stand still and now these models are just part of the past. BRP's agenda for the next few years is to put utility vehicles on a new wide-track platform. The Rotax 550F carburetor engines are outdated in all respects, so they have been replaced by the 85-horsepower Rotax 600 EFI fuel-injected engines. The new two-stroke engines are liquid cooled and can be started manually. They have 35% more power, they are quieter, less power-hungry and reliable.
In Ski-Doo Skandic we still see a telescopic suspension - a reliable solution, but not in keeping with the spirit of the times. But the Finns Lynx in the 2020-2021 season decided to abandon it in favor of front levers. The new suspension handles unevenness perfectly and improves the snowmobile's cross-country ability and controllability. Conservatives can still work on snowmobiles with telescopic suspension - Ski-Doo Skandic WT and Sport with wide tracks, as well as Skandic SWT models with even larger tracks.
In the “trinity” we are considering, the Lynx 59 Ranger 600 ACE stands apart. It has a four-stroke engine with digital throttle control and an EasyShift gearbox with low speed. The reverse mode of the snowmobile is activated by a button on the steering wheel.
RAS SUSPENSION
This type of suspension found its application on the REV chassis. The design of this suspension is based on double A-arms. The principle of operation of this suspension is as follows - the main part of the shock load falls directly on the spring and shock absorber and only a small part on the chassis itself. Typically, a snowmobile with a REV chassis has a pyramidal frame shape. Due to this, the design of the snowmobile is incredibly durable, capable of withstanding heavy loads and the movement of the snowmobile on the most extreme trails.
Video
In the cold, snowy regions of our country you simply cannot do without a snowmobile. The market offers a large selection of these devices; sometimes it is very difficult to find a unique and exclusive option. But after purchasing a specific model, so that this vehicle becomes unique, which no one else will have, you can tune it. One of the parts that are often modified on these vehicles is the suspension. What role does it play in operation? Let's look at all this further.
Manufacturing of structural elements
Before starting to manufacture structural elements, prepare a drawing, required materials and tools. You can take ready-made drawings based on the Bullfinch or Vepr snowmobiles. Tools you will need:
- welding machine;
- pipe bender or finished frame;
- hammer;
- screwdrivers.
Since the design of the mini snowmobile is low, the seat is made of durable waterproof material. The fuel tank is made of metal. Its volume should be from 10 to 15 liters. You can use a motorcycle chain as a drive.
The role of the rear suspension in the movement of a snowmobile
Most often, the rear suspension is equipped with a linear force element, which is located outside the vehicle's track. The linear force element mounts are located on the frame and on the corner arm of the vehicle. Also, sliding rails are connected to the corner lever and supporting rollers are attached to it. When folding the sliding rails using an angular lever, the linear force element is advanced, after which the suspension moves smoothly in its range. The rear suspension system of a snowmobile works on this principle.
These processes in the vehicle suspension mechanism ensure comfortable vehicle control. Thanks to a well-tuned suspension, the snowmobile moves smoothly. The purpose of the rear suspension is to support the track and motor drive while driving. When the snowmobile travels over uneven surfaces, strong shocks may be felt. It is in such situations that the rear suspension will show its effect? she will take all the possible impacts and shaking.
Design and functionality
The Varyag 550 has high traction characteristics, thanks to which the snowmobile copes well on almost any surface and with various loads. This vehicle is suitable for fishermen and hunters, as its high cross-country ability allows it to reach hard-to-reach places.
The Taiga Varyag 550 snowmobile is equipped with a power plant of its own production - a two-stroke engine of the RMZ-550 brand. The block contains two cylinders, the total volume of which is 0.553 liters.
As standard, the engine is equipped with one Mikuni carburetor. The rated output power of the RMZ-550 reaches 36.78 kilowatts, which translates to 50 horsepower.
Air type cooling system. Starting is carried out using an electric starter, but the engine can also be started manually. The programmable ignition system of the DUCATI CDI model is used.
The installed engine allows you to develop a rated power of 36.78 kilowatts, which translates to 50 horsepower. The rear suspension of the snowmobile was specially designed to transport fairly heavy loads.
Why does the rear suspension need modification or replacement?
Whether a snowmobile needs tuning, in particular changes to the rear suspension parameters, is determined by the purpose for which the vehicle will be used.
Are there two types of snowmobile suspensions? connected and unrelated. A connected suspension has two main advantages:
- she shares the toughness;
- controls weight transfer if the vehicle picks up speed.
Often this type of rear suspension is installed in snowmobiles that will be used for sporting purposes or for transporting cargo. This is necessary in order to cope well with sharp turns, strong shaking and frequent redistribution of weight.
Unconnected pendants have their own characteristics. Their front and rear elements are independent. Therefore, if the front part deviates, the rear either deviates only a little or remains in place.
Unlinked harnesses are best attached to snowmobiles that are used in deep snow or have long tracks. They are more capable of increasing traction and also distribute weight well. Also, improving the performance of the suspension may be necessary if the snowmobile engine has been tuned. After all, in order for a vehicle to cope with new loads, a comprehensive modification is necessary, and the suspension in this case? not an exception.
First of all, suspension tuning includes replacing shock absorbers. The main types of shock absorbers for vehicle suspensions:
- simple shock absorber;
- telescopic shock absorber;
- shock absorber for enduro;
- shock absorber for crosses.
In case the main purpose of the snowmobile is? normal riding, then enduro shock absorbers are needed. They are applicable in production 440 Pro vehicles, but the price of such shock absorbers is also considerable. Shock absorbers for tuning sport snowmobiles are often equipped with additional volume gas chambers that allow them to be tuned for specific applications.
Also, the rear suspension often needs adjustment. The choice of adjustment level depends on what kind of physical load is planned for this vehicle, what the weight of the driver and passengers is, how the driver is used to driving the vehicle, what his personal preferences are, the speed mode and the condition of the roads. Each part of the rear suspension is responsible for specific functions. Therefore, in order to know what you will achieve by adjusting the suspension, you need to decide which part needs to be adjusted.
- The job of the rear springs is to ensure smooth movement.
- The purpose of the extension cord? provide reverse movement, taking into account the loads and condition of the snow paths.
- The shackle is adjusted taking into account the condition of the snow path and what the loads will be.
- How comfortable it will be to drive the snowmobile depends on the adjustment of the central spring.
- The tape limiter controls the redistribution of weight.
- Thanks to the shock absorbers, the snowmobile is easy to control and comfortable to ride and sit on.
Snowmobile assembly
You can make your own snowmobile from a moped, chainsaw or motorcycle. The circuit for a homemade snowmobile made from a chainsaw needs to be developed independently, since each part has its own characteristics. The equipment is assembled in stages, adhering to the drawings:
- First, the frame is assembled. The middle part of the structure is made from steel corners measuring 50x36 cm. The front and rear parts are assembled from steel sheets with a thickness of 2 mm or more.
- To install the track mechanism and guides, 2 holes are made. They must be end-to-end. Tensioners for track wheels are mounted on both sides of the side members. The tensioner helps adjust the track and creates tension in the second stage tensioner.
- To install track rollers, special brackets are required. They are welded to the side members, on the bottom side at the same distance from each other.
- The rollers are installed in the open slots of the brackets. Installation is carried out from the bottom. The rollers are positioned on 5 axes.
- Bushings are made from pipes of suitable diameter and installed between each roller.
- The bracket axes are secured with nuts and locknuts. This fastening will allow you to maintain the required distance between the side members and strengthen the frame.
- Mounting stands are made for the chainsaw gearbox. They are made from 3 metal corners. Then the intermediate shaft of the chain drive is mounted.
- The frame is ready. A seat is installed between the rear and middle parts. You can use a car seat or a simple box as a seat.
- Control handles are welded to the pipe - this will be the steering wheel. It is installed on the front of the frame, after drilling a hole.
- To create additional strength, the area where the racks are attached is equipped with metal gussets.
- The drive shaft is made from a pipe. To attach the gears, a round flange is inserted into it.
- A steering mechanism for a snowmobile is created from an old motorcycle that has a three-lever control.
The finished snowmobile has simple controls and can be used for children's parties. This is a lightweight and compact equipment that can be transported in the trunk of a car. If snowmobiles are made on the basis of a walk-behind tractor, then they are divided according to the material of the snow hooks: “pipe bugs” and “stick bugs”. Here, simple plastic water pipes are used for the tracked structure. This protects it from deformation, but at the same time reduces the level of adhesion between the tracks and snow.
Source: specmahina.ru
What is better: replacing the suspension with a factory one or a homemade one?
Should I buy a ready-made suspension for a snowmobile or make it myself? This is a question that must be decided by the vehicle owner himself. Several factors may influence the decision. If the snowmobile is purchased and not made yourself, then most likely it is better to buy a suspension for it. It will be easier to do this, because for each factory model of snowmobiles there is a certain type of suspension.
However, the rear suspension on a homemade snowmobile should most likely also be homemade? It can be difficult to find a factory one. Also taken into account is the purpose for which the snowmobile will be used. What if its purpose? professional winter sports, then you definitely need to take a professional factory suspension. If the main purpose of the snowmobile is to transport its owner, then it is quite enough to make the suspension yourself. In addition, if you make the suspension yourself, you can save a lot of money.
How to adjust the carburetor
The manufacturer and experts recommend adjusting the carburetors after the snowmobile has been run-in (300 kilometers). Here the owner has a choice - send it to a service center or make the adjustment himself. By following our instructions, even a beginner can handle the setup.
- We check the opening of the carburetor throttles for synchronism; to do this, remove the intake noise muffler, take a mirror measuring 140 by 40 millimeters and look into the carburetor diffusers while smoothly squeezing the gas lever. If the throttles do not move synchronously, you should use the technical documentation for setting up for adjustment.
- We look to see if there is any play on the sheath of the fuel corrector drive cables “must be in the closed position.”
- Let's look at the position of the carburetor metering needle locks. According to the manufacturer's recommendations: the needle locks should be in the middle third groove.
- We check the carburetor dosage details: GTZ 230 (main fuel jet);
- ZHKH 55 (idle jet). We recommend replacing the idle jets with ZHKh 40, you can take them from the VM-34-560 carburetor.
- We clean the spark plugs from carbon deposits and set the gap to 0.7-0.8 millimeters.
How to make a homemade suspension for a snowmobile?
Let's take, for example, the simplest type of linked rear suspension for snowmobiles? four-link suspension. Its main components are:
- chassis;
- two levers;
- sliding rails;
- connecting hinges.
The suspension design (it is used mainly for the Polaris Fusion snowmobile model) is as follows:
- its front arm is connected to the sliding rails using a hinge joint;
- at the other end, the front arm is attached to the chassis with the same hinge;
- next you need to connect the rear lever with the sliding rails with a hinge;
- at the other end, the rear arm is attached to the chassis by a hinge;
- the placement of torsion springs must be determined between the sliding rails and the rear reaction rod;
- the fastening of the first and second linear power element is located between both suspension arms (the first and second - respectively, and relative to the sliding rails).
To remove the old factory suspension, there are a few steps you need to take:
- lift and hang the snowmobile from the rear;
- remove the bolts on the front and rear arms;
- remove the suspension.
To attach the new suspension, you need to use the front and rear control arm clamps, which allow you to install bolts that attach the suspension directly to the frame.
A little history
As already mentioned, the Lynx 113 snowmobile has aluminum cylinders with a special coating, which was the main mistake of the designers. This circumstance contributed to the aluminum piston sticking to the mating surface, and even with a short mileage the engine could fail.
Production was discontinued by the Ufa Engine Production Association in 2009.
One of the obvious advantages of the model and this modification in particular is that the car is capable of covering significant distances in winter off-road conditions and towing a sled with a considerable load - up to a quarter of a ton. The machine can be operated at an ambient temperature of minus 40°C.
Is it necessary to register such changes with Gostekhnadzor?
Probably everyone already knows that when purchasing a snowmobile, it must be registered. You also need to have a category A license to drive such a vehicle. Using a snowmobile without a license or while intoxicated is strictly punishable by law. However, are there rules regarding the registration of small changes to the design of a snowmobile, such as rear suspension changes?
The law establishes the rule that owners of any vehicle must present it for technical inspection from time to time. Snowmobile? not an exception. The interval at which this needs to be done is determined depending on the terrain and type of vehicle. If a tracked vehicle is designed for eight or more seats for passengers, then it must be presented for technical inspection every six months. If this is an ordinary snowmobile, then it needs to be inspected every year. When undergoing regular technical inspection, there is no need for additional registration of minor changes in the design. Main ? ensure safe movement on a snowmobile.
How much does the base model and its modifications cost?
The Taiga Varyag 550 snowmobile in its basic configuration belongs to the middle price segment. Cost - from 349,000 rubles. This snowmobile is the most practical and powerful in its class. A used car is sold on Avito for 250,000-300,000 Russian rubles. In this case, the price fluctuates depending on the year of production of the snowmobile and the technical condition of the vehicle.
In addition to the main model, there are also modifications - Taiga Varyag 550 V and Taiga Varyag 550 Limited. Their price exceeds the cost of a basic snowmobile:
- Taiga Varyag 550 V. Features extended equipment. A power plant of the RMZ-550 model is installed, equipped with two Mikuni model carburetors, air cooling and a two-speed gearbox. It also uses the DUCATI CDI programmable ignition system, which ensures optimal operation of the power unit regardless of operating modes. Price: from 389,000 rub.
- Taiga Varyag 550 Limited. Key features of this configuration are two carburetors on Mikuni models, allowing the engine to develop a rated power of 40.45 kilowatts (55 horsepower). Instead of a conventional gearbox, the manufacturer equipped the snowmobile with a variator transmission (CVT). Otherwise, the Limited version is completely identical to the previous one; it uses the same programmable DUCATI CDI ignition system and air cooling. Price: from 394,000 rub.
In terms of maintenance, the Taiga Varyag is very simple and unpretentious; all parts are sold in auto parts stores for motorcycles. Here are approximate prices for some parts for this model (in rubles):
Lynx 59 Ranger 600 ACE 2021
And finally, the third participant in our review is the Lynx 59 Ranger 600 ACE. It has a classic EasyRide rear suspension with a folding roller, and a wishbone front suspension with a 990 mm ski base. The track is equipped with impressive 44mm lugs. There is a radiator under the hood, the gearbox has a low gear, and the trunk is equipped with a guard. The engine throttle is controlled by the iTC electronic unit and allows you to switch to one of three riding modes. A high windshield with deflectors on the sides protects from headwinds.
The snowmobile is powered by a four-stroke 62-horsepower Rotax 600 ACE engine. It is weaker than the Rotax 600 EFI engine, but has its advantages. For example, it is the quietest and most economical in the industry, and the presence of three operating modes makes it also very popular. The Lynx 59 Ranger 600 ACE has a wide range of applications - from work tasks and towing cargo to cruising with friends.
The decision is yours - determine why you need a snowmobile and contact us. We will guide you through the range of new products and help you equip your equipment with useful accessories.
Engine selection
Gasoline engines are used for walk-behind tractors or strollers. Engine speed is controlled by a throttle handle located on the steering wheel. To make a homemade tracked snowmobile with your own hands, the easiest way is to use ready-made small-volume engines for walk-behind tractors with pre-installed:
- Fuel tank.
- Ignition system.
- Reduction gearbox with a ratio of 1:2.
- Centrifugal clutch, automatically activated when the speed increases.
The power of these engines does not exceed 10 horsepower, but they are easy to install: the technician does not need to separately assemble the ignition system, connect fuel pipes, adjust the clutch, etc. There are different options on the market:
| Brand | Model | Power, l. With. | Volume, cm3 | Weight, kg | Approximate price, thousand rubles. |
| Kipor | KG160S | 4,1 | 163 | 15,5 | 20−25 |
| Sadko | GE-200R | 6,5 | 196 | 15,7 | 15−20 |
| Lifan | 168 FD-R | 5,5 | 196 | 18,0 | 15−20 |
| Zongshen | ZS168FB4 | 6,5 | 196 | 16,0 | 10−15 |
| Nomad | NT200R | 6,5 | 196 | 20,1 | 10−15 |
| Brait | BR-177F-2R | 9,0 | 270 | 30,0 | 10−15 |
| Honda | GX - 270 | 9,0 | 270 | 25,0 | 45−50 |
If it is not possible to purchase a ready-made engine from a walk-behind tractor, then you can use an engine from a stroller. Such engines are 10-15 horsepower more powerful, but require self-assembly. The system includes:
- Engine.
- Clutch.
- Gearbox.
- Gas tank (volume 5-10 liters).
- Muffler.
- Generator.
- Electronic ignition switch and coil.
Some of the elements will come from old motorcycles (“Minsk”, “Vostok”, “Java”, “Ural”). The gas tank is located as close as possible to the carburetor to reduce the length of the pipes.