Today, motorcycle tuning is especially interesting for those motorcycles that were legends in past years, and MT Dnepr is considered one of such motorcycles. Let's talk about its basic tuning.
At one time, the Dnepr with a boxer engine was one of the best in the entire USSR, but also for several years the model was produced in Ukraine, but the plant was closed and has not been operating for several years. But the owners of the Dnepr motorcycle, tuning of which is necessary for all old models, want to see something new in their “iron horse”, and therefore they often turn to tuning the motorcycle with their own hands. So if you are the owner of MT Dnepr and want to significantly improve its performance and appearance, read on.
You can also read a detailed review of the Dnepr motorcycle - technical characteristics and a detailed description of the legend of the Soviet Union.
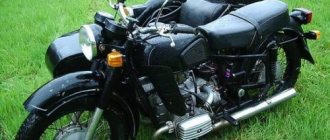
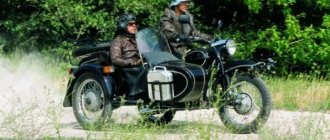
Bright, stylish, but still Dnepr
Looking at this motorcycle, different emotions immediately appear in me.
On the one hand, the author of the project had a hand and spent a lot of time creating this “horse”, but on the other hand, I don’t see much point in them. It is unlikely that this homemade seat will be more comfortable than the standard one. Exhaust
- the highlight of the whole design. As for me, the “cans” are too massive for the pipes that go directly to the cylinders. I think if they were made thicker in cross-section, this modification would look somewhat more impressive.
The colors here are extremely bright and dull
, but this is
a matter of taste
. And, according to the classics of the genre, we are witnessing the abandonment of the steering wheel and the fact that the author of the project gave preference to clip-ons, completely cutting down the ability to move around on this motorcycle.
Carburetors and ignition
Tuning a Ural motorcycle engine affects all engine systems, including ignition and carburetors. It is recommended to read the information: how to properly configure Ural carburetors. The standard ignition is so outdated that it is not even suitable for everyday driving, let alone anything else. It is desirable to install a microprocessor ignition with the possibility of an automatic advance angle. This article will help you set up the electronic ignition system. Ideally, such an ignition would be installed with a programmable controller with the ability to adjust the firmware. Such ignition systems have another useful feature - speed cut-off. This will prevent over-torque of a heavily boosted engine. Well, for maximum spark strength, in combination with a new ignition, you can use a coil from the Oka or Gazelle. Branded high-voltage wires with silicone insulation and internal resistance are required, for example from Tesla from VAZ 2108. They will ensure an uninterrupted spark in any weather and eliminate the possibility of spark breakdown to ground. As for carburetors, you will need to install Japanese vacuum carburetors with a diffuser diameter of 32 to 36 mm, followed by selection of jets, synchronization and adjustment with a gas analyzer. Tuning on a dynamometer is highly advisable, where you can test different settings and ignition timing and get the most out of your motorcycle tuning!
Where it all began
The production of motorcycles in Russia, or more precisely, in the USSR, began in the late 20s of the last century. The IZH and PMZ models, designed by designer Mozharov, had a heavy stamped frame and a huge 1200 cc engine, which nevertheless produced only 24 hp. With. At the same time, controllability disappeared already at 60 km/h.
Then, according to one version, third-party developments were used. In pre-war Germany, several models of the BMW R-71 motorcycle and drawings for them were purchased. According to the second version, the motorcycles were imported from Sweden. Having disassembled and modified the German cars to suit Soviet realities, the devices began to be produced at the Moscow and Gorky factories. During the war, production was evacuated to Irbit, in the Sverdlovsk region.
Be that as it may, the German R-71 became the progenitor of the serial M-72. The Soviet analogue was not a complete copy of the BMW: instead of a single-disc clutch, a double-disc clutch was installed, the tank volume became larger, the gear ratio was increased, which made it possible to more effectively overcome obstacles that are often encountered to this day in our country. We can say that this was the first tuning of the Ural. At that time, it wasn’t even “Ural”, but “Irbita”. Only with the M-62 model did motorcycles acquire their permanent name.
boost the engine MT Dnepr 11
I plan to install pistons from 412
I’ll ask a naive question: is it possible to solve the difference in the overall height by shortening/lengthening the connecting rods (say, when switching from a 41mm Kasik to a 38mm Zhigov one)? Have there been such experiments? (don’t throw cardans, please. I’m not a real welder! (C) )
If you have a head and hands, everything is possible...
There is a known collective farm with an extension of the crankshaft connecting rods of the Ural 650 for installation in the K-750\M-72. The connecting rods are cut and inserts are welded. Someone demonstrated such a shaft here, and it was pulled out of a working engine. Obviously, you can experiment on the Dnieper knee due to its disassembly, on the Ural knee, but it’s also possible.
Quite realistic for quiet use. The steel there is like nails. Cooked at once.
Tuning for the Ural motorcycle or its restoration
Here a lot depends on the condition and modification of the bike. If a representative of one of the latest lines arrives in your garage, which is in perfect order externally and runs, be prepared for the fact that remodeling it will turn out to be quite expensive - you will have to pay relatively a lot for components. Add to this the price of an iron horse that came off the assembly line, starting at 300,000 rubles, and think about whether the changes are worth such expenses.
It’s a different matter if you somehow become the owner of a rare specimen: restoring it is not just a matter of honor, but also quite a profitable business. By restoring a rare model, you will bring history back to life and get a status vehicle that can be sold for good money.
And the third case, if you have a very ordinary Ural with a cradle: tuning will allow you to diversify the design of an ordinary motorcycle or increase its technical characteristics and at the same time will cost a very reasonable amount.
External tuning of the Dnepr motorcycle
As for external tuning, everything here can only be limited by your imagination, but before you do anything, look first at the Dnepr tuning photo, where you can see some modernization options. If you change the technical characteristics of the MT Dnepr, then this will significantly improve its appearance, because this model was initially limited to external features and some kind of plastic. An excellent option for external tuning would be to install additional indicators, an improved tachometer and speedometer on the motorcycle.
Most tuned motorcycles come in the form of choppers or sports versions, so to get a chopper from the Dnepr you will have to install an extended front fork. And to make your iron horse look like a chopper, it is recommended to install a disc brake system, which will also give the motorcycle an excellent appearance.
Many specialists in the modernization of Soviet technology advise carrying out a procedure to lighten the entire structure of the Dnieper. To do this you will have to replace:
- shock absorbers;
- shields;
- fuel tank:
- seat;
- footrests;
- headlight;
- steering wheel.
As a result, after replacing the above parts with lighter ones, you will get many positive aspects. Thus, the motorcycle will be easy to control, maneuverable, and speed indicators will be noticeably increased. Also, if you notice other heavy components or parts, if possible, replace them with lightweight analogues.
But even this is not the end of the external tuning of the Dnieper, because one of the standard methods is to coat parts with chrome. Unfortunately, this procedure is quite expensive, so experts have come up with an excellent alternative - the necessary part is coated with nickel.
Conclusion
If you decide to tune the MT Dnepr motorcycle, be sure to make a plan in which you indicate the necessary details for the change. If your iron horse is too old, it will most likely have rusty and sometimes rotten components. Therefore, the primary task when tuning will be to replace old parts with new ones. Also, if possible, have the engine overhauled, which will give you incredible driving pleasure. So first of all, bring the engine and components to normal condition, and only then proceed with external tuning.
What can be tuned in Dnepr?
At the time these motorcycles were released, their quality was at the highest level, so all the components and the design itself still actively serve all owners. But modern requirements for appearance and some technical characteristics force us to carry out cosmetic and internal modifications to the motorcycle. Of course, you can do the tuning of the Dnieper with your own hands, but if you don’t have enough knowledge, workshops are open in most cities where people are probably knowledgeable in modernizing Soviet motorcycles.
There are basic elements that need to be changed when tuning, and in this model the following elements can be improved or even replaced:
- exhaust pipe;
- almost the entire chassis, in particular the windshield, roll bars;
- engine;
- front fork.
You can also briefly discuss the refinement of each element. For example, to tune the exhaust system, you will need to install a forward flow system and nickel elbows, which you can do yourself. External tuning will contain a lot of chrome parts, so tuning the Dnepr engine will involve a polishing process. If you upgrade these two parts, your motorcycle will not only look great, but it will also sound great.
As for technical modernization, the above recommendations can be supplemented by installing a fifth gear on the Dnepr. It is unlikely that you will be able to do this kind of work yourself, so it is better to turn to specialists with experience. But the result will be justified; your vehicle will have reverse gear. But even this is not where the basic tuning ends, because some Dnepr models, depending on the year of manufacture, can be improved by installing an electric starter.
What do you need to know when tuning?
If you have an MT Dnepr motorcycle that is several decades old, you should be aware of its main disadvantage - the fuel system. Unfortunately, this model from KMZ did not receive an ideal fuel system, so many will be interested in improving this characteristic through tuning. Also, Dnepr owners will be interested in improving the oil system by installing a high-quality oil filter.
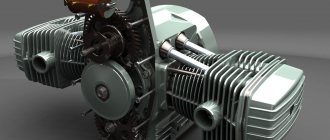
Engine tuning Dnepr
The main feature of any Dnepr MT model is the engine lubrication system. It should be improved first of all, since this is a disease of all Dnepr motorcycles. The problem is that the oil is poorly cleaned at low engine speeds (up to 3000 rpm). There is no oil filter in the engine. Its role is played by a “centrifuge”, which should be replaced with a “cap-plug” and an external automobile oil filter should be installed. And in the “guitar” of the engine, make grooves for the sealing rings for stable oil pressure.
This procedure will allow:
- increase the oil pressure in the system
- improve the quality of lubrication of the crankshaft and other rubbing parts
- increase oil change intervals
- double the service life of the Dnepr motorcycle engine
Now you don’t need to remove and disassemble the engine every 10,000 km to clean the centrifuge; you just need to replace the external oil filter with a new one.
When the oil supply system is back to normal, it's time to think about increasing power. Standard crankshaft bearings, connecting rods, as well as the crankshaft itself have a huge margin of safety! But the rings and pistons leave much to be desired. The ancient design of standard piston rings does not allow achieving high compression in the cylinders. To install VAZ car rings, you need to bore the motorcycle cylinders to the third repair size of 79mm and tuning the pistons.
Thanks to such rings and new pistons, you will not only get an increase in power from increased compression, but also get rid of oil wastage, excess carbon deposits in the cylinder heads and a clean exhaust. The starting of the motorcycle will be greatly improved. In addition to this, cut off 2mm of metal from the upper steps of the cylinders to increase the compression ratio and switch to 92-95 gasoline.
Let's move on to tuning the timing system - gas distribution mechanism. The main role of this process is played by the camshaft. The camshaft cam profile determines the torque range and the peak of maximum power. If you want to achieve maximum power, you need a camshaft from the MT 10-36 model.
Of course, a good way to increase power is tuned carburetors. As a rule, they can be found at Japanese motorcycle dismantling sites. An excellent option would be carburetors such as Keihin CVK32 and the like. Many carburetors are suitable for different ATVs and other equipment with a similar engine size.
It will be necessary to replace the old contact ignition system with a new microprocessor one. This could be either Sovek or Saruman, which is more perfect. Well, to realize such power on the highway, the 8th pair of gears in the gearbox must be replaced with a 9 or 10 pair.
Modification of stock Dnepr-11 1991
I’ve been reading articles for a long time and finally decided to write about my motorcycle and the history of its repairs and modifications. Maybe it will help someone.
I’ll write briefly about my path to getting started with motorcycles, because we’re talking about today’s motorcycle. Having repaired and ridden my father’s moped Karpaty-2 from 1989. decided to switch to a motorcycle. The purchased JAVA 638 with a broken fork brought only problems and there was no talk of skating. For those interested, here is the album “https://vk.com/album20195327_154020977”. My father-in-law helped out by giving me his IZH Yu-4 with a sidecar, which had been sitting in a metal garage in the village for 10 years. Having quickly brought it back to life with the help of a familiar motorcycle technician))) I began to master this device. Having suffered with the problems of this model (which I partially corrected) and due to the lack of documents in my hands, I began to look towards more powerful devices because... Izh did not impress me... He advertised the purchase of a Dnepr motorcycle. “Why the Dnieper and not the Urals?” — you ask, I’ll say that I liked the Dnepr in appearance, and it has more opportunities for “tuning” due to a more progressive lubrication system compared to the Urals. Quite by chance, an acquaintance gave him the phone number of his grandfather, who offered him the Dnieper. For a long time, one thing or another did not work out, but in the end it grew together. After installing the carbers and kicking the kickstarter for a long time, the engine finally started and my friend and I took it for a ride. I finally decided to take it. And so I bought a red Dnepr-11 with a stroller, produced in 1991. and mileage 5052 km.
The garage, as you can see, is FULL of the Soviet style: a lot of rubbish and filled with all sorts of nonsense. At the time I brought the Dnepr, there were already 4 motorcycles in the garage: a mokik Karpaty-2, a disassembled Java-638, an Izh-Yu4 and half a Ural motorcycle. Dnepr still found its place, “dispersing” the others to the corners)))
The very first thing we had to do was go through the wheel and steering column bearings, as well as the gearbox, because the old collar seal had been leaking for a long time and constantly: either the grandfather himself, or before him, had put the collar on incorrectly and the spring had half flown out of its place, giving free rein to the oil, which negated all attempts to slow down. The advice of the former owner to “tighten it harder” would not have given anything - the pads were already pressed “to nothing” and I began to dig deeper. The initial replacement of the oil seal with a new one gave results, but not salvation. Also, on the large gear, it was necessary to replace the factory double lock washers with lock washers, since they did not fulfill their function and the bolts holding this gear to the hub were half unscrewed and the entire structure was flopping around. I installed turn signals from IZH at the back - screwed them directly into the brake light bracket (it turned out to be a funny Cheburashka when viewed from behind)))
Replaced the seat in the stroller. The seat itself is from an Izhevsk stroller, like from a Yu-4. The fastenings for it are built into the bottom, but the back is handmade: from a 40x40 profile pipe, they welded the same frame as before, and put on a leather cover from a car seat, with thick foam rubber inside. The lock was built in as standard, as were the hooks on the bottom. I had little experience, but thanks to OPPOSIT.ru I slowly dealt with the problems that arose).
Having skated the 2013 season, I summed up the results: 2 cars wrecked at the rear, one a little, the second more severely, and the money spent on it made me think about modifications to my horse. And it was the brakes... Actually, that’s where it all started. All season I had to constantly remove the rear wheel and wipe the pads with gasoline, as the brake began to slip literally after a week. At the end of the season, I already found out that oil was leaking not only from under the collar seal, but also along the axle. The question arose about the seal and, thanks to the Internet, I installed a rubber ring instead of a felt ring on the spacer sleeve in the gearbox. Yes, the inner surface of the gear, where this bushing is located, had to be treated for a long time with an emery roller of our own production, inserted into a screwdriver. At the same time, for some reason I unscrewed the screw screwed into the drainage hole from the outside. It became much better, but still the oily pads and leakage from the collar did their dirty work...
A dent on the trunk from my shoulder)) The bike clearly flew under the fender and split between the car and the curb with the sidecar raised... The best part is that the motorcycle was almost not damaged: it only tore off the windshield and glass and bent the steering wheel slightly.
Now about the solution to the problem: “https://oppozit.ru/article85909.html” - oil seal from the hub of Suzuki Grand Vitara + 2! rubber rings on the spacer sleeve in the gearbox following the example of the Ural gearbox “https://uraldnepr.ru/forum/9-668-1”. It is better to select rings by taking with you a machined bushing and a machined gear. Of course, there were some incidents: in the first lathe (I asked for advice) they said that it was difficult to center the crankcase to properly machine the seat (under the oil seal you need to remove 1 mm from the diameter APPROXIMATELY - everyone has their own), they will try, but if they don’t center it, they’ll take it will not. YEAH, NOW! Quote: “Well, somehow it happened, it (the oil seal) somehow fits in freely. In general, this is how it is." I see an oval hole with a strong displacement, and an oil seal flying into it... Silent scene... To my indignation, they offered to make a bushing. I didn’t take any further risks and went to the factory, where they made me a perfectly aligned, perfect bushing. We also had to polish the crosspiece - it was completely untreated, which caused rapid wear of the seals. Replaced the double row bearing on the shank. I “zakolhozil” the large gear of the planetary gear - it is put on the hub and tightened with bolts, the catch was that it was possible to tighten this gear only with an offset, i.e. There was a gap between the inner surface of the gear and the hub and it kept shifting by placing a strip of tin around the entire circumference so that the gear was centered relative to the hub. The edge of the strip is bent in the form of a small flange to cling to the inner chamfer of this gear, i.e. it's inside the hub-gear assembly and prevents this "spacer" from falling out. Advice for beginners: carefully choose the place where you will order work and better take all the parts that need to be adjusted to each other. I assembled the unit, changed the pads from the purchased donor and in the new season my happiness knew no bounds. But first things first. )))
While the gearbox was being made, I started working on the engine and gearbox. The reason was banal curiosity, reinforced by the 6th!!! a feeling that something is wrong there. This was caused by poor clutch release, coupled with worn-out compression and vibration when driving in 1st speed. The autopsy showed: 1. Worn valve guides 2. Seats damaged by grandfather (tried to rip them off due to compression problems) 3. Worn valve runners 4. Worn rings and piston 5. Uneven wear in the cylinder 6. Sulfur wear on the liners 7. Loose left connecting rod cover 8. Loose and loose camshaft flange (the screws were turned out and barely reached the gear) 9. ABSOLUTELY AMAZING FACT - 2 ROLLER BEARINGS on the crankshaft 10. Wear of the tip of one of the rods 11. Gas breakdown on the outside of the guides (it turned out after pressing out) and 1 seat of irregular shape 12. The aluminum gasket under the left head is of the wrong size, which caused the tightening nuts of the left cylinder to loosen and gas breakthrough 13. The difference in the masses of the pistons is as much as 8 grams. 14. The race on the crankshaft journal at the FRONT ROLLER BEARING is loose 15. There is a lot of oil under the right valve cover (probably poor outflow through the drain pipe) 16. Problems with oil pressure after the engine warms up 17. It’s already my jamb - the thread on the rocker adjustment screw is pulled. This from major “troubles”, in addition to small ones. The decision was made - REPAIR! Definitely! Now about the solution, again thanks to OPPOSIT.ru, www.dnepromoto.com and user AIR1580 on yuotube:
cylinder head. The guides were replaced with Metelli 01-1916, which had to be shortened slightly to make room for the valve seals. The seals were supplied by Goetze and only on the intake valves. Well, naturally it takes a long time to process the seats; thanks to the sliding reamer, I ruined the seats, which is why I had to look for larger guides and order a gauge from the factory to check the seats for these guides))). By the way, if the guides fit into the seats almost without tension, there is a pressing method with Chinese glue 101 or 110, which gives an excellent result (advice from a friend of a car repairman). The guides were pressed out and pressed in by me using technology, i.e. mandrel and hot. To maintain the required depth, I placed a bearing that matched the size - the mandrel simply rested against it. Subsequent removal of the working edges on the saddles by an already familiar specialist, who almost cursed for the fact that I climbed in myself and beveled the corners))) The valves were replaced with automotive analogues: AE V91407 39.6x7.97x91.9 mm for the inlet and AE V91338 38.1x7 .97x91.9 mm per outlet. The valves were also ground in on a machine. The rocker arms have a plane for the locking nuts of the adjustment screws and a plane for contact with the valve compensator. The valve springs were taken used from a VAZ 2108 along with the upper and lower plates and new crackers for them. This was already a necessary measure due to other valves. I shortened the upper plates slightly so as not to break (well, suddenly) the valve seal. Heat-insulating gaskets were made from fiberglass. The inlet and outlet channels were also processed: slightly expanded, brought to the same attractive shape (on the right and left heads) and processed with fine sandpaper. The intake ones were generally very different: the left one was apparently larger than the right one. Drainage tubes are drilled to 4 mm. Well, new head gaskets were cut out of sheet copper using a “ballerina”.
Cylinders. I machined the cylinders to the 1st repair size (I took with me 2 sets of pistons of the 1st and 2nd repair sizes for measurements). I checked the pistons immediately on the counter using electric power. scales Yes, during assembly it later turned out that the pins that were standing were too big for the new pistons and fit in with good tension when the piston was very hot. And of course, adjusting the grooves on the piston to the rings))) Rings for the 1st repair with a small adjustment of the gap according to the manual, one-piece oil scraper. Engine. Front camshaft bearing replaced. A front ball bearing 6209 was purchased and installed on the crankshaft, the bearings were replaced with size 0 (a check revealed that there was practically no wear). The crankshaft was drilled to align the oil channels and the turner ordered a plug with a groove instead of a centrifuge. The unit was ordered in two parts so that the groove for the key could be drilled along the entire length. Then I simply connected it by welding.
A turner's mistake with the internal dimension gave me the opportunity to simply press it over the gear. The channel in the “guitar” was drilled out. The crankcase is treated from the inside, the holes for oil flow there are also brought back to normal. After weighing the connecting rods, I found a difference of only 1 gram. The fingers differed by 0.5 g. approximately, and I assembled two balancing sets: connecting rod-piston-pin.
Oil filter from VAZ on an adapter for a Muscovite.
The oil pump has an outlet welded into a steel cover. The body and gears were ground, the channel for the pressure reducing valve was drilled out, metal was welded onto the side of it to create a new outlet channel, realized with a STRAIGHT steel tube, which is screwed into the new hole and comes out of the crankcase from the side. Metal is also welded onto the crankcase opposite this place. I drilled with the oil pump installed to ensure the holes were aligned. Next, threads are cut in the crankcase and in the oil pump, a homemade pressure seal is screwed into the crankcase, and a tube is screwed into the oil pump and secured with a nut.
Outside, a steel tube is connected to a copper one, which is connected to the adapter. The outlet of the purified oil is made into the hole for the pressure sensor through a tee (it seems also from the Muscovite’s oil system), into which the sensor is screwed. The adapter was secured to the frame on the engine mounting studs under the tank.
The design turned out to be surprisingly rigid and successful. The parts for creating this oil line are standard for oil systems, purchased from car dealerships and slightly modified. I also moved the oil intake point to the middle of the pan because there were problems with pressure when the motorcycle was going uphill. The gasket on the pallet did not withstand the shooting and it was necessary to install a rubber one instead of a cork one. Conclusion: tires are crap. I will look for options.
Ignition. I replaced it with a contactless one with a Hall sensor from VAZ, an electronic switch 0529.3734 [VTN] - VAZ 2101-2109 and a coil for the 406th Gazelle engine. I tested this ignition system on Jupiter and simply transferred it to the Dnieper. The commutator is secured under the saddle,
the coil was installed in place of the old one with minor modifications to the housing and the coil itself - “https://www.youtube.com/watch?v=Z8VvD-noOOw”.
The modulator is made in the form of a butterfly with an opening angle of 60 degrees and installed (secured by welding) on a standard ignition timing mechanism, only not in the middle of the cam like many, but at its very edge in a groove made in order to place the Hall sensor in the original ignition housing and cover original cover. Yes, the cam had to be spared from the axial run-up by placing washers on the bottom)). The wiring harness is also standard for VAZ. BB wires used silicone. The candles are A17B, Soviet-made.
I went through the electrical system and checked it, a new turn relay from a VAZ 2108 - “https://np26.ru/catalog/83/459156/”. But the VAZ fuses are crap... I also installed the front right turn signal on a standard bracket from a donor. I also went through the box, changed the bushing in 1st gear, and the bearings. Now I’m looking for options for modifications and boxes, it’s just that at that time there were a lot of alterations. I replaced oil seals and O-rings everywhere with new automobile ones, and spent a long time selecting analogues by size. The tables on OPPOSITE helped a lot. I struggled with the air filter and finally, lo and behold, the TGA oil filter, F2000 catalog number: 51.05504-0098, fit almost like the original one. Whoever buys one will figure out where and how to trim it. Only it turned out to be a little shorter and we had to put additional gaskets 2.5-3mm thick under the standard rubber seals. PEKAR K-68 carburetors for 650 cc were installed. Gaskets made of thick paronite - 4mm instead of those included in the kit. For some reason, on carburetors the holes for the studs are d=10mm, but the studs are M8. I had to make bushings from a copper tube so that the carburetor would not warp when being pulled. I rebuilt the shock absorbers because the sidecar was leaking and the rear ones were not working well. I found almost no wear, I just washed it. I had springs installed without housings on top. Probably from the factory). I found a way out and made casings from polyurethane foam cylinders - it protects from dirt and a little from water, and it looks decent.
I completely rebuilt the fork, it was also in good condition, and this was after 2 accidents))) In the fuel tank, I initially replaced the tap with a new one, then I added a tap to the jumper under the tank and I got a 2nd reserve system, or even a 3rd one. th)
I made the mirrors like many others - from Shakhov’s.
Oil. I thought about this question for a long time. I searched the entire Internet. In the end, I realized that everyone uploads what they consider acceptable. The selection of oil was based on operating conditions, taking into account the technical features of the components. I used AZh-12T for shock absorbers, it seems to be good. The engine contains Lukoil mineral 20W50, even in winter (-10) everything is fine. The gearbox and gearbox also have LUKOIL TRANSMISSION TM-4 80W-90 (API GL-4), here I selected the class according to the year of manufacture of the engine (well, we know what year the design of our parasites is))))). There is a lot of useful information on the internet on the topic of oil selection, you just need to find it and study it. And to pour in detention like “real boys” and say that everything is fucked up...wonderful - this is everyone’s choice.
I skated the 2014 season without incident, I am very pleased with the improvements. Oil pressure, by the way, at idle is 3.6 kg, rises with increasing speed to 5 kg and is reset by the gearbox. Hell of a compression))) The brakes now always work without problems. The turn signals don't fail either. The downside is that the pan gasket is leaking somewhere, most likely the input shaft seal. I don’t want to, but maybe I’ll get into the cylinder head to check the valve guides and valve seals, then there will be a review about this modification.
In the fall, the generator began to suffer from low voltage, now I’m looking for a replacement car donor, perhaps a Daewoo Tico or a G-1000 tractor. The tapered bearings for the steering column “https://www.ebay.com.au/itm/390566473437” have already arrived. I also ordered new indicators for the panel - “https://russian.alibaba.com/product-gs/warning-light-switches-12v-led-indicator-light-dia-22mm—637261532.html.” I want to replace the fuse box with a car type “https://oppozit.ru/node/59130”, replace the headlight, weld a front frame onto the stroller and install a fog light, install a trunk on the stroller. In the end, to make a normal windshield with glass - there are 2 glasses from Izhevsk strollers. At the same time, there are plans to make a clutch disc with progressive characteristics, as comrade Shlans recommends. The biggest problem by far, besides the alternator, is the frame. More precisely the quality of workmanship. Bad seams and the steering column is bent, like many owners of Dnieper cars from 89-91. Now I'm looking for a frame up to 1986. so as not to bother with this one.
Of course we need photos, everything will be fine, I promise. Perhaps you will ask me “why do I need all this?”, or say that “this is the Dnieper, you can’t make a foreign car.” I just love my motorcycle, and if I have the opportunity to make it even a little better, I will strive for it. Well, also regarding improvements - I’m trying to follow the path of maximum interchangeability and availability of installed parts, with minimal production of exclusive ones, for greater maintainability and ease of maintenance. ))))))))))
Current state of affairs
Today the release is aimed at the foreign market. More than 95% of models are sold not in Russia, but in the USA and Canada, European countries, and the Asian market is becoming increasingly important over time. In South Korea or Japan, for example, there are still no worthy competitors in the sector of transport with a cradle; this niche is relatively unoccupied; there are perhaps Chinese replicas that have been copying BMW since the 50s, but they do not have the same status at all.
The total sales volume, if we count from the times of the late USSR, has long exceeded 3,000,000 copies, and this figure continues to grow. This makes it clear why you can so often hear the name “Soviet Harley” - people make the analogy based on popularity, and not on fit or appearance.
Naturally, there are many who want to first buy a legend, if only because of its glorious name, and then, after several years of operation, somehow update, refresh, and improve it. We are just moving on to possible changes.
Handy tools and tuning of the Dnieper for sports
Tuning the Dnieper for sports primarily involves installing a plastic cladding. In the absence of special cladding panels and panels, the cladding can be made from a foam plastic model. Cheap and abundant material allows you to worry-free experiment with the design of the unit until the best option is found.
After cutting out the model, the foam is coated with a layer of liquid that prevents the fiberglass from sticking to it. The latter is cut to size, soaked in epoxy resin and applied in 4-5 layers to the foam. During the first two layers, it is recommended to add metal shavings to the resin, and, if possible, place a thin metal mesh between the fiber and the foam to strengthen the frame.
To completely dry the structure, you need to wait about a day, after which the foam can be removed. The resulting cladding is puttied, sanded, primed and painted. Painting in most cases is done in bright shades of blue, green, yellow, and red. Airbrushing is not uncommon, and it is performed entirely depending on the owner’s imagination.
Just as in the case of a chopper, tuning for sport involves changing the frame design, only in this case without lengthening or significantly tilting the front fork. A high “rocket” rear fender is installed, and the recessed seat is made to slope towards the high gas tank. The handlebars are shortened to an extremely comfortable length, and the exhaust pipe rises at an angle equal to the rear fender.
Basics and tuning options
The “King of the Road,” as fans call it, can be converted into either a sport or a classic (chopper). The last option is the most popular, because it better suits the characteristics of the motorcycle.
A distinctive feature of choppers is the elongated frame , with which do-it-yourself tuning of the Dnieper begins. After welding, the frames are usually sandblasted until they are completely shiny. When the pendulum is lengthened, the rear wheel moves back 7-10 cm, and the front fork is lengthened no more than 15 cm from the standard version. The inclination of the latter is selected based on considerations of convenience and safety. Lengthening the pendulum can be done in a tuning workshop, or you can do it yourself using video instructions.
If possible, shock absorbers are replaced with lighter, chrome-plated ones. The fenders and their fastenings, side support, driver's footrests, kick starter and headlight are also chrome-plated. The engine is polished until it fully matches the chrome elements.
Tuning the exhaust system is often achieved by installing nickel-plated elbows and forward flow systems. Such an innovation, firstly, will complement the attractiveness of the appearance, secondly, it will improve (albeit not significantly) the performance of the engine, and thirdly, it will give the engine sound a dense, bassy tone.
Tuning a Dnepr motorcycle also involves installing the following modules:
- The tachometer gives the bike a more “serious” look and gives its owner ease of operation.
- The starter modernizes the unit and adds practicality to it.
- Fifth gear - a new 5-speed gearbox, or replacing reverse gear with a new speed, together with a new gearbox, can raise the speed limit by a couple of tens of km/h.
Increasing the bike's speed limit is also achieved by lightening its structural components. For example, a gas tank from a Honda rebel 250, which will also complement the classic “road monster” style.
Stages of turning a Dnepr motorcycle into a custom one
Perhaps this is said loudly about turning the Dnepr motorcycle into a custom one. Because more often such alterations fall under the definition of tuning. What is the difference between custom and tuning?
Tuning is the alteration of individual spare parts or components of a motorcycle. A custom motorcycle is a bike that has been completely modified to suit the owner's wishes. Moreover, it becomes unique and inimitable.
Stages of turning a Dnepr motorcycle into a custom one:
- engine replacement or upgrade
- front fork upgrade
- chassis modification
- exhaust replacement
- adding decorative elements
The engine is additionally cleaned and polished. This is done on purpose so that it does not differ from new parts. Various rings or a direct flow system are installed on the exhaust. You can also add a decorative nozzle.
All these manipulations are easy to do yourself, since they do not require special technical knowledge. Other spare parts can be purchased in specialized stores. For example, valve covers and engine ignition covers can be purchased in our online store.
Motorcycle Dnepr: do-it-yourself custom
Any tuning or customization of motorcycles entails difficulties. The Dnepr motorcycle, despite its simplicity, is also no exception. But these difficulties more than pay off when the result exceeds all expectations. At such moments, the problems associated with finding parts and fitting them to the motorcycle simply fade into insignificance.
A converted Dnepr motorcycle should not only be beautiful, but also elegant and not bulky in appearance
If you replace the fork with an extended one, the old Soviet Dnepr motorcycle will immediately turn into a chopper. Of course, it must be paired with a disc brake system and a drum.
There is another goal that is set during tuning or customizing a motorcycle - reducing gas mileage. The lower the weight, the lower the fuel consumption. An obvious fact. Therefore, everything that weighs it down changes. Even the gas tank and seat are used up. Not to mention the modification of the body.
MOTORCYCLE FENDER COVER
Engine tuning
The power of the original engine, despite its fairly large volume, is not always enough. If you decide to take such a step.
The following steps should be followed:
- Polishing the cylinder bores to remove carbon deposits and casting defects will give your motorcycle an extra 2 hp. With. And if you also adjust the compression ratio in each cylinder, then this procedure will add power due to the coordinated operation of the two cylinders.
- Check valve timing.
- Check the integrity of the ignition design in absolutely all cylinders. The ignition overtake should be around 40°-42°. The simultaneity of the ignition organization can be achieved if the arrogance of the fight in the distributor is knocked down and continued up to the same value of the ignition timing of 2 cylinders.
- A couple of “horses” are given to you by the K-301 B carburetors.
- I advise you to install air filters from Moskvich-412 cars (2 pcs.) or Volga GAZ-24 at your discretion.
- Adjust the carburetor for smooth operation.
- Select the length and diameter of the exhaust pipes and mufflers.
Ural's position now
Before the notorious events of the early nineties, about three million devices were produced. After the collapse of the Union, the plant's position began to deteriorate. The purchasing power of the population fell sharply, factories in the country were closed and sold off. Fortunately, the unenviable fate passed the Ural. Production continued. These were mainly motorcycles with a sidecar (with or without a drive), with a 4-stroke opposed two-cylinder engine with a volume of 745 “cubes” and a power of 40 “horses”, plus 4 gears and reverse gear.
Since the mid-90s, almost all parts in the design of the Ural motorcycle have been improved or replaced with new ones. In honor of the 70th anniversary of the plant in Irbit, modernized models were produced, one of the best is the Ural motorcycle with M70 Sidecar tuning.
The sale of models already produced in Russia, and not in the USSR, is aimed at foreign countries. 97% of all models of the plant are sold in the USA, Europe, Canada, and Australia. Asia is considered as one of the promising markets: Japan and Korea. In these countries there are simply no competitors in the niche of motorcycles with sidecars, but there is demand. China, as a sales market, has been producing a replica of the M-72 under the guise of a copy of BMW since the 50s.
Choosing a task that suits your needs
It is important to understand that changes can be both painless and significant, drastic. And the point is not only in the degree of difficulty in implementing all modernization measures, but also in registering improvements for successfully passing technical inspection. If in the first case the updates do not need to be coordinated with anyone at all, then in the second it is necessary that they be allowed to be carried out either by regulatory authorities, either representatives of the manufacturing plant, or all of them at once.
If in the first case the updates do not need to be coordinated with anyone at all, then in the second it is necessary that they be allowed to be carried out either by regulatory authorities, or representatives of the manufacturing plant, or all of them at once.
So, if you are going to refresh your Ural or another motorcycle with a sidecar, tuning can be one of two types:
- simple, that is, not requiring additional paperwork;
- complex - carried out only after approval, confirmed by official papers with seals and signatures.
Let's decide which one to choose.
Selecting a design for the Dnepr motorcycle
Giving a large tank color can be anything. Having made a one-color motorcycle, it is worth doing the same painting of the tank, along with the seats and tires. You can come up with your own sign for the tank cap, thus giving the motorcycle an original design.
Choosing a design for a motorcycle is a very exciting thing; here you can give free rein to any imagination. You can make unusual graffiti, or you can
bend the tires. It is always worth considering that the front wheel of such a vehicle must be smaller than the rear one. And accessories and a curved steering wheel will give the Dnieper a unique look.
Note: You can easily get discount coupons in Chelyabinsk on the website gilmon.ru.
The seat should be given important attention, because it should not only fit well into the design, but also be comfortable. It is preferable to use a leather seat, which you can purchase in a store or make yourself. The taillights can be darkened for added style. Headlights can be made in different cone shapes.
You can get ideas for tuning an iron horse on the Internet, where there are always many design options and possibilities for improving such vehicles. You just need to enter in the search engine line - motorcycles Ural, Dnepr alterations and start viewing the results.
Painless changes
There are quite a lot of them, but they can be divided into external and internal. The former are aimed at individualizing the design, the latter at improving driving and technical parameters.
If we talk about appearance, then it is initially classic, which means quite stylish and attractive, but nothing prevents you from customizing it to your own taste. In the case when you have the Urals or the Dnieper, for tuning you can:
- raise and straighten the steering wheel;
- make a single seat;
- install mirrors, control knobs and fairings of a different shape;
- move the footrests forward, thus adding convenience to the landing;
- remove the wings, giving the bike more dynamics;
- move the muffler to the right;
- give preference to solid brake and clutch levers;
- chrome all visually noticeable parts;
- replace the rear wheel with a wider size, 130-150, but not more, otherwise you will have to buy a frame as well;
- remove the original fuel tank and replace it with a streamlined one, from the Planet, 49 or 56 IZh, Jupiter or even Java-250 (if it fits).
Look how much such painless tuning of the Urals transforms the design of the bike: the motorcycle in the photo already looks completely different, and in real life this impression only intensifies.
Belgian masterpiece
Two people worked on this model, one of whom was Belgian. One evening he walked into a local bar, in the parking lot of which there was an old Dnepr. That’s how he came up with the idea of restoring a Soviet bike.
The repair process and tuning took more than two months. Although it was initially planned to restore the motorcycle in the rat-custom style, in the end the old Dnepr combines several styles: scrambler, chopper and tracker.
For a more believable effect, the specialist used special paint to give the surface a rusty effect. The Belgian enthusiast added several parts from the famous Harley-Davidson to the Soviet bike: a custom steering wheel, a leather saddle and a brake light.
The master also equipped the engine with new Schaeffler bearings and pistons from the BMW R60, and the wheels were finished with shiny tires from Heidenau K37. Now the old “Dnepr” from 1970 has found a second wind and is ready to conquer new tracks.