Electrical circuit diagram for motorcycles Minsk
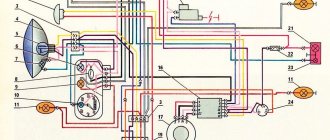
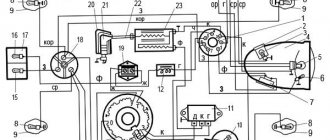
Motorcycle electrical circuit diagram 3.11211: 1 – front turn signal lamp A12-10; 2 – speedometer illumination lamp A12-1; 3 – high beam indicator lamp A12-1; 4 – side light lamp A12-4; 5 – low/high beam lamp A12-45+40; 6 – control lamp of direction indicators A12-1; 7 – neutral indicator lamp in the A12-1 gearbox; 8 – light switch, direction indicators with horn button; 9 – sound signal; 10 – relay-interrupter of direction indicators 25.3747; 11 – neutral control lamp switch; 12 – generator 43.3701010; 13 – rear direction indicator lamp A12-10; 14 – switch-stabilizer unit 262.3734; 15 – brake light lamp A12-10; 16 – side light lamp A12-5; 17 – brake light switch 13.3720; 18 – high-voltage transformer 2102.3705; 19 – spark plug A23B; 20 – handbrake brake light switch 13.3720; 21 – central switch; 22 – day-night switch and emergency ignition switch
Electrical diagram of a motorcycle 3.115 with an electronic ignition system
Electrical diagram of the Minsk motorcycle with battery:
1 – light switch and emergency ignition switch; 2 – handbrake brake light switch; 3 – right direction indicators with lamps A1 2-10; 4 – speedometer scale illumination lamp A12-1; 5 – headlight lamp A12-45+40; 6 – high beam indicator lamp A12-1; 7 – control lamp of direction indicators A12-1; 8 – control lamp for neutral in the gearbox; 9 – front side/parking light lamp A12-4; 10 – left direction indicators with lamps A12-10. 11 – light switch, direction indicators and horn button; 12-ignition switch 058; 13 – spark plug A23B; 14 – neutral control lamp switch; 15 – sound signal; 16 – rechargeable battery 6MT-5; 17 – fuse 8A; 18 – charger; 19 – ignition coil 2102.3705; 20 – relay-interrupter of direction indicators 25.3747; 21 – block BKS 262.3734; 22 – foot brake brake light switch; 23 – brake light lamp A12-10; 24 – rear marker/parking light lamp A12-5; 25 – generator 43.3701
Electrical diagram of motorcycles M-103, M-104, M-105, M-106: 1 – ignition switch; 2 – speedometer scale illumination lamp A6-1 (only on M-105, M-106); 3 – headlight lamp A6-32+2 1 or A6-32 + 32; 4 – side light lamp for headlight A6-2; 5 – sound signal S-34; 6 – light switch with sound signal button P-25 or P-200; 7 – ignition coil KM-01, IZH-56 or B-300; 8 – brake light switch (only on M-105, M-106); 9 – generator G-38, G-401, G-411 or G-421; 10 – brake light lamp A6-15 (only on M-105, M-106); 11 – rear side light lamp A6-3
Electrical circuit diagram for motorcycles Minsk MMVZ 3.111
The electrical diagram of the Minsk motorcycle is shown in the figure.
Operating principle of the electronic ignition system
The latest generation of Minsk generators significantly increases the power of the electricity source. This ensures uninterrupted functioning of all elements of the system. In all speed modes, electricity consumers have reliable supply.
New generators differ not only in their functionality, but also in their structure. Different motorcycle models have different types of alternators. But they are similar in appearance, which allows you to attach them without matching the model.
The only thing to remember is that when changing the generator to another type, it is necessary to regulate all other elements .
Electronic ignition is non-contact. The design features of Minsk do not provide for the presence of a battery. The ignition system operates on the basis of GPT. The work uses a switch unit - stabilizer and an induction sensor.
A voltage stabilizer is used to regulate the amount of current supplied to lighting and sound signals. The switch and the stabilizer are not interconnected in their functions.
The Minsk ignition system works through the connection of such elements as:
A properly configured ignition system is the key to ensuring that the motorcycle will start even in winter. The absence of a battery makes life easier for a motorcycle owner to some extent. There is no need to think about periodically recharging the battery. The Minsk motorcycle wiring diagram shows the relationship between individual elements.
As the revs increase, the headlights become brighter... is this namano?
Re: volt generator Power the headlight from a 12 V battery, and put an amp diode in the circuit between the battery and the generator on Stanislaff View profile Forum posts Created topics. Re: volt generator I wish I could write what kind of motorcycle it is. Re: Volt Izh Planet 5 generator with Mins generator.
Re: Volt generator Is the switch-stabilizer unit alive? Re: volt generator switch live. Re: the volt generator may have a circuit that will constantly show 12 volts even at low speeds. Re: a volt generator is what they suggested to you, insert a battery and a chocolate bar from a car generator, it will regulate the voltage. Alex View Profile Forum Posts Home Page Created Topics. Re: Volt generator Message from dear Karlson. Last edited by Zhenya1; Re: volt generator Is writing correctly in Russian also “not an option”?
Smilies On HTML Code Off Current time: All rights reserved.
Generator care
When maintaining the generator, it is necessary to periodically tighten the threaded connections. It is necessary to periodically check the gap between the rotor and the induction sensor. This is done in this way: a maximum gap is created when the rotor is turned, then using an eccentric, the gap is set within 0.35-0.40 mm and the screw is tightened into place.
At the end of these actions, the gap is measured again. The performance of the generator is greatly influenced by the storage conditions of the motorcycle. Do not expect electrical equipment to perform well if left in a damp area for a long period of time. This is especially true for storage in winter.
Dimensions
Regarding the overall characteristics, we note the following indicators. The motorcycle wheelbase is 1230 millimeters. The length is 2100 millimeters, width – 800 millimeters, height – 770 millimeters. The tank capacity is 11 liters. Fuel consumption shows the following figures: consumption is 3.5 liters at a distance of 100 kilometers.
So, when considering whether to buy such a motorcycle, first of all, decide for what purpose you need it. If you are going to the store to buy bread, then you can do without it. But if you want a bike powerful enough for off-road and city riding, then this is what you're looking for.
Wiring diagram for IZH Planet 3: transition to operation without battery
Motorcycle electrical circuit diagram 3.11211: 1 – front turn signal lamp A12-10; 2 – speedometer illumination lamp A12-1; 3 – high beam indicator lamp A12-1; 4 – side light lamp A12-4; 5 – low/high beam lamp A12-45+40; 6 – control lamp of direction indicators A12-1; 7 – neutral indicator lamp in the A12-1 gearbox; 8 – light switch, direction indicators with horn button; 9 – sound signal; 10 – relay-interrupter of direction indicators 25.3747; 11 – neutral control lamp switch; 12 – generator 43.3701010; 13 – rear direction indicator lamp A12-10; 14 – switch-stabilizer unit 262.3734; 15 – brake light lamp A12-10; 16 – side light lamp A12-5; 17 – brake light switch 13.3720; 18 – high-voltage transformer 2102.3705; 19 – spark plug A23B; 20 – handbrake brake light switch 13.3720; 21 – central switch; 22 – day-night switch and emergency ignition switch
Electrical diagram of a motorcycle 3.115 with an electronic ignition system
Electrical diagram of the Minsk motorcycle with battery:
1 – light switch and emergency ignition switch; 2 – handbrake brake light switch; 3 – right direction indicators with lamps A1 2-10; 4 – speedometer scale illumination lamp A12-1; 5 – headlight lamp A12-45+40; 6 – high beam indicator lamp A12-1; 7 – control lamp of direction indicators A12-1; 8 – control lamp for neutral in the gearbox; 9 – front side/parking light lamp A12-4; 10 – left direction indicators with lamps A12-10. 11 – light switch, direction indicators and horn button; 12-ignition switch 058; 13 – spark plug A23B; 14 – neutral control lamp switch; 15 – sound signal; 16 – rechargeable battery 6MT-5; 17 – fuse 8A; 18 – charger; 19 – ignition coil 2102.3705; 20 – relay-interrupter of direction indicators 25.3747; 21 – block BKS 262.3734; 22 – foot brake brake light switch; 23 – brake light lamp A12-10; 24 – rear marker/parking light lamp A12-5; 25 – generator 43.3701
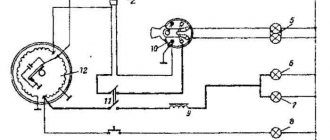
Switch P-200
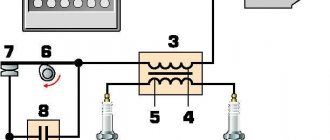
Light switch with horn button (located on the left side of the steering wheel). To switch the low and high beam circuit, a P-200 type switch is used with a built-in push-button horn switch for three operating positions: neutral - the headlight lamp is off; far right – low beam is on; far left – high beam is on.
The horn button has a movable contact connected to ground and a fixed contact connected to one of the wires coming from the horn terminal. When you press the button, the contacts close and the signal circuit is completed.
Operating principle of the electronic ignition system
The latest generation of Minsk generators significantly increases the power of the electricity source. This ensures uninterrupted functioning of all elements of the system. In all speed modes, electricity consumers have reliable supply.
New generators differ not only in their functionality, but also in their structure. Different motorcycle models have different types of alternators. But they are similar in appearance, which allows you to attach them without matching the model.
The only thing to remember is that when changing the generator to another type, it is necessary to regulate all other elements .
Electronic ignition is non-contact. The design features of Minsk do not provide for the presence of a battery. The ignition system operates on the basis of GPT. The work uses a switch unit - stabilizer and an induction sensor.
A voltage stabilizer is used to regulate the amount of current supplied to lighting and sound signals. The switch and the stabilizer are not interconnected in their functions.
The Minsk ignition system works through the connection of such elements as:
[sc:ads3] A properly configured ignition system is the key to ensuring that the motorcycle will start even in winter. The absence of a battery makes life easier for a motorcycle owner to some extent. There is no need to think about periodically recharging the battery. The Minsk motorcycle wiring diagram shows the relationship between individual elements.
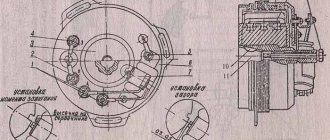
Magneto installation in Minsk
- Motorcycles
- Jawa Reviews/Tests
- IZH
- Minsk
- Ural/Dnepr
- Sunrise
- Scooters
- Jawa
- Jawa
- VAZ
- VAZ
- VAZ
- Motorcycles
friends of site
Motorcycle engine boost Minsk
First you need to disassemble the engine. Then the engine crankcase needs:
1 )
insert and securely fasten the rings into both halves of the crankcase, reducing the diameter of the crank chamber to
121 mm
,
2)
change the seals so that they can withstand a pressure in the crank chamber of at least
0.8 kg/cm2
.
In the engine cylinder, set the phases: exhaust - 164°
, purge -
108°
and intake -
128°
(Fig. 66).
Increase compression ratio to e = 9.5
.
Install a K-36
I carburetor with a diffuser diameter of
27 mm
, the main jet must have a flow rate of at least
250 cm3/min
.
The purge windows in the piston should be cut to 25 mm
(Fig. 67) so that they coincide with the purge windows in the engine cylinder.
To increase the boost effect, the total length of the intake pipe should be 300 mm (the length of the intake pipe from the cylinder mirror to the carburetor is 100 mm
;
the length of the pipe with an internal diameter of 40 mm
, between the carburetor and the air cleaner is
150 mm
(Fig. 68).
Ignition from the G-416
does not work well due to interruptions at high speeds.
For normal engine operation, it is recommended to install an M-24G
.
Ignition timing is 2.2-2.5 mm
to top dead center.
Candle PAL-14-8
or
BOSCH-260-280
.
In the crankshaft, the bronze separator of the lower head of the connecting rod should be replaced with another one, for example, duralumin ( D-16T, V-95
) or made of cyanidated steel (can also be made of steel
45
without heat treatment) with subsequent silver-plated surface.
After running-in and final adjustment, the engine develops a power of 12 hp
. and has excellent pickup.
Uprated engines for motocross M-105
,
M-106
and
M2-125
.
Piston with two L-shaped rings and piston pin bosses shifted upward by 7 mm
(compared to the standard size).
The diameter of the crankshaft cheeks is 120 mm
.
Length of connecting rod on centers 125 mm
.
The length of the piston skirt is 62.5 mm
, on the intake side the piston skirt is cut by
1 mm
and is equal to
61.5 mm
.
Compression ratio e = 15
.
Particular attention should be paid to the processing of the cylinder channels, their throughput and the correct angles of the purge outlet (Fig. 69)
Head with an offset “jockey cap” sphere. Magneto ignition. Recommended ignition timing is 2.2-2.3 mm to top dead center. Candle PAL 14-15. Gasoline B-95, B-100. A-98.
MS-20
oil in a ratio of 1:20.
The engine is equipped with one carburetor with a diffuser diameter of 28 mm
.
The length of the pipe from the cylinder mirror to the center of the nozzle is 135 mm
.
The total length of the intake tract is 170 mm
.
Be sure to install a large air filter (tank volume 2.5-3 l
) with paper filter elements.
After all the work on boosting, running in and fine-tuning the engine, the maximum power is 14-15 hp.
With. at
n = 6600—6800 rpm
.
An engine like this can be increased to 20 hp.
With. , increasing the speed to
9000 rpm.
But this will require a special crankshaft, piston, rings and higher valve timing, a new muffler and carburetor.
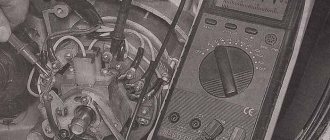
Adjusting the gap in the breaker
Adjusting the gap between the contacts is a simple procedure with which you should begin diagnosing problems. First of all, prepare a key for 10 - you will need it more than once when setting up the ignition in Minsk.
To adjust the gap you will need to do the following:
Next comes setting the ignition timing. It must be performed only after the above steps.
You can set the ignition timing as follows:
If after this the problem with the ignition on the Minsk motorcycle has not been corrected, then you need to proceed to the next, not the easiest step - installing the outline.
Appearance tuning Minsk
Every Minsk 125 owner has at least once thought about the appearance of his motorcycle. Perhaps we should start by repainting the frame and other parts of the motorcycle. The first thing to do is remove the handlebars, seat, tank, engine, wheels, fork and other parts to leave a bare frame. Sandblast the parts to be repainted or remove the old paint layer using special attachments for an angle grinder/drill. An attachment on a drill for an emery wheel with Velcro is also very effective for this. Be sure to get rid of pockets of corrosion. The next stage is puttying. This is necessary to get rid of deep scratches and level the surface. Parts with a leveled surface are degreased to prepare for priming. Apply primer in 2 layers. The dried soil should be sanded with 400 grit sandpaper. Then we paint it in the color we like in 2-3 layers, followed by a layer of varnish in 3 layers. The metallic color on your Minsk 125 motorcycle will look very impressive.
The next method of tuning Minsk is polishing the engine crankcase to a mirror finish. This procedure can also be done with your own hands using a set of sandpaper with grit from 120-180 to 2500. By sanding the surface of the engine in steps from coarse to finer, you will achieve an ideal matte surface. At the end of this work, use GOI paste, a felt circle and a drill to achieve the final mirror surface. The Minsk motorcycle engine will immediately be transformed!
This procedure applies to the rims, spokes and muffler - this will help them shine in a new way.
New road tires would be a good investment. The new tread pattern is not only effective when driving on wet asphalt, but also looks attractive. Replacing lighting equipment will also appeal to everyone. For example, LED turn signals and brake lights will not only give a modern appearance, but will also reduce the load on the generator, and will also increase road safety when driving at night. Separately, it is worth noting the efficiency of xenon installation. The recommended heat of light is 4300k as it is the most neutral white light, does not cause eye fatigue and provides the best illumination. A useful tuning in Minsk will be the installation of new chrome mirrors, which will also significantly increase riding safety and complement the transformation of the motorcycle. In conclusion, I would like to note that these tuning actions can be carried out selectively at will and combined according to your taste and financial capabilities.
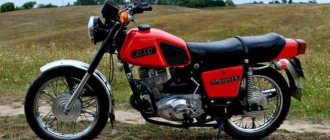
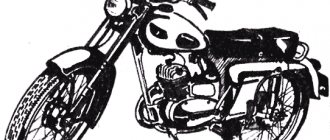
Minsk was perhaps the most widespread and accessible of the motorcycles of the Soviet Union. Produced at the Minsk plant, it enjoyed deserved popularity among motorsports enthusiasts and ordinary citizens for its low price, ease of operation and good maintainability. This unpretentious motorcycle could serve as both the first vehicle for a novice motorcyclist and a workhorse for many residents of cities and rural areas.
The ancestor of the Minsk motorcycle was the motorcycle of the German DKW center, the equipment for the production of which was exported from Germany as reparations in 1945. The production of the first models was established in Moscow, but then by 1951 production facilities were transferred to Minsk. The first motorcycle rolled off the assembly line of the Minsk Motorcycle and Bicycle Plant back in 1951. For more than 60 years of production of motorcycles of this brand, more than 6.5 million Minsk motorcycles have been sold worldwide.
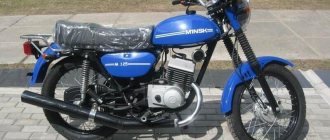
Tuned motorcycle Minsk 125
But this mass-produced motorcycle, like any other equipment, of course, has its certain drawbacks. The main ones include:
- The rather weak engine is the most powerful available in the basic version, only 13 hp.
- A poorly designed clutch that can slip even after the motorcycle has been driven for a long time.
- On early models, the arrangement of the crankshaft bearings was poorly thought out.
- Weak braking system.
But this amazing motorcycle provides its enthusiastic owners with ample opportunities to implement tuning ideas. And, although in the basic version, even with the most powerful engine, the Minsk motorcycle could hardly accelerate to 100 km/h, as a result of competently and responsibly carried out tuning from this beloved, but still not very technically advanced product of the Minsk plant, it is possible to make a truly nimble, responsive and fast motorcycle, not much inferior to its expensive foreign counterparts.
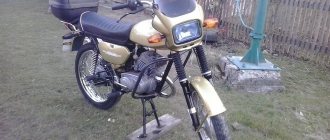
Motorcycle styling Minsk 125
Generator care
When maintaining the generator, it is necessary to periodically tighten the threaded connections. It is necessary to periodically check the gap between the rotor and the induction sensor. This is done in this way: a maximum gap is created when the rotor is turned, then using an eccentric, the gap is set within 0.35-0.40 mm and the screw is tightened into place.
At the end of these actions, the gap is measured again. The performance of the generator is greatly influenced by the storage conditions of the motorcycle. Do not expect electrical equipment to perform well if left in a damp area for a long period of time. This is especially true for storage in winter.
Operational Features
It was the motorcycle in our country that became a clear confirmation that a two-wheeled vehicle is truly a means of transportation.
The owners and their “iron horses” could be found everywhere:
On a JAWA motorcycle you could easily travel 1000 km from home. Its endurance and reliability on the longest routes contributed to such a high popularity of the brand as a whole. Even the resale of a 5-year-old copy brought the former owner at least 500 rubles.
For reference: Purchasing new domestic two-wheeled motorcycles cost more modest sums for the family budget. The shortage of spare parts, missing instructions and minor breakdowns did not stop me from buying my dream motorcycle.
However, difficulties with parts and a simple design contributed to the fact that owners serviced the motorcycles with their own hands in a variety of places:
Flaws
First, let's figure out what shortcomings the motorcycle has, this will allow us to decide what needs to be improved first. In general, many problems are typical for domestic motorcycles, and when tuning sunrise 3m they are faced with the same problems.
The main disadvantages of the motorcycle are as follows:
- Low-power engine. The most powerful engine is only 13 hp;
- On the earliest models, the placement of the crankshaft bearings was unsuccessful;
- Poorly designed clutch;
- Weak brakes.
These are the main disadvantages of Minsk. In general, it is worth noting that all of the above can be eliminated with your own hands, significantly improving the performance of the motorcycle.
How to set the outline for the best ignition
Initially, the outline is installed at the factory, when the finished motorcycle is in a state of assembly, and is tightly adjusted with special screws. In most cases, this avoids problems, but sometimes they become loose, disrupting the course of the ignition spark and reducing its intensity.
Setting an outline on a Minsk motorcycle is not easy. This procedure takes a lot of time and effort, and also requires utmost attention from even the most experienced drivers. Therefore, you need to start it only if you are absolutely sure that the problem lies in the outline. You can check this by measuring the intensity of the spark when adjusting the contacts. Changing it indicates a problem, but if it remains stable, no adjustment is required.
Loosen the outline screws and check how the spark changes. If it increases with increasing distance between the contacts, then the plate should be gradually rotated clockwise, and vice versa if it decreases. The steps must be repeated until you get a strong ignition spark that will remain stable when the distance between the contacts changes.
Installing a Minsk motorcycle ignition will be much easier with the assistance of experienced drivers or mechanics if you are new to this matter. However, you can easily do it yourself, paying maximum attention and effort to it, saving a lot on the price of repairing a motorcycle at a service center.
Instructions
1
If you're choosing a base engine, go for the M-125. Compared to the previous models M-105 and M-106, it has improved cooling, which increases the possibility of boosting it for sports purposes. If for models M-105 and M-106 the power is 9 hp. is almost the maximum, then for the M-125 model you can achieve 10.3-10.8 hp. in the conditions of an average mechanical workshop. The engine must be well run-in and have serviceable parts and mechanisms.
2
Completely disassemble the engine. Insert and securely fasten rings into both halves of the crankcase, which will reduce the diameter of the crank chamber to 121 mm. Replace your crank chamber seals with specially designed sport models. They must withstand pressure of at least 0.8 kg/sq.cm. Change the valve timing: exhaust phase should be 164 degrees, scavenging phase should be 108 degrees, exhaust phase should be 128 degrees.
3
Instead of the standard one, install a K-36I carburetor with a diffuser diameter of 27 mm. Its main fuel jet must have a flow rate of at least 0.25 l/min. Cut the purge windows in the piston to 25 mm so that they coincide with the purge windows on the motor cylinder.
4
Extend the intake manifold to 300 mm. In this case, the length of the intake pipe from the cylinder mirror to the carburetor should be 100 mm, the internal diameter of the intake manifold should be 40 mm, the length of the manifold from the carburetor to the air filter should be 150 mm. Install an M-24G magneto in the ignition system. Set the ignition timing to 2.2-2.5 mm before TDC. Screw in a spark plug type PAL-14-8 or BOSCH-260-280.
5
Replace the bronze separator of the lower head of the crankshaft connecting rod with an alloy type D-16T or V-95. A homemade one made from cyanidated steel or grade 45 steel without heat treatment with mandatory silvering of the surface is also suitable.
6
Carry out additional polishing of the cylinder channels, check and correct, if necessary, the cross-section of these channels, as well as the angles of the purge outlet. The factory level of processing of these surfaces is insufficient for sports purposes.
7
Replace the air filter with a larger one, with a reservoir volume of at least 3 liters and paper filter elements. After running in the engine boosted in this way, install a carburetor with a 28 mm diffuser, increase the length of the pipe from the cylinder mirror to the center of the nozzle to 135 mm, increase the length of the manifold from the carburetor to the air filter to 170 mm.
8
In an engine boosted in this way, use B-95, B-100 or A-98 gasoline. Motor oil - MS-20 in a ratio of 1:20. To further increase power, you will need to install a sports crankshaft, piston and piston rings, switch to higher valve timing, as well as use a racing muffler and carburetor.
Motorcycle electrical equipment
Despite the high build quality and durability of the main components and assemblies, the technical condition of the motorcycle had to be constantly monitored.
In particular, regular maintenance was required:
The manufacturer clearly indicated in the documentation the components that require constant attention
Battery
Motorcycles made in Czechoslovakia were equipped with a proprietary TREPCHA 6A5 battery. Its service boiled down to:
The TREPCHA 6A5 battery was installed under the seat
Wiring
The Java 634 6v wiring diagram also required close attention from the owners.
For reference: dirt accumulated in the insulation cracks and served as a bridge for current leakage, which affected the sparking of the ignition system.
The motorcycle wires had to be carefully monitored