The Ant is still a fairly popular scooter, despite its advanced age and origins dating back to the times of the USSR. There are still many owners of such equipment. And increasingly, they have to deal with repairs and routine setup and maintenance issues.
One of the most frequently serviced components is the clutch. This mechanism periodically gets confused, which is why it requires adjustment.
In practice, adjusting the clutch is not that difficult. But in order to do this correctly and without errors, you need to at least become familiar with the device and operating principle. Plus, it wouldn’t hurt to find out what exactly could be causing problems with the clutch.
ADJUSTING THE CLUTCH OF A MOTORCYCLE “TULA”
Owners of new Tula scooters often encounter “mysterious” behavior of the clutch . Following the factory manual, there is no way to adjust it. Moreover, the clutch manages to “drive” and “slip” at the same time. Such a “whim” clearly indicates that the clutch discs are assembled skewed. Unfortunately, this assembly defect is typical of many power units, and not only those from Tula .
The consolation is the fact that it is quite easy to eliminate the problem - the adjusting nuts on the clutch pins are used for this. They also make it possible to restore a clutch in which the discs are worn out and the adjustment possibilities with the central screw have been completely exhausted. But if you only use the instructions, then, as a rule, it will not be possible to ensure normal operation of the clutch.
The fact is that, following “the letter of what is written,” the owner must visually determine (“by paying attention”) whether the pressure plate moves without distortions when the clutch lever is pressed. However, in practice, it is quite difficult to ensure this condition: you have to remove the left crankcase cover, for which you first drain the oil, or tilt the scooter on its side (having previously removed the battery and drained the gasoline from the tank). The proposed method provides more precise adjustment of the movement of the pressure plate without dismantling.
It has been tested many times and invariably allows for normal operation of the clutch assembly. So that you don’t have to constantly look at the “papers,” I present the full adjustment procedure, highlighting the manufacturers’ recommendations in bold and accompanying them with the necessary comments. From the instructions: to properly adjust the clutch you must: - screw in the adjusting fitting of the cable jacket on the engine until it stops; remove the inspection hatch cover; Unscrew the lock nut and turn out the adjusting screw.
After this, tighten all three adjusting nuts until they stop. But two points must be taken into account. Firstly, a strict sequence must be observed: turn each nut half a turn at a time, moving from one to another clockwise, avoiding large distortions of the disks. Secondly, the expression “all the way” does not mean that you have to tighten it “with all your might” - there are cases when overzealous “regulators” manage to break the clutch .
Then, again rotating the nuts sequentially, but this time counterclockwise, we unscrew each one by the same number of “clicks”.
Photo report: Replacing the rear chain of an Alpha moped
Torque chain transmission is always a problem. But low cost, ease of maintenance, coupled with low weight, and for a motorcycle - weight is a very significant parameter - outweigh all the disadvantages and the chain drive of the rear wheel, just like many years ago, is dominant in the motorcycle industry. And we are unlikely to get away from this in the coming decades.
As already said: the chain is always a problem. The infection is spreading and nothing can be done about it. And if only it drags on, it begins to eat the teeth of the stars and if it is not replaced with a new one in time, then it will literally eat the stars in one season.
Without going into theory, let's consider a classic case: the chain has stretched and requires urgent replacement. If you look closely at the picture, you will see that the chain rollers do not fit into the sprocket teeth. As a result, the chain rollers hit the sprocket teeth and eat it up literally in one season.
Some especially gifted people manage to cut their own exclusive teeth on such sprockets using a grinder. But we won’t suffer from such garbage today, but we’ll buy a new driving star (the driven one is still alive, it’s good for a couple of seasons), a chain and do everything like a human being, and not like a collective farm.
When choosing a new chain, consider the width and number of teeth on your moped's sprockets. Chains for Alpha come in different widths and lengths: some are wide, some are narrow, some are long, some are short. We will use a wide 428 for Z13 Z41 sprockets, and which one you will use depends only on your sprockets and preferences.
We install the pin on the footrest, if you have one, of course.
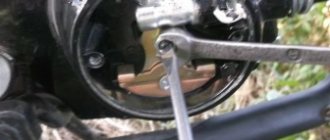
We remove the casings, the drive sprocket cover, unscrew the rear wheel/rear sprocket axle nut, and loosen the tension chains on both sides.
We look for a lock on the chain, unfasten it and remove the old chain. For tusks, the chain is always riveted tightly and in this regard I was unlucky: I had to go for the grinder B-)…
We push the wheel along the rear pendulum as far forward as possible, throw on a new chain, and fasten the lock. To prevent the lock from unfastening while moving, we place the latch so that its cut faces in the opposite direction from the direction of its movement. To avoid getting confused, do this: turn the wheel so that the lock is on top of the pendulum and fasten the latch with the cut towards the rear wheel.
We lightly tighten the nuts of the sprocket/rear axle, remove the stub from the step, pump the rear suspension several times and slowly begin to tighten the chain according to approximately the following principle: tighten the chain a little and immediately measure with a ruler how the wheel is.
If the distance from the wheel to the pendulum on one side is significantly less or greater than on the other, we calibrate the position of the wheel with the required tensioner. In this way, in fits and starts, we pull the chain to the desired condition.
We pull the chain until it sag by 1-1.5 cm. This will be quite enough. After everything has been done, tighten the axle nuts and make sure to adjust the rear brakes. Never forget about the brakes, otherwise you’ll end up slamming into a trash can or a similar deer.
For those who are still with us, I will tell you the old-fashioned way of how to easily and simply determine how much the chain is loose: take the chain, straighten it and hang it in a horizontal position. The looser the chain, the stronger it will describe the arc; the newer the chain, the more even it will be.
For comparison, I took two chains: one was broken, the other was just from the store: the broken one hung snot at almost an angle of 90 degrees, the new one sagged a little and that’s all. This is the way.
Photo report: Adjusting the clutch of the “Ant”, “Tula” scooter
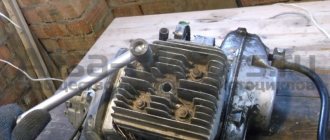
The clutch of the next customer's "Ant" after the "repair" and probably the hundredth adjustment continued to work not quite properly. Namely, it skidded when starting the engine so that the crank lever simply turns to idle. The owner naturally began to assure that everything was fine with the clutch and that it just needed to be adjusted (typical conversations: most of my clients associate repairs exclusively with adjustment work). The reason for this line of thinking is trivial: adjustment does not imply the purchase of new spare parts.
I didn’t argue for a long time - I pressed the lever a couple of times; it turned out to be not that tight, but just oak... And it was oak to such an extent that even I couldn’t squeeze it all the way... We argued for a long time with the owner and decided to open the clutch and look , what is what.
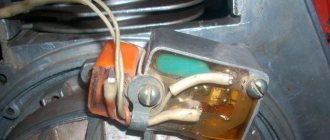
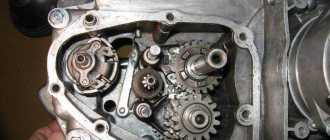
As a result, after opening it was discovered that the clutch was assembled incorrectly and when squeezing, the bolts rested against the cover. Plus, several disks were crooked and had to be replaced.
The last disc was either installed like this, or flew out of the slots itself - it’s unclear
The adjusting nuts were tightened to such an extent that the bolts began to rest against the cover and rubbed a groove in it
The drive cable was reaching its last days and required replacement.
At the other end of the cable there are traces of a typical collective farm repair (no comment)
After repairs, followed by replacement, lubrication and adjustment of the free play of the drive cable, the clutch finally worked. Believe it or not, gears from neutral to fourth can be switched by lightly pressing with the toe of the sneaker while standing still, and not while moving. And after replacing and lubricating the cable, the lever became so soft that the owner, when he squeezed it and engaged the gear, almost cried with happiness.
Why am I telling you all this? Moreover, in 99.9% of cases, problems in the clutch operation of Soviet motorcycles have nothing to do with its adjustment. Sometimes a person fusses with the adjustment for three days, and then it turns out that the reason is not an incorrect adjustment, but, for example, a rusty cable or crooked discs.
Maintenance and repair
Due to its low weight, this moped, if necessary, can be “put on its side” even alone. Also, given that Ant disc wheels consist of 2 halves bolted together, replacing a damaged tire is quite simple. To connect the tube and the spare tire, it is necessary to separate the parts of the removed wheel.
Motor scooter repair Ant
Tools
In order to properly repair a Soviet moped, you will need the following tools:
- double-sided wrenches (set), 4-22 millimeters;
- screwdrivers - 3 pcs. (large, medium, small);
- hammers, 2 pcs. (100 and 300 grams);
- combination forceps;
- wooden stick;
- wire cutters;
- pliers;
- socket wrenches (4 pcs.);
- velvet files - 2 pcs. (flat).
Adjusting the tightening of nuts
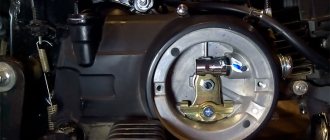
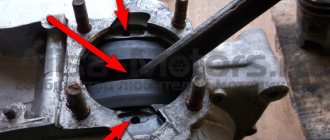
We tighten the adjusting nuts to approximately the same limit as in the photo. I delay all my clients in approximately the same way - no more and no less. After tightening the nuts, press the lever and watch how the pressure plate comes off.
- If the disk comes off skewed, tighten the required nut half a turn and check with a new one
- If half a turn is not enough, turn the nut another half turn until the disc comes off perfectly straight.
- If you are transporting large loads and the clutch cannot cope with the increased load and slips, tighten the nuts a few turns
- If the force on the lever is high for you and you operate the scooter without a load or alone, for example, “Tula” - loosen the nuts
hello, please help me after overhauling the engine, the clutch does not engage, I assembled it as you show the release is normal, but the clutch does not engage the adjusting screw, no emotions before disassembling the engine led a little. I put in an old ball, I’m wondering if it’s because of it since it’s not quite a ball anymore, I’d say there was nothing to replace the square with
Andrey, did I understand correctly that the clutch does not engage? That is, you turn on the gear, but the scooter doesn’t go anywhere. If so, then it is possible that during assembly the last disk did not fit or flew out of the groove of the basket. Describe your problem in more detail, or, what would be best, remove the clutch cover and take a photo of how it is assembled there and then we will advise you something.
no speed, they turn on, but when the clutch is depressed, the gearbox does not disengage; the adjusting bolt tightens the crankshaft and piston; they don’t move at all; I loosen things up a bit; everything works, but when I press it, again there is zero emotion
Andrey, I just can’t get to the bottom of the problem. First you say the clutch won't engage, now you say it won't disengage. Explain in more detail what's wrong with your clutch. If it drives (does not turn off), then when the gear is engaged, the scooter will move even with the clutch lever fully depressed. If the clutch slips (does not engage), then when the gear is engaged the scooter will not go anywhere - even if you release the lever or not. The “Ant” clutch is very reliable and unpretentious, and when serious problems arise with it, in most cases, this moment indicates to me that it was assembled incorrectly (“hello, help, please, after reassembling the engine, the clutch does not engage”) or damaged. Try taking it apart again, and then reassembling it.
Adjusting the free play of the cable
On the left side of the engine, remove the cover, unscrew the locknut on the adjusting bolt and, depending on what problems you had with your clutch, adjust the free play of the clutch lever.
- If the clutch was moving, tighten the adjusting bolt
- If the clutch is slipping, unscrew it
We tighten and unscrew the adjusting bolt exactly until the free play at the end of the clutch lever is 5-10mm. After adjusting the bolt, fix it with a screwdriver and tighten the locknut
{SOURCE}
Engine characteristics
In fact, the engine itself is not bad: moderately reliable, simple, maintainable and not whimsical. If it were not for its extremely unreliable and capricious dyno starter, which, according to the good old collective farm tradition, is usually abolished and a magneto is installed
- Type - two-stroke, single-cylinder with three-channel purge
- Cooling - air, forced by fan
- Cylinder diameter - 62 mm
- Piston stroke - 66 mm
- Working volume - 199 cm
- Compression rate - 7.6 kg/cm
- Power - 13 l. s./9.6 kW at 5200 rpm
- Carburetor - K62G