Installation Features
Many car enthusiasts make a big mistake - they install the “zero” incorrectly, which is why it is not able to perform its functions normally.
For example, the filter is installed too close to a hot engine or exhaust manifold. Here it’s time to remember physics.
The density of cold air is higher than that of hot air. As a result, it is easier to “push” cold air into the combustion chamber than hot air.
Therefore, the “nulevik” should be located as far as possible from any heat sources (motor, exhaust manifold, etc.).
In addition, it is not recommended to install the filter in the lower part of the engine compartment. In such a situation, the product will quickly become dirty and lose its best qualities.
In addition, a dirty filter will have to be “repaired”, which will also take some time.
Today there are a lot of models of zero filters that are designed for installation on various types of cars - with an injector or a carburetor.
The material can be mesh, foam rubber or cotton. Filters made of foam rubber have the highest degree of purification, but they also have more resistance than their “brothers”.
Installation of the “nulevik” on different cars is done differently, but in general you need to follow the following algorithm:
- discard the connector from the MAF (mass fuel flow sensor);
- use a screwdriver to disconnect the rubber tube from the air flow sensor;
- remove the sensor fasteners from the body (to do this you will have to unscrew a couple of bolts);
- dismantle the case and remove the rubber clamps (use duckbills or pliers);
- unscrew the fastener from the group of wires;
- fasten a pair of bolts from the mass air flow sensor clamp to the “zero” fastener;
- Place a new filter on the mass air flow sensor, tighten the clamping clamp and connect the sensor.
That's all, the new filter is installed on the car.
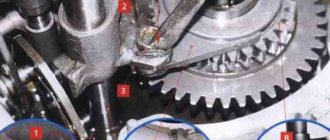
Needle adjustment
The peculiarity of this carburetor is the absence of a jet for the quality of the mixture; its adjustment here occurs by raising or lowering the locking ring on the needle. If you notice that the mixture is too lean, you will have to install the ring higher by 1 or 2 grooves; accordingly, the mixture will be rich when installing the same ring on the 4th or 5th step. The center position on the 3rd groove indicates the standard throttle needle setting. If configured correctly, the scooter will have good traction, speed and consume fuel according to the specified characteristics.
Pros and cons of installing in a regular place
The advantages include the absence of changes in appearance and design integrity. The standard location is usually hidden by the manufacturer under covers, and the filter is not visible from the outside.
But there are many more disadvantages:
- Hidden installation of the filter under the housings prevents full access of air to the filter. For zero engines this is especially critical, because their purpose is lost - to give the engine as much air as possible.
- In addition, installing the filter under the housing requires the use of an air duct, which is a flexible rubber pipe that runs from the filter to the intake manifold, which integrates the intake, carburetor and cylinder.
- Due to the design features, the air duct most often has a curved shape, so the air flow in it changes direction. Passing through such a pipe also creates resistance to flow. To improve performance, a direct-flow filter for the carburetor is best suited. This type of zero does not require an air duct, has open access to ambient air and is the most efficient.
What is a nulevik?
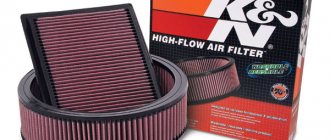
A zero-resistance filter for a motorcycle or scooter is a conventional air filter designed to protect the cylinders from dust, but has less resistance to air flow (almost zero). This is achieved by increasing the filter surface area compared to standard filters, which facilitates the passage of air.
A conventional air filter is a zero resistance filter
Why do you need a zero? When the piston moves back, a vacuum is created in the cylinder, and air is sucked into it, mixing with gasoline. The more air that can be sucked into the cylinder, the more combustible mixture there will be for operation and the greater the power. However, a filter gets in the way of the air. It creates resistance to air flow, so less air enters the cylinder than it could.
It is impossible to do without a filter, because any dust entering the cylinder causes severe wear. A zero resistance filter avoids these problems. The engine begins to “breathe deeply” and at the same time has full protection from dust.
Practice
Oil-impregnated air filters are now quite common. In terms of their structure and the material from which they are made, these elements are no different from ordinary ones, so you can saturate the filter with oil at home; to do this, follow the algorithm:
Remove the specified element of the air system, disassemble it and remove the foam rubber. If there are cracks, deformations, or tears on its surface, then it is better to replace the filter material with a new one. Dip the foam rubber in a soapy solution (you can use non-aggressive chemical detergents), let it sit for up to 20 minutes, then rinse with water
You should not use gasoline for these purposes; it will dissolve the glue that holds the foam particles together. Please note: you cannot twist or stretch the material, otherwise you will damage it, so wash it carefully and wring it out. Rinse the foam rubber thoroughly, without using high water pressure. Allow the material to dry on its own, without using forced drying: at high temperatures the foam will deteriorate. Lubricate the filter element with oil, it is important that the lubricant is absorbed: there should not be too much of it, it should not drain from the foam rubber. Choose certified products from well-known brands: a low-quality mixture will harm the engine. Remove dirt from the air filter housing. Reinstall the foam in its original place.
In a similar way, filters that use special material in a mesh are washed and lubricated. By applying these manipulations, you will extend the life of your car or motorcycle engine.
Maintenance of zero vehicles
In principle, servicing tuning filters is no different from servicing standard ones. The filter element is cleaned by blowing air in the direction opposite to suction.
There are also types of filters that can be washed. It all depends on the material from which the zero is made. The possibility of washing is usually indicated by the manufacturer. It is necessary to make a reservation that most of the zeros are still disposable. It is impossible to completely wash out dust particles from a heavily soiled filter. Even after thorough purging or washing, its throughput will be lower than that of a new one.
For washable filters, maintenance boils down to rinsing it in water with a detergent solution and then drying it. The manufacturer specifies what exactly to use for washing.
Important: washing the filter with products not recommended by the manufacturer can damage it!
For engines with insufficient power, such a filter is needed
How to care for such filters?
As already mentioned, one of the main disadvantages of the filter is the need for regular maintenance.
After purchasing and installing the product, it must be washed and treated regularly. In this case, processing according to the “remove-wash-install” principle will no longer work - a special algorithm is required here.
The frequency of washing is every 5-6 thousand kilometers. If the car is operated in dusty areas or off-road, then the filter must be cleaned more often.
If you forget about servicing the device, the machine becomes “gluttonous” and “dumb.”
The algorithm of actions is as follows:
- remove the zero filter from the machine and remove all dust from it using a special brush;
- Wash the unit in a special container with a special cleaning solution, then rinse the filter under water pressure;
- shake off the filter element and inspect it. If there are light spots, the filter needs to be impregnated with a special agent;
- treat the product with a special impregnation (as a rule, it is sold separately from the “nulevik”);
- return the “zero” to its original place.
There are even special kits for caring for “nuleviks”, which include washing and impregnation. A few manipulations as described above, and the product looks like new.
Please note that the total number of washes can be limited and is about 20 pieces. After this, it is worth installing a new filter.
How often does it need to be replaced?
The frequency of replacing the air filter depends on the degree of use of the 4 T scooter, as well as the responsibility of its owner and the quality of the roads. If the vehicle is operated on dusty country roads from morning to night, then the period of use of the air purifier will be short.
Average statistical data indicate that it is necessary to change the cleaning structure every 5 thousand kilometers if the vehicle is not used regularly. The service life will also be affected by the quality of the filter itself. Original models will last much longer.
How to make an air filter for a scooter
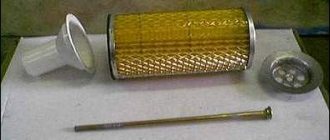
So, I’ll give you a sample of restoring a filter element from a Biwis scooter (do not confuse it with BWS, as they have different motors and filters). First, remove the old filter paper from the element (the edges should be smoothed with a file).
Next, let's go to the auto store and buy an air filter from the Zhiguli. We remove the metal mesh with the cotton strip, we don’t need all this at all. Then we cut the filter with a knife and get a strip.
We cut off the required section of the filter pad.
Remove excess gum from the workpiece.
We insert our workpiece into the nozzle, and glue the edges with tape on both sides (as in the photo). I used reinforced tape because I didn't have anything else on hand; plain plastic tape wouldn't work. We use either paper or reinforced.
Using a hot-melt gun, we completely glue all the edges and check the quality of the seams (sizing). There should be no gaps anywhere, as road sand is terribly treacherous.
And so, we get a filter device (photos from both sides).
That's all, the air filter has been restored. A similar method is used for some 139QMJ motors, where a similar paper filter is installed, only smaller in size. I myself am already in my second season, and everything is fine, the engine consumes gasoline according to the instructions.
Don't forget to replace the filter every 1500-2000 km.
Downloading a book
After successfully completing the payment (by any method) and returning to the KrutilVertel store from the payment system website, you will be taken to the successful payment page:
The book you purchased will be in your personal account, from where you can always download it.
Please note that after making the payment, you need to return back from the payment system website to the KrutilVertel website. If for some reason you did not return back to the site and closed the payment system tab with a message about the successful completion of the payment, please let us know - we will send you a letter indicating access to download the book. If for some reason you did not return back to the site and closed the payment system tab with a message about the successful completion of the payment, please let us know - we will send you a letter indicating access to download the book
If for some reason you did not return back to the site and closed the payment system tab with a message about the successful completion of the payment, please let us know - we will send you a letter indicating access to download the book.
Replacing the fuel filter on a scooter and cleaning it
All modern scooters have a fuel filter. The purpose of the filter is to clean fuel (gasoline) from various sediments and other small particles. After this, pure gasoline enters the scooter's carburetor. In addition to fuel, air also enters the carburetor; it must be, like gasoline, clean and free of dust. The fuel filter is located between the carburetor and the gas tank. If your scooter has a fuel pump (Honda scooter models usually do), then a filter must be connected between the pump and the tank.
A scooter can have a gasoline filter, either disposable or reusable. Their difference speaks for itself. A disposable filter on a scooter is changed after a certain mileage, and a reusable filter after a certain mileage is removed and disassembled and cleaned. After this, it is ready for use again. As practice and experience show, it is most rational to use disposable filters, because Their cost is not at all high, within $1, and they are smaller in size than reusable filters. So the labor costs for cleaning the filter do not justify it at all; it is easier to replace the fuel filter than to maintain and clean it. In addition, collapsible filters are also more expensive than disposable ones. So it's better to spend $1 and replace the fuel filter with a new one than to clean it.
There are models of Japanese scooters that are equipped with a variety of filter elements and already have their own place under the seat or under the floor. As a rule, you need to look for the filter near the gas tank. You can always replace the fuel filter with a disposable one. Well, if you have a desire to service your reusable filter, then you are always welcome. Personally, for me, it’s better to buy a new one and not bother with various cleanings and so on.
Every scooter has a gas tank. It is most often susceptible to rust or paint peeling. This usually happens when the scooter has not been used for a long time. In this case, our filter helps us out. The main thing in this matter is to replace the filter in a timely manner, because... If it becomes clogged, it will prevent fuel from entering the carburetor. When your fuel filter is clogged, you can also feel it. For example, at speed you may feel symptoms of a lean mixture or jerking. All this suggests that the fuel filter in the scooter is clogged, and gasoline does not reach the carburetor in full.
As a rule, replacing a fuel filter on a scooter is not a long process; any owner can do it independently. You just need to loosen the hose clamps, pull out the old filter, and attach the new one. When replacing or installing a new filter, its direction must be taken into account. There will be a mark drawn on the filter itself that will show how it should be installed. The process of replacing a filter on a scooter is simple and does not require any specific skills.
Tuning a scooter's variator - theory and practice
I hasten to disappoint some readers. In this article, you will not find a “super-duper” manual for sawing a variator a la “Hello everyone! Today Evgeny Matveev is with you” - don’t even hope! Especially for you, on YouTube, there are several videos that show this work in accordance with the canons of Feng Shui. You go to YouTube, the rest of the readers sit back and listen. In general, as they say: “boys to the right, girls to the left.”
Basic concept: Many scooter drivers mistakenly believe that tuning a scooter (variator) comes down solely to sawing it - everything else is a tricky one. Our mentality is partly to blame for this belief: they say a tuning kit or a set of rollers costs money, and I seem to have a file in the shed - so why pay then?
No, my dears, sawing a variator is not tuning. This activity, from the outside, looks very much like old and cheap porn... Good tuning costs money, no matter how much you would like to think differently - this will be the main concept of today’s article.
Theory: There is no point in telling how the variator works, since this topic has already been “sucked” up and down on other thematic resources. For beginners, we advise you to search for information on YouTube, where there are very good videos showing the principle of operation of the variator.
A scooter's variator is an automatic type of transmission, its task is to increase or decrease the transmission gear ratio without a stepwise method, to ensure the most efficient acceleration of the scooter (dynamics), ease of control, and efficiency. That is, to put it simply: the variator, depending on engine speed and driving speed in automatic mode, provides the optimal transmission ratio at a certain point in time.
Unfortunately, budget scooters are equipped with a mechanical CVT. That is, the operation of the variator is controlled using rollers, which, under the influence of centrifugal force, control the operation of the variator, thereby increasing or decreasing the transmission gear ratio.
This technical solution has proven itself from the best side, due to its low cost, simplicity and reliability - you can’t argue with that. But! Any mechanical device has a certain moment of inertia; frictional forces and temperature also have a great influence on the operation of such devices. Therefore, the mechanical type of variator works in steps; it is not able to instantly respond to changes in engine speed and other parameters. Because of this, dips appear in the operation of the scooter, dynamics deteriorate and power decreases.
Manufacturers of branded scooters have long been using a CVT controlled by an on-board computer in the transmission. This type of variator (electronically controlled) has an almost perfectly smooth operating characteristic, providing the scooter with high dynamics, ease of control and efficiency.
In our country, such scooters are still poorly represented, but we want dynamics and comfort in handling, so a logical question arises: how to squeeze the maximum capabilities out of the standard mechanical type variator installed on most scooters?
The answer is simple: install variator rollers optimally selected for weight or buy a ready-made kit (set), which will provide smoother performance and a slight increase in the power and dynamics of the scooter.
The rollers are sold as a set; the packaging indicates their size and, most importantly, their weight. Depending on the model of your scooter, you can buy roller skates that completely satisfy your preferences. The price of the sets presented below fluctuates around 250-300 rubles.
Here you see rollers of the same size, only much heavier than the previous set, the price is the same 250-300 rubles.
Let's consider both options in more detail: When choosing a tuning option, you need to start from a specific task, that is, what do we want to get in the end?
If you want to get high power (torque) of the scooter, then you should change the rollers to lighter ones - this action can increase the traction of the scooter throughout the entire engine speed range, slightly improve the dynamics, but the maximum speed will decrease significantly.
If you want to get an even characteristic in the middle range of engine speeds, then there is no clear solution; here you need to experiment with the weight of the rollers, both higher and lower.
Heavier rollers are installed only if you have done engine tuning, that is, increased the maximum power and speed. There is no point in installing heavy rollers on a stock engine, since in this case you will be guaranteed prolonged failures during acceleration of the scooter.
It is almost impossible to give the optimal weight values of variator rollers for each scooter model within the framework of this article, since there are a great many scooter models and each model has its own denomination. You understand...
It is worth noting that the selection of CVT rollers is the lot of experienced scooter drivers who have already tasted the drive, know many important points, and feel their scooter like their own. Therefore, for beginners, it is better to buy a ready-made tuning kit, which includes a set of rollers of optimal weight along with a CVT of an improved design.
Such whales have very positive reviews among the people; they provide smooth operation, good dynamics, and economy, which is just right for city traffic. The price for such a kit starts from 1200 rubles and above, yes, it is expensive, but the ride comfort, efficiency and dynamics more than compensate for the money spent.
You should know: a tuning kit works well on a stock engine; if you “charged” the engine, then such a kit will not provide the desired result. Here we must make a reservation: there are also whales that are specially designed for “charged” engines, but we are not talking about them today.
Tuning the rear variator: what can I say? Installing tuning springs (more rigid) in terms of dynamics, control comfort and efficiency of a scooter equipped with a stock engine essentially does nothing. Tuning the rear variator is only worth it if you have hard-charged the engine - then yes, there will be an effect from installing hard springs!
And so... There is no point in installing stiff variator and clutch springs for a stock engine.
Pros and cons: is there any sense in “nulevik”?
In reality, the difference with and without a filter is noticed only on a dynamometer stand. The benefit of reducing the resistance of only one element of the intake system appears exclusively in the “full throttle” mode at high speeds; in the standard city driving cycle, the effect of the “zero filter” is exactly zero.
Even for forced engines, reducing intake resistance gives a penny of benefit. Let's take for example a graph taken on a dyno with a Nissan Skyline ECR33, whose RB25DET engine has already moved away from the standard configuration:
The result is not bad - 250 horsepower at the wheels. But, if we remove the air filter altogether - to ensure a reduction in intake resistance even greater than that of a high-quality "zero" - we will get the second graph:
The drop in power after the 5000 rpm peak has become smoother, but the difference in numbers is negligible: its increase without a filter is only 8 horsepower. With 250 hp, which is already there, it is impossible to notice anywhere except on the track, when hundredths of a second count.
And you have to pay for these pennies by complicating maintenance and deteriorating air purification.
In addition, the oil impregnation of “zero” vehicles itself can cause problems on engines equipped with mass fuel flow sensors. The air flow, passing through the filter, carries along microparticles of oil, which then settle on the walls of the inlet pipes and directly on the surface of the sensing element of the mass air flow sensor. Because of this layer, which acts as a heat insulator, the mass air flow sensor begins to “lie”, giving an incorrect signal to the injection computer. And here, based on the “outdated” composition of the air-fuel mixture, the conversation will not be about a microscopic increase in peak power, but about a noticeable drop.
In some cases, the installation of the Federal Tax Service itself can even reduce the maximum engine power. When installing a fashionable cotton “cone” or a foam “mushroom”, you have to dismantle the standard air filter box and air intake. If the layout of the engine compartment is unsuccessful, after this “anti-tuning” the engine does not receive air that is close to atmospheric temperature, but air that is already heated, passing through the radiator. An increase in air temperature for every 10 degrees Celsius gives a loss in density of 0.04 kg/m3 - and an average atmospheric two-liter engine, revved up to 5000 rpm, drives 35 - 40 cubic meters through itself per minute! As a result, an engine with a zero-resistance air filter receives less air mass than with a standard, supposedly “stifled” intake.
An inevitable harm from using zero air filters is accelerated wear of the cylinder-piston group. Even the air purification results of these filters declared by the world's leading manufacturers (for example, K&N) do not exceed 99% under ideal conditions and using expensive branded impregnation oil. The paper curtain air filter is capable of filtering out 99.5 to 99.9 percent of dust. It would seem that the difference is small - but after several tens of thousands of kilometers we will already be talking about the difference in whole grams of dust that gets into the engine cylinders. Moreover, as the paper filter gets dirty, it only increases the degree of filtration: dust, clogging the pores, reduces the flow area, and they become capable of trapping smaller particles, although at the cost of increasing resistance.
In “zero” filters, contamination on the surface of the pores reduces the likelihood of new particles adhering, and the cross section of the pores remains larger than the size of the filtered particles; as contamination increases, the degree of purification decreases with little change in resistance. Previously used contact-oil air filters suffered from the same thing, where oil soaked the fishing line stuffed inside (designs familiar, for example, from old Soviet trucks and motorcycles). “Nuleviks” have become a more compact and lighter version of these filters, which have long been replaced by paper filters.
And errors during filter maintenance only increase the wear rate. Some people manage not to saturate the filters, while others use cheap aerosols or oils that are completely unsuitable for impregnation. Try rubbing a drop of the brand's impregnation oil between your fingers: it's so sticky that it's hard to even wipe it off your fingers. Other oil will not provide any noticeable improvement in cleaning compared to a filter that is not impregnated at all.
The only advantage for engines that have not undergone serious tuning from installing “nuleviks” can be considered the absence of the need for regular replacement: you need to wash and re-impregnate the same filter on time.
Advantages and disadvantages of use
Advantages:
- The main advantage of tuning the air filter (installing a zero filter) is an increase in engine power. This is the most accessible and inexpensive way to get extra “horses” from the engine. Installation does not require any special modifications and can be done independently.
- There are varieties of zero filters that are installed in place of the standard filter, but they are not very effective and often cost more. The most effective models of zero filters do not coincide in size with the standard ones, because they have a large filtering surface. To install them you will have to choose another place.
An increase in engine power is the installation of a zero gear
. Negative aspects:
- One of the difficulties that arises when installing any zero resistance filter is the need to adjust the carburetor. For more air in the cylinder, which is provided by the filter, more fuel is also necessary, because the air-gasoline mixture must be proportional.
- The operation of the carburetor in transient modes (acceleration), when additional enrichment of the mixture is required, is subject to adjustment. If more air is not supplied with more fuel, the engine will lose acceleration dynamics.
- There is one more problem. A real headache for motorcycle owners are low-quality filters. Companies that produce such products simply reduce the density of the filter material instead of increasing the surface area. With a reduced material density, the air actually encounters less resistance, but the filtering effect is also greatly reduced. As a result, dust still gets into the cylinders.
By purchasing a zero-resistance filter from an unknown manufacturer, you risk having to overhaul the engine within a season. Therefore, it is recommended to use zero-resistance filters only from trusted manufacturers.
A zero-resistance filter allows you to avoid problems
Cleaning the foam filter
In short, let's get started. Let's start by removing the filter. Often, in order to reach the filter, you need to unscrew the seat and part of the plastic body kit. Before removing the filter cover, you need to make sure that there are no deposits of dirt, sand or dust in the filter housing that may have entered the intake distributor during dismantling. If there is, it needs to be cleaned before removing the filter. We remove the filter and look into the air intake. It's great if you can see the carburetor directly. We are looking for dust deposits and dark deposits on the carburetor diffuser, which indicate that the air is not being cleaned well.
At the next stage, after inspecting the intake tract, you should plug it with a rag (which does not leave lint and does not unravel into strings, well, it’s clean, of course) or a special lid. Since the next step in order will be cleaning the inside of the air filter housing, you need to be sure that nothing gets into the middle of the intake pipe. Why do you need to clean the air filter box? The cleaner it is, the slower the cleaned (new) filter will clog, and the box itself is also a good dust collector, especially if a crankcase exhaust is connected to it, due to which an oily deposit forms on the walls of the air filter housing. It would be advisable to clean all this with a cloth soaked in gasoline or white spirit. When working with white spirit and other solvents, it is good to use glasses, gloves and work in a well-ventilated area!
Now the fun part begins, which is actually cleaning and washing the removed foam filter.
There are a lot of specialized motorcycle chemicals for servicing filters, but a significant part of it is not approved for use in Europe due to toxicity and, accordingly, may not be officially supplied to our country. Some similar kits even come with a branded washing bucket, but considering the price products like this, I wouldn’t want to go bankrupt servicing the filter. But it needs to be serviced constantly, and no tuning bucket will reduce its dirtiness. That's why smart scooterists choose white spirit! It is prohibited to use gasoline, as there is a danger of affecting the glued seams of the air filter, and even more so, more aggressive solvents, which can directly turn foam rubber into glue, are not suitable. You need to purchase your own plastic bucket with a sealed lid and store a couple of liters of white spirit in it just for flushing purposes. This cleaning is rough and preliminary, so a couple of liters filled in is enough for repeated use.
You need to put something like a grate on the bottom of the bucket. This is so that the washed dirt particles quietly fall into the sediment and remain there without rising to the top, catching them with the filter when washing.
Replacing the fuel filter
The basic procedure for replacing the filter element on most types of cars is similar - at the end of the life of the filter element, the old device is removed and a new filter is installed in its place.
The main distinguishing feature of different engines is the location of the filter itself. And the complexity of the work and other details depend on this
To dismantle/install the TF in vehicles with different types of engines, special tools and accessories may be required. They need to be prepared in advance. Next, we will tell you how to change the filter for each specific type of engine, explaining how to remove the old one and install a new filter device.
Replacing the TF on the carburetor
In a carburetor engine, the filter device is usually located under the hood. It is made of plastics/light alloy metals, and its installation will be simple and understandable for everyone.
First, you need to remove the clamp on each side, then remove the filter device itself
When installing a new TF, it is extremely important to install it correctly, without confusing the direction (inlet/outlet). To make it easier for the car owner to navigate, there is an arrow on the body that, when installed, should point to the gas tank
Having put the clamps in place, you need to pump in fuel using the fuel pump handle. If at this moment a slight whistle is heard, the seal is broken. Metal clamps will help ensure reliable fastening.
Replacing the filter on the injector
Replacing the TF on the injector
The supply of the working mixture to the cylinders of an injection engine occurs under high pressure, and therefore the fuel pumps for such engines are made of metal with threaded fasteners at the connections. The injector TF can be located in the engine compartment or under the bottom.
- First, you need to reduce the pressure in the system, for which you need to remove the middle one in the safety block, which is located at the gear lever (usually it is responsible for the functioning of the pump).
- Then you need to start the engine and wait until it stalls (usually no more than a minute).
- Next, using the appropriate tools, dismantle the old filter and install a new one. Here the arrow should point in the direction of fuel flow.
After finishing the work, you need to put the fuse in place. After this, try to start the power unit.
Replacing TF on a diesel engine
In conclusion, we will tell you how to change the filter on cars with a diesel engine, which are extremely sensitive to the characteristics of the fuel being poured. A significant volume of impurities clogs the injectors, and this affects the correct operation of the power unit.
We have already mentioned above that diesel cars have 2 filters (pre-filter/fine filter). The second one usually needs to be changed after 10-15,000 km. It is located in the front part of the car, and to get to it, you will need to remove the wheel with the fender liner. After this you need to do the following:
- Roll up the tray.
- Remove the chip from the water meter.
- Remove the fittings by pressing the buttons located on the back wall.
- Remove the water level meter and the plug at the bottom.
- Provide the dismantled parts with new parts that ensure tightness (rubber gaskets/washers are supplied with the filter).
- Place a water meter with a plug on the filter device being installed, then place it on the machine.
During installation, do not hit the water meter - all work must be carried out with the utmost care.
Replacing a filter on a diesel engine And in order for the car to start after completion of work, before installation you need to fill the new fuel filter with diesel fuel. To expel excess air, you can rotate the starter for 5-7 seconds, after first squeezing each nozzle a little. After 2-3 similar procedures, small bubbles appear near them. Holding the injectors on the driver's side, you need to repeatedly rotate the starter several times. After this you need to clamp the remaining ones. These steps will help start the car engine.
Adjusting the Suzuki Sepia carburetor
Before the procedure, you should remember that when changing parts such as a cylinder, filters, muffler, the old carburetor settings will be invalid and you will have to make adjustments again. It is also extremely important to adjust the jets when the engine is already warm. The process is carried out as follows:
- Adjustment of needle and venturi tube size at 1/3 gas;
- Adjusting idle speed and mixture quality.
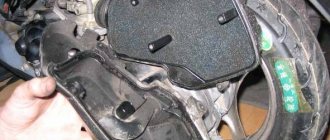
Replacing the air filter on a scooter
The process of replacing the air structure on a scooter begins with determining its type and general characteristics
Another important feature is the location of the air filter.
There is a “wet” type filter, which is most often installed on Chinese models. There are also “dry” cleaners. The latter can often be found on scooters from Japan.
The “wet” filter, which is based on oil- and petrol-resistant foam, is impregnated with special oil.
The design consists of two layers:
- Internal. The material contains small cells that are capable of trapping even the smallest air pollutants;
- External. This layer has large cells that trap massive flows of dust.
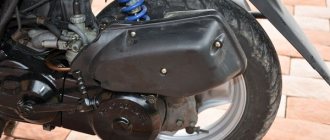
The air purifier for the 4 T scooter is mounted in special boxes. This design can be located in front of the carburetor, above the muffler or variator.
Preparing for work
Selecting a suitable filter is the main preparatory stage before replacing the structure. The main rule that will allow you to cope with the task efficiently is that you should not skimp on cleaners. It is better to purchase a more expensive but original version than a fake one. A scooter, like a motorcycle, must quickly respond to the driver’s actions and reach the required speed, which is only possible if you have a high-quality cleaning device.
Required tools for replacement:
- crosshead screwdriver;
- socket wrench;
- pliers;
- clamp
This set of tools will be sufficient for routine filter replacement on a 4 T scooter.
The next step is preparing the new filter for installation. Additional impregnation will help the cleaner cope with its task to the maximum. This can be done using oil or a special chemical. If the choice falls on an aerosol, then it should be applied in linear movements over the entire surface of the filter. It is not recommended to make circular movements, as you should then wait 20 minutes and check the surface for the presence of unimpregnated areas.
On which mopeds or scooters should a zero gear be installed?
First of all, such a filter is needed for engines with insufficient power. This category includes:
- spent motors;
- worn-out motors;
- subcompact.
A separate category includes new, powerful equipment, the owners of which strive to achieve maximum speeds. A nulevik on a motorcycle can give it an increase of several km/h to its maximum speed.
In Russia, small mopeds and scooters are extremely popular due to their low cost. Their power is very low, which does not suit the owners very much. A conventional zero-resistance filter installed on the carburetor allows you to compensate for the lack of power.
It is not always advisable to repair heavily worn motors. They are often fitted with new or contract stock (standard) engines. If the owner is already accustomed to increased power, then the standard “stock” characteristics will no longer suit him. To tune such engines, they usually immediately install a zero.
The filter element is cleaned by blowing air