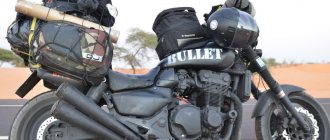
Good day! Some time ago I had a question about buying the first motorcycle in my life and it so happened that my choice fell on the HONDA CB400. And since I had no experience at all, and there are a lot of stories about what rickety Pepelats are found in the vastness of our great Motherland, I decided to properly read the manual and find out how to choose a really good motorcycle and not be deceived in our not so easy crisis period. While studying the history of HONDA construction, I came across the mysterious HONDA CB400SFVK motorcycle. When I was trying to understand what the educational version of CB 400 is and how it fundamentally differs from the full version, I searched through a bunch of sites and found a lot of information, here I will try to put it together and provide it in a “for beginners” format, which I so lacked.
The HONDA CB400SFVK has been produced since approximately 1999-2000 (it was not possible to find exact data), that is, approximately since the birth of the VTEC versions of the “Sibishka”. This version is educational and is intended for training novice motorcyclists in Japan. In Japan, because in our country they teach on the full version... you understand, only youth, only hardcore. The main differences from the regular CB 400 are a much more affordable price tag, the engine is “strangled” from 53 to 35 hp. and the maximum speed limit is 150 km/h, some owners actually claim that the motorcycle easily runs at 180.
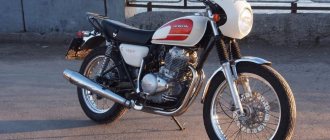
Note: in order not to get confused, please note that in the photographs presented, the educational version is ALWAYS on the left, and the full version is ALWAYS on the right. As an example of a training version, I took a 2005 HONDA CB400SFVK.
Go!
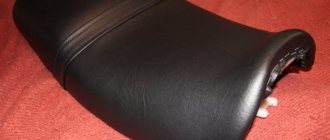
Steering wheel If you have previously driven a SV400, you will easily understand what is wrong. The thing is that on the training version the steering wheel is slightly raised. What to do if there was no opportunity to sit? In principle, this sign is not so obvious and is listed here rather “for show”, but at least this should be another proof for you that you should not thoughtlessly take the first motorcycle you come across, try to look at at least 3-4 options before buying and sit on each.
Dashboard Without getting into details, the most obvious sign is the noticeably larger sizes of the “glasses” (marked in blue) on the training version, the absence of beauties, such as iron inserts in the dashboard body, a slightly different arrangement of indicators and, of course, the absence of a display.
The headlight glass on the training version has a convex shape, while on the full version it is flat. The headlight housing itself is also different; on the full-fledged version, the headlight is inserted into the body and has a “groove” along the edges, but on the training headlight, the headlight is of the old design and looks monolithic. Speaking about the case, it is also worth noting that in the educational version it is completely black. In the original, the motorcycle is still hung with a “festive” garland from which kilometers of wires stretch, but in real life they will all be dismantled.
Mounting for arches For obvious reasons, the training version initially has more options for installing arches. The most important beacon indicating training is located in close proximity to the radiator (marked in blue), this is one of those signs that is really worth paying attention to, since it is not so easy to hide such differences.
For a better understanding, this is what the tutorial looks like with installed arches under the steering column:
Brake discs and pads The brake system exactly repeats the pre-VTEC versions of motorcycles: on the front fender there is no element “hugging” the fork, different pads are installed, slightly, but the brake discs themselves are different.
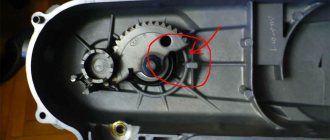
Engine cover Another “hello” from older models and one of the most obvious signs. The most important thing to remember here is that since 1999, that is, since the beginning of the production of VTEC, the cover has changed its appearance forever; a motorcycle of 1999 and older cannot have the old cover. If it happens that the owner somehow replaces the cover, it doesn’t matter. Pay attention to the window for monitoring the oil level (marked in blue and located under the engine cover); on the tutorial (as on older versions) there is a dipstick instead for measuring the oil level. For those with an especially keen eye: did you notice the moved HONDA sign?
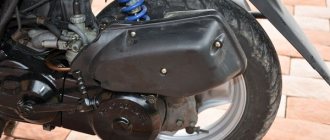
Rear shock absorbers For obvious reasons, the simplest shock absorbers are installed, even on pre-VTEC versions they are not installed. Most likely the owner will replace them with something more decent, but it’s worth paying attention.
Radiator On full-fledged versions (including pre-VTEC) there is an iron plate.
Engine The training version does not have oil channels, just like the pre-VTEC versions of the motorcycle. This knowledge will be useful if in front of you is a motorcycle manufactured in 1999+ and you see other signs of training.
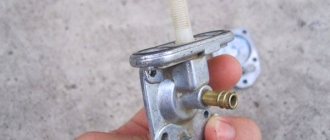
Plugs on pipes Exclusively educational “trick”
Idle air control As in the case of plugs, it is found only on training versions of the motorcycle
Stickers on the tank As a rule, there are none, but if they are, most likely the owner is not hiding the fact that this is a training version, a very simple and obvious sign.
Slot on the cover on the right, inscriptions Most stickers and covers do not survive to the future owner, if only simply because they are easy to replace, so just pay attention.
Wires When creating the motorcycle, changes were made not only to the engine, but also to the electronics. There are significantly more wires in the motorcycle than in the full-fledged version, but if you haven’t seriously read the manual and don’t know how and where the wires should be or have simply never looked under the seat, it will not be easy for you to assess the scale of the disaster. Actually, electronics is one of the sore points of training, keep this in mind if you decide to buy such a motorcycle for yourself.
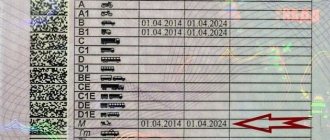
Documents In general, this should always be done after, and in some cases before, inspecting the motorcycle you are interested in. Anyway, if you have any suspicions, take a look at the documents. In the documents, please note that: - in the “motorcycle name” column there should not be anything similar to “HONDA CB400SF VK ” or “Honda CB 400 SF License ” - also pay attention to the engine power, it should be 53 hp. This is also true for pre-VTEC versions. And of course, if you see an obvious training in front of you, and its power is the same as that of a full-fledged version, I recommend abandoning this purchase; at best, the service life of such an engine was seriously reduced after the intervention.
That's all.
PS This post is not intended to create a negative image of the educational version of CB400. The purpose of this post is to avoid falling into the trap of unscrupulous people who live by the principle “without a sucker, life is bad.”
Honda Cb 400 Manual
Power unit (removal and installation) (CB400N). 1 — coolant tube bolt, 2 — coolant tube, 3 — O-ring, 4 — oil filter, 5 — generator connector, 6 ■ switch connector, 7 — fuel pressure sensor connector, 8 — starter wire, 9 — ground wire, 10 — clutch cable, 11 — drive sprocket mounting bolt, 12 — washer, 13 — drive sprocket, 14 — mounting bracket bolt, 15 — bushing, 16 — bracket bolt (65 mm), 17 — bracket bolt (60 mm), 18 — bracket, 19 — hinge bolt nut, 20 — hinge bolt, 21 — hinge bolt nut, 22 — washer, 23 — hinge bolt, 24 — support sleeve, 25 — power unit assembly.
Honda CB400F(CB1)
Power unit (removal and installation) (CB400F). 1 — high-voltage wire tips, 2 — breaker connector, 3 — generator connector, 4 — oil pressure sensor connector, 5 — starter wire, 6 — ground wire, 7 — coolant hose adapter, 8 — O-ring, 9 — cable clutch, 10 — gear shift pedal bracket, 11 — coolant pump side cover, 12 — speedometer cable, 13 — drive sprocket casing, 14 — chain guide, 15 — installation sleeve, 16 — coolant hose, 17 — drive sprocket mounting bolt , 18 — washer, 19 — drive sprocket, 20 — lower rear engine mounting bolt, 21 — lock nut, 22 — adjusting bolt, 23 — washer, 24 — front engine mounting bolt, 25 — bracket mounting bolt, 26 — bracket, 27 — fastening bolt, 28 — bolt cover, 29 — upper rear engine mounting bolt, 30 — engine assembly.
Cylinder head cover (CB400N). 1 — radiator mounting bolts, 2 — coolant temperature sensor connector, 3 — ground connector, 4 — high-voltage wire tip, 5 — ignition coil, 6 — drain bolt, 7 — wiring harness guide, 8 — radiator filler neck, 9 — tube crankcase ventilation, 10 — cylinder head cover bolt, 11 — washer, 12 — cylinder head cover, 13 — gasket, 14 — bolt, 15 — plate, 16 — gasket.
Camshafts (CB400N). 1 - plug, 2 - o-ring, 3 - plug, 4 - o-ring, 5 - camshaft bearing cap bolt, 6 - chain guide, 7 - camshaft bearing cap, 8 - locating pin, 9 - intake camshaft, 10 — exhaust camshaft.
Fastening the camshaft sprocket (tightening torque 20 Nm).
Cylinder block (CB400N). 1 — coolant pipe mounting bolt, 2 — coolant pipe, 3 — o-ring seal, 4 — chain tensioner mounting bolt, 5 — chain tensioner, 6 — tensioner gasket, 7 — fastening bolt, 8 — cylinder, 9 — gasket, 10 -locating pin, 11 — lock ring, 12 — piston pin, 13 — piston, 14 — upper compression ring, 15 — lower compression ring, 16 — oil scraper ring.
Cylinder head (CB400N). 1 — coolant pipe mounting bolt, 2 — coolant pipe, 3 — cylinder head mounting bolt, 4 — cylinder head mounting nuts, 5 — cylinder head assembly, 6 — gasket, 7 — mounting sleeve, 8 — spacer carburetor
1 — nut securing the cylinder head. 1 — fastening nut, 2 — fastening bolt.
Cylinder head (CB400N). 1 • pusher, 2 — adjusting washer, 3 — crackers, 4 — spring plate, 5 — valve spring, 6 — inlet valve, 7 — exhaust valve, 8 — oil scraper cap, 9 — spring seat, 10 — valve guide.
Honda CB400F(CB1)
Camshafts (CB400F). 1 - heat shield, 2 - cylinder head cover bolt, 3 - washer, 4 - cylinder head cover, 5 - gasket, 6 - camshaft bearing cover bolt, 7 - camshaft bearing cover, 8 - locating pin, 9 — intake camshaft, 10 — exhaust camshaft, 11 — pin.
Cylinder head (removal and installation) (CB400F). 1 — washer, 2 — cylinder head mounting bolt, 3 — cylinder head, 4 — gasket, 5 — mounting sleeve, 6 — timing drive mechanism bolt, 7 — mounting sleeve, 8 — washer, 9 — timing drive mechanism, 10 — spacer.
Cylinder head (disassembly and assembly) (CB400F). 1 — pusher, 2 — adjusting washer, 3 — cotters, 4 — spring plate, 5 — valve spring, 6 — valve, 7 — oil scraper cap, 8 — spring seat, 9 — valve guide.
Cylinder block (CB400F). 1 - coolant pipe mounting bolts, 2 - coolant pipe, 3 - o-ring seal, 4 - cylinder head mounting bolt, 5 - cylinder, 6 - gasket, 7 - installation sleeve, 8 - retaining ring, 9 - piston pin, 10 - piston, 11 - upper compression ring, 12 - lower compression ring, 13 - oil scraper ring.
Removing and installing camshafts
1. When removing and installing camshafts, the alignment marks must be aligned as shown in the figure.
- - tags,
- - intake camshaft,
- - exhaust camshaft,
- - tags,
- — mark “T”,
- — installation mark on the crankcase cover.
2. The bolts securing the camshaft bearing covers are unscrewed and tightened evenly in 2-3 passes.
Tightening torque 12 Nm
1 - drive housing, 2 - driven gear, 3 - drive gear, 4 - intermediate gear, 4 - locating pin.
1 — installation sleeve, 2 - mounting bolts, 3 - installation sleeve.
Tightening the timing drive mounting bolts is carried out in the order shown in the figure.