Why is it worth ordering spare parts from us?
If you have already selected a suitable option, simply fill out the online form on the website, and if you can’t make a choice, call our consultants. Depending on the nature of the breakdown, we will help you decide on the purchase of rare spare parts for the Izh, Jupiter and Planet motorcycles. All specified components come with a quality guarantee. You will return your vehicle to working order with minimal investment of time and money.
The advantages of working with us are the extensive experience of our specialists in selecting components for Soviet motorcycles, the availability of even rare samples and the supply of only original and high-quality spare parts from reliable manufacturers.
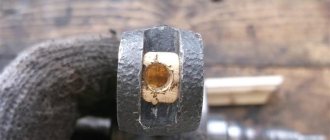
BLITZ FILTER
After leaving half the season with two such filters, I switched to one paper one from Dnepr with a tee for two carburetors. I didn't notice much difference in engine performance. For testing, I installed it on IZH-PLANETA-5 instead of contact oil. The engine clearly began to breathe easier, and the acceleration dynamics improved. It was only necessary to adjust the carburetor to a richer mixture. One of the filters was installed on a “Tula” (a homemade one like a cross-country motorcycle). The result is positive. But the filter quickly ran out - water got in, but the paper doesn’t like it.
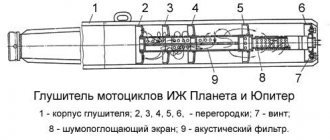
Blitz filter for a motorcycle (a - filter assembly with carburetor; b - blitz filter components):
1 - carburetor; 2 — screw car clamp; 3- sanitary rubber step coupling; 4 — moist paper filter; 5 — moped filter casing; 6 rubber washer-plug; 7 fastening the plug and casing (M6 bolt)
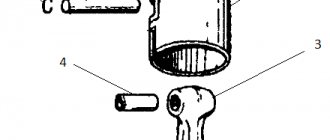
Then the idea of an outer casing arose. The photo shows one of the first options - the “original” oval plastic casing from the \/-50 moped filter. To fasten the casing, I used an M6 screw protruding outward. During installation, it turned out that the clamp screw assembly was in the way, although there was a gap between the casing and the filter. Therefore, instead of a clamp, I wrapped the rubber coupling with “knitting” wire and pulled it together with pliers.
A season of using the filter in this form revealed one problem. The fact is that the casing from \/-50 has small slot windows in the side walls. So, the contamination of the filter opposite these slots occurs much more intensely than the rest of its surface. The solution was found to be very simple: I replaced the moped casing with half a 1.5-liter plastic bottle, making a hole in the bottom for an M6 bolt. Now, firstly, you can install a clamp to secure the filter in the coupling, and secondly, air to the filter will pass through the increased gap between it and the casing.
The inlet diameter of Russian motorcycle carburetors is unified, so my air filter can be adapted to most of them. I installed it on K-62D, K-65U, K-65I, Lkou-2928, K-36B. There were no complaints.
I hope that the simplicity and reliability of the proposed design and the low cost of materials and time during manufacturing and assembly will help fellow enthusiasts when creating home-made structures.
D. RASKAZOV, K a sh i r a
We recommend reading
- IT SEEMED TO BE LITTLE THINGS, bit by bit the experience of processing various materials is collected in each mug. Often, the solutions and technological techniques used by the guys when building models are surprisingly...
- IF THE NEEDLE IS BROKEN To inflate nipple balls, a bicycle pump with a special needle is often used. But it doesn’t matter if it’s broken or you simply don’t have it at hand: with this work it’s quite...
Tuning the IZH Planet 5 engine for those who love their IZH
The legendary model of domestic motorcycle production appeared before the world 3 decades ago, but is still popular. What is the secret of success? Since that time, tuning the Izh motorcycle has captivated thousands of hundreds of motorcycle fans in the Soviet and then post-Soviet space.
Tuning the Izh motorcycle is complemented by excellent technical parameters. The two-wheeled miracle includes a 1-cylinder 2-stroke engine with a power of 22 hp. With. The fuel processing system operates at a modest 5 liters. gasoline consistently delivering 90 km/h. In addition, the model was among the first to receive an air cooling system, increasing traction at low speeds.
The IZH Planet engine lends itself perfectly to various kinds of modifications, and all in order to increase the power of our bike. Therefore, the issue of tuning the IZH Planet 5 engine is very acute.
But what is the best way to start tuning the IZH Planet 5 engine? And you need to start by repressing the crankshaft. It is necessary to replace the crankshaft main bearings with secondary shaft bearings from Java, this will increase the service life of this unit.
Next, in order to increase the working volume of the cylinder, it is necessary to cut off the upper part of the cylinder and bore the liner to 76 mm. A piston from IZH Planet Sport is perfect for this. After tuning the engine, Planet 5 will be able to drive 160 km/h. True, it will be a little scary to drive so fast on such a trough, but still.
A tuned engine will not be able to work with the basic clutch, especially the clutch disc and rear rubber. And this is understandable, because the loads will become higher, and the standard clutch is designed for standard loads. So you need to pull out the discs and replace them with thicker metal discs, this will prevent slipping. The heavier clutch will be offset by increased power and new capabilities.
As an option, when tuning IZH Planet 5, some craftsmen install supercharging, but this is a more complex job, we will talk about it later. In addition, we must remember that a new air filter will better clean the air, because improved air purification will affect the increase in power. Therefore, it is necessary to replace the standard air filter with one of the imported analogues.
Turbocharging on IZh Planet 5 And now let's move on to the almost impossible - putting turbocharging on Planet 5. First you will have to find out what the pump capacity is; in most cases it is 1750 l/min. That is why it is necessary to install a boost driven by the crankshaft, and the inflatable pump must have an impeller speed of at least 10,000 rpm.
When tuning the IZH Planet Sport engine, the exhaust resonator can be of great help to us, as it creates a back-up of the combustible mixture in the form of a resonant wave. And with the help of a slide valve, asymmetrical phases of motor operation will be obtained. To avoid possible problems, it is necessary to install fuel injection. The purging phase will be reduced so much that only the required amount of air will get there.
When tuning the IZH Planet 5 engine, piston lubrication is very useful to reduce friction. Particular load will be placed on the connecting rod roller bearing. The engine chain and crankshaft will not be balanced if the engine chain is slack, so it must be replaced. Under heavy loads, the clutch will not work as usual, which is why it is necessary to ensure that the textolite discs are without damage, and that there is no warping on the metal discs. If you have experience and hands, then you can make the IZH Planet 5 motorcycle very nimble. By the way, Java motorcycles are also great for tuning.
Good day everyone! The sun is shining outside, the season is already in full swing. On the agenda is a continuation of the story about the process of restoring the IZH-Planet 5 motorcycle, which we wrote about recently. Part 1 of the restoration of IZH-Planet-5 Now the motorcycle is completely assembled and the owner just recently picked it up. So here we go. Last time we stopped at completely disassembling the motorcycle. They dismantled everything, checked it for defects, and were horrified by the amount of rust and general fatigue. But if you're afraid of wolves, don't go into the forest. This won't scare us. Having made the right decision, we sent all the black parts (frame, yokes, swingarm, footpegs, headlight, etc.) to be sandblasted and then powder coated. Everything was painted to perfection! All parts are like new. Not a trace of rust. Before painting, as expected, everything was treated with a special primer. In general, this time I did not participate in the global painting, but just found where they do it, brought it and picked it up. We did all this within a week. And this is what happened.
Having brought all the spare parts, I carefully laid everything out and began to think where to start. I didn’t want to assemble the frame without shock absorbers and forks, since I already assemble it in my own convenient order. I decided to start with repairing the suspension, but everything was sad with it! The original shock absorbers were completely rusty and there was no point in rebuilding them. It is obvious that everything is bad here.
Then I had to take the donor shock absorbers that had been put aside from my garage, I thought I’d get them for myself later, but I had to put them into use a little earlier. So, I disassembled all 5 shock absorbers, including the original ones. I took the whole thing apart and put it in gasoline to soak, so that I could then wash it and take it apart to check what needed to be changed.
After pre-washing, I saw that... Yes, a complete finish. All the glasses are rusty, one stem is actually bent. The main thing is that the pistons and washers are all intact. But the glasses, I hoped that they would be better preserved under a layer of oil and dirt (personally, these were perfectly preserved). I’m thinking what to do... The store doesn’t sell new glasses. I had a couple of good glasses in stock, but damn it seems a pity. Oh come on! I brought glasses from stock, they will go to a good cause anyway. Made a small adjustment))
Well, everything is ready for assembly. New silent blocks, seals, glasses. Everything is clean, washed, blown off from dirt. Let's start collecting.
After a little time, the rear shock absorbers were completely ready for use.
Now we begin to reanimate the front fork stays. Things weren't so good with them either. In appearance they somehow did not inspire confidence.
Unscrewing the glass, pulled out the cylinder with the piston. Mother of God, what happened there. In the glass there was some kind of clot of oil and something similar to grease. And the piston was in the same liquid. I decided to put the pipe and piston back in, add a little gasoline and rinse. When I started rinsing, a stream of gasoline ran from under the seals - the seals were simply destroyed.
Well, I started to launder the whole thing. There was so much stuff inside... It took me a long time to wash it all clean.
Started troubleshooting parts. The cylinder liners were already worn out... After measuring all the diameters and checking them with the dimensions in the book, it was clear - change them! I had to go to the bins again and get these bushings)) I had a couple of spare ones lying around just in case my own fork died, but then I so wanted to put it all together that I put in my own spare parts again)))
Having prepared all the spare parts, I began to assemble the ill-fated feather.
After a little time, pouring in the appropriate liquid, the pen came to life and began to work as expected, hurray!!! This made me happy, but when I saw the second unassembled pen, the joy quickly went away... But then it came again, since both pens were brought into working condition.
Finally you can put everything back together! I've been waiting a long time for my favorite part of the build! Let's go! Having replaced the steering wheel bearing races, you can begin installing the traverses.
We put the reflectors back on the fork housings. Well, just like new!
We put on traverses with casings. Soon you can insert feathers.
Before installing the feathers, we put on the rear pendulum and shock absorbers so that the front does not overweight. In general, we ensure sustainability.
Finally, we insert both feathers and align them in height. For convenience, we insert the axle so that they do not warp.
Well, the height is set, everything is leveled. Lock the nut on the traverse. How does everything look... virgin?)))
We put the rebuilt headlight in place. It will no longer interfere with the fork, so you can attach it.
I also immediately assembled all the steps. We bought new rubber bands, otherwise the old ones were already worn out. I also took new cotter pins. After assembly they looked like they came straight from an assembly line.
We install glove compartments with updated rubber bands. We immediately mount the fender liner together with them. The motorcycle is slowly beginning to revive.
Intermediate degree of readiness. The evening was already approaching night and it was time to call it a day. But I stayed for another 2 hours while I had inspiration))
And so another evening ended.
Then the dashboard came to hand. Her appearance was also not camilleaux. Strange, the plastic trim is intact, but the speedometer rim is bent, plus the glass is cracked...
I started taking it apart and realized... I forgot to paint the base of the panel. It completely slipped my mind! Well, it doesn’t matter, I had a good base in the garage, so then I decided to put everything on it.
I disassembled this miracle and started working on the speedometer. Since stores don’t sell glass and rubber bands for it, what did I do? That's right - I went to the basement to get the old speedometer and removed everything that was needed from it)) Well, it would be funny not to buy a new speedometer because of 3 rubber bands and glass.
Now it’s like new, only the numbers are a little faded, but these are minor things.
Now the assembled dashboard is in place. Of course, the inscriptions have already worn out, but the “IZH” mark is there, a new Chinese plastic would look different.
We begin to assemble the wing. We insert rubber bands with bushings into the wing mount, which, as I mentioned earlier, are few left. Original after all)
Now the wing is safely installed. IZH, is that you? Is it possible that with every new detail you regain your original appearance!? Class…
At the back we install a central step with footrests for the driver and passenger; there’s no point in them lying on the sidelines!
Now you can start assembling the steering wheel and putting the wiring in order.
So the engine and frame finally met after almost six months of separation.
The heart returned to its rightful place. Everything is clean and tidy, just the way I like it)))
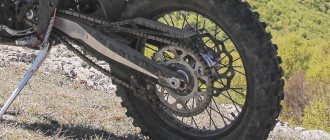
I also finally found the rear casing complete with coupling. The old casing was broken and the sprocket teeth were eaten away. And here everything was better, but everything had to be disassembled, cleaned, painted, and the pads and bearings had to be changed.
Folk art))
While the rear casing was drying after painting, I replaced the bearings and seal in the front wheel. Well, I finally put the wheel in place. More turn signals have been added)
The space under the tank is filled with everything necessary: a coil, a turn relay. They even purchased vibration dampers for the engine so that everything would be fine.
Well, that's it, the casing was installed along with the wheel. The chain is stretched, tensioned, lubricated. HOORAY! IZhik got on wheels. You could say I got off the bandwagon) Just like ships are launched into the water, it’s the same here. Only instead of breaking champagne on the frame, we opened a bottle of oil and poured it into the engine)))
Now we need to prepare the wiring and clean the muffler with the elbow from carbon deposits...
We put all the cables on to check. As it turned out, it was not in vain. Along with the motorcycle, they brought me new cables, which I ordered online. But out of all of them, only one fit; the rest had to be purchased again. But they didn’t fit because in some places there was more cable sheathing, and in others there was less, and for example, it was impossible to adjust the clutch and front brake.
We assembled the steering wheel) The mirrors are not original, but you can see everything much better in them! The view is wider and you can see everything that is happening behind. I installed the wiring first and installed the arches.
Well, something like this)) Then time was spent on the muffler...
That's how he was. Half is covered in oil and dirt, rust in places. And there was... just an indecent amount of soot. Well, we can use zinc, fine sandpaper, gasoline, a gas torch, screwdrivers and chrome polish. I burned the whole thing for about an hour and removed all the carbon deposits, but there was enough of it there! I scraped it out and poured out 6 large piles the size of my palm.
Well, that's a completely different matter! New flange, instead of the old home-made one)) Looks much better already.
The wire clamps under the village were cleaned, polished and put back. The clamps under the tank will already be plastic, since the old ones were no longer cleaned, but were falling apart.
Intermediate readiness. There are still some small things left, but we are moving in the right direction.
Before painting, it turned out that the original tank was no longer able to return to service. When I removed the nigrips (or whatever they are called correctly), they came off along with the metal. But fortunately, I had an unnecessary tank from the A in the garage. I wouldn’t have needed it anyway, so I gave it as a gift, so to speak))
In the meantime, I began to reanimate the saddle. Also, for painting, it was necessary to remove the rear bracket, remove the wing, clean the base, process it and tint it. The bracket was removed, but now it was the wing's turn. And with such rust, it was fraught with turning the internal nuts and completely disassembling the saddle...
And then, out of nowhere, an unexpected passenger appeared. I think what kind of shadow is running. I took a closer look - a spider))) I took a closer look, and the guy was not local, apparently, he arrived with a motorcycle. Then I found his web there))
When he began to unscrew the wing, he crawled under the skin and hid there. I didn’t kick him out, let him live there and then go back home. Damn young traveler))
In the end, there was no surgery and the wing was removed. Then he took it off to wash the saddle, dry it and prepare it for painting. In the end, everything was fine with him.
Meanwhile, the motorcycle was ready for its first start.
While there was no lining, we put on a temporary tank and started it up. Ooooh, it worked quietly and smoothly, which I was very happy about. No unnecessary knocks or other abominations. You can see the video at the link: First launch
I went to get the cladding and installed it on the motorcycle. Yeah, he looks like a handsome guy.
After 2 days I brought the motorcycle home. After the first trip I had to slightly adjust the ignition and carburetor. After that everything worked as expected. A diligent search for carburetor shields also began.
The casings were found. There was no vibration at all with them. Well, I decided to start by taking a ride through the neighboring streets. I drive and drive, I brake at a turn and boom, everything stalls. Stopped, no power. Yeah, the fuse blew out... I’m standing there thinking what’s going on... I connected the battery without a fuse and drove home. I started looking for the problem.
And the problem was this. When I pressed the rear brake, the fuse blew out. I thought the “frog” was closed, but nope. The brake rod sometimes touched the engine and there was a short circuit. After which I moved it a little, wrapped half of the rod in heat shrink and the problem went away. Well, we can start running in))
In general, during the entire period I managed to ride a motorcycle 166 kilometers. For the first 50 kilometers I had to cool down every 10 kilometers, because I felt that I was starting to ride hard. But in the end everything went well)) There wasn’t a single breakdown during this time.
And now, the project can be considered completed. Before sending, you can make a final photo shoot.
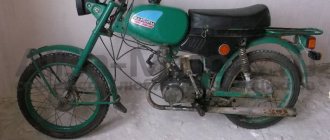
What a handsome guy he turned out to be))) And where did it all begin... With a dead engine.
Complete with a not-quite-live motorcycle.
And as a result of the degeneration, IL became almost like new.
This is the story with a good ending. Another IZH has risen from the trash and is ready to ride again and conquer our vast expanses. I liked this motorcycle because I couldn’t get into it with crooked hands and there was nothing clunky that could add problems. But it wasn’t that easy either, well, we’re not looking for very easy ways. But the end result is worth it. I hope that now it will be stored and used even more carefully. In general, I wish the owner successful rides on it))
Thank you all for your attention Thank you for following the restoration process of this motorcycle. PS Who wants to restore their motorcycle - write. One place is still vacant xD))))