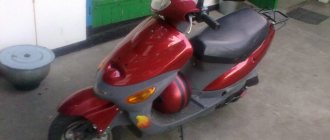
When to adjust the drum brake on a scooter
Adjusting the scooter drum brake is necessary in the following cases:
- Braking performance is reduced.
- The wheel constantly brakes on its own without pressing the brake lever.
- The force applied to the handle is good, the handle does not press, but the scooter does not brake well.
- The handle does not return to its original position on its own, which is why it slows down even after you release it.
- You can hear a squeaking noise from the scooter's drum brake.
Let's consider all the points in more detail:
CONTROL ON THE ROAD
It’s one thing to master the skills of driving a scooter in an empty lot, and quite another to join the hustle and bustle of city streets. Need I remind you that while driving, all your attention should be focused on what is happening around you? If all you are doing is trying to control how you maintain your balance, including when turning, then it’s too early to hit the road.
Riders of 50cc scooters have few legal options for positioning on the roadway. They are instructed to drive in the far right lane, as close to the sidewalk or curb as possible. In life it’s different: you have to drive closer to the middle in order, say, to go around potholes or foreign objects... Blindly following traffic regulations and driving at the very edge is dangerous. What if a pedestrian takes a step off the sidewalk? Or will a careless car owner open the door of his car?.. It’s safe to stay in the middle of the right lane or even a little to the left.
You should not trail along in the same lane with a slowly moving truck or bus. And it’s better not to approach them: it gets boring quickly. In addition, it is so easy to miss an open hatch or brick that your “leader” missed between the wheels.
The difficulty of driving through city intersections is not even heavy traffic, in which it is difficult to maneuver. Multi-level interchanges in modern cities, tricky lane layouts, prohibitory traffic light signs - all this baffles even an experienced driver. Learn by heart difficult sections of the route on frequently repeated routes, master the algorithms for driving through intersections and junctions.
Law-abiding scooter riders are required to remember the restrictions prescribed for them (the main one is the prohibition of left turns on a multi-lane street). Let's hope that the outdated rules will be rewritten to take into account the increased capabilities of scooters, but until then, let accumulated experience and common sense become guides and good advisers when riding.
Poor braking performance
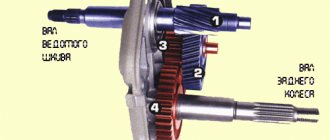
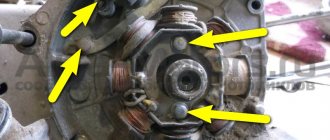
During the operation of the scooter, the linings on the brake pads wear out. Wear of the linings requires more travel of the brake lever, up to its complete depression. The problem is solved by tightening the adjusting nut located near the wheel.
In the case when the nut is tightened all the way, but there is no desired effect, you can move the lever itself, which is located on the cam axis, by 1-2 slots. In this case, you will need to remove the rear wheel.
MOTOUA.NET: The rear brake does not brake well. Dio 35sr. —MOTOUA.NET
Entrance
New user? Registration Help
- >FORUM
- > GARAGE: discussion, operation, repair and tuning of motorcycles
- > REPAIR AND OPERATION OF SCOOTERS (up to 49.9cc)
- 2 Pages
- 1
- You cannot create a new topic
- You can't reply to the topic
The rear brake does not brake well. Dio 35sr.
#1 Strikernia
- Group: Users
- Posts: 1,518
- Registration: 03 March 06
The scooter does not brake well, even if a lot of force is applied to the brake lever.
When you press the brake lever with maximum force, but the braking is not particularly noticeable, although the resistance on the lever is good, you should think about the quality of the linings, their wear and possible contamination. The fact is that oil from the same gearbox seal could get between the brake drum and the brake linings. Naturally, there is no need to talk about any effectiveness after this. In addition, cheap, low-quality pads a priori do not want to perform the task assigned to them, they constantly creak and wear out very quickly. Therefore, it is very important not to save money when buying pads and to give preference to famous brands such as Ferodo and Brembo.
Good day, friends! Today I would like to share my option for replacing the rear drum brake with a disc brake.
Those interested, please take a look 
I think most owners of Chinese (or maybe not Chinese) vehicles sooner or later, often or rarely encountered the problem of very bad brakes... in particular rear brakes, namely drum brakes... Personally, I was 100% convinced of this, since there are no complaints about the front - At least it’s a disc one, but the rear drum just didn’t want to console me with adequate braking in addition to the front one... I was filled with anger, but I didn’t get mad for long. Inflamed with enthusiasm, I decided to get down to business. The information is partially incomplete, since I did not take photos all the time... but I think the essence will be clear... Let's go. Initially, having bought parts (used) in a motorcycle store, namely: the main brake cylinder (left), brake hose, brake disc and caliper... I cleaned them and brought them into divine shape... spitting on the incomprehensibility and relying on my own education and partially collected information began to make drawings and sketches of the future design... Since the drum wheel disk does not itself provide for the installation of the disk, it must be raped first morally, and then mechanically. A preliminary drawing of a certain spacer was awarded to my very good friend, an edge, side, or even whole body friend with a branch of a foundry company in my city... After much waiting, torment, suffering, modifications, redrawings, castings, milling, finally... from the likeness of this drawing:
I received this aluminum blank: As you can see, instead of widened holes, milling was made - this is so that the bolts do not have to be held with a wrench... and the 10 holes were made for M8 with a groove 10 mm deep for the original brake disc bolts... angrily and tastefully))) Most sizes at a glance, but this is for the better - further understandable... Then a short search for materials, drawing all the details 1 to 1, fitting them to each other virtually, so that there were fewer problems in reality) I began to bring the drawing to life. A piece of 3.6 mm iron, a grinder, a round file and a drill, they gave me a part - a bracket for attaching the caliper: While I put it aside and began to connect the wheel and spacer together: It seemed to work, putting the wheel aside I started working on the second shock absorber strut... it not only performs this function, but let it there will be a “stand”... So, we saw the picture - let’s try it on live: Everything seems to be fine, but when I came to the garage and tried it on... to my surprise, not everything is as simple as I wanted. At first I was shocked - the height of the spacer would have been chosen “by eye” and the gap between it and the stand turned out to be too small for the bracket to fit between them: In the end I had to figure out how to place the bracket from the outside - I slightly bent the bracket itself, put washers under mounting the caliper and tried it on: It turned out even better than I wanted - if the spacer were a little thinner, the caliper would simply be impossible to place on the disc, and the bracket has more welding points. Then I welded it semi-automatically, cleaned it and painted it: It’s a pity I couldn’t find the angle - everything is right next to each other...
Using similar fasteners, the tract is laid along the frame
Well... everything seems to be going well... another cup of coffee and thoughts flow like a river again, only the channel is different - to figure out how to mount the mirror on the steering wheel, because the new brake machine did not have a mount for the mirror...
So I had to make fun of the mount... there was very little space and I had no choice but to ruin the original brake handle bracket for the sake of the mirror post... as you can see in the photo - everything is so tight that there is almost no gap, but neither of the two parts complete the necessary functions lost:
On the same day I went to check the new brakes - of course, in comparison with the drum - the earth and the sky) And confidence on the road increased and the fear of finding out how much the rear bumper costs on some Mercedes decreased)))
Thank you for your attention, I hope someone will find at least some of the above useful)
Smooth roads without holes and nails to everyone) Lots of positive and kindness, and since it’s winter - good health!)
Removing fluid
Before starting work, remove excess brake fluid from the reservoir. It’s easier to do this with a syringe, suck it out with a hose, or just pour it out. There should be some brake fluid left at the very bottom, covering the intake hole. Next, place the transparent hose onto the brake master cylinder fitting. Use an open-end wrench to loosen the fixing nut a little.
IMPORTANT! The hose should be constantly immersed in the liquid that you drained from the tank. Before bleeding the front brakes on a motorcycle, you need to remove the old fluid.
It will be dark in color. Using a back and forth motion while pressing the brake, pump the fluid until light (new) fluid comes out. All this time it is necessary to fill the expansion tank. At the end of the work, close the fitting with the key. Bleeding the front calipers involves repeating such actions for each of them.
Upon completion of the work, it is necessary to bleed the system and check whether all the air has escaped.
If you don't know how to bleed the rear brake on a motorcycle, follow this rule: for the rear system, only the slave cylinder needs to be bleed. The front brakes are serviced by bleeding both the working cylinder and two working calipers. This is done because the design of the rear brake master cylinder automatically diverts air bubbles to the expansion tank. It is quite easy to speed up this process - just press the brake for 5 minutes. Moreover, on larger motorcycles, a fitting may be installed on the brake cylinder to bleed air after changing the fluid or servicing the hoses.
After performing the above steps, it is necessary to evaluate the performance of the braking system. The brake lever should never fall through. If this happens, repeat pumping and adding fluid. Often, novice motorcyclists make the mistake of filling the tank right up to the cap after changing the fluid. This is incorrect, the maximum and minimum fluid levels should be marked on the side walls, stick to it.
Remember, pumping (replacing) brake fluid is necessary regularly - at least once every two years, preferably before the start of the summer season. This will protect the brake cylinders from corrosion and give you confidence when riding your iron horse.