Payment for goods and downloading of the book in electronic form (PDF format) is made on the website.
To do this, you need to find the book you are interested in and click on the “Buy” button. The price of the book is indicated on the button.
For convenience, the price on the website for residents of Russia, Belarus and Kazakhstan is presented in rubles.
For residents of Ukraine in hryvnias, and for all other countries - dollars.
After clicking on the “BUY” button, a payment window will open where you can select a payment system with which you can pay for the selected book using any bank card (Visa, MasterCard, MIR, etc.)
When you click on the “Pay by bank card” button, the Portmone payment system will open, which is the easiest way to make a payment.
In addition, the website offers four payment systems for payment:
- Yandex (payment from any bank cards, Yandex Money account, QIWI Wallet, terminals, etc.);
- Portmone (payment from any bank cards, Portmone account);
- PayPal (payment from any bank cards, PayPal account);
- WebMoney (payment from any bank cards, payment from WebMoney wallets).
Payment via Yandex Cashier
After selecting payment via Yandex, the Yandex Cashier payment system will launch, where you need to select a convenient payment method (bank card, QIWI, Yandex Money account, etc.)
After specifying payment details and confirming payment, payment for the goods will occur.
If you have a bank card in a currency other than the ruble, then the money will be debited from the card at the rate of the Central Bank of Russia at the time of the purchase.
This payment method is optimal for residents of Russia, Kazakhstan and Belarus.
Official website of the Yandex Kassa payment system https://kassa.yandex.ru
Outline
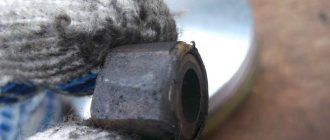
It happens that when installing it back, the stator is installed in reverse, and then depending on your luck: everything may go without consequences, or the spark may disappear or interruptions may appear. To avoid this, any, not just CDI-type scooter generators must be installed exactly as they were originally installed. If you follow this golden rule, you will be happy.
We remove the stator. Installation of the generator is carried out in reverse order.
Source
Payment via Portmone
After selecting payment through Portmone, the payment system will launch, where you need to select the payment method: bank card or Portmone account.
The price in the Portmone payment system is converted into dollars at the exchange rate of the Central Bank of the country where you are located.
If you have a bank card in a currency other than the dollar, then the money will be debited from the card at the rate of the Central Bank of your country at the time of the purchase.
After specifying payment details and confirming payment, payment for the goods will occur.
Official website of the Portmone payment system https://www.portmone.com
Factory puller
The rotor can be removed using either a factory puller or a homemade one. The option with a factory and homemade puller has its pros and cons. I'll start with the disadvantages of the factory puller.
The main disadvantage of a factory puller is its price. A factory puller is very, very expensive. About 500-600 rubles. But price is essentially not a very important criterion for me. Versatility, reliability, ease of use and durability are much more important to me. Unfortunately, the factory puller does not have all these advantages, except perhaps ease of use.
The versatility of the factory puller is zero and, unfortunately, it is only suitable for a certain series of engines. And if you need to repair a scooter that is not widely used in our country, then you will also have to buy a new puller for it. And this will be very, very difficult to do, since tools for rare models of scooters are as rare on sale as spare parts.
The reliability of the factory puller is extremely low. I won’t say that the problem is in the design itself, rather the opposite: the design is more than perfect. And it’s much more perfect. Nut + bolt - that’s all its design.
Payment via PayPal
After selecting payment via PayPal, the PayPal payment system will launch, where you need to select the payment method: bank card or PayPal account.
If you already have a PayPal account, then you need to log into it and make a payment.
If you do not have a PayPal account and you want to pay using a bank card via PayPal, you need to click on the “Create an Account” button - shown with an arrow in the picture.
PayPal will then prompt you to select your country and provide your credit card information.
After specifying the information required to make the payment, you must click on the “Pay Now” button.
Official website of the PayPal payment system https://www.paypal.com
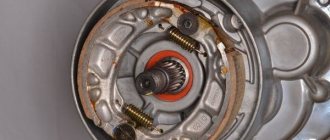
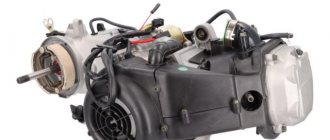
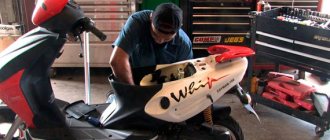
16.31. Scooter repair. Generator - disassembly and inspection
16.31. Scooter repair. Generator - disassembly and inspection
REMOVAL
To get to the generator, it may be necessary to remove the side trim (see Trims - Removal and Installation)
1. Unscrew the screws securing the plastic fan casing.
2. Remove the casing cover.
3. Holding the fan impeller from rotation with your hand, unscrew the two bolts securing it.
4. Remove the impeller.
5. Having secured the generator rotor from rotation using a spacer or a special puller, unscrew the rotor mounting nut located under the impeller with a wrench.
ATTENTION!
Be careful when fixing the rotor with a spacer so as not to damage the generator windings located on the stator.
6. We screw the impeller mounting bolts into place to facilitate the removal of the rotor.
7. Using a two-jaw puller, remove the rotor.
8. Unscrew the stator mounting bolts.
9. Remove the generator stator from the engine crankcase.
Having measured the resistance using a multimeter, we check the absence of breaks in the windings and rectifier diodes. The winding resistance should be 2–5 Ohms.
It is recommended to periodically clean the generator rotor and stator from dust and dirt with a soft brush or compressed air (if possible). The main problems in the operation of the generator arise precisely because of the contamination of its individual parts and the occurrence of oxides on the solder terminals.
ASSEMBLY
We assemble and install the generator in the reverse order.
Next chapter
16. Scooter repair 16.1. Scooter repair. Facings - removal and installation Partial or complete removal of the facings is necessary for most scooter maintenance and repair operations. ATTENTION! The plastic of the scooter is fragile; when removing and installing it, you must
16.1. Scooter repair. Facings - removal and installation Partial or complete removal of the facings is necessary for most scooter maintenance and repair operations. ATTENTION! The plastic of the scooter is fragile; when removing and installing it, care must be taken
16.2. Scooter repair. Spark plug - replacement SERVICE INTERVIEWS It is recommended to replace the spark plug after every 8-10 thousand kilometers. REMOVAL 1. Using a hex wrench, unscrew the bolt of the battery compartment cover located under the seat.
16.11. Scooter repair. Tires - replacement REMOVAL 1. Remove the cap from the valve and press the spool to relieve pressure in the tire. 2. Remove the wheel (see Front wheel - removal and installation or Rear wheel - removal and installation. 3. Set the tire beads off the landing
16.19. Scooter repair. Headlight light - adjustment 1. The direction of the luminous flux of the headlight is changed by turning the adjusting screw. Adjustment is necessary when the road lighting in front of the scooter is poor, when the headlight beam blinds the driver of oncoming traffic, but
16.22. Scooter repair. Front fork - disassembly and assembly DISASSEMBLY Work on dismantling the fork stays is carried out with the lining of the front part of the scooter removed. To make it easier to dismantle the fork stays, it is recommended to remove the fork assembly (see Steering column bearings -
16.27. Scooter repair. Muffler - removal and installation REMOVAL 1. Holding the fixing nuts with a spanner or socket wrench, use a hex wrench to unscrew the three bolts securing the muffler to the pipe. 2. Using a hex wrench, unscrew the three bolts securing the muffler to the frame and
16.29. Scooter repair. Adjusting the valve clearances The rear facings have been removed, the saddle with seat reservoir has been removed, the cylinder head cover has been removed (see Facings - removal and installation).1. Valve clearances are adjusted on a cold engine.
16.35. Scooter repair. Starter Relay - Replacement REMOVAL To remove the starter relay, you must first remove the rear trim of the scooter (see Trims - Removal and Installation).1. Using a hex wrench, unscrew the bolt securing the starter relay. 2. Remove from the starter relay
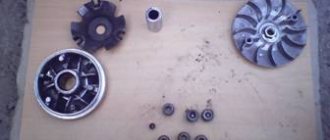
16.36. Scooter repair. Starter - removal and installation REMOVAL To dismantle the electric starter parts, you must first dismantle the variator cover, remove the variator belt and drive pulley (see CVT - disassembling and assembling the drive pulley).1. Unscrew the two screws on the front
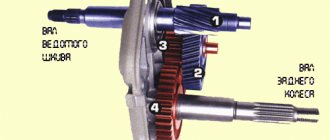
16.37. Scooter repair. Rear gearbox - disassembly and assembly The rear gearbox must be disassembled in case of obvious breakdown (noise, grinding, lack of torque transmission to the rear wheel, as well as noticeable oil leakage). DISASSEMBLY The variator cover is removed, the variator belt is removed.
16.38. Scooter repair. CVT Belt - Replacement REMOVAL (Shown on removed power unit)1. Place the scooter on the center stand.2. Using a hex wrench, unscrew the kickstarter bolt and remove it from the axle. 3. Unscrew all the cover bolts
16.39. Scooter repair. CVT - disassembling and assembling the drive pulley The variator cover is removed, the variator belt does not need to be removed (see CVT belt - replacement)1. Unscrew the nut of the variator drive pulley. To do this, you need to fix the drive pulley: insert
16.41. Scooter repair. Two-stroke engine - disassembly and assembly Using the example of an engine with a separate lubrication system, the engine-transmission unit is removed from the scooter frame (see Power unit - removal and installation), the variator cover is removed, the variator belt is removed, the drive pulley and
16.42. Scooter repair. Four-stroke engine - disassembly and assembly DISASSEMBLYThe engine-transmission assembly is removed from the scooter frame (see Powertrain - removal and installation).1. Drain the oil from the engine (see Engine oil - replacement). (If you do not plan to disassemble the crankcase
16.43. Scooter repair. Oil seals - replacement Lip seals, or oil seals, are used to seal moving joints of mechanisms, to prevent oil from leaking out of the mechanism and from getting water, dirt and dust into it. The difference between an oil seal and a simple gasket
info.wikireading.ru
Payment via WebMoney
After selecting payment via WebMoney, the payment system will launch, where you need to select the payment method: bank card or WebMoney wallet.
If you already have a WebMoney wallet, then you need to log into it and make a payment.
If you do not have a WebMoney wallet and you want to pay in another way, you need to select any of the methods that WebMoney offers and make the payment
After specifying payment details and confirming payment, payment for the goods will occur.
Official website of the WebMoney payment system https://www.webmoney.ru/
How to check the charging relay on a scooter yourself?
A relay regulator, or voltage stabilizer, plays an important role in the operation of modern scooters, the main task of which is to stabilize the voltage. At a moped speed of 60 km per hour, the generator is capable of generating voltage up to 35 Volts, and without its stabilization, this can lead to failure of all the electronics of the moped, including the battery. The article will tell you what a voltage regulator is and how to check it on a scooter.
Four-pin voltage regulator relay for scooter
Downloading a book
After successfully completing the payment (by any method) and returning to the KrutilVertel store from the payment system website, you will be taken to the successful payment page:
On this page you need to indicate your e-mail, where access to download the book will be sent.
If you are already registered on our website, then simply follow the link to your personal account.
The book you purchased will be in your personal account, from where you can always download it.
Please note that after making the payment, you need to return back from the payment system website to the KrutilVertel website.
If for some reason you did not return back to the site and closed the payment system tab with a message about the successful completion of the payment, please let us know - we will send you a letter indicating access to download the book.
Checking the ignition coil
Disconnect the battery and remove the beak on the scooter. We disconnect the connector on the switch and measure the resistance on the coil with a meter. We put one probe in the connector on the black wire, and the second on the negative (green wire). There should be 4 ohms - this means that the wiring and the primary winding of the coil are working properly.
We check the second winding of the coil. We take out the probe from the contact of the green wire and insert it into the candlestick instead of the candle. And we leave the other probe on the contact of the h/w wire. The resistance should be about 7.85 kOhm. This indicates that the second winding, the armored wire and the candlestick itself are in good working order.
Let me remind you that the armor wire and the candlestick separately from the coil have a resistance of 5 - 8 kOhm. Such resistance is needed to suppress radio interference from the spark discharge, so as not to interfere with others listening to the radio in the car or at home. If you make an armored wire and a candlestick without resistance and drive next to someone who is listening to the radio. Then the radio stops working normally and begins to crackle in time with the spark discharge on the scooter (moped).
And if the device shows a break (i.e. does not react at all), then remove and check the candlestick and armored wire separately. If they ring, it means a break has occurred in the ignition coil. It cannot be repaired, it is solid, you will have to replace it with a new one. It's inexpensive and you can always buy it without any problems.
Problems when paying with bank cards
Sometimes difficulties may arise when paying with Visa/MasterCard bank cards. The most common of them:
- There is a restriction on the card for paying for online purchases
- A plastic card is not intended for making payments online.
- The plastic card is not activated for making payments online.
- There are not enough funds on the plastic card.
In order to solve these problems, you need to call or write to the technical support of the bank where you are served. Bank specialists will help you resolve them and make payments.
That's basically it. The entire process of paying for a book in PDF format on car repair on our website takes 1-2 minutes.
If you still have any questions, you can ask them using the feedback form, or write us an email at [email protected]
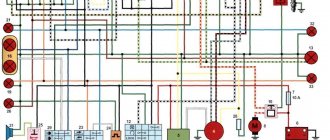
Scheme and principle of operation
The operation of the stabilizer for all models is almost the same and consists in distributing the current supplied from the generator to stabilize it and further distribute it to consumers.
The operation of the stabilizer is almost the same for all models
The main peripheral consumers of the scooter include:
- battery;
- indicators;
- light bulbs;
- sensors;
- enrichment agent;
- other nodes;
- starting enrichment.
How does the stabilizer work? The main principle of its operation is to act as a transformer, which lowers the voltage to an optimal level acceptable for the operation of electrical appliances, and also stabilizes the network and prevents unexpected power surges.
If the relay malfunctions, the scooter’s devices fail, quickly wear out or burn out.
To avoid these problems and their undesirable consequences, you should know the basics of the correct operation of the electrical circuit and voltage components of the scooter (Figure 1).
Voltage relay pinout diagram and wiring for main scooter models