How to remove a scooter's variator
Unfortunately, the task of removing a variator from a scooter engine without the use of special tools turns out to be difficult in practice, and in many cases it is impossible.
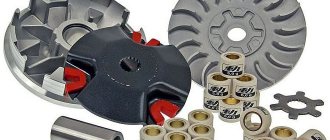
Depending on the scooter model, the front variator impeller may be of different designs, which will require the use of different types of pullers to remove it.
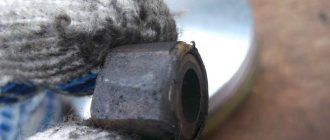
We insert the puller pins into the special holes in the impeller, put a wrench on the nut, rest the puller arms against something or simply hold it with your hand (if you can hold it) and unscrew the nut on the trunnion (right-hand thread). Our puller will be homemade, making it is easy and simple.
The design of the puller is easy to understand from the photo. And what exactly is there to understand? Two plates fastened together with a bolt at the ends of which pins are welded - half an hour of work...
To remove a front variator of a different type, we use a puller of a slightly different design: several scraps with teeth from an old unnecessary variator plate and a piece of a tire are welded to a suitable metal ring so that there is something to hold it by.
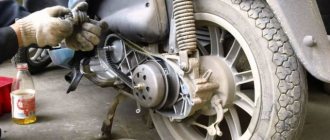
In the same way, we put the puller on the outer pulley of the variator, rest the lever against something or simply hold it and unscrew the nut.
We remove the belt, pry the front variator with your fingers from the inside and remove it from the axle.
In the same way, to remove the rear variator: insert the puller pins into the holes of the clutch drum, rest the puller levers against something or hold them, and use a wrench to unscrew the nut on the input shaft of the rear gearbox.
Remove the clutch drum from the shaft and then remove the rear variator. If anyone is interested in how to disassemble the rear variator, read the article: How to disassemble the rear variator of a scooter
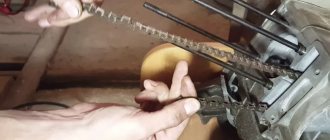
This type of front variator can be unscrewed using a chain puller. For such work, it is advisable to choose a more powerful puller. Something like this.
Carefully wrap the chain around the variator impeller, hold or rest the puller lever against something and unscrew the nut.
Source
Scooter with 2 or 4 stroke engine: which one to choose?
What is the difference between 2 and 4 stroke engines for scooters.
Without going into technical details, we note that when it comes to scooter engines, the principle of “bigger is better” does not work. Many people mistakenly believe that a 4-stroke engine is more powerful or faster than a 2-stroke engine simply because it has more strokes.
In fact, there is no direct relationship. The number of strokes is a purely technical characteristic that shows how many similar movements the engine makes during each of its operating cycles. There are two movements in the cycle of a 2-stroke engine, and four in the cycle of a 4-stroke engine. As a result, the first completes the full work cycle twice as fast as the second. This is where many of the features of scooter movement and operation come from.
Comparison of 2-stroke and 4-stroke engines.
1. Fuel consumption. According to this indicator, a 2-stroke engine is inferior to a 4-stroke engine by about 30%. The fuel consumption of the first is one third more than the second, since during a short operating cycle the fuel burns worse and releases less energy.
2. Dynamism. When it comes to acceleration and maintaining maximum speed, a 2-stroke engine has certain advantages. Due to the fact that the full operating cycle of the motor is completed 2 times faster than that of a 4-stroke unit, the scooter picks up speed faster and behaves more dynamically at high speeds. On the other hand, the movement of vehicles with a 4-stroke engine is smoother and more elastic; acceleration and deceleration do not occur as sharply as in 2-stroke models. However, lovers of high speeds usually choose scooters with a 2-stroke engine.
3. Reliability. Practice shows that scooters with 4-stroke engines are more reliable than those with 2-stroke engines. Firstly, they have a more advanced oil supply system, when every part is literally bathed in it, and secondly, a more complex motor design allows you to reduce the load on its individual parts and increase the service life. On the other hand, repair and maintenance of a 2-stroke engine is much simpler and therefore cheaper than a 4-stroke engine.
So which engine should you choose a scooter with?
If you need a simple unit, with low weight, high speed and easy repairs, then we recommend choosing a scooter with a 2-stroke engine. A vehicle with a 4-stroke engine will cost a little more, require more thorough maintenance and complex repairs if necessary, as well as constant oil changes, although it will save money on gasoline, last longer and provide more comfortable driving (smooth and soft). Which of these is more important is up to you to choose.
Photo report: Repair of engine 157 QMJ of Atlant scooter (150 CC)
This article will show only the main stages of assembly and repair of the 157QMJ engine, which is very popular in Russia. If you describe the entire assembly process from start to finish, the article simply will not load in your browser. Therefore, for your convenience, at the end of the article and more, there are links that will lead you to where any stage of assembly and disassembly of a mechanism or assembly is of interest to you will be described in more detail.
It is worth noting that the 157QMJ engine is very simple in design, so to repair it there is no need to install additional pullers or devices. The engine that we will be assembling today was very worn out, so much so that there is nothing to talk about here. Whether you like it or not, you will have to change almost all the parts, from oil seals to the crankshaft. More details about disassembling this engine are written in the article: Disassembling the engine 157 QMJ of the Atlant scooter (150 SS)
So, first we clean off the remnants of old gaskets and sealant from the planes of the crankcase halves; if necessary, we “drive” the threads under the mounting bolts; by the way, we also do not forget to “drive” the threads on the bolts.
We blow through the oil channels with a compressor, thoroughly clean all parts from dirt and wash them.
Take the crankshaft and insert it into the right half of the crankcase.
We turn the engine around, take the key of the overrunning clutch and insert it into the groove on the axle.
Lightly tap it with a hammer, making sure that it sits evenly in the groove without distortion.
We insert the oil pump drive axis into place.
We take the oil pump drive chain (in our case the chain is new), put it on the oil pump sprocket, then put it on the middle sprocket of the crankshaft, then put the pump sprocket on the drive axis.
Please note: the oil pump drive chain must be placed on the middle sprocket of the crankshaft.
We insert sprockets, a tin rod or a stick under the tooth and tighten the nut on the oil pump axis.
Screw the oil pump drive housing into place.
We take the overrunning clutch body, put it on the axle, turn the body so that the key on the axle fits into its groove on the body, then push the clutch all the way.
Insert the starter idler gear shaft
We put the starter intermediate gear on the axle
We put the overrunning clutch gear separator in its place.
We put the overrunning clutch gear on the axle
We put on the washer, thoroughly clean the threads of the trunnion and the nut, then degrease it, apply a “blue” locking agent to the threads (preferably) and using an old unnecessary screwdriver and hammer, tighten the nut (left-hand thread).
Photo report: Dismantling the engine 157QMJ of the Atlant scooter (150CC)
The 157 QMJ engine with a volume of 150 CC, which we will be disassembling today, is installed on scooters that are very popular in Russia and have different trade names: Atlant, Racer, Pioneer; there is no particular point in listing all the scooter models on which this engine is installed.
What can you say about this engine? In general, the engine is not bad, there is little potential for tuning, it has a very reliable kickstarter mechanism, this engine is equipped with a powerful generator that allows you to install additional electrical appliances, and so on. etc.
Unfortunately, it will not be possible to place all the stages of engine disassembly in one article, therefore, by analogy with previous articles on engine disassembly, the article will contain links that will lead you to a page where the disassembly of an individual mechanism or assembly will be described in more detail.
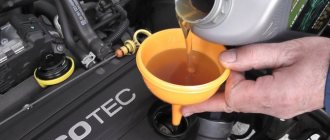
We drain the oil, place the engine on some clean surface and begin disassembling the engine by removing the piston; how to remove the piston is described in detail in the article: How to remove the piston from a scooter engine
We unscrew all the fastening bolts on the engine cover and tap it with a wooden mallet on all sides.
We remove the cover without losing the guide bushings - there are two of them (marked with arrows).
Remove the starter idler gear
Using an old unnecessary screwdriver and a hammer, unscrew the overrunning clutch nut (left-hand thread).
Remove the nut and washer
Remove the overrunning clutch gear from the shaft
Unscrew the two bolts on the oil pump housing
Remove the overrunning clutch from the axle
Please note how much the oil pump drive chain is stretched - it will have to be replaced.
We remove the key from the trunnion
We insert a tin rod or stick under the tooth of the oil pump sprocket and unscrew the nut.
Remove the sprocket from the oil pump drive axis along with the chain
We take out the oil pump axle and put it somewhere away
Unscrew the last mounting bolt
We tap the crankcase halves on all sides and separate them, without losing the guide bushings (shown by arrows).
We insert a slightly sharpened rod into the center of the crankshaft journal and use a hammer to knock the journal off the kickstarter gear (one gentle blow is enough for this).
We remove the crankshaft and timing chain from the half
Source
Chinese scooter engine
Most Chinese scooter owners eventually face engine repairs. And here the problem arises in finding spare parts; many try to find spare parts for the name of the scooter, which is printed on the scooter itself as stickers. Most often, it is almost impossible to find spare parts for a Chinese scooter by model name. Because Chinese manufacturers rarely stick to one name for scooters, every year developers can visually release the same model under different names. How to find spare parts and what engines are on scooters, you will learn from this article. Often, the name of the scooter does not help in finding spare parts; in this case, the engine marking will come in handy. There are several types of Chinese engines. The Chinese do not develop new engine models, nor do they modify or upgrade engines. The Chinese are copying existing models of Japanese engines that have been discontinued. The engine that is on your Chinese scooter is identical to the Japanese engines on Honda, Suzuki, Yamaha scooters that were produced 15-20 years ago.
In this article we will talk about the most famous models and try to clearly explain the markings of Chinese engines.
Every Chinese scooter is equipped with an internal combustion engine, which is divided into two types: two-stroke and four-stroke. All engines have their own markings on the crankcase. The marking consists of a set of numbers and letters, and can tell, for example, about the manufacturer, engine size, piston diameter, number and location of the cylinder.
When searching for spare parts for a Chinese scooter, it is very important to find out the engine markings; most often they are stamped on the left side of the engine crankcase itself. Below is a list of letter designations.
Characteristics of the third letter in the engine marking A - up to 50cc (cc); B – up to 70cc (cube); G – up to 100cc (cube); N – 100 to 125cc (cube); I – 120 to 125cc (cube); J – 150cc (cube); L – up to 200cc (cube); M – up to 250cc (cube);
Additional letter designation P – horizontal engine; Q – forced air cooling (impeller); F – air cooling by oncoming (counter) flow; M – the engine is suitable for motorcycle equipment;
Let's look at an example of 139QMB engine marking below. The top designation is a characteristic of the engine, and the bottom row of numbers contains the number of the engine itself.
Decoding of the engine 139QMB, 139QMA (1Р39QMB / 1P39QMA): — Number 1 tells us about the number of cylinders (there is just one); — The number 39 indicates the diameter of the piston or cylinder; — The letter Q means that the engine has forced air cooling; — The letter M usually means that the engine is suitable for motorcycles; — The letter A or B marks an engine with a volume of 50-70cc (cube).
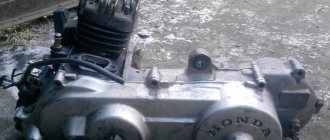
If you have the marking 1P39QMB / 1P39QM, then the letter P will mean a horizontal arrangement of the cylinder. For greater clarity, we will give an example of exactly what the 139QMB engine looks like.
Next, consider an engine such as 157QMJ (1P57QMJ). This engine has a volume of 150cc (cube), scooters with this engine usually look larger than usual. And their speed is an order of magnitude higher than ordinary “fifty kopecks”. The marking of such an engine is very similar to the example above, so we will not go into detailed research and will only talk about the main technical points.
Decoding of the 157QMJ (1P57QMJ) engine: — Number 1 tells us about the number of cylinders (again, there is only one); — The number 57 indicates the diameter of the piston or cylinder; — The letter Q means that the engine has forced air cooling; — The letter M usually means that the engine is suitable for motorcycles; — The letter J marks an engine with a volume of 150cc (cube). If you have the marking 1P57QMJ, then the letter P will mean the horizontal position of the cylinder.
Actually, the appearance of the 157QMJ engine itself is very different from the “fifty-kopeck” one; you can immediately notice the large elongated shape of the variator cover, as well as the kickstarter lever rotated 180 degrees.
Also found in scooters are engines - 152QMI (1P52QMI). Engines 152QMI and 157QMJ differ only in piston volume and diameter. Because The 152QMI engine has a displacement of 125cc (cube).
Decoding 152QMI (1P52QMI): — Number 1 tells us about the number of cylinders (again, there is only one); — The number 52 indicates the diameter of the piston or cylinder; — The letter Q means that the engine has forced air cooling; — The letter M usually means that the engine is suitable for motorcycles; — The letter I marks an engine with a volume of 120-125cc (cube). If you have the marking 1P52QMI, then the letter P will mean a horizontal arrangement of the cylinder.
Before this, we talked about engines that are installed on Chinese scooters. Now let’s look at the engines that can be found on mopeds Alpha (Alpha), DELTA (Delta), etc. These engines do not provide forced air cooling, but use “natural” free-flow cooling. These engines also use a gearbox; it can also be automatic, semi-automatic (without a clutch handle) or manual.
Let's look at the example of the 139FMB (1P39FMB) engine, which is installed on most Chinese mopeds with an engine capacity of 50-70cc (cc).
Decoding 139FMB, 139FMA (1P39FMB / 1P39FMA): - Number 1 tells us about the number of cylinders (again there is only one); — The number 39 indicates the diameter of the piston or cylinder; — The letter F means that the engine is air-cooled by free flow; — The letter M usually means that the engine is suitable for motorcycles; — The letter A or B marks an engine with a volume of 50-70cc (cube). If you have the marking 1P39FMB, then the letter P will mean a horizontal arrangement of the cylinder.
And in this photo we see the complete absence of side cooling casings for the cylinder; everything is open here and there is no forced cooling fan. The entire engine cooling process occurs due to the counter flow of air.
This was an example of a 50cc engine, but there are other engine models such as 147FMD, 152FMH. Visually they are similar with the 139FMB engine. The main difference between them is only in the piston diameter (engine volume), and in some aggregate components, for example, the location of the starter, the type of clutch, etc.
Based on the main options offered, you can easily make out the numbers and letters in the markings of your engine and easily find all the spare parts you are interested in.
How to unscrew the variator nut on a 157 qmj engine
[sc:ads1] Despite the fact that the variator is one of the most durable and wear-resistant components of two-wheeled vehicles, sooner or later the motorist faces the problem of replacing it. A beginner inexperienced in the intricacies of motor mechanics, in view of the widespread opinion about the ease of operation and maintenance of minibikes, will most likely consider this a piece of cake, but everything is far from so simple .
Replacing a CVT in a home garage is quite difficult. The reason is that to dismantle this unit you must have dexterity (that is, straight hands), an understanding of the structure of the vehicle being repaired and, most importantly, specified tools.
If the first and second are purely a matter of profit, then the availability of the necessary repair kit will not be solved by itself. At specialized service stations, the variator is replaced using special pullers, which are provided by official representative offices of brands or are made independently by Kulibin motorcycle mechanics.
The main difficulty in removing the variator from a scooter is fixing the pulley and moving parts. To do this, it is necessary to have pullers suitable for the specific design of the vehicle assembly. This holder is available in several versions.
It can consist of two plates connected in the middle with a bolt (like scissors), with pins welded to the edges. The principle of operation of the tool is to fix the impeller. To do this, puller pins are inserted into the holes on it. Then, using a wrench of a suitable size, the nut on the axle is unscrewed and the variator is dismantled.
There is another design for a homemade puller. It consists of a ring slightly larger than the outer pulley with the teeth of a used variator plate welded along the inner circumference. For convenience, the tool is equipped with a handle holder. Despite the fundamentally different design, the principle of operation of such a puller is similar - fixation.
How to remove the variator cover on a scooter
I can’t remove the variator cover. The bolts are set to 8. I try with a wrench and they lick off. What should I do? Such parts must be removed with sockets and not wrenches.
Tap the bolts lightly with a hammer. You only need to unscrew it with socket wrenches.
So I unscrewed them
cut it, put new ones
tap the edge of the bolt with a chisel, so basically they tear off (do not confuse with tear off, tear off, move from dead point) the bolts on the plugs if they are stuck
or pull tight and then try to unwind
Didn't help. Fucking CHINA.
take it with a clamp (and if nothing else helps, weld the M8-M10 nut should unscrew) I unscrew the studs on engines like this (I work on car restoration) and come and unscrew the 60-year-old bolts that are all rusty and stuck.
Most likely your heads are Chinese, unscrewing them with crappy heads is not a problem! But there is a way! Usually in cheap kits or American ones there are heads of non-standard size three-eighths or the like, measure with a caliper, look for a head of about 7.5 mm, hammer it with a hammer and unscrew it, do not cut off the bolts, if they are tightened well, then you will not unscrew them with an extractor! But in my opinion, the whole reason is the quality of the tool you use. I sell it and use it often.
(05.14.2009, 19:49) ——————————————— Me too. When I first unscrewed it with a weak head, I couldn’t, it straightened out. Find a good one better than one made in Novosibirsk, they are six-piece and when overloaded they burst and do not stretch. A CVT for a scooter is like a gearbox for a car. In principle, this is the gearbox. The rear variator is a manual continuously variable transmission. As a rule, all modern scooters are equipped with a V-belt variator. The peculiarity of its operation is that it works depending on the engine speed and despite the number of loads. If the scooter's rear variator is worn out, it can be easily felt while driving. The scooter loses its smooth ride, acceleration speed and maximum speed drop. It is not comfortable to ride a scooter for the reasons mentioned above. The rear variator of a scooter is also called a centrifugal clutch. The operating principle of a centrifugal clutch is quite simple. At certain engine speeds, the clutch automatically connects the secondary shaft of the variator with the gearbox, this ensures a smooth start of the scooter from a standstill. To ensure comfortable travel, the rear variator must always be in good working order.
A scooter's variator (centrifugal clutch) usually lasts for more than one season. In Japanese scooters this can be 5 years or more. But even despite such excellent service, sooner or later he becomes unfit for service. To make it last longer, you need to disassemble the scooter’s variator before each season and evaluate its condition. Even for minor tuning of the variator, it needs to be completely disassembled.
Dynamic capabilities
Two-stroke. Due to its short operating cycle, it allows the scooter to pick up speed faster, while the response to turning the gas lever is more sensitive. Purely in terms of sensations, riding such a vehicle, especially at high speeds, is comparable to riding a sports motorcycle. Connoisseurs of high speeds, this is your choice.
Four-stroke. Scooters with such an engine, due to the longer stroke of the latter, provide “elastic” acceleration and smooth, smooth movement. The vibrations that the motor creates are almost imperceptible, even if you drive at high speed. This provides significantly greater comfort while riding and makes it easier to control the bike.
Dismantling the rear variator of a scooter
To disassemble the variator you need to remove the variator cover; it is secured with several bolts. For example, in a Honda dio scooter, the variator cover is screwed on with 6 bolts, which require a 13 socket head.
Now that you have removed the variator cover, let's begin disassembly. It is not necessary to remove the variator belt.
Even if you don’t understand what a scooter’s rear variator or centrifugal clutch is, you can navigate all the terms listed in the article from the photo. And you will need the terminology and name to order parts that have failed. By the way, at the end of the article there will be a video that will help you clearly see how the rear variator on a scooter or moped is disassembled.
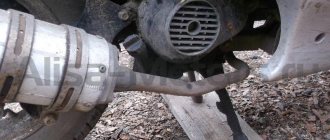
Removing the generator
But with a generator it’s not so simple. The generator can only be removed with a puller. All your attempts to knock down the rotor with a hammer or pry it out with a crowbar are doomed to failure.
Unscrew the bolts on the cooling impeller and remove it and the rotor
Fix the rotor with a puller and unscrew the nut (right-hand thread)
Install the puller and pull the rotor off the crankshaft journal
We blow out the generator, unscrew the bolts and put it somewhere away
LAA1P39FMA09013521
The next letter P will tell you about the location of the engine. It can be horizontal or vertical. The horizontal model contains the letters P in the number; the vertical engine does not have this letter.
| A, B - up to 50 cm3 |
| G – up to 100 cm3; |
| N – from 100 to 125 cm3 |
| I – 120 – 125 cm3 |
| J – 150 cm3 |
| L – up to 200 cm3 |
| M – up to 250 cm3 |
As mentioned above, often the designation does not correspond to the actual volume, but deviations usually occur with scooters with a minimum cubic capacity.
But the next 6 digits, in our case it is 013521 , are the engine number. For example, our model is 13,521 in production order.
As you can see, the engine number of a scooter says a lot. Everyone should know this information about their iron horse.
You can also read other articles on the topic:
Source
How to Remove the Variator Cover on a Scooter
How to remove a variator on a scooter?
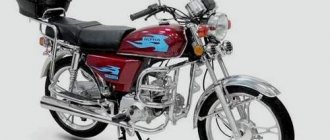
The design of a scooter is quite different from ordinary mopeds and bikes, because instead of a chain, traction is transferred to the rear wheel using a variator, inside of which a belt is placed. Specifically, the scooter's variator is considered one of the higher-quality components of the scooter, because it is made of strong materials and is designed for enormous loads. But even a variator breaks down at some point, so the question arises: how to remove the variator on a scooter?
Despite the simplicity of the scooter design, removing the rear variator on a scooter will not be so easy; you need to have some knowledge and tools, otherwise there is a possibility of destroying the variator parts. Also keep in mind that depending on the scooter model and country of manufacture, different tools may be useful, so they should be selected according to your scooter. It is also necessary to have special pullers.
How to remove a variator on a scooter?
First, we remove the variator cover; inside we see a complex structure, where the main parts are the front and the variator. In most cases you will have to remove the front variator
, it holds most of the parts, including the belt. Removing the front variator begins with unscrewing the drive pulley nut; its size may also vary. To tighten the nut, take a screwdriver and insert it between the gear and the housing (seen in the picture), this is necessary so that the variator does not spin while unscrewing the nut.
Removing the piston
We clean and blow off the cylinder connectors, cylinder heads and valve covers. Unscrew the bolts on the valve cover and remove it from the head
Unscrew the nuts and bolts on the cylinder head
Remove the camshaft bed. The camshaft bed is practically not subject to wear. After removing it, just wash it and check for cracks.
We remove the chain from the camshaft and take it out of bed. The camshaft has two problematic points that are worth paying attention to: wear of the support bearings and the working surfaces of the cams
The cylinder, head and camshaft bed are centered relative to each other using guide bushings. These bushings tend to fall out of their sockets and then try to find it. To avoid this, immediately remove the bushings and put them somewhere away. Here and below, the bushings will be indicated by arrows.
Remove the cylinder head. The cylinder head is the most vulnerable part of the engine and the operating parameters of the engine directly depend on its condition. To avoid problems later: the head must be completely disassembled, inspected for cracks, the valve seats cut, new valves installed, the valves ground into the seats, new oil seals installed and the plane ground in on a plate or milled
Design Features
Structurally, scooters equipped with two-stroke engines are simpler and more compact. Since the operating principle of such a power unit is simpler, just as the lubrication and gas distribution system is free of technical difficulties.
All working cycles in 2T take place within one revolution of the crankshaft (in 4T - within two). Motorcycles with a 4-stroke engine are larger and heavier, but they look more massive and bold. And this is already a matter of aesthetic taste.
Also, the four-stroke engine is designed for a longer service life, it is more reliable - up to 5 seasons on one piston. Some popular models: RACER Neo RC50QT-3X, Motoland PALADIN 150, Yamaha NMAX 150.
How to remove a variator on a scooter?
The design of a scooter is quite different from ordinary mopeds and motorcycles, because instead of a chain, traction is transferred to the rear wheel using a variator, inside of which there is a belt. It is the variator of a scooter that is considered one of the highest quality components of a scooter, because it is made of durable materials and is designed for heavy loads. But even a variator breaks sooner or later, so the question arises: how to remove the variator on a scooter?
Despite the simplicity of the scooter design, removing the rear variator on a scooter will not be so easy; you need to have some knowledge and tools, otherwise there is a possibility of damaging the variator parts. Also note that depending on the scooter model and country of manufacture, the tools you need may vary, so they should be selected according to your scooter. You also need to have special pullers.
Types of scooters
Mini scooters or with a volume of up to 50 cm3
These models come in small sizes, ideal for children, or standard ones. Wheel diameter can vary from 8 to 14 inches. It is not difficult to choose a device for both children and adults.
The main difference between this category is the ability to drive around the city and on the highway without a license. Of course, no one is exempt from following the rules. This is a good option for a teenage child or an elderly person to go shopping and visit.
Advantages:
- various types of design, from classic to aggressive;
- there is a built-in alarm system;
- models for 1.5-2 people;
- reinforced suspension;
- fast acceleration;
- low cost;
- There are low models for children;
- also available with 14-inch wheels;
- quiet engine operation;
- low fuel consumption.
Flaws:
- maximum speed 50-60 km/h;
- Depending on the country of assembly, minor damage may occur;
- small fuel tank reserve;
- the passenger practically hangs on the edge of the seat.
Medium scooters or with a volume from 50 to 250 cm3
This is the most popular class of equipment due to its good combination of speed, power and cost.
Such devices have an engine capacity from 50 to 250 cm3 and their operation requires a driver's license. Their wheel sizes vary from 12 to 14 inches, and the maximum speed ranges from 80 to 120 km/h.
The reinforced suspension allows them to be used not only in the city, but also when traveling to the countryside and fishing. It is easy to get on it to the neighboring city within a radius of 100-200 km. This is an option for young and old people to commute to work every day, perhaps even from the suburbs, or to get to a fishing spot.
Advantages:
- beautiful alloy wheels;
- interesting streamlined design;
- good headlights;
- hydraulic disc brakes;
- acceptable speed;
- average cost;
- the ability to travel far beyond the city limits;
- moderate fuel consumption.
Flaws:
- a license is required, which excludes driving by teenagers (14-15 years old);
- The suspension is not well assembled everywhere.
Maxi scooters or with a volume over 250 cm3
These models resemble modern motorcycles in appearance. They have wide upholstery, two full seats, comfortable foot rests, and a taller windshield. The models have more power and are capable of reaching speeds of up to 180 km/h.
The devices are liquid cooled and can travel long distances without overheating. Such scooters are suitable for those who like to travel long distances or active young people.
Advantages:
- aerodynamic fairings;
- durable frame;
- powerful engine;
- good management;
- hydraulic brakes;
- spacious fuel tank;
- full seats for two people;
- high speed.
Flaws:
- high fuel consumption;
- very high cost.
How to remove a variator on a scooter?
First of all, we remove the variator cover; inside we see a complex structure, where the main parts are the front and building variators. Most often you will have to remove the front variator; it holds most of the parts, including the belt. Removing the front variator begins with unscrewing the drive pulley nut; its size may also vary. To tighten the nut, take a screwdriver and insert it between the gear and the housing (seen in the picture), this is necessary so that the variator does not turn while unscrewing the nut.