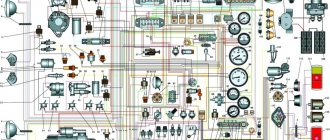
Hyundai Solaris 1 The next generation was introduced in 2010. Produced in 2011, 2012, 2013, 2014, 2015, 2021 and 2017 with sedan and hatchback bodies, mainly with 1.6 and 1.8 liter petrol engines. During this time, Solaris underwent restyling. In this material you will find a description of the fuses and relays of the Hyundai Solaris 1 with block diagrams, photos - examples of execution and locations. Note the fuse responsible for the cigarette lighter.
The purpose of fuses and relays in Hyundai Solaris 1 units may differ from those presented and depend on the level of equipment and year of manufacture. Check the purpose with the diagrams on the back of the protective cover.
Block in the cabin
Located under the instrument panel on the driver's side. To gain access, remove the protective cover.
Circuit breakers
Example of a circuit from a block cover
Scheme
Description of fuses
| 1 | 15A FRT-Deicer - Heated windshield |
| 2 | 15A P/OUTLET – 12V socket |
| 3 | 10A C/LIGHTER – Cigarette lighter |
| 4 | 10A ACC - Ignition switch - audio system, body electrical equipment control module, automatic transmission lock control module, electronic key system control unit |
| 5 | 10A A/BAG IND - Airbag deactivation indicator - front |
| 6 | 10A A/BAG - Airbags, SRS control module |
| 7 | 10A T/SIG Emergency - light signaling |
| 8 | Reserve |
| 9 | Reserve |
| 10 | 15A R/WPR - Rear window wiper - motor, Multi-function switch |
| 11 | Reserve |
| 12 | 10A RR (R/FOG) - Fog lights (rear) |
| 13 | 10A FRT (F/FOG) - Fog lights (front) |
| 14 | 10A ROOM 2 - Battery charge saving relay (automatic protective shutdown) |
| 15 | 15A STOP LP - Stop lights |
| 16 | 10A CLUSTER — Instrument cluster |
| 17 | 10A IG1 1 - Security system control module |
| 18 | 10A ABS - hydro electronic ABS module |
| 19 | 10A B/UP LP - Rear running lights (switch) |
| 20 | 10A PCU - Control module, body electrical equipment control module, automatic transmission lock control module, electronic key system control unit |
| 21 | 10A H/LP LH - Headlight - left |
| 22 | 10A DAY TIME RUNNING LIGHT - Daytime running lights |
| 23 | 15A HAZARD - Hazard warning switch |
| 24 | 25A SMK 1 — Control module, body electrical equipment control module, automatic transmission lock control module, electronic key control unit |
| 25 | Reserve |
| 26 | 10A SMK 2 - Control module, body electrical equipment control module, automatic transmission lock control module, electronic key control unit, engine start and stop button switch |
| 27 | 15A TCU - Speed sensor Automatic transmission range sensor. Pulse generator |
| 28 | 15A IGN COIL - Ignition coil 1-4, capacitor |
| 29 | 10A IGN 2 - Electric glass lifts. Luke |
| 30 | 25A F/WPR - Windshield wiper |
| 31 | 20A DOOR LOCK - Central locking - control unit |
| 32 | 25A SAFETY P/WDW – Electric glass lifts – locking |
| 33 | 15A S/HEATER — Heated front seats |
| 34 | Reserve |
| 35 | 10A ROOM 1 — Interior lighting. Air conditioner |
| 36 | 20A AUDIO - Audio system |
| 37 | 10A TAIL LH - Headlight and lantern on the left side. License plate light |
| 38 | 10A TAIL RH - Headlight and lantern on the starboard side. Illumination of switches, switches in the cabin, selector lever. Instrument cluster, power and switch buttons |
| 39 | 10A START - Starter - relay. Anti-theft alarm |
| 40 | 10A H/LP RH - Headlight - right |
| 41 | 25A P/WDW LH - Window lift control unit - left rear switch |
| 42 | 25A P/WDW RH - Window lift control unit - rear right switch |
| 43 | 10A HTD MIRR — Heated exterior mirrors |
| 44 | 10A A/CON 2 - Air conditioning |
| 45 | Reserve |
Fuse number 3 for 10A is responsible for the front cigarette lighter, and fuse number 2 is for 15A for additional sockets.
You can find out more information about how to replace the fuse on the cigarette lighter in the 1st generation Hyundai Solaris by watching this video.
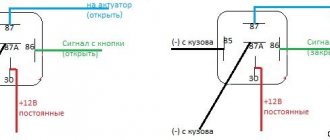
Relay
There may be some relays located on the back of the block.
Scheme
Relay decoding
- MK1 Rear window heating relay
- MK2 Fog lamp relay
- MK3 Fog light relay
- MK4 Side light relay
- MK5 Interior lighting relay
- MK6 Heated windshield relay
- MK7 Central locking relay
- MK8 Reserve
- MK9 Reserve
- MK10 Alarm relay
- MK11 Power window relay
- MK12 Reserve
- MK13 Electronic control relay for brake signals (installed outside the unit)
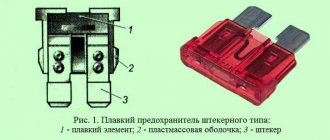
What is a fuse?
The fuse protects the vehicle's electrical circuits from excess voltage, which could melt the wires and cause a fire in the cabin. If the permissible voltage is exceeded, the fuse blows and melts, and current stops flowing through the wires.
Therefore, failure of any device, from heated seats to air conditioning, can only be caused by its failure. A simple replacement of a small element will completely restore normal operation.
It is impossible to unequivocally answer the question, which Hyundai Solaris fuses are most important? Some of them are responsible for peripheral and service systems, some for the operation of core systems, but none should be allowed to fail.
Regular checking of each and timely replacement will help avoid problems. Sometimes a blown fuse indicates the presence of serious problems with the power supply, so the failure of several in a row may be the reason for an extraordinary vehicle inspection.
Fuses are sold in blocks of 10 pieces, this is convenient, they can be immediately purchased in a set, which will be used for a long time.
Where are the fuses located in the passenger compartment and in the hood?
The interior fuse box is located in the vehicle interior, on the driver's side, to the left of the steering wheel. The unit is closed with a plastic cover that can be easily opened by hand. To see the diagram, you need to open the compartment cover.
The diagram is a table in which devices are depicted in pictograms and instructions are given on their ratings; almost all of them have a current strength of 10-15 A. For convenience, they are also equipped with alphanumeric symbols that will help the car owner navigate by determining the relationship between the designation on the diagram and decoding given in the technical documentation.
Please note that the yellow clip in the middle of the block contains 2 fuses at the same time.
Thus, the F2 symbol hides the protection of the electronic key system, F5 controls all electrical equipment of the body, F7 controls the air conditioning, F17 controls the heated front seats. The diagram will indicate its location on the block.
Thus, on the block, the seat heating fuse will be located in the top row, second from the right. Their numbers are not written on the fuses themselves, only the rating; you will have to navigate according to the proposed diagram. The red ones are rated at 10 A, the blue ones are 15 A, the yellow (one) is 20 A and the whites are 25 A.
If the car owner has several already purchased parts of different denominations, if they burn out, the driver will be able to replace them himself, without wasting time going to the store. The burnt-out part simply melts from a small plastic plate on the side and top, which can be determined by visual inspection.
In addition to the main ones, there are also redundant, spare relays, they are hidden under the numbers F3,13,36. Also located in the cabin are fuses for long-term parking; they are significantly larger in size and yellow in color.
The electrics of the hood and trunk depend on the unit, which is located in the engine compartment. It is a small plastic box, on the lid of which there will be a diagram of the location of the protective devices.
It is less clear, some details are marked larger, some less clearly. The rating of the elements ranges from 10 to 125 A; accordingly, the sizes of the parts are also different.
In total, there are 41 fuses in the block in the hood, among them:
- F1 – control of the electric power steering wheel;
- F3 – heated rear window;
- F7 – wiper operation mechanism;
- F9 – oil supply valve;
- F13-14 – headlights;
- F28 – main relay of the engine compartment.
The 2021 models also have another small block in which fuses are located that are responsible for heating the wipers. A small plastic box is located to the left of the center of the hood.
Replacing fuses located in the engine compartment
The replacement operation is carried out in the event of a failure of the fuse or relay located in the engine compartment block. The car owner will need a new part of the appropriate value, gloves and tweezers to remove it.
Work algorithm:
- disconnect the negative terminal from the battery, wait at least 10 minutes;
- release access to the block by squeezing two plastic latches;
- remove the black plastic cover of the unit;
- find the desired element by first determining its location on the diagram, and then finding it on the block. It will be possible to detect a burnt-out one by the melted jumper;
- carefully remove the part with tweezers;
- Insert a new one to replace the burnt one.
As standard, the block is equipped with fuses with short contacts, but if it was not possible to purchase one, it can be replaced with a more popular part with long contacts.
Larger fuses in the motor block may also fail; depending on their rating, they are blue or white. This element can be easily removed with your fingers – you just have to pull the plastic casing. A new one is also installed manually.
Failed relays are also replaced in the same way. It is important that, simultaneously with replacement, it is necessary to establish the cause of the malfunction by checking all the wires of the system for which the element is responsible.
All work with the block located in the hood must be carried out in the garage or in clear weather; rain water, of course, will not damage the contacts, but it is better not to risk it.
How to remove the fuse box on a Hyundai Solaris?
The technical process of removal and replacement is not complicated; it can be examined in detail in the video, in which mechanics will cover all the intricacies of operation and safety precautions. Changing power fuses is somewhat more difficult than regular or salon fuses.
Their unit can only be replaced as a whole; to do this, it must first be dismantled. To carry out work on removing the main fuse block in the hood of the Hyundai Solaris, you must:
- unscrew the nut securing the block with a 10mm head;
- Carefully remove the ends of both wires from the studs;
- The power fuse block is removed from the mounting block by hand and replaced with a new one.
This unit fails extremely rarely; most often this happens in a situation where the car is left unused for a long time. To avoid this, before leaving the car, you must remove the memory fuse from the passenger compartment.
This will ensure the safety of electrical networks for a long time. But if a malfunction is detected specifically in the engine compartment, then it can always be removed and replaced with a new one.
To do this you need:
- remove the negative terminal from the battery;
- release the latches;
- release all wiring harnesses from the mounting block;
- release and carefully remove the port intended for diagnosing machine systems;
- Disconnect all relays from the block body;
- unscrew the fastening nuts;
- slightly lift the block and remove the rear group of wires;
- rearrange the fuses and relays to the new unit and install it strictly in the reverse order.
How to change the cigarette lighter fuse on a Hyundai Solaris?
The process of replacing a part can be demonstrated using the example of a cigarette lighter, but for all interior units it will be carried out in a similar manner. As stated in the diagram, only compatible parts should be used. Replacing the denomination, either up or down, is unacceptable.
The device simply won't work, and incompatible fuses can reduce the overall safety of the vehicle. For work you will need tweezers and gloves.
Replacement algorithm:
- Locate the required fuse. For the cigarette lighter it will be F8 or F. They are located 1 and 2 from the top in the second row from the left;
- check whether the plastic jumper is burnt out. If yes, this means the element has failed;
- remove the burnt part with tweezers, carefully insert the new one into place with your hands.
Replacing an element from the long-term parking group, also located in the interior unit, will require a little more attention and effort; this will require a flat-head screwdriver:
- on the block (it may have to be removed if your hands are not flexible enough) there is a yellow element;
- the latches located on its sides are carefully squeezed with fingers on both sides until the latches are released;
- the fuse group is removed;
- the latch is pryed off with a screwdriver, the red element is removed from the yellow latch and replaced with a new one;
- it is also necessary to act with the second;
- After the change, the latch is installed in place.
For Hyundai Solaris, replacing fuses with your own hands becomes a simple and economical way to avoid expensive repairs at an authorized service center.
You can replace a burnt-out element within 5 minutes, and this will save much more time, money and nerves. It is necessary to be prepared in advance for any emergency situations and have a small supply of working elements of the required rating in the glove box.
Source: https://chtocar.ru/servis-i-remont/servis-hyundai/hyundai-solaris/podrobnaya-instruktsiya-po-predohranitelyam-henday-solaris.html
Block under the hood
It is located on the right side of the engine compartment next to the battery.
Example of a circuit from a block cover
Photo - diagram
Purpose of fuses
| 1 | Reserve |
| 2 | Reserve |
| 3 | 15A F/PUMP - Fuel pump |
| 4 | 10A HORN - Horn |
| 5 | 50A B+2 - Switching unit: emergency lights, power windows, central locking, fuses - F23-F25, F31, F32 |
| 6 | 40A C/FUN - Heating system control unit |
| 7 | 40A ECU 1 - Engine control unit - relay 1. Fuse F25 |
| 8 | 40A IG1 - Ignition switch, body electrical control module, automatic transmission lock control module, start-stop button control unit. |
| 9 | 50A IG2 - Ignition switch, body electrical control module, automatic transmission lock control module, start-stop button control unit |
| 10 | 10A A/CON - Air conditioning |
| 11 | Reserve |
| 12 | Reserve |
| 13 | 15A INJECTOR - Engine control module. Transmission control module. Fuel pump - relay. Oil Control Valve |
| 14 | 10A SENSOR - Engine control module. Camshaft sensor. Oxygen sensor. Immobilizer. Air conditioning - relay. Fan - low speed relay and high speed relay. Solenoid valve |
| 15 | 10A ECU 2 - Electronic engine control unit |
| 16 | Reserve |
| 17 | 10A B/UP LP - Transmission control unit. Automatic transmission sensor. Dashboard. Combined rear lights. |
| 18 | 10A WAPER – Glass cleaner |
Relay designation
| R1 | Reserve |
| R2 | Horn relay |
| R3 | Ignition switch relay, body electrical control module, automatic transmission lock control module, engine start/stop button control unit |
| R4 | Air conditioner relay |
| R5 | Ignition interlock switch relay |
| R6 | Fan Relay (Low Speed) |
| R7 | Fan Relay (High Speed) |
| R8 | Diagnostic connector relay |
| R9 | Ignition switch relay |
| R10 | Ignition switch relay, body electrical control module, automatic transmission lock control module, engine start/stop button control unit |
| R11 | Emergency Brake Warning Relay |
| R12 | Engine control unit relay |
| R13 | Fuel pump relay |
| R14 | Reserve |
| R15 | Cooling system radiator electric fan relay |
Where are the fuses and block located on the Hyundai Solaris 2?
The fuse and relay box is scattered in two places.
Relay and fuse box under the hood
It is located next to the battery and is covered with a lid. Under the fuse and relay panel cover there is a label with the names of the fuses/relays and their rated currents.
Fuse box in the passenger compartment
Located under the instrument panel on the driver's side. Under the fuse and relay panel cover there is a plate with the names of the fuses/relays and their rated currents.
Repairing the wiring supplying the cigarette lighter
In order to carry out this procedure, you need to go to a service station or find a suitable electrician. You won't be able to deal with this on your own. The only nuance that you can solve yourself is to check the presence of power at the terminals and open connections available for testing. You will need some equipment:
- tester;
- voltmeter;
- multimeter
Having even a little knowledge in the field of physics or electrical engineering at the school level, you can conduct a superficial diagnosis of the electrical component of the system. If all the wiring turns out to be in perfect order, then the third and only problem needs to be solved.
Replacing the mechanism of a damaged device
It is necessary to purchase a new seat for the plug of our cigarette lighter, which costs about $10. To dismantle a spare part that has become unusable, you must first open the cover of the 12V socket.
Using two fingers, the index and middle of either working hand, remove the panel by inserting your fingers into these two holes. The lid will give in easily with a little applied force and move outward. We make a replacement by first removing the terminals from the socket plug, disconnecting the burnt-out part, and installing a new one in its place.
We connect the connectors at the end of the wires back and, lightly pressing the socket, fix it in its original position. The renovation is complete.
Location
If the power supply has not been opened for a long time, you may need to use a screwdriver. But you shouldn’t think that the power windows or cigarette lighter work only because of this, since such designs are only designed to protect property from harmful effects during power surges.
Every car enthusiast should know where this unit is located in his vehicle and how to replace the fuses. This article discusses the Hyundai Solaris, so this information is useless for other cars. It turns out this way due to the fact that, firstly, even the box with the circuit boards itself can be located in different cars in different places. And secondly, the layout of the fuses is always different, and in order to correctly diagnose electrical equipment, you need to know what is located and where.
Location This is the topic to start with. It should be noted that there are two fuse blocks in the Hyundai Solaris. The car enthusiast should know their location, since fuses often fail. So, for example, any diagnostician will first of all ask a question regarding this detail. Many drivers check this type of breakdown on their own, so this question is answered without delay.
And this is correct, since not everyone wants to pay extra money to detect the most obvious problem. You also need to know that many more powerful electrical devices in the Hyundai Solaris are connected using special relays. Experts say that these are the same thing, but are simply able to withstand a higher voltage surge.
FAQ
Using our adapter you connect to the interior lamp. Consequently, power will be supplied and disconnected to the DVR or other device, just like to the lamp. All cars implement this differently. For some it is related to the ignition, for some it is related to the central locking. In some cars, power is constantly supplied to the lamp. But you can check how it will work on your car. To do this, turn on the courtesy light to the constant lighting position and watch its behavior when you turn on the ignition and close/open the car.
Connecting to a lampshade, of course, is not the official way to connect a DVR. Everything you do with your car is done at your own peril and risk. And, theoretically, the official dealer can use the fact of connection to deny you warranty electrical repairs. But a huge advantage of connecting with our adapter compared to other methods (twisting, soldering) is that you can very easily dismantle everything and return it to its original state before going to the OD.
We do not claim that connecting to a lampshade is the most correct and safe way to connect. We are only trying to help those who have chosen this method for themselves to do it easier, faster and perhaps somewhat more correctly, without twisting the solder, etc. In any case, everything you do with your car is done at your own peril and risk. Thousands of people use this method of connecting DVRs, radar detectors and other devices. Practice shows that this is a fairly safe and simple way to connect. But you still need to be careful. We do not recommend connecting more than one consumer in this way. This can cause an increase in load and melting of the vehicle's standard wiring.
You can place an order and pay for it in our online store. Payment is made by card using the Tinkoff payment system. We ship orders within three business days from payment. Delivery throughout Russia and the CIS countries is carried out by Russian Post using first class mail. Shipping costs are calculated automatically when placing an order. After sending your order, a letter with a tracking number will be sent to your email address (Letters sometimes end up in Spam).
Hyundai Solaris Manual
We carry out work when fuses and relays fail.
When removing fuses and relays, be sure to disconnect the wire terminal from the negative terminal of the battery.
To access fuses and relays located in the engine compartment block...
...pressing two plastic latches...
...remove the cover of the mounting block.
On the reverse side of the cover there are spare fuses and a diagram of the location of fuses and relays and their purpose is indicated. A faulty fuse is identified by a blown jumper.
Use tweezers to remove the fuse. Replace the blown fuse with a new one.
The vehicle is equipped with fuses with short contacts. If there is no such fuse, you can install a fuse with long contacts instead.
We remove the large fuse from the block by hand and replace it with a new one.
We remove the relay from the block by hand and replace it with a new one.
A new relay or fuse should be installed in place of a failed one only after the cause of the malfunction has been determined and eliminated. It is allowed to use only standard fuses designed for a certain rated current (the rated current of the fuse is indicated on its body).
To replace the power fuse block...
...with a 10mm head we unscrew the nut securing the block.
Remove the wire tip from the stud. Similarly, disconnect the tip of the other wire.
We remove the power fuse block from the mounting block and replace it with a new one. Reinstall the mounting block cover. To replace the fuses of the mounting block in the passenger compartment...
...by pulling, remove the cover of the mounting block from the instrument panel. Using tweezers, remove the blown fuse from the mounting block in the engine compartment. To replace the fuse of the long-term parking fuse group...
...we squeeze the two latches (for clarity, shown on the removed mounting block) ...
...and remove the fuse group.
Using a screwdriver, pry the lock...
...remove the fuse and replace it with a new one. We replace the other fuse in the same way.
On the reverse side of the cover there are spare fuses and a diagram of the location of fuses and relays and their purpose is indicated. A faulty fuse is identified by a blown jumper.
Cabin fuse box
Replacing fuses is quite simple. The main thing is to replace circuit breakers with the engine off and the car's ignition turned off.
- It is necessary to slightly remove the plastic cover of the unit in the passenger compartment from the panel and press the latches.
- After removing the cover, you need to find the faulty fuse.
Worth remembering! Do not replace faulty fuses with wire inserts. The use of jumpers that are not designed for the electrical circuit can lead to a short circuit and fire.
- Using special tweezers, remove the burnt part.
On a note! If the fuse has burned out, you can find out the rating of the part using the diagram located on the back of the plastic cover of the unit.
- The new element should be installed using tweezers until it is completely seated.
On a note! If the fuse has burned out, you can find out the rating of the part using the diagram located on the back of the plastic cover of the unit.
What is a fuse?
The fuse protects the vehicle's electrical circuits from excess voltage, which could melt the wires and cause a fire in the cabin. If the permissible voltage is exceeded, the fuse blows and melts, and current stops flowing through the wires.
Therefore, failure of any device, from heated seats to air conditioning, can only be caused by its failure. A simple replacement of a small element will completely restore normal operation.
It is impossible to unequivocally answer the question, which Hyundai Solaris fuses are most important? Some of them are responsible for peripheral and service systems, some for the operation of core systems, but none should be allowed to fail.
Regular checking of each and timely replacement will help avoid problems. Sometimes a blown fuse indicates the presence of serious problems with the power supply, so the failure of several in a row may be the reason for an extraordinary vehicle inspection.
Fuses are sold in blocks of 10 pieces, this is convenient, they can be immediately purchased in a set, which will be used for a long time.