Photo report: Repair (repressing) of the crankshaft of the Izh-Planet motorcycle - SCOOTERS AND MOTORCYCLES
Due to a gross design miscalculation, the crankshaft of the engine of the Izh-Planet (SZD) motorcycle, having traveled some measly 5,000 km, successfully “grunted” (knocked). Even Chinese plasticine goes through many times more, but here is “Planet”. How so?
Of course, to make the picture clearer, it’s worth making a little reservation: The crankshaft, the repair of which will be discussed in this article, is slightly different in design from the original “Planet” one, since it is from a SZD (motorized sidecar) engine. But in essence, there is practically no difference between these shafts and the engines.
The reason for the rapid failure of the crankshaft was that the bearing of the lower head of the connecting rod, due to a gross design flaw, was not at all lubricated with oil during operation.
In the cheeks of the crankshaft, recesses were made for the lower head of the connecting rod (it is not clear why), so when the lower head of the connecting rod fell into place, the standard oil channels of the lower head of the connecting rod were blocked by the walls of the recess, which led to “oil starvation” of the bearing.
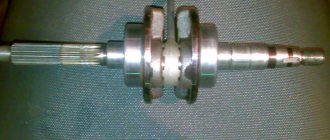
Here, that same depression in the cheek, of unknown purpose.
But the oil channel (ordinary chamfer) on the “native” connecting rod, the channel must be said: it’s made to “fuck off”, and it’s not a channel in essence, but just another Soviet bullshit (even the Chinese don’t allow themselves to do this). Through such a channel, lubricant cannot even theoretically flow to the bearing.
Now look, if you put in a new connecting rod with developed channels for lubrication, then all the same, the channels are blocked by the walls of the recess.
Our task for today: Install a new connecting rod, instead of the old one, into the crankshaft, first taking care of its normal lubrication. And then, the whole thing must be carefully aligned using special measuring tools.
First, the crankshaft must be disassembled.
We are looking for a sheet of metal of suitable thickness (7-8 mm) and using a grinder we cut out a wedge approximately in the middle.
Place the crankshaft on the sheet.
We lay the sheet on some powerful beams so that the crankshaft journal hangs freely in the air, take a suitable mandrel, place it on the finger and use a heavy sledgehammer to knock the finger out of the cheek. After removing the finger from one cheek, take the second cheek, place it on a sheet and knock out the finger in the same way.
Before removing your finger, remember the main rule: Never try to knock out a worn finger all the way through the other cheek! During engine operation, the working surface of the bearing pin of the lower connecting rod head takes on an elliptical shape, so if you decide to knock out the pin with a worn surface through the cheek, the result will be the same - you will violate the geometry of the hole for the pin in the cheek. Because of this, the new finger will no longer stay in such a hole!
Previously, a new connecting rod was purchased from the online store (factory-made, not 100% Chinese).
We are looking for a cutting disc for the grinder that is as thin and worn in diameter as possible, prepare a container with water in advance, install the disk on the grinder and begin to refine our connecting rod.
We cut a small groove at the bottom of the connecting rod, through which the bearing will be lubricated; you need to saw slowly, a little at a time, while constantly lowering the part into the water; under no circumstances should the bearing be overheated, otherwise all the work will go down the drain.
Such a groove is quite enough to lubricate the bearing; as you can see, due to the timely cooling of the part with water, there are completely no traces of blue. After cutting the groove, we take needle files and thoroughly sand all burrs, sharp corners, and “other jambs” both inside and outside.
The connecting rod has been modified, now you can start assembling.
We place any cheek on some flat surface (preferably wooden) and, using a mandrel, a heavy hammer or a small sledgehammer, drive the bearing pin into the cheek. Be careful not to let your finger stick out of your cheek.
We put the support washer on the finger, then we put the connecting rod with the pre-washed bearing there and put the second washer on top.
We adjust the mandrel under the finger, take the second cheek, turn it around so that it is as equal as possible to the first and, through a spacer, place the second cheek on the shaft.
You shouldn’t push the cheeks together too much; bring them together so that there is a small gap between the connecting rod and the cheek (0.15-0.2 mm).
The final step in all this work will be the final alignment of the crankshaft.
The crankshaft cheeks do not always occupy a level position during assembly, which is why the crankshaft journals are in different axes. With such an imbalance along the axes, the engine simply cannot work. Therefore, to begin with, we take a caliper in our hands and measure the thickness of the crankshaft in certain places (marked with arrows).
In case of any discrepancies in the thickness of the crankshaft, we either move the cheeks in the desired direction or compress them. Until the thickness of the crankshaft in all measurement locations is absolutely the same.
After we have equalized the thickness, we place the crankshaft on the prisms, install the indicator on the stand and proceed to the final one.
We turn the crankshaft so that the indicator arrow shows maximum runout. Take a piece of chalk and place a mark along the axis of the indicator.
We take a metal plate, cover it with a sheet of some non-ferrous metal; in our case, the role of the non-ferrous metal is played by a piece of lead. And lightly hit (where the mark is) with the marked cheek on the slab. Afterwards, we install the crankshaft on the prisms and check the runout, and repeat this until we can reduce the runout of the axles to the minimum possible value (no more than 0.03 mm).
This work may seem difficult only at first glance, but in fact everything is very easy and simple, the main thing is not to rush! And of course, measuring instruments play a major role here; without them, there is no point in taking on such work.
Source: https://scooter-mania.ru/fotootchet-remont-perepressovka-kolenchatogo-vala-motocikla-izh-planeta/
Assembly
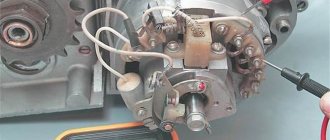
In a carefully washed and prepared for assembly crankcase we place the input shaft, the first gear gear and the follower shaft with pre-selected shims.
We put a fork on the gear-carriage for engaging the second-fourth gear (it is smaller than the gear-carriage for engaging the third-first gear, you can’t go wrong) as shown in the picture. We put the gear on the input shaft and insert the fork pin into the upper groove of the follower shaft.
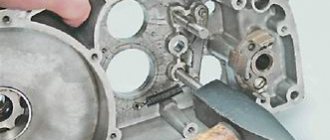
We put a fork on the gear-carriage for engaging the first-third gear, as shown in the picture, place it on the first gear gear and insert the fork pin into the lower groove of the copy shaft.
We install the fork guides in their places (with grooves towards the clutch basket). By the way, if necessary, the “Planetovskaya” gearbox can be assembled and disassembled without disassembling the clutch basket and without removing the guides. But to do this, during installation you will have to pull the tracing shaft towards you a little, insert the pins of the forks into the grooves and after that, remove the locking bar and push the tracing shaft all the way.
Install the intermediate shaft.
On older engines, the end gear is installed separately. On later ones, it is made integral with the intermediate shaft.
We fill the return spring of the gear shift shaft as shown in the picture.
We check the functionality of the gearshift shaft pawls: compress and unclench them several times
We pay special attention to their working edges: they should be sharp and not licked. And don’t forget to check the spring that compresses the pawls: it must be of the correct shape and ensure the elasticity of the pawls’ movement
We squeeze the pawls and install the gear shift shaft in its place.
We rotate the tracking shaft with the mark on the body towards the gear shift shaft and so as not to miss the mark during installation, we cover the gap between the teeth opposite the mark of the tracking shaft with lithol or paint it. It will be more noticeable this way.
We look for a mark on the sector and when putting the sector on the gear shift shaft, we combine the mark on the sector with the mark on the tracking shaft body: the tooth opposite the sector marks should strictly fit between the teeth opposite the mark of the tracking shaft.
To ensure that our marks do not get lost during installation, we tie together the sector and the copy shaft with ordinary sewing thread.
We put standard thrust washers on the input and follower shafts and insert the guide bushings of the gearbox cover into place.
We degrease the surfaces, apply sealant, lay the gasket, install the cover and tighten the mounting bolts with the maximum possible force. We adjust special washers under the bolts marked with yellow arrows.
After tightening the gearbox cover, we check the axial play of the primary and secondary shafts. Normal: 0.2-0.4mm.
If the play is greater than normal, remove the plate, seat the bearing and adjust the required number of shims under it.
Photo report: Repair of the engine of the IZH-Planet motorcycle 2, 3, 4 and fifth model
Nowadays it’s rare to find a “Planet” anywhere, especially in stock form. Grandfather's sheds where they once stood in abundance have long been cleaned out by the suffering, and the garbage dumps where they once lay are overgrown with grass...
The only place where you can still find something more or less decent is local newspaper advertisements. You can also search on Avito, but before you buy it there, see the product in person, otherwise they will send you a bag of bricks instead of an engine...
I was lucky: I found an advertisement in a local newspaper for the sale of an engine from a sidecar, went to the place, inspected it, made an agreement, bought it and brought it home. Don’t let the fact that the engine is from a motorized stroller scare you - the engine is completely identical to the original Planetovsky one.
In general, when I tossed the engine around, I was happy and immediately upset... I was happy because the engine was stock and had no signs of interference. There was also original oil and a USSR spark plug. I was upset because the piston and lower connecting rod bearing were killed.
I had a good factory cylinder in stock: bored to repair size + a factory piston, chrome rings and pin were purchased for it a long time ago.
I bought the connecting rod from an online store. We managed to find a factory one - not plasticine. I modified it a little: I made a small cut in the lower head to improve bearing lubrication, decompressed the crankshaft, threw out the old connecting rod, installed a new one and then centered the crankshaft using an indicator.
Tools
Tools you will need:
- Drill or screwdriver
- Metal drill 4 - 5 mm
- Flat file
- Technical hair dryer
- Mandrels. Plumbing fittings can be used as mandrels
- Powerful flat head screwdriver
- Open-end or socket wrench 14
- Clamp
- Hammer or mallet
- Oil can or syringe
- Sealant
Preparation
To perform a high-quality repair, the engine parts must be clean, the threads in the crankcase must be threaded, the seals and gaskets must be new.
First, we clean the oil channels in the crank chambers. There are two channels in the Izh-Planet engine: one in the left half of the crankcase, the other in the right. We find the channels and if they are very clogged, we clean them with wire, rinse them with clean gasoline and blow them with compressed air.
Engine repair IZH Planet 5
The IZH Planet 5 motorcycle, created in 1987 by the Izhevsk plant, is still popular among motorcyclists. This is a very high-quality and reliable bike, characterized by durability, simplicity and affordability. Disassembling the IZH Planet 5 engine is quite simple even for amateurs. The design of the motorcycle itself does not contain complex elements.
https://www.youtube.com/watch?v=yekfVJhtL8M
Planet 5 is unpretentious to weather conditions. If you want to start the engine in a cold winter, it will surprise you, even if it is -30 degrees outside the window. Moreover, the motorcycle was designed to ride on various types of roads, which makes it very passable and an excellent assistant in agricultural work.
Like its counterpart, Jupiter 5, IZH Planet 5, whose engine performance is not much inferior to its “brother,” has a strict classic style. However, it has a number of advantages over Jupiter, the main of which are:
- single cylinder engine;
- disassembly and repair of the gearbox without removing the engine;
- presence of one muffler.
However, there is also a big disadvantage . The Planet's crankshaft is much more massive, so it operates at lower speeds, which makes it less powerful.
Although the design of the IZH Planet 5 engine is practically no different from the Jupiter one.
True, breakdowns occur no less frequently, so if you switched from one motorcycle to another, there should not be any special problems with operation and maintenance.
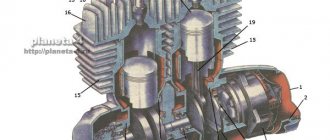
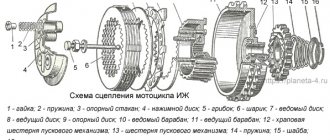
IZH Planet 5 engine diagram
| 1 - spark plug; | 2 - cylinder head; |
| 3 - cylinder: | 4 - piston; |
| 5 - piston ring; | 6 - piston pin: |
| 7 - crankcase; | 8 — channel for lubrication of the main bearing; |
| 9 — roller bearing; | 10 — left oil seal; P - left cover; |
| 12 — motor chain; | 13 - ball bearing; |
| 14 — crankshaft sprocket: | 15 — outer drum of the clutch; 16 — clutch disc; |
| 17 - inner drum: | 18 — pressure disk; |
| 19 — spring; | 20 - shaped nut; |
| 21 - pusher; | |
| 22 — ball bearing; | 23 — trigger gear; |
| 24 — gear shift lever; | 25 — trigger lever: |
| 26 — trigger shaft; | 27 — gear shift shaft; |
| 28 — trigger sector; | 29 - spring: |
| 30, 31, 32. 39, 40, 42 — gearbox gears; | 33 — gear shift fork; |
| 34 — emphasis; | 35 — gear shift shaft; |
| 36 — gearbox cover; | 37 — installation sleeve; |
| 38 — right cover; | |
| 41 - intermediate shaft; | 43 - ball bearing; |
| 44 - roller bearing: | 45 - secondary shaft; |
| 46 - input shaft: | 47 — clutch adjusting screw: |
| 48 - worm ball; | 49 — clutch worm; |
| 50 — cap of the secondary shaft nut; | 51 - oil seal; |
| 52 — asterisk; | 53 - generator; |
| 54 — right oil seal; | 55 — roller bearing; |
| 56 - gasket; | 57 - crankshaft; |
| 58 - bypass channel; | 59 — exhaust window; |
| 60 - decompressor |
Assembly and disassembly of the IZH Planet 5 engine
Domestic motorcycles of the IZH brand, despite their age, are still popular in various parts of our country. This simple and unpretentious transport is especially popular among residents of rural areas.
Not every imported motorcycle can start at +40 or -30, run on any gasoline, and when modified with a sidecar, it turns into a universal transport for a hunter or fisherman. Unfortunately, these motorcycles also have a significant drawback - low engine life. It’s rare that an IZh can work for several seasons and not fail.
That is why below you will find step-by-step instructions on how to disassemble and reassemble the IZH Planet 5 engine.
Repairing the IZH Planet engine can be done entirely with your own hands, since the simple design allows this. The main postulate of such work is to follow the established order of disassembly and assembly.
Following the diagram below, you can get to all engine elements in order to inspect or replace them. It makes sense to completely disassemble the engine if you need to get to the crankshaft or left oil seal.
Failure of the latter leads to a decrease in driving characteristics and smoking due to the presence of a large amount of oil inside the crank chamber.
Step-by-step disassembly diagram:
- Unscrew the spark plug and nuts from the top of the cylinder. We remove the cylinder with the piston.
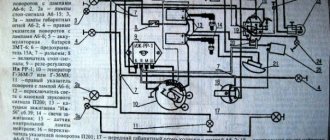
- We drain the remaining oil in the engine and remove the engine from the frame (mounts in the front and rear), having first disconnected and numbered all the wires.
- We unscrew the left cover and remove as much as possible the gearbox and other accessible elements.
- From under the right cover we remove the generator, the final drive sprocket and the crankshaft oil seal.
- We remove all accessible parts related to the gearbox.
- On the right we find the screws that tighten the crankcase parts. We unscrew them together with the nuts of the two bolts.
- Use a rod of suitable diameter to push out the installation sleeves so that they partially remain in the grooves.
- Using a mallet, lightly tap along the entire plane of contact between the crankcase parts. If the parts do not move away from each other or come off partially, try inserting a mounting blade into the groove and tapping it without much force.
- Unscrew the locking plate and remove it.
- We take out the ring-washers, simultaneously noting their order.
- The left side of the crankcase can now be removed from the crankshaft. If the element does not give in, you can use light blows with a rubber hammer to help the parts separate.
- Using pliers, remove the retaining ring.
To remove ball bearings, you will need a pipe or similar element, the end of which coincides with the outer race of the bearing. We lean it against the bearing and little by little knock it out of its mounting position. - By lightly tapping, remove the guides of the gear shift units.
- We take out the retaining ring installed inside, and behind it the split remote ring.
- Press in the left oil seal. Similarly, we take out the main bearing ring installed on the right.
Engine disassembly is complete, now you can repair the IZH Planet 5 engine.
Engine assembly IZH Planet 5
The engine assembly process occurs in the reverse order, with the obligatory condition that all technological features of the process are observed. When restoring the motor, do not forget that this is a precise mechanism and its main characteristics will depend on how carefully you approach the fitting and installation of all parts.
- All dismantled spare parts and engine elements are washed with solvent and an inspection is carried out. If serious chips, scuffs or other defects are found, these parts are replaced. If the left half of the crankcase or the right is damaged, then they are replaced in pairs.
- The joining surfaces are cleaned of traces of sealant or gaskets.
- The elements of the gear shift assembly are polished to a shiny surface.
- We fill the left oil seal with grease and install it in place with the bearing ring, followed by a shaped washer.
- We install the retaining ring, after checking the accuracy of installation, proceed to the next steps.
- Next we mount the main bearing rollers and lubricate them.
- We put on the crankshaft and place a ball bearing lubricated with grease on it.
- We install spacer washers and follow them with a retaining ring.
- Let's see how easily the crankshaft rotates after lubricating it with engine oil.
If assembly at this stage does not cause any complaints, the following steps correspond to the reverse order of engine assembly. Please note that you need to purchase a complete set of new gaskets, and additionally lubricate the connecting surfaces with heat-resistant sealant.
Source: https://www.real-biker.ru/articles/razborka-dvigatelya-izh-planeta-5-42/
To watch online, click on the video ⤵
How to replace a crankshaft bearing without disassembling the engine! SIMPLE METHOD | IZH planet/JupiterMore details
IZH-Jupiter engine. We change the oil seal without disassembling the engine. Read more
Replacing the crankshaft oil seal without disassembling the engine.Read more
Replacing the left crankshaft oil seal Izh Planet without removing the engine, the fastest wayRead more
Updating the oil seal of the left half of the Izh PLANET crankcaseMore details
Replacing the crankshaft oil seal Izhevsk planet 5 without disassemblydizhkaMore details
Engine assembly Planet 5 Ch1Read more
replacing the right oil seal IZhRead more
Replacing the oil seal of the IZH Planet drive starRead more
Replacing the gasket and oil sealRead more
#233. I installed the oil seal on the right side of the Planet 5 calenshaftMore details
DO NOT BUY THESE SEALS. More details
#229. Left half of the engine and bearing Planet 5More details
How to remove the right crankshaft bearing of a Minsk Voskhod motorcycleRead more
Pain. The motorcycle engine is assembled, but you need to get the bearing. Read more
Engine. Izh planet 5. REPAIRMore details
Pressing out the crankshaft bearing to replace the oil seal without disassembling the engine!Read more
replacement of the left crankshaft oil seal Izh Jupiter-5More details
Source
Engine IZH Planet 3, 4 and 5, disassembly, assembly for repair and tuning
When disassembling the engine, you must first drain the oil from it and remove it from the motorcycle frame; you must wash the engine thoroughly. To do this, it is advisable to use a high-pressure apparatus (car wash) with car shampoo. Having washed the engine and protected it from getting dirt inside, we proceed to disassembly.
We remove the right engine cover, remove the generator (by unscrewing the mounting bolts). Be careful not to damage the paronite gasket; remove the cover and disassemble the box. We take out the gears with the shafts and disassemble the shift mechanism, remove the control levers from the engine, and remove the clutch cover. We completely disassemble the clutch and remove the motor chain.
We disassemble the piston, remove the cylinder head (by unscrewing the fastening nuts), then remove the cylinder. After this, remove the piston from the crankshaft, first removing the retaining rings and carefully knocking out the piston pin.
We place the engine on its left side and, carefully without damaging the heads, unscrew the connection bolts using a powerful screwdriver. Then we knock out the centering halves of the crankcase half the length of the bushing.
Using a mallet, we strike the area where the crankcase halves are separated. We remove the crankcase half from the crankshaft and press the bearings out of it. To improve the pressing of the bearing, oil seal and outer race of the roller bearing from the crankcase, the crankcase half must be heated to 70-90 degrees.
Disassembled parts must be washed in gasoline and carefully inspected; damaged and faulty parts must be replaced with new ones. Clean the junction of the crankcase halves from old glue. On the oil seals (cuffs), pay attention to cracks and springs. The bearings should rotate easily without jamming and should not have any play. Having prepared the serviceable parts, we begin assembly.
We assemble the engine in the opposite order of disassembly. Be sure to heat the crankcase half to the same temperature, which makes assembly easier and preserves the crankcase surface from damage during pressing. The connection of the crankcase halves must be coated with BF-4 glue.
When installing the piston on the crankshaft, it is advisable to heat it to a temperature of 60 degrees, this will help when inserting the piston pin. During assembly, you also need to lubricate the cylinder mirror and piston pin with engine oil.
When installing the cylinder and cylinder head, install new gaskets. Pay attention to the position of the piston rings in the piston locks; if installed incorrectly during assembly, the rings may break.
Source: https://planeta-4.ru/obsluzhivanie/dvigatelj_razborka_sborka_planeta.php
Installation of bearings and seals
We install a retaining ring in the left half of the crankcase.
Depending on the model of the main oil seal, we install a spacer sleeve in the mounting hole of the main bearing, or, if the oil seal was initially wide (there are some), we heat the crankcase and, on the inside of the crankcase, place the oil seal until it stops against the retaining ring.
My engine had a regular narrow oil seal, so I put in a bushing.
Using a mandrel, install the main oil seal into the preheated crankcase.
Quickly, before the crankcase cools down, place the oil guide washer on the oil seal. The oil guide washer has a saucer-shaped profile. We place it on the oil seal so that the concave side faces us, and the curved side faces the clutch basket.
While the crankcase has not cooled down, we press the outer race of the main bearing into it using a mandrel.
If you are going to replace the main bearings with new ones, don’t be lazy: find a sheet of iron 7-8 mm thick, cut a wedge in it for the connecting rod, pass the sheet of iron between the cheeks of the crankshaft and use a mandrel to drive the main bearing onto the axle.
This way you will protect yourself from damage to the crankshaft. The main bearing has a very high interference and fits into the axle with a very large force. It is not uncommon for people to simply knock out the axle (the axle on the planetary crankshaft is pressed into the cheek) inside the crankshaft, but they were never able to put the bearing on.
Motorcycle Izh Planet 5 engine specifications
Two-wheeled motorcycle IZH Planet 5 engine, which developed only 22 hp. pp., throughout almost the entire period of its production, and from 1987 to 2008 it was considered one of the most common middle-class motorcycles among domestic buyers.
- Engine for the fifth model.
- Reasons for repair.
- Engine modernization.
This motorcycle was developed and manufactured at the Izhevsk Machine-Building Plant (Izhmash), which is located in the capital of the Republic of Udmurtia. The main advantages that ensured the popularity of Izhevsk motorcycles, and not only in Russia, should be considered:
- Ease of use.
- Simplicity of design and maintenance.
- High overall reliability.
- Economical, repairable motors.
- Affordable prices.
In addition, Izhmash constantly sought to make changes and improvements in the design of its products, including the Izh Planet 5 motorcycle model and the Izh Planet 5 engine.
At the plant itself, production was regularly modernized in order to improve quality.
Thus, the assembly of power units, including the assembly of the IZH Planet 5 engine, was carried out at a specialized technological site.
Engine for the fifth model
The Izh Planet 5 engine contains the following main characteristics and indicators:
- execution type – two-stroke with one cylinder;
- working volume – 345 cubic meters. cm;
- piston diameter – 72 mm;
- power – 22.0 l. With. at 4800 crankshaft rpm;
- battery voltage – 12 volts;
- cooling option – air;
- ignition type – contactless;
- the ratio of the mixture of oil and gasoline (A 76) is 1/30.
Reasons for repair
Complete disassembly of the Izh Planet 5 engine during repair work is carried out if damage or breakdown of the following elements occurs:
- crankshaft;
- bearings;
- piston;
- connecting rod
Failure of these parts can occur due to engine jamming, general severe wear, which is accompanied by increased noise during operation, as well as various knocking noises in the crankcase. In addition, repair of the Izh Planet engine with its complete disassembly is carried out when the crankshaft seals are worn out.
At the initial stage of production of power units, the reed valve on the Izh Planet 5 had certain technological shortcomings associated with low strength.
Therefore, it quickly collapsed, its elements fell inside the cylinder, which required further disassembly and, in most cases, replacement of the Izh Planet 5 piston.
After a certain time, the manufacturer eliminated this defect.
If, when operating the engine, all routine and technical maintenance procedures established by the manufacturer were observed, and appropriate technological materials and fluids were used, then it was operated for a long time, while maintaining its technical parameters.