Wanting to buy a chopper, many motorcyclists are faced with financial problems. Motorcycles of this design are produced exclusively in foreign countries. However, don't be upset. Even if only proven mopeds with a classic design are produced in Russia, it is quite possible to reconstruct them into a chopper with your own hands.
Due to the simplicity of the equipment, Soviet motorcycles such as the Ural or Dnepr can become an excellent basis for modification. The first reconstruction was carried out in the early 90s. Then, having dismantled the Ural down to the screw, a homemade product was created that looked like a confident American Harley.
The essence of the work is to change the angle of the shock absorbers, reduce the ground clearance and trim the motorcycle in a biker style. However, changing the parameters of one part may lead to its incompatibility with another. So, if you change the angle of the shock absorber, you will have to re-weld the frame on which the unit rests. Or, if the clearance between the bottom of the motorcycle and the ground decreases, the wheels may rest on the fenders . Multiple inconsistencies will require patience and focus from the owner.
Countersteering
Countersteering is the only correct way to control a bike in a curved motion.
It uses the force resulting from centripetal and gravity, and the gyroscopic effect created by the wheels. The essence of counter-steering: when making a turn, we push away from ourselves the steering wheel towards which we are turning. And vice versa: by pulling the steering wheel towards us in the direction of the turn, we will change the direction of the turn.
The principle of counter-steering is used to maintain balance at low speeds, when the gyroscopic effect does not provide sufficient stabilization. In these cases, we instinctively turn the steering wheel in the direction of a likely fall. As a result, the two-wheeled friend deviates in the opposite direction, and balance is maintained.
Whole stuffed pike
If you know fishermen, ask them to bring a whole one to decorate the table with a masterpiece. But if you don’t know anyone, you can buy frozen fish in a store or market so that after tasting the dishes you can feel like royalty. Stuffed pike will require dexterity and ability to use a knife.
You will need:
- medium-sized pike;
- 120 gr. bread crumb;
- egg;
- bulb;
- mayonnaise, salt and pepper.
Stuffed and baked pike in the oven will turn out excellent if you follow the instructions.
- Preparing fish for stuffing
. You need to remove the “skin” from the thawed carcass. We start the work with a whole fish, do not rip open the belly, do not cut off the fins, wash it and remove the scales. We make an incision near the head, without separating it completely, and begin to remove the skin using small cuts like a stocking. When you remove the “skin” of the pike to the tail, cut the ridge. The fish skin is ready for stuffing. For more information on how to remove the stocking skin, see the video below the recipe. - Let's prepare the filling
. You need to separate the pike fillet from the bones, and then you can proceed as desired. In the recipe, I suggest adding boiled carrots, onions and bread soaked in milk to minced pike minced through a meat grinder. You can add herbs, spices, salt and pepper. Combine with a raw egg and mix the minced meat. - Stuffing fish
. When the skin and filling are ready, proceed to filling the skin-stocking with minced meat. Fill it loosely so as not to tear the thin shell. When the process is completed, secure the edge of the fish with a thread and attach the head. Lubricate the stuffed pike with mayonnaise and wrap it in foil. - Cooking
. Place the stuffed fish in the oven and bake at 185-190° for about an hour.
You will need:
- medium-sized pike;
- milk;
- 120 gr. wheat bread;
- egg;
- medium carrots and beets;
- spices, peppercorns and bay leaves;
- lemon.
How to cook pike:
- Cooking fish
. Differs from removing the skin-stocking in the previous recipe. After cleaning and washing the carcass, you can cut off the head and tail. We make cuts on the belly side of the carcass - 3-4 centimeters thick, without cutting all the way through the back. We remove the entrails through the holes and use a knife to cut off the meat from the inside of the skin and wash the fish again. - Let's prepare the filling
. We clean the fillet from the bones, grind it in a blender with onions, carrots and bread soaked in milk. Add the egg and mix the minced meat. Salt and pepper the filling. - Stuffing
. Place the finished filling in the pike pieces and insert lemon slices into the slits. - Cooking
. Place the root vegetables cut into circles in a deep baking tray, add spices, bay leaf and peppercorns. Place the stuffed fish on top and fill with water until the vegetables are hidden. Place the dish in the oven for 1 hour at 185-190°. - Submission
. When the fish is cooked, place it on a plate and decorate it with vegetables. You can serve.
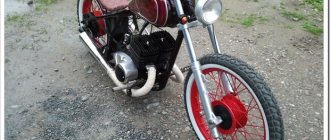
DIY chopper
Chopper is not a cheap pleasure, but this will not stop a real biker. So converted choppers appear on our roads, which in terms of technical characteristics are in no way inferior to factory units.
If you decide to build a chopper with your own hands, first find a suitable donor that will become the base for your chopper. The easiest option is to make a chopper from the Ural. This motorcycle already has almost everything you need for a classic chopper. You will only have to do a little magic with the rear wheel and lengthen the handlebar for the chopper. If you are at least a little technically savvy, you shouldn't have any problems. In addition to the Ural, choppers are made on the basis of the Dnepr motorcycle; Izh or Minsk are also popular donors. Additional parts are taken from VAZ or ZAZ cars.
Well, then everything depends on your imagination, only you can know which chopper you want and tune it accordingly. Today it is not difficult to buy chrome trim, fenders or exhausts, but with the help of these parts you will give your chopper an original appearance.
Stages of turning a Dnepr motorcycle into a custom one
Perhaps this is said loudly about turning the Dnepr motorcycle into a custom one. Because more often such alterations fall under the definition of tuning. What is the difference between custom and tuning?
Tuning is the alteration of individual spare parts or components of a motorcycle. A custom motorcycle is a bike that has been completely modified to suit the owner's wishes. Moreover, it becomes unique and inimitable.
Stages of turning a Dnepr motorcycle into a custom one:
- engine replacement or upgrade
- front fork upgrade
- chassis modification
- exhaust replacement
- adding decorative elements
The engine is additionally cleaned and polished. This is done on purpose so that it does not differ from new parts. Various rings or a direct flow system are installed on the exhaust. You can also add a decorative nozzle.
All these manipulations are easy to do yourself, since they do not require special technical knowledge. Other spare parts can be purchased in specialized stores. For example, valve covers and engine ignition covers can be purchased in our online store.
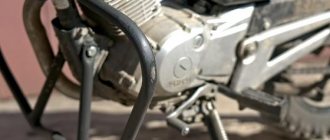
MOTORCYCLE PHYSIOLOGY: METAL FRAMEWORK
Like toys on a Christmas tree, all the components and assemblies of a motorcycle are strung on a single base - the frame. The load-bearing function is the main one, but not the only one. The frame sets the geometric characteristics of the motorcycle, ensuring parallel movement of the wheels (not only statically, but also dynamically, due to its rigidity, resisting attempts to lead the wheels “astray”), setting the angle of the steering column (a parameter that directly affects handling - see "Moto", 2002, No. 3, p. 42). Since the design of the frame determines the layout of the machine, it directly affects the location of the center of gravity and center of mass.
It is clear that such an important component appeared simultaneously with the birth of the motorcycle. In fact, even earlier, since the bicycle served as the model for the chassis of the first motorcycle crews. An unexpected exception is the very first motorcycle in the world with an internal combustion engine - Gottlieb Daimler's Reitwagen, built in 1885. Even his contemporaries were shocked by the extremely archaic design of the wooden (!) chassis, copied not even from bicycles, but from their ancestors - scooter runners of the early 19th century. The current engineer is shocked by something else. The configuration of this frame is the same as that of modern sportbikes: two powerful elements running diagonally from the steering column to the rear wheel and covering all the most important components of the motorcycle.
But this is only an exception, and it is caused by the fact that Herr Daimler was not at all interested in the development of bicycle technology. The overwhelming majority of motorcycle creators of the late 19th and early 20th centuries quite adequately accepted both the bicycle frame design and the method of its manufacture (not by the usual electric welding, but by soldering). What attracted them? Firstly, proven production technology. Secondly, this classic design, formed by two tubular triangles, successfully combines low mass with high rigidity (flexural, but not torsional).
Latest improvements
If you manage to weld a high-quality frame, then you can assume that most of the work has already been done. The only thing I wanted to add was the angle of the front fork. We do not recommend tilting it more than thirty-three degrees. This value is the most optimal for choppers, because the greater the angle of inclination of the front fork, the worse the motorcycle will handle. In our opinion, 28-30 degrees will be more than enough to make the motorcycle look like a real chopper from the Urals, and at the same time handle well.
The last stage is the final assembly of the motorcycle. The engine and other main mechanisms are installed on the frame. The front wheel and handlebars are finally in place and we can see for the first time what our bike looks like after the rework. But in general, the frame is not the only thing that can be done with a Ural motorcycle.
True motorcycle enthusiasts can put all their soul and money into their custom motorcycle, and end up with a Ural Chopper that will delight them for a long time. Installing and reworking the exhaust system, upgrading the fenders, seats, lighting fixtures are just a small part of what can be changed. When modernizing the appearance, you can fully express your imagination or borrow ideas from ready-made choppers.
Choppers appeared as a variant of motorcycles that were converted for street racing. But over time, chopper motorcycles began to be mass-produced, and they transformed into a separate type of motor transport.
The first choppers appeared back in the thirties of the last century, but the biker movement gained popularity in the post-war years. The abundance of identical motorcycles prompted some craftsmen to create exclusive motorcycles, which later became the prototype of the classic chopper.
The most famous chopper manufacturers
The most popular chopper is, of course, the legendary Harley Davidson. Owning an American chopper is every biker's dream. It is worth noting that Harley motorcycles have been popular for several decades, and have long become a household name for a good bike. If we talk about other manufacturers, then Honda choppers are quite good, especially Honda, VT 750 DC Black Spirit, VT 1300 CXA Fury and other motorcycles in this line.
Recently, mini choppers have begun to appear. This is the same chopper, but in miniature. Of course, the technical parameters of a mini chopper will be slightly behind those of its larger brother, but you don’t need to have a license to ride such a miracle.
Belgian masterpiece
Two people worked on this model, one of whom was Belgian. One evening he walked into a local bar, in the parking lot of which there was an old Dnepr. That’s how he came up with the idea of restoring a Soviet bike.
The repair process and tuning took more than two months. Although it was initially planned to restore the motorcycle in the rat-custom style, in the end the old Dnepr combines several styles: scrambler, chopper and tracker.
For a more believable effect, the specialist used special paint to give the surface a rusty effect. The Belgian enthusiast added several parts from the famous Harley-Davidson to the Soviet bike: a custom steering wheel, a leather saddle and a brake light.
The master also equipped the engine with new Schaeffler bearings and pistons from the BMW R60, and the wheels were finished with shiny tires from Heidenau K37. Now the old “Dnepr” from 1970 has found a second wind and is ready to conquer new tracks.
Front and rear suspension
Homemade ATVs are equipped with front or rear suspension. It is easier to mount a ready-made front suspension from an old motorcycle. You can use other options:
- Rear axle from the car. It must be shortened to fit the parameters of the quadric. The advantage of this method is the presence of a differential. The disadvantage of the bridge is its large mass.
- Cardan + gearbox on the rear axle. An independent suspension with high ground clearance is suitable for an all-terrain vehicle. In this case, the suspension arms are fixed to the frame using bolts.
To prevent the ATV from turning over while driving, it is recommended to tilt the front suspension strut. The shock absorbers are from Izha. If you have the financial opportunity, it is better to install gas-oil shock absorbers with pumping. They provide suspension adjustment based on the road surface.
The steering system of an ATV is similar to that of a car. A steering wheel or motorcycle handlebar is installed. Some experts advise combining 2 types:
- motorcycle handlebars, shaft and lever at the top;
- parts of the steering system from the car are below.
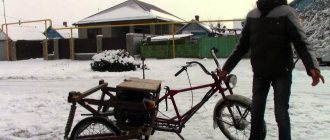
Building a cargo bike with your own hands
Has anyone seen a cargo tricycle? This is an unusually functional and convenient type of transport that is suitable for a wide variety of occasions. For example, it is indispensable for summer residents, it will become a faithful assistant for people living in the village, and it can also transport children. Moreover, such a bicycle is very good for health: it strengthens muscles, increases endurance, and has beneficial effects on the heart.
Adult tricycle for carrying cargo
And most importantly! This type of transport will travel over any off-road terrain and reach the most distant dacha. Well, SUV drivers, be jealous.
There are some other pleasant moments: direct hands and imagination can turn this seemingly ordinary thing into a real work of art.
If you want to assemble a cargo tricycle with your own hands, then let's figure out what they are. So, our mini-trucks come in two types:
aktsport.ru
Chopper frame
The frame makes any DIYer “dance” - it determines the constitution and style of the bike. Let's not disrupt the sequence of building a homemade motorcycle. Do not believe those who claim that a good frame can be made without a slipway - they are lies! Only by using any semblance of a slipway in your work can you make a motorcycle frame, the wheels of which will ride strictly in the wake. Otherwise, no one can guarantee that the steering column pipe will not deviate somewhere to the side.
Insert the shaft into the column, its other end is already clamped in the dividing head chuck. Carefully fix the head housing on the slipway plate. That's it: there is a point where the steering column should “look”. You can start plumbing work. It’s good if you have a high-speed “grinder” - an angle grinder. If you don’t have one, you’ll have to work hard with a hacksaw.
First, cut the main (upper) pipe from the smaller diameter pipes that form the support for the stock seat. Next, saw the pipes going down from the steering column. The cut location is strictly in the center of the straight section of pipes. Now separate the sawn-off upper part of the frame with the steering column from the one mounted on the slipway.
Anyone who is familiar with the basics of welding is well aware that a transverse weld is not great. But we need a frame that is no different in strength from the original one. Therefore, weld inserts onto reinforcements - pins (for example, pieces of reinforcement) or sections of thick-walled pipes of suitable diameter. First, drive the reinforcements into the frame pipes secured to the slipway. Make chamfers on the mating ends of the frame pipes and inserts (on both sides) and weld them to each other in several clamps. Then hammer the reinforcements into the pipes of the cut top part of the frame.
The next step is to bend the frame pipes so that they, together with the inserts, form a straight line - from the bend in the lower part (in the area of the front engine mount) of the frame to the steering column pipe. To do this, use gas welding to heat the frame pipes below the welds on the body of the steering column (above) and below to increase the bending of the standard part of the frame. Now bend... Until you get the best shape for the front of the frame to your liking.
When you finish cooking, the most difficult and important part will be left behind. On the slipway you were able to accurately position the steering column, mounting points for the rear wheel swingarm and engine. And this is the key to the straight-line movement of the motorcycle on the road (unless, of course, the frame was originally oblique).
It's another matter if you decide to increase the base (the distance between the wheel axles) by lengthening the frame itself, and not the rear wheel pendulum. In this case, you will also have to work with the slipway so that the new position of the pendulum's swing axis is strictly parallel to the standard one and does not shift during the transfer either to the right or to the left, not even a millimeter!
Exactly the same problems arise when the pendulum is lengthened. Here you can get by with a small plate, which ensures welding work without vertical distortions and shifts to the right and left. It seems that we have figured out the basic requirements that arise when building a chopper frame.
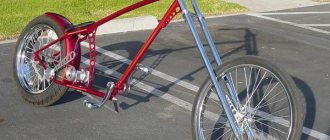
What is a chopper?
First of all, you should understand what motorcycles of this class are. The first choppers appeared in the USA around the 50s. This class became very popular due to the fact that it had a very comfortable seating position, which made traveling on a motorcycle a pleasure. The thing is that the chopper has a high steering wheel, with a clearly inclined front fork. The front wheel of this class of motorcycle is narrow, and the rear wheel is much wider.
Choppers are also distinguished by a small tank and a large engine. And what is important, the very first choppers were made by the same American bikers who created a chopper from an ordinary production motorcycle. Most often these were bikes from the Harley Davidson company, until engineers began producing serial models of Harley choppers.
Choppers are not only a cool and unusual appearance, but also a comfortable ride. The upright riding position allows you to ride a bike like this for quite a long distance before you get tired, which is not the case with sports bikes, for example. But creating a custom chopper with your own hands allows you not only to have a lot of imagination, but also to create a motorcycle just for yourself, which is good news.
DIY making
A branded factory tool is a good and convenient tool for motorcycle repair. But the prices for such devices are quite high. It will also be quite difficult to choose a stand for a specific motorcycle model. Many companies offer universal stools. But, as practice shows, a universal tackle does not always have functions for a specific motorcycle.
In this case, you can make a motorized scooter with your own hands using drawings found on the Internet. A homemade lift can be perfectly adjusted to the size of your bike. It is quite simple to make, but it requires a lot of time and great care, since it must have ideal geometry. Otherwise, working with it will be quite problematic.
In the second option, threads are made on the bushings and they are attached to the pendulum. In this position it is convenient to change wheels. When making the central frame of the tackle, you will need the help of a welder. All corners must be perfectly measured and welded securely. After all, safety and convenience during work depend on the accuracy of measurements and the quality of welding.
In conclusion, I would like to say that if possible, it is better to purchase a good branded option. If you are limited on money, then it is quite easy to make a motorcycle lift with your own hands. Drawings can be easily found on the Internet. A high-quality tackle will be an indispensable assistant in the repair and maintenance of your favorite bike.
Every motorcyclist must understand that his new “friend” needs appropriate maintenance, which consists of diagnosing and removing all kinds of faults. And in order to successfully carry out repair work at home, you need to equip your workshop with such a device as a motorcycle underride.
What will you need to build a chopper from the Urals?
Many bikers who have ever thought about building a custom motorcycle have never even tried to get started. The thought that this requires a good understanding of technology, and the whole process is very complicated, completely discourages the desire to create the motorcycle of your dreams. This is completely the wrong approach. In fact, as soon as you start making your first chopper from the Urals, you will realize that everything is actually very simple and you were worrying in vain.
So, in order to make a real chopper out of a Ural motorcycle, we don’t need much. First of all, of course, you need a donor if you don’t already have one. If you are just planning to purchase a Ural motorcycle, then it is better to immediately look for a working bike so as not to waste time. Here it’s worth saying right away why we choose the Ural and not another motorcycle.
Firstly, the Ural is equipped with a fairly powerful engine, which is very similar to the displacement engines of chopper motorcycles. And secondly, the Ural motorcycle has everything we need to build a chopper. Otherwise, apart from spare parts from an old VAZ or ZAZ, we will need practically nothing.
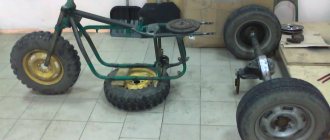
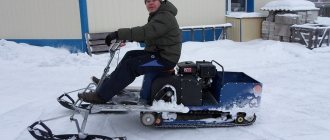
How to make a homemade wheeled all-terrain vehicle
An example of a drawing of an all-terrain vehicle on low-pressure tires
It makes sense to equip the basic unit with a reduction gearbox. The reason is that gasoline and diesel engines have the best torque performance at a crankshaft speed of approximately 75-85% of the maximum.
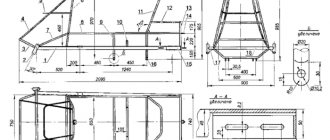
All-terrain vehicle frame
An example of a frame-fracture drawing
A frame is created between the front and rear axles. It is better to use profile pipes of rectangular or square cross-section as the basis. They provide greater rigidity than rolled angles, channels and I-beams of the same mass.
The joining of the frame elements of a wheeled all-terrain vehicle can be rigid, then it will be formed in a single-volume format. When using heavy Neva or MTZ walk-behind tractors, this option will be preferable.
As an option, a breakable frame (fracture) is made; this option is used for areas with a complex profile. Here the articulation is performed through the kingpin. The front and rear axles have independent suspension from each other. Craftsmen create such all-terrain vehicles based on the Neva and Ugra walk-behind tractors.
Rear axle and suspension of a homemade all-terrain vehicle
To simplify the design, some DIYers use a ready-made rear axle from a passenger car. For example, from the Moskvich-412 car: its low weight allows installation on a light all-terrain vehicle. The suspension is performed on shock absorbers for a smooth ride and reduced vibration.
Other craftsmen make independent suspension on each rear wheel. This approach is implemented on the Ant scooter. When driving, a slight rocking is felt, at the same time the wheels experience less resistance on uneven surfaces, and fuel consumption is noticeably reduced.
The rear axle is connected to the frame with long, hardened bolts. For elastic joints, rubber inserts are used, for example, silent blocks. This improves the performance characteristics of an all-terrain vehicle based on a walk-behind tractor.
Wheels (low pressure chambers)
To move on wet and unstable ground, you can use lugs. They provide high grip. Large-diameter low-pressure chambers perform even better. Pneumatics have minimal ground pressure, and the presence of air contained in the all-terrain vehicle’s chambers will make it possible to create a floating all-terrain vehicle.
For installation on the rear axle, homemade or special wheels for all-terrain vehicles, swamp vehicles and snowmobiles are used. They can be purchased assembled or as separate elements: tire, tube, disc. The wheel is easy to assemble.
- Homemade discs for pneumatics are made by welding ordinary discs and mounting plates using metal tubes. This expansion is necessary in order to adjust the small diameter of the car rim to large cameras and better fix them.
- A large camera is placed on a specially expanded disk - either a proprietary one or from other units (GAZ 53, Ural, Kamaz or another truck, an aviation camera, etc.).
- An air valve is installed in the hole of the disk.
- The wheel is inflated with air.
- The resulting tires are installed on a homemade all-terrain vehicle.
You can increase the cross-country ability of regular wheels on low-pressure chambers by creating an additional tread. For example, additionally secure the cameras with chains, conveyor belts, homemade tracks or another method.
Another option is to cut a patch lug from the tire. The depth of the structure’s hook reaches more than 20-25 mm. Rolling resistance increases, while at the same time the slip coefficient decreases sharply.
Assembling a homemade all-terrain vehicle from a walk-behind tractor
When all the tools, spare parts and components are prepared, you can begin assembly. This is a rough plan for how to assemble a homemade all-terrain vehicle, it all depends on the chosen design.
- A walk-behind tractor is installed on a welded or finished frame.
- The rear axle and, if necessary, the front axle are mounted.
- The seat is placed on the frame.
- If provided in the drawing and diagram, the steering control is installed.
- The protection is attached to the frame; it is made of plastic or metal sheet.
- The future driver should try out the comfort of the seat; if necessary, provide auxiliary devices for adjusting the seat.
- The functionality of the brakes is checked.
- Electrical circuits and lighting fixtures are installed.
After completing the bench tests, they begin the field tests. You need to know how the car behaves in difficult conditions.
Where to weld a motorcycle frame after an accident?
During operation, the motorcycle receives various damages associated with a violation of the frame geometry. In the event of a head-on collision or collision with an obstacle, a crack may appear and further use of the motorbike is prohibited. Many people cannot afford the purchase and installation of a new frame, so the best option is to use the services of our service to restore the integrity and strength characteristics of the supporting structure.
Welding frame yamaha warrior xv 1700
Professional services on favorable terms
In order to eliminate defects that appear in the form of cracks, specialists weld the motorcycle frame. Our employees have undergone special training, confirmed their qualifications and have permission to perform complex repair work. The accumulated experience and knowledge of the process sequence and metal welding technology allows us to guarantee customers high quality welding operations, as well as reliability and safety during further operation of the motorcycle. Modern equipment and tools are used for the work, so all welding operations are performed in a short time.
Chopper: Insignia
The most striking difference between choppers and other motorcycles is the elongated, high handlebar, which adds shock value to the chopper. It is also worth noting the absence of a deep rear wing, and in some models even the complete absence of a front one.
In addition, the chopper boasts a rear Great Wide Wheel, as bikers call it. This is a wide rear roller wheel, which is also a significant difference between a chopper and a regular bike.
Choppers also have a small teardrop-shaped tank and a low driver's position, which corresponds to the relaxed and imposing style of the biker.
If you look at the photos of choppers, you can note a large number of chrome elements. It is worth noting that the chopper is not designed for fast riding, like on sports bikes, so the motorcycle engine operates mainly at low speeds and does not have the pronounced dynamics of racing motorcycles. Chopper is a status motorbike that is designed for comfortable riding, and not for high-speed racing.
Another difference between the chopper is soft shock absorbers and a fairly high torque, which allows you to drive slowly at high speeds. The closest "relative" of the chopper is the cruiser - a motorcycle that is designed for the road.
Painless changes
There are quite a lot of them, but they can be divided into external and internal. The former are aimed at individualizing the design, the latter at improving driving and technical parameters.
If we talk about appearance, then it is initially classic, which means quite stylish and attractive, but nothing prevents you from customizing it to your own taste. In the case when you have the Urals or the Dnieper, for tuning you can:
- raise and straighten the steering wheel;
- make a single seat;
- install mirrors, control knobs and fairings of a different shape;
- move the footrests forward, thus adding convenience to the landing;
- remove the wings, giving the bike more dynamics;
- move the muffler to the right;
- give preference to solid brake and clutch levers;
- chrome all visually noticeable parts;
- replace the rear wheel with a wider size, 130-150, but not more, otherwise you will have to buy a frame as well;
- remove the original fuel tank and replace it with a streamlined one, from the Planet, 49 or 56 IZh, Jupiter or even Java-250 (if it fits).
Look how much such painless tuning of the Urals transforms the design of the bike: the motorcycle in the photo already looks completely different, and in real life this impression only intensifies.
How to make a tricycle from a Ural and ZAZ-968 motorcycle
The front fork works like in the Urals, a lever system is used and the front axle is located between the transverse arms.
When creating a trike from the Urals and a ZAZ-968 car, the rear part remains practically unchanged, like a car. Only a muffler, oil cooler and air filter are added there. The gearbox and engine are also original to ZAZ. The engine is mounted as before, and the gearbox is placed on the left.
In general, there is not much to change.
DIY assembly steps
- At the very beginning, the rear axle is removed from the car.
- A beam is attached to the cut.
- Mufflers, an air filter, an oil cooler and pipes are installed on the rear wheel axle. If you use engines from the 90s, then all these elements will already be installed.
- A frame is being made that will be the basis of the tricycle, so it is necessary to make it strong and reliable.
- An extended front fork is manufactured by welding with shock absorbers attached to it. Lengthening occurs by replacing the fork rods with longer ones or by welding more tubes to the Ural fork.
- Welds the frame and rear axle of the car, forming a solid structure.
- The fork is connected to the frame by welding, just like with the rear axle of the ZAZ.
- After this, the seats, gas tank and other elements are attached.
- Finally, the new tricycle is painted and chromed.
Other improvements
Sometimes cups are installed under the tapered bearings, the seat line is lowered (if the frame has been lengthened), the front pipes are lengthened, and so on.
If it is necessary to weld pipes, first of all you need to achieve the strength of the seam. Therefore, it is advisable to practice beforehand in order to learn how to work with electric welding.
A problem may also arise with the evenness of the frame. This needs to be taken very seriously and only after the wheels are rolling, you can cook it.
If inconsistencies appear at the assembly stage, you should not resort to a sledgehammer. Failures happen quite often, but it is best to be patient and ensure that the original actual assembly matches the prepared drawing.
As a last resort, you can leave the work in the hands of professionals. Then the stylish “Ural Chopper”, the photo of which you see, will be at the finish line too.
Custom motorcycles always looked more impressive and gave their owner much more positive emotions than a regular factory model. The idea of modifying and reincarnating motorcycles appeared back in the 50s. American bikers began to actively remodel their motorcycles, not only painting them in the original color, but also modernizing power units. Some created completely unique models, installing a new exhaust system, beautiful wheels on their motorcycles, modifying the optics, and even such elements as a tank or wings. But what if you try to modify a Soviet motorcycle, for example, Ural or IZH. After thinking a little, we decided to tell you about how to make a chopper from the Urals.
Manufacturing
The first step in the process of creating an ATV is to make the suspension. First of all, the old vehicle will need to be disassembled. The frame of the unit must be freed from all its components; the steering wheel and shock absorbers must be removed. It would be a good idea to determine in advance what type of suspension will be installed on the Ural ATV, for example:
- spring suspension (suspension system);
- rigid system without shock absorber;
- suspension system with spring shock absorbers.
Of course, the best option would be a suspension with shock absorbers on springs. You can borrow them from an old motorcycle. Since the unit will be 4-wheeled, the missing components will need to be purchased additionally. The suspension in this version will have the shape of the letter “A”.
The second step is the frame. The frame must be assembled in such a way that it is possible to mount the engine on it. It will be located in front or behind - it doesn’t matter, the main thing is that it is thoroughly fixed. There are 2 options here:
- create a new frame from pipes from the very beginning - for this you need to have equipment that makes it possible to bend the material;
- take a motorcycle frame as a basis, remove what is useless and add what is needed.
Professionals recommend using frames from Ural and Oka vehicles; they are best suited for modification. In the case of using a frame from Ural with an additional frame made of pipes, this design will be much simpler to implement. Everything is explained by the fact that the motorcycle frame will already have a prepared gearbox, motor and other components (without unnecessary welding), and the auxiliary frame will directly support the vehicle operator and the wheels.
You can weld a frame for an all-terrain vehicle by first studying the diagram with dimensions given below. You can also consult with a mechanic or welder who can quickly and professionally weld all the elements for you.
As you can see, the all-terrain vehicle frame shown in the drawing is quite standard and has a simple design; the most important thing is to do all the processes correctly
Attention! Before making the final version of the frame, it is necessary to perform spot welding and check the resulting structure with the drawings. If everything is in order, you can thoroughly boil it
Engine and power train (transmission)
The Ural engine is in most cases used in the manufacture of homemade all-terrain vehicles. This motor is quite powerful and durable, which guarantees high functionality of the motorcycle. Such an all-terrain vehicle can be used both for off-road travel and at home.
It should be noted that the Ural engine is quite powerful. This is a 4-stroke 2-cylinder engine with a displacement of 750 cm3 and a power of 41 horsepower.
When assembling, it is advisable to use not only the motor from the Ural motorcycle, but also its power transmission. In such a situation, the system will function consistently. This motorcycle has a 4-speed gearbox and reverse gear. A rear wheel driveshaft is also included as standard.
The steering wheel from the Ural motorcycle is also used in the design, but certain modifications will need to be made. It is necessary to add drives, which will now rotate 2 wheels. The design is supplemented with levers and ball joints, which are borrowed from a car. Additional items can also be purchased at a special retail outlet. During the assembly process, it is necessary to achieve high accuracy and comfort of the steering wheel of the future all-terrain vehicle.
Chopper from the Urals - start of work
Having selected a decent motorcycle and checked its engine for performance, you can begin to create a motorcycle - the Ural Chopper. All we need to do to create a chopper is to lengthen the front of the bike and work on the rear wheel and suspension. Let's try to break down the construction process step by step.
Drawing
The process will go much faster if you make a drawing or approximate picture of what the resulting motorcycle will look like. There are quite a lot of drawings of chopper frames on the Internet, so choosing the right one will not be so difficult. If you are confident in your abilities, then you can do without it.
Frame
Perhaps the only difficult stage that you will have to face is the alteration and welding of the frame. The whole secret is to place the steering rack at the right angle, which will ultimately change the angle of inclination, allowing you to set the front fork at the required degree. It is worth saying that a lot of attention needs to be paid to welding this place, since this area will receive quite heavy loads.
Having finished with the front fork, you need to work on the rear part of the future motorcycle - Ural Chopper. As a rule, bikes of this class are quite long due to the large rear wheel. That is why we need to weld the frame so that we can install a wide wheel on the axle. Naturally, this part of the frame should also be given a lot of attention. In general, if you have not done welding before, then it is better to entrust this task to specialists, because safety comes first.
How to weld a car frame or.
This article will not be of interest to owners of passenger cars, it’s a completely different story, but owners of trucks, dump trucks, and truck cranes will find this quite useful. Everyone knows that it is supposedly impossible to weld a frame. But if these “talkative experts” had seen how much we had digested in our time, they would have changed their minds or mumbled something incomprehensible. Although in some ways they may be right, because the frame is a non-welded structure and if it breaks they say that it needs to be replaced. But who would agree to lose profit and time, because there are no spare frames lying around on the road and hardly anyone has any in stock.
In my practice, this most often happened with KrAZ trucks and it was not necessary that they were old. It’s just that in the days of self-financing and “ton-kilometers” everyone wanted to earn money, and they had to build, materials were required, and the roads were mostly winter roads. Not everyone knows what it is. So the painters put containers in the back of the car to carry diesel fuel, and they also carried road slabs, and the especially zealous ones took a double load and were with us after the flight. the frame is cracked. Most often, frames broke in the area of the second pair of wheels, approximately the center of the car; this is the weakest point for fracture. Of course, the frames of other cars also broke, but less often. Equally, only the Kirov trawls, mainly the ganders, broke. Well, they've already broken it, now we need to repair it.
First, you need to free up as much space as possible where the welding will take place. Roll out the wheel, if necessary, remove all tubes and anything that may interfere with a full repair. If the frame has fallen apart, then it’s more difficult, because you need to put everything back in place, and so that the car doesn’t go sideways later
These are all precautions and necessary. Now, actually, preparation for welding
First you need to weld the broken area itself. To do this, use a cutter, electrode or grinder, in general, in any available way, to remove a chamfer from the crack, first, if possible, to do this from the inside of the frame. We will immediately weld this part and then grind the chamfer from the outside, preferably to solid metal. Now let's melt the chamfer from the outside. If the seam turns out to be high, then it needs to be ground flush with the base metal, a little later you will find out why. Some welders called it “brew the root”, but this is not the root, and you can learn what the root of the weld is from the early articles of our channel “Welding is our everything”
No matter how well you brew it, it will not be enough; you need to strengthen the broken place. To do this, we cut out a double or, as it is often called, a patch. The width of the patch is the width of the frame, and the length is the same as the width, but in each direction from the crack. We clean the edges from burrs and apply them to the frame. This is exactly why the seam needed to be ground off, the patch should fit tightly. If there is a large gap, you will of course weld it, but because of this the load will pass on the broken part of the frame and it may burst again along with the patch. We have been convinced of this several times.
That's why the patches have this shape. And in no case should longitudinal seams begin and end at the same level. If suddenly you don’t have the time or tools for a good repair, you broke down in foreign lands and you quickly need to go home, then you can take a rectangular patch, but cook it, retreating 20-30 mm on one side from the edge, and the same amount on the other side, but from the other side. Then the beginning and end of your seams will not coincide and you will successfully get home, where you will make a high-quality repair. Cook only along, across - no.
Parallelepiped patches can be placed on the inside of the frame, where the edges will already be offset and we will also weld longitudinal seams. Place ovals and diamonds on the outside and cook completely. If you find metal that is the same as the frame, then take the same thickness, but most likely the metal you have is the most common and therefore they use thicker metal for the patches, because it is weaker than the main one, so we equalize it using the thickness. We usually took 8-10 mm. There is no need to take very thick metal, this will put an extra load on the frame itself!
So the diamond was installed, grabbed, and the most important thing left was to brew it. Here, as always, it begins: what is better, electrodes or semi-automatic? And what electrodes? etc
It’s unlikely that anyone will have the brains to take a stainless steel patch, it’s stupid and unnecessary, so you need to take electrodes that are designed for carbon or alloy structural steels, preferably with good ductility. For example, the 55th SSSI is suitable. We cooked all this with ordinary OZS-4 and everything was fine, with rare exceptions. You can weld it with a semi-automatic machine, but it’s better to weld it with what you know best. The main thing is to brew it well and not to burn the frame itself, otherwise it will burst at the point of the burn.