If there is no charging on the Izh Jupiter motorcycle.
This article was written to help those motorists who decided to find and fix a malfunction in the battery charging system on IZH 12V motorcycles themselves.
Of the special instruments, you will need the simplest tester with a continuity function (tweeter) and resistance measurement. If you do not have this device, then you can use a light bulb with a battery to determine the contact or break in the circuit.
In this case, you need to install a well-charged battery on the motorcycle, or power the on-board network from another external power source with a constant voltage of 12 V. First of all, we check the presence of voltage with the ignition switch on at the positive terminal of the regulator relay. There should be +12v.
If there is no voltage, then we look for a break from the positive terminal of the battery through the ignition switch and to the + terminal on the relay regulator.
Next, we measure the voltage on the brushes. There should be +12V on one of the brushes. If not, we call the wiring from the relay to the generator brushes.
Next step. We take the brushes out of the holder and ring each of them from the terminal to the graphite. It happens that at the point of contact of the wire with the graphite body of the brush itself, the contact is lost.
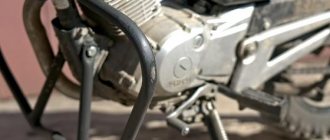
Troubleshooting the generator
Stator
Three phase wires are disconnected from the stator and the winding (connected to each other according to a star circuit) is connected. That is, the windings should ring with each other and have approximately the same resistance. If some winding does not ring, this means that there is a break and the stator is not working properly.
Next, all three phases are called relative to the body (mass). If it rings, it means the windings are broken into the housing and the stator is not working properly.
Anchor
We ring the armature winding (on copper rings). If the rings ring among themselves - good, if not - there is a break, the armature is not working.
The next step is to wire the armature winding relative to the armature body.
If it doesn’t ring, it’s good; if it rings, the winding is broken into the housing and the armature is not working properly!
That's it with the generator.
Relay regulator
If all the wiring is in order, the brushes, stator and rotor are ringing and everything is working, all that remains is the relay regulator! In my experience, even if you don’t have much knowledge of radio electronics, you can at least remove the back cover of the relay regulator and wipe off all the dirt. Carefully look at all the contacts, fastening parts, wires, jumpers; sometimes the contact or soldering simply falls off due to vibration. The diode bridge is practically “eternal”. But the control thyristors sometimes fly out! They are also called simply - to check for breakdown on the housing and between the cathode and the control electrode!
They are also easy to change; a 10 mm nut is unscrewed from below and the wires are unsoldered from above.
That's basically it!!! And there is absolutely no need to change entire components at random; there can be a lot of reasons, even banal bad contact on the chips or oxidation of the wires in the connector
Sergey Sharikov
The editors of the magazine thank Sergei Sharikov for kindly providing materials for the article.
If you have something to share with readers and would like to publish your story or photo report about your travels on our website, please send the materials to:
This might be interesting
- Tuning the Izh motorcycle. BSZ on Izh Jupiter The main “soreness” of the Izh Jupiter motorcycle engine is the standard contact ignition system. Any owner of Jupiter...
- On bicycles through the mountains This is a report on a journey by bicycles through the Caucasus Mountains of completely unprepared people. Read this article and you...
- Car loan. Article 5. Reviews about car loans It’s up to you to decide whether to take out a car loan or not. We publish reviews from consumers and car owners who at one time...
Generator - serviceability check
Checking the serviceability of the generator can be done on a motorcycle without disassembling the generator.
To carry out the work you will need a multimeter.
1. Place the motorcycle on the center stand or side stand.
2. Disconnect the battery by removing its fuse.
3. Remove the right cover of the power unit.
4. 6mm
unscrew the nuts securing the five “upper” wires of the generator. In order not to confuse the wires during subsequent assembly, we mark them or tie them with thin wire so that we get a cable.
5. Check the short circuit of the stator windings to ground. To do this, touch the probes of the multimeter to the generator housing and alternately the three terminals of the windings. The ohmmeter should show infinity.
6. Check the stator windings for breaks. To do this, touch the probes of the multimeter in turn to all three terminals of the stator windings. The resistance should be about 8 ohms.
7. Check for a short to ground in the excitation (rotor) winding. To do this, touch the probes to the generator housing and one of the terminals of the brush assembly. The ohmmeter should show infinity.
8. Check the field winding (rotor) for open circuit. To do this, install probes on both brushes. The ohmmeter should not show infinity.
Source
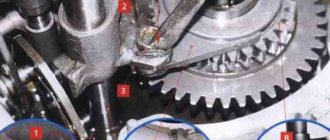
Generator rotor 281.3701
The generator rotor 1 is located inside the stator. It is installed on the crankshaft using bolt 3 and key 5. An excitation winding 6 is wound on the rotor core with a copper wire with a diameter of 0.56 mm, 600 turns are made. The winding resistance is approximately 6.4 ohms. For contact with the winding, two copper rings 2 and carbon brushes are used. They perform the work of a current collector.
How to remove the generator rotor 281.3701
The breaker cam 4 is installed in one position on the rotor shaft in a special socket and secured with a mounting bolt 3. Under this cam there is a thread that is intended for removing the rotor from the crankshaft. To remove the rotor, you need to screw the screw from the chain disassembly device into the thread. The device is located in the motorcycle tool. If there is no screw, you can use a regular bolt with an M10 thread. The only condition for the thread must be at least 70 mm. Turn until the screw rests on the crankshaft. Then we apply more force to tighten it, and the rotor is removed from the shaft.
The main mistakes when making a windshield with your own hands
Non-professionals often make mistakes in this matter.
The most common:
- Poor cleaning and degreasing of surfaces;
- Using products that have long expired;
- Failure to comply with temperature conditions;
- Degreasing with low-quality composition.
Remember that if you do this yourself, due to your inexperience you risk ruining something, scratching the glass or not being able to install it correctly. Do you want to get high-quality glass from monolithic polycarbonate? When purchasing the material, you can immediately indicate the size you need, and everything will be cut out for you as needed.
Conclusion:
This material is in no way inferior to classic glass, and its impact resistance is two hundred times higher than the impact resistance of different types of glass. Auto glass made from polycarbonate is much lighter than regular glass (16 times), this technologically advanced material is also UV resistant, thermoplastic and incredibly practical for installation.
Advantages of a polycarbonate windshield over regular glass
- Polycarbonate glazing is resistant to ultraviolet radiation and temperature changes;
- Such strong glass has a minimum number of stiffeners;
- Polycarbonate perfectly transmits light and glazing, thus providing a full overview;
- The material is not prone to destruction;
- A windshield made of this material is lightweight and does not create excessive loads;
- Monolithic polycarbonate is easily molded when heated and therefore its shape can be any.
Major problem with motorcycle wiring
On IZ Jupiter 5, the wiring had a large number of contact terminals. Therefore, the main cause of malfunctions in the electrical circuit was a violation of the integrity of the connections. This led to such moments as: there is no charging for the battery, the generator does not provide the necessary 12-volt voltage to the system, the switch is not able to generate the necessary charge for the ignition coil, loss of functionality of all lighting devices, and a number of others.
The cause of loss of connection in the terminals was contamination and oxidation of the contacts. This was especially true for motorcycles produced at the beginning of mass production. The main way to solve this problem was to exclude these terminals from the IZ Jupiter 5 wiring.
To do this, we used soldering the wires directly to each other (by analogy with the Tula motorcycle), as well as sealing the terminals on the supply wires to the following main elements:
This increased the reliability of the connections and, as a result, ensured the operability of the specified parts, and also made it possible to turn on charging for the battery in order to subsequently confidently start the engine of the IZH Jupiter 5 motorcycle.
Unlike similar Soviet-era motorcycle models, the electrical wiring diagram of the IZH Jupiter 5 motorcycle provides for operation from a battery with air-cooled equipment. This causes many problems for owners. The article provides recommendations for modernization that solves problems with sparking.
Features of electrical equipment
Despite the unification of parts with other models, the IZH Yu5 wiring diagram was chosen for battery use.
We are talking about a contact ignition system, which, if the battery is dead, immediately creates problems for the owner:
- Starting the engine is difficult;
- The engine runs intermittently;
- Driving at low speeds further drains the battery.
Therefore, many owners prefer to upgrade their ignition system with their own hands to a more progressive one - a contactless electronic type. It should also be noted that repairing the wiring of IZ Jupiter 5 should there be a desire for such an upgrade (see also the article about the wiring diagram of IZ Planet 5).
For reference: unlike the Jupiter model, new wiring and an electronic ignition system were installed on the modified IZ Planet 5. The methods proposed below are designed for simplified work - not requiring major replacement of components.
Assembly procedure
The procedure for making a simple version of drags looks something like this:
- Using 4 pieces of pipe, a metal frame is made for a rectangular base. Set the dimensions yourself;
- If the design will be used for cargo transportation, it is better to supplement the base frame with special cross members;
- Vertically located racks are mounted to the base;
- The number of racks used depends on the length of the drag itself;
- Basically, 2-4 racks are used on each side;
- Skis are made from pipes, this time plastic. I advise you to level them so that you get flat-shaped skis;
- The pipe, cut in half lengthwise, is straightened with a construction hairdryer;
- The heated plastic is pressed with something heavy to fix the new shape. Wait for the plastic to cool;
- Skids are mounted on the frame;
- It is desirable that the upper part of the ski runners be at the level of the frame and mounted to the edge of the base. Otherwise you will bury yourself in the snow;
- A drawbar and a lock for coupling with a snowmobile are mounted in the front part;
- A sheet of plywood is laid on top of the frame as a flooring.
Then equip and decorate this variation of drags at your discretion. You can look for ideas on the Internet, or just use your imagination. Nobody limits you here. But I have everything. Thank you all for your attention! Subscribe, tell your friends about us and stay with us! ( 4 ratings, average: 5.00 out of 5) Polymer pipes are a universal material that is perfect for installing water supply, sewerage and heating systems in a house or apartment. However, in the hands of a home craftsman who has a remarkable imagination and an insatiable desire to make something on his own, PVC parts can turn into quite intricate, but no less useful products. For example, into a snowmobile sled made of plastic pipes, about the manufacturing process of which will be discussed below.
You can make a sled from plastic pipes yourself
Choosing a carburetor for the Urals, Dnepr
Let’s answer the most common question in advance - no, none of the old carburetors are suitable for this job. You can explain for a very long time why, in general, this model is designed for one cylinder, but you will have to “feed” two, so let’s move on. The second question is “Which Solex or Moskvich carburetor should I choose?” The answer is none. We immediately dismiss all car carburetors for their unreliability and difficulty of maintenance. There are many articles that describe the conversion of the Urals to carbs from various domestic cars or foreign cars, but they all end with the owner constantly suffering from its incorrect operation, etc.
From the above, we conclude that we need a motorcycle carburetor capable of feeding the volume of our engine. For example, the Soviet K28G or from Japanese two-cylinder engines of similar volume.
Generator
The heart is the generator (sometimes called a magneto, but they were never used on Izh Planet). Three windings produce alternating current. For excitation, an additional coil is used instead of a permanent magnet. Therefore, it is impossible to jump start a motorcycle with a completely dead or missing battery.
A diode bridge for current rectification and a voltage regulator assembled in one unit are mounted on the Izh Planet 5 generator (they are not even highlighted in the Izh Planet wiring diagram manuals).
Possible breakdowns in this unit:
- It is checked by measuring their resistance of current-carrying conductors and insulation. If the generator is damaged, it will become noticeably hot.
- — the output voltage will differ significantly from the nominal level or be absent.
- Although the electrical circuit includes short circuit protection, it happens that the automation does not work and most often the output transistor burns out.