Once the dominant method of braking, the drum and shoe brakes of yesteryear disappeared for the most part. While drum brakes are effective enough for most situations, they require constant adjustment to ensure maximum stopping power. Disc brakes, which rely on hydraulic force to compress the brake disc or rotor between a set of pads, have become the primary method. Providing enormous stopping power in a low-maintenance package, disc brakes can operate without constant, tedious adjustments, requiring only periodic brake pad replacements and replenishment of the fluid that operates hydraulic brakes.
Replacing brake pads
Warnings
- Check and double check that the brake pads are held securely in place by the clamps and mounting bolts. A loose pad can cause dangerous loss of control or braking.
- Do not under any circumstances use WD-40 or similar products on your motorcycle's brake rotors. WD-40 has lubricating properties that can impair your motorcycle's braking ability, which could result in an accident or injury.
- Do not spray brake cleaner onto painted parts as the cleaner will easily saturate the paint.
- Brake cleaner can be dangerous if not handled correctly. Always wear gloves and safety glasses when working with chemicals.
Photo report: Adjusting the brakes of the Alpha moped
It’s good for those who have a moped with disc brakes: add brake fluid to the reservoirs on time and change the pads and all the troubles end there.
We, the owners of simple Alphas, have to constantly adjust the brakes: tighten the chain - adjust, replace the pads - adjust, replace the cable - adjust... In a word: adjust, adjust, adjust... We put the moped on the stand
We unscrew the wheel by hand and begin to turn the adjusting wing nut in the desired direction: if the brakes are weak, tighten the nut, if the brakes are too tight, unscrew it.
As soon as the pads begin to cling to the brake drum (the wheel begins to slow down slightly), pump the brake lever/foot several times until it stops, spin the wheel again, and if the pads still continue to cling to the drum, unscrew the nut a turn and a half.
Unfortunately, adjustment does not always help, especially when you need to tighten up weak brakes. It's all due to worn out pads. And if with the rear wheel in this regard it is a little easier: you can throw the lever on the rear support along the splines and at the most inopportune moment plow your nose on the asphalt and knock the pads almost to the metal, then with the front wheel this method will not work for you.
On the front support the lever cannot be thrown over the splines; it is placed in one position. Therefore, whether we like it or not, worn out pads will have to be replaced with new ones.
Source
What is the difference between disc brakes and drum brakes?
There is a big design difference between disc and drum brakes. They have only one thing in common - braking by rubbing pads and a rotating surface. If in the second version the pads are located inside the drum and are pressed against it from the inside, then in the first the pads cover a special disc. This is the main difference between disc and drum brakes.
Therefore, we can assume that the principle of operation of brake systems is the same, but they are designed differently. Accordingly, their advantages and disadvantages will be different.
Disc brakes have also been known for a long time; they were used on Soviet Zhiguli cars. But at first they had a rather complex design. They were placed on the front wheels, where they are more efficient. Since there are two brake pads on each wheel, each of them was pressed to the disk by its own hydraulic cylinder. Nowadays, ordinary budget cars use one hydraulic cylinder for each wheel - this has greatly simplified the design.
The design of disc brakes is much simpler. They are easy to take apart and have few parts. But opening the drum itself can be a problem - over time, the lid can stick. And there are more details, and the device is more sophisticated. In modern versions, a non-specialist may not understand how to disassemble it and then reassemble it correctly.
Another big difference between a disk system is good ventilation. When braking at high speeds - more than 100 km/h, the drum version, due to its closed design, experiences severe overheating. Disc brakes are exposed to all winds and are well cooled by air
But now speeds of 100-120 km/h are the norm, and good cooling is very important. Brake discs, in addition, began to use ventilated ones, which further improved the performance, and the hub bearings do not overheat
Car disc brakes
Rules for operating and maintaining a scooter with a disc brake
- The fluid fills the entire line and is stored in a special tank, which is usually located on the steering wheel. It cannot work forever and over time it loses its properties, after which the entire effectiveness of the braking system decreases. You can also add wear to the pads and discs, and the appearance of moisture from the air in the circuit.
- During operation of the scooter, brake fluid must be added to the reservoir in accordance with the indicated marks inside or outside the reservoir. The reservoir can be metal or plastic. Metal tanks are usually equipped with a special window for monitoring the liquid level. Plastic ones allow you to control the level due to the translucent material of manufacture.
- The brake fluid level must not be allowed to fall below the marked position, as this entails air leaks into the circuit and the efficiency of the system is reduced due to the fact that the air is perfectly compressed and takes the force upon itself. To add new brake fluid, you need to remove the reservoir cap, which can be secured with screws or simply unscrewed. There is usually a membrane or gasket under the cover; it needs to be removed to the side. Fresh fluid is added to the top mark, after which the gasket and cover are installed in place. This procedure must be carried out as the liquid level in the tank decreases; therefore, the level must be constantly monitored.
- It is permissible to use only the brake fluid recommended by the manufacturer of a particular scooter model. Usually the marking is always indicated on the tank cap and there is no need to look for it in the manual.
- The brake fluid level should decrease gradually as the pads and disc wear. A sharp decrease in level may indicate a leak in the circuit. This should alert you and checking the entire circuit, in particular the brake hose, is mandatory. Perhaps there are cracks in the hose, or maybe the fastenings just need to be tightened.
- Periodically, preferably once every two seasons, it is necessary to completely replace the brake fluid in the circuit, as it absorbs moisture from the air and gradually loses its properties. How to properly bleed the hydraulic system was discussed here.
- It is strictly forbidden to store brake fluid in open or loosely closed containers. If this happens, its further operation is not allowed.
- The wear of the brake pads is controlled without removing them. The pads are always visible and the thickness of the linings is very easy to determine. If the pads are covered with special protective covers, they must be removed to ensure sufficient visibility.
- You should monitor the wear of the linings. Typically the minimum acceptable value is within 2mm. If the scooter manufacturer does not indicate other parameters, this rule should be followed. Measure the thickness of the linings; if it is less than 2mm, the brake pads must be replaced.
- Before replacing the pads, read the repair and maintenance manual for your scooter model. If the latter is missing, determine for yourself how the caliper is attached to the fork. Usually these are two bolts that can easily be unscrewed and the caliper removed from the disc.
- After installing new pads, most likely you will not be able to put the caliper on the disc, since their thickness has increased and the clearance for the disc has decreased. In this case, it is necessary to push the piston of the mechanism a little deeper to free up clearance for the disk.
- If you feel vibration when braking, the brake rotor is most likely slightly warped. The distortion could have occurred as a result of a fall, hitting a pothole, etc. The disc runout can be determined with a special indicator in the workshop. The indicator is installed at a distance of about 1 cm from the outer edge of the disk, after which the wheel is spun. The maximum permissible runout is 0.3 mm.
Thus, regular checking of the elements of the hydraulic disc brake system on a scooter, timely replacement of fluid and worn parts will allow you to feel confident on the road.
Drum brake device
Detail of a drum brake. 1.3 – fixed parts; 2 – rotating part
Structurally, drum brakes include the following elements:
- a drum mounted on the wheel hub;
- brake pads, on the working surface of which friction linings are attached;
- a working brake cylinder with pistons, sealing collars and a bleeder fitting;
- return (coupling) springs attached to the pads and fixing them in the non-activated position;
- brake shield installed on the hub or axle beam;
- brake pad support stand;
- lower pad support (with adjuster);
- mechanism .
In addition to single-cylinder drum brakes, there are systems with two cylinders, which will perform significantly better than the first option. In this case, instead of the lower support, a second brake cylinder is installed, thereby increasing the contact area between the drum and the shoe.
MY MOTORCYCLE
Adjusting the rear brake involves setting the free play of the rear brake lever.
The free play of the rear brake lever is determined by the distance from the start of movement to the “grasping”. Normal free play, measured at the end of the front brake lever, should be within 10-20 mm (Fig. 1).
Procedure for adjusting the rear brake:
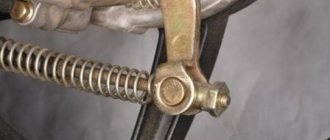
Fig 2. Rear brake adjusting nut and rear brake brake pad wear marks: 1-adjusting nut; 2-brake lever; 3-nut for rear brake lever; 4-mark on the brake drum; 5-mark on the brake lever. Fig. 3 - rear brake adjustment
• place the scooter on the central support stand;
• adjust the free play of the rear brake lever by rotating nut 1 (Fig. 2). located on the rear wheel hub (to decrease the free play, you need to rotate the adjusting nut clockwise, and to increase the free play, you need to rotate it counterclockwise);
• after adjustment, you must make sure that the rear wheel rotates freely and without jamming;
• check the serviceability of the brake cable and rear brake lever. If the threaded part is not enough to adjust the free play of the control lever, then you can adjust the rear brake by moving brake lever 2 by 1-2 slots (Fig. 3).
REPLACING REAR BRAKE PADS (for models with rear drum brakes)
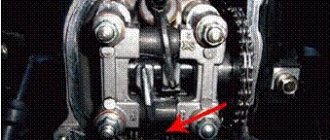
To indicate the degree of wear of the brake pads, marks 4 and 5 are used, located on the controlled brake lever (located near the rear wheel hub) and on the brake drum (Fig. 2).
When the control lever (located on the steering wheel) is fully pressed, there should be some distance between the marks. If, after pressing the lever, the marks align or come close to each other, this indicates critical wear of the brake pads - they need to be replaced.
The pads must be replaced when the friction layer thickness is 1.5-2 mm.
The procedure for replacing brake pads is as follows:
• place the scooter on the central support stand;
• having unscrewed the fastening nut, move the muffler to the side (Fig. 4.1) (on scooters with two shock absorbers, you need to unscrew the fastening nut of the right shock absorber and move it to the side);
• unscrew the fastening nut and remove the wheel (Fig. 3.2-3):
• prying it with a screwdriver, overcoming the force of the springs. REMOVE worn brake pads (Fig. 4):
• clean the brake drum and wheel hub:
• having installed new brake pads, reassemble the mechanism in the reverse order......
Source
How rim brakes work
From the name it is clear that braking is carried out by acting on the wheel rim. The most common type today is the V-brake, characterized by good braking force, low price and low weight.
The rim brake on a bicycle is located on the rear stays of the bicycle frame and on the fork. The device performs braking when the pads are brought to the rim. The pads are made of rubber - a soft material, so that when braking they wear out, not the bicycle rim.
The principle of operation of the device is that when you press on the brake handle, the cable tightens, bringing the brake mechanism together, i.e. bringing all the pads to the rim at the same time.
Next is the cable. It weakens over time and requires periodic tightening.
Another disadvantage is that the pads wear out quickly and get sand or dirt on them. Braking performance in these cases deteriorates noticeably. But there are nuances here: not everyone drives through mud, since this activity is difficult and unpleasant.
Well, those who drive don’t drive fast, because you can’t reach high speed through mud, so you don’t have to slow down. To combat this drawback, you can install pads on your bicycle with special grooves to remove dirt.
Next, about the frame stays and fork legs: their rapid wear is associated with a large force during braking, from which they expand. To eliminate the shortcoming, additional rigidity is added by installing special rocker arms.
Pads and tires also wear out quickly due to the heating of the wheel during braking. Despite the fact that the consumables to which they belong are inexpensive and easy to replace, this causes some inconvenience.
Another disadvantage is the inability to install tires wider than 2.5 inches on the wheel.
Drum brakes on a scooter
Are drum brakes really that popular? We'll try to figure it out with you...
The principle of operation of drum brakes is quite simple: you press the handle and it pulls the cable (unlike cars on scooters, this moment is carried out by the cable). The second end of the cable is connected to the brake mechanism and releases the pads. When you release the brake lever, the spring compresses them back. It seems that what else is needed?, it seems like a simple and fairly reliable mechanism:
- The inner shell of the wheel, against which the pads rub during braking;
- A special plate that unclamps these pads;
- Return springs;
- Brake pads;
- Cam.
But then the disadvantages begin, which prompted the creators to switch en masse to their disk analogues:
- Braking efficiency is much lower, this is explained by a different method of adhesion of the pads to the road surface;
- The cable is not as effective as brake fluid. When using brake fluid, almost all the force is transferred to the piston, which compresses the pads.
- Over time, the brake cable loses strength and becomes a “rubber band” (the brake handle sinks further when pressed, like a spring when pressed).
- The brake cable may break (very rare, but it happens).
- They squeak a lot and quite often (especially Chinese ones) in order to lubricate the cam and clean the linings, you have to remove the entire wheel, which is very inconvenient.
Having a fairly large number of disadvantages, this type of brake is still installed on the rear wheel today. Of course, with this type of brake it reduces the cost of the scooter, slightly, but still. Manufacturers also explain this step by the fact that, in their opinion, the rear wheel should not take an active (main) part in the braking process, but only slow down, and drum brakes do this fully. (information - How to check brake pad wear)
If the mass of your scooter is not very large, and you prefer to ride alone, then the ratio is as follows: front-disc, rear-drum. But if the scooter weighs more than 100 kg and you often ride together, then the efficiency of the rear ones is quite low for this. And if such brakes are installed at the front, then be very careful, you will not be able to completely control the situation on the road.
Replacing Rear Brake Pads on a Chinese Scooter
Scooter maintenance and repair
Replacement drum brake pads on a scooter
replacement
Brake drum brake pads are required when the pads are worn out, the pads themselves are defective, and in some cases where the scooter does not perform satisfactorily with the existing pads due to poor quality of the pads. So, let's take a look at the process of replacing a brake drum with a scooter brake pad.
The process of replacing brake pads.
Even a beginner scooter who cannot handle equipment repairs can replace the brake pads on his own.
We recommend that you read the following articles before you begin rebuilding your drum brake:
The most common drum brakes can be seen on the rear wheel of a scooter, we will look at it. Front wheel steering is not fundamentally different. Let's take a look at the entire repair process to:
Removing the rear drum brake.
Place the scooter on a flat, hard surface. Use central support. The muffler usually does not allow the rear wheel of the scooter to be removed, so we continue to remove the muffler. It's very simple. Remove the two bolts that secure the muffler to the crankcase. And also two pins attached to the cylinder. If the rear wheel has a tight-fitting plastic fender that will prevent the wheel from being removed, the fender should also be removed. Now unscrew the wheel nut. Remove the rear wheel from the axle. After removing the nut, you only need to remove it from the grooves on the shaft. Remove the brake pads. They are held in place only by the tension of two springs, which are attached to the cam and eccentric. Carefully inspect the inside of the wheel hub (which touches the brakes). If the drum itself is worn out, replacing just one liner will not help. The inner diameter of the drum is determined by the manufacturer of each scooter model and is indicated in the operating instructions. If the inner diameter exceeds the limit, the wheel disc must be replaced. Check the thickness of the brake pads on the pads. If the pads are worn beyond the limit specified in the scooter's operating instructions, the pads must be replaced
Please note that you need to replace two panels at a time rather than just one if it is worn out.
Replacing rear brake pads
Removing the HORS MOTORS 056 wheel.
This video was processed in the YouTube video trunk () scooter
Do it yourself.
Rear drum brake assembly.
- Reassemble in reverse order. First, rotate the mark on the cam towards the rear wheel axis.
- The wear indicator of the pads located on the grooves of the eccentric shaft should be returned to the mark on the eccentric.
- Now install the wear indicator and lever onto the slots, aligning the eccentric groove with the eccentric seat.
- Be sure to lubricate the cam and cam with a small amount of lubricant before installing the pads. Lubricants should be kept to a minimum to prevent gaskets from coming into contact with the work surface during operation. Grease on the pads will significantly reduce the quality of the drum brake in the future.
- If any traces of dirt are visible on the pad(s) and inside the brake cap (on the wheel hub), wipe them with a cloth dampened with solvent or mineral spirits.
- Replace the brake cable and tighten the adjusting nut so that the free play of the wheel brake handle on the wheel is 10-20 mm.