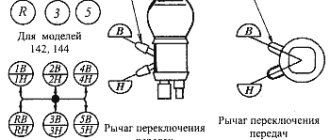
contents .. 1 2 3 4 ..
Adjusting the carburetor of motorcycles Java-250, Java-350
Let's consider adjusting the carburetor without selecting and replacing jets. The factory-installed jets provide good throttle response of the motorcycle in everyday use and the possibility of short-term movement at maximum speed, for example, when overtaking on the highway. By adjusting the carburetor, such qualities as the ease and speed of starting the engine, the stability of its operation at idle and under load, the absence of “failures” when switching from one operating mode to another, the throttle response and maximum speed of the motorcycle and, finally, efficiency are determined. The difficulty of adjusting the carburetor lies not in the process itself, but in the difficulty of more or less objectively assessing the results obtained, since under individual operating conditions the possibility of using any control means for this purpose is, of course, excluded. Here you have to rely entirely on the technical literacy of the motorcyclist and his sufficient operating experience, during which certain skills in handling equipment are developed and, as they sometimes say, a “feel for the machine” appears. However, these qualities are not acquired immediately, so a novice motorcyclist should not show excessive independence when adjusting the carburetor, at first
In these cases, it is better to follow the relevant recommendations of the manufacturer (Table 1), which are intended for consumers with an average level of training. Following the manufacturer's recommendations ensures normal carburetor operation. Individual carburetor adjustment is aimed at ensuring the optimal composition of the combustible mixture for any operating mode. Strictly speaking, each specific engine and carburetor has its own regulation features. So, for example, two carburetors of the same design with the same parameters of the metering devices and with the same positions of the adjustment elements, when they are successively changed on the same engine, can show different results. A similar picture can be obtained when installing the same carburetor on different engines of the same design. Before you begin adjusting the carburetor, you must perform the following preliminary operations:
Pour a mixture of gasoline and oil into the motorcycle tank of the grades on which further operation is intended. Remove cover 22 (see Fig. 6) of the float chamber, make sure there is no dirt on the bottom of the chamber. If necessary, remove the carburetor from the engine, disassemble, wash and reinstall. Set the quality adjusting screw 5 and the dosing needle 17 to the positions indicated in the table. 1. Adjust the stop 11 of the throttle cable sheath, ensuring a play of the sheath of 2-3 mm. Check that the ignition timing is set correctly, see chap. 4. Check the condition of the air filter. A clogged paper microfilter should be replaced, and a contaminated mesh contact-oil filter should be washed and soaked in oil. Start the engine; Use the inclined screw number 6 of the throttle stop to adjust the minimum stable idle speed. Immediately before starting the adjustment, warm up the engine by riding the motorcycle for 5-10 km.
It is recommended to carry out the operations listed below and the sequence of carburetor adjustments in accordance with the order in which they are presented. Since the main metering system and the idle system are not functionally connected, because fuel from the float chamber is supplied to them independently of each other, the idle system in all engine operating modes is under the influence of vacuum and, due to its autonomy, continues to participate in mixture formation. Especially at partial throttle lift and in transient mode. Therefore, adjusting the carburetor should always begin with adjusting the idle air system. The carburetor should be adjusted at idle as follows. 1. Place the motorcycle on a stand (on a level surface); screw in new spark plugs of the PAL-8K2 or PAL-9K2 brand. 2. Start the engine. 3. By rotating the quantity screw 6, adjust the minimum stable engine speed. 4. Slowly rotating the quality screw 5 counterclockwise or clockwise to achieve a maximum increase in engine speed; Leave the screw in this position. 5. Using quantity screw 6, lower the throttle until the minimum stable speed is obtained. 6. Use quality screw 5 to set the engine speed to maximum again. 7. Set quantity screw 6 to the minimum stable speed position, then turn quality screw 5 clockwise by 1/4-1/2 turn and leave in this position. 8. Check the stability of the engine at idle, to do this, sharply increase and release the gas; At the same time, the engine should not stall, otherwise the idle speed should be slightly increased using the throttle lift quantity screw 6. To prevent the engine from stalling when changing gears, for example, at intersections, which is of course very unpleasant for the motorcyclist and other drivers, it is recommended to set the idle speed to a slightly higher speed. Or, in other words, the engine must idle steadily with the clutch depressed and the gear engaged, of course, with the clutch in good working order and correctly adjusted. After changing the air filter and after cleaning it, as well as after cleaning the engine and exhaust noise muffler from carbon deposits, it is necessary to adjust the low idle speed. Sometimes the optimal carburetor adjustment for idle speed does not provide a good enough start for a cold engine. In this case, the mixture should be slightly enriched by reducing the flow of air into the idle system with quality screw 5. Some re-enrichment of the mixture at low idle speeds will ensure reliable engine starting. The starting quality of the engine and the stability of its operation at low speeds of up to 50 km/h significantly depend on the adjustment of the idle system. Adjusting the carburetor to the optimal composition of the combustible mixture for medium load modes is done by changing the relative position of the metering needle and the throttle, while changing the ratio of the flow sections of the atomizer and the main air channel: to enrich the mixture, the needle is raised, to lean it is lowered, installing the spring latch 15 in the corresponding one needle groove position. To adjust the carburetor at medium loads, it is recommended to select a horizontal section of an asphalt highway 1-2 km long. You need to control the result of carburetor adjustment when the motorcycle is moving in direct gear in the speed range of 40 km/h and above (the last condition does not apply to the break-in period). It is highly advisable to carry out the adjustment in calm, cool weather.
The adjustment should be made as follows. 1. Check the operation of the engine when the motorcycle is moving at a speed of 60-70 km/h with the throttle (throttle) position strictly unchanged. If the engine operates unstable (the engine starts to operate “every other stroke”, which is a sign of a rich mixture), you need to lean the mixture by sequentially lowering the metering needle 17 and testing the motorcycle on the move after each rearrangement of the needle, and achieve stable engine operation. With stable engine operation, it is necessary to enrich the mixture by sequentially raising the metering needle 17 and testing the motorcycle on the move, to achieve unstable engine operation, and then lower the needle, moving the spring latch to one groove. Sometimes it is not possible to over-enrich the mixture even when the needle is set to the highest position. In this case, the last adjustment should be accepted as optimal. 2. Check engine operation in variable driving modes with different rates of acceleration (in direct gear). To do this, first, slowly and evenly adding gas on a section of road 500-700 m long, accelerate the motorcycle from 40 to 75-85 km/h, carefully monitoring the nature of the engine, which should develop speed smoothly, without sudden transitions. The exhaust sound should be sharp and clear. Then, not very sharply, opening the throttle quite energetically, check how the motorcycle accelerates in the same speed range on a minimum section of the road, i.e. evaluate the throttle response of the motorcycle. If at the same time there are no interruptions and “failures” in the engine operation, and acceleration is carried out quite effectively, the carburetor adjustment can be considered sooted. If for some reason the driver is not satisfied with the results obtained or there are obvious problems with the operation of the engine (carburetor), you can try to slightly change the adjustment of the idle system, the main system, or both. As a rule, this is not necessary, since correct adjustment of the carburetor for “quiet” driving modes also ensures good throttle response. During operation, however, conditions may arise when the resulting carburetor adjustment will need to be changed in one direction or another depending on climatic conditions, driving mode, motorcycle load, fuel type and other circumstances. If the motorcycle is operated in winter, it is necessary to install a main jet with a high throughput, and when operating in the southern regions, as well as in high mountain areas, with a lower throughput. The quality of the mixture can be controlled indirectly by the condition and color of the spark plug electrodes. When the engine is running on a mixture of optimal composition, the electrodes of the spark plugs are covered with a brown coating, the color resembling rust. The end of the threaded part of the candle can be black or dark brown. The deposition of black soot and soot on the electrodes indicates that the mixture is over-enriched. The spark plug electrodes of an engine running on a lean mixture have a light brown coating with white or gray spots at the ends. An over-lean mixture can even lead to melting of the electrodes. An assessment of the qualitative composition of the mixture using the method described above can only be done under the following conditions: 1. the spark plugs installed before testing are new or in fairly good condition; 2. the engine is well warmed up; 3. the speed of the motorcycle (75-80 km/h) was maintained constant on a section of the highway with a length of at least 1-1.5 km; 4. The engine is turned off while the motorcycle is running and the spark plugs are immediately removed from it (after stopping).
Preventative maintenance of the carburetor. It comes down to keeping it clean, checking the threaded connections and the reliability of fastening the carburetor to the engine. If the tank is filled with a clean mixture through a fine filter, then cleaning the internal cavities and parts of the carburetor, in addition to cases where there is obvious clogging, is required approximately once or twice a season (for example, in the middle and end of the season, when the motorcycle is parked winter preservation). To flush, the carburetor must be removed from the motorcycle and disassembled. To remove the carburetor, you must do the following: 1. close the fuel valve; 2. disconnect the gas line from the tap; 3. unscrew the shaped nut securing the carburetor casing; 4. Unscrew the spool well cover and remove the throttle along with the needle and spring; 5. disconnect the throttle from the cover by squeezing the spring with your fingers and removing the cable tip from the throttle through the hole located next to the stop of the cable sheath; For the Yikov 2926SD carburetor, unscrew the cover of the starting carburetor and remove the throttle; unscrew the cable holder from the throttle and compress the spring, disconnect the holder from the cable and remove the cable from the cover; 6. Having disconnected the throttle (or throttles) from the cable, remove the carburetor casing and the shaped nut; 7. Rotating to the right and left and simultaneously pressing along the axis, push the rubber coupling with the air damper onto the intake noise muffler housing as deeply as possible; 8. Unscrew the two nuts securing the carburetor flange to the engine crankcase, and carefully, so as not to damage the paper gasket, move the carburetor on the studs back; 9. remove the carburetor, then, if necessary, the gaskets, remembering their position; It should be remembered that if handled insufficiently carefully, the gaskets (paper and thermal insulation) can easily be damaged. Complete disassembly and cleaning of the carburetor must be done in the following order: 1. unscrew the cover 3 (Fig. 7) of the spool well (if it was wrapped after removing the carburetor), remove the spring 27 and the throttle spool of the main carburetor with the metering needle 25; for the “Yikov” 2926SD carburetor, unscrew the cover 23 of the starting carburetor and remove the spring 21 and the throttle valve of the starting carburetor 19 with the cable retainer 20; 2. unscrew two screws 5 in the cover 6 of the float chamber, remove the cover and remove the float 7 with the locking needle; 3. Unscrew the screw cap 11 from the bottom of the carburetor; unscrew the main jet 9; 4. unscrew the idle fuel jet 16 and the horizontal quality adjustment screw 18; the number 12 screw does not need to be unscrewed; At the “Yikov” 1916SD carburetor, use a wrench to unscrew the fuel jet 13 of the starting carburetor, located at the bottom; 5. Wash the internal parts with gasoline: jets, float, spool, needle and spring. 6. wash the carburetor body; 7. blow air in the direction opposite to the flow of fuel, channels and jets, then rinse everything again in clean gasoline, following the same sequence: first the jets and other parts located inside, then the carburetor body. If there are tar deposits on the carburetor parts, the carburetor should be washed in acetone after washing in gasoline. If acetone is not enough to flush the entire carburetor, you must at least flush the carburetor jets and channels, and then blow all parts with air. After purging the channels, the carburetor must be washed again in clean gasoline. Assembling and installing the carburetor in place must be done in the reverse order. When installing the float in place, the cone of the float needle in the float chamber should face up. The float chamber cover must be installed carefully so as not to damage the shut-off needle. When installing the throttle, you must align the vertical groove on it with the guide pin located in the body. First you need to make sure that the dosing needle gets into the sprayer. The throttle with the dosing needle should be at
place under the influence of its own gravity. Before installation, it is recommended to lightly lubricate the sliding surface of the throttle with engine oil. It must be remembered that the carburetor parts are made of a brittle alloy, so when tightening the threaded connections, great force should not be used.
Fig.7. Parts of the Iikov 2926SD carburetor: 1 - throttle cable sheath stop; 2 - lock nut; 3 - spool well cover; 4 — needle latch; 5 - screws; 6 — float chamber cover; 7 — float; 8 — carburetor body: 9 — main jet; 10 - gasket; 11 — threaded plug; 12 — quantity screw; 13 — fuel nozzle-plug of the enrichment device; 14 - gasket; 15 - spring; 16 – idle fuel jet; 17 — spring; 18 — quality screw; 19 – throttle valve of the enrichment device; 20 — cable clamp; 21 - spring; 22 — throttle valve of the main carburetor; 23 — housing cover of the enrichment device; 24 - lock nut; 25 — dosing needle; 26 – stop of the concentrating device cable sheath; 27 - spring.
contents .. 1 2 3 4 ..
Starting system
The 634 model had its own feature - a float quencher. It served to start the engine in the cold season. The Java 638 does not have such a system, but there is an additional carburetor to start the engine. It is located inside the main one. When starting a cold engine, it makes the fuel mixture more saturated. For it to start its work, a special toggle switch is turned on. After warming up it is turned off. This system only works well when the throttle is lowered, otherwise the starting carburetor will not perform its function.
It is important to keep the jet clean. Its close location and pressed fit in the float chamber ensures injection into the diffuser hole. The amount of emulsion supplied depends on the location.
It is important not to forget that adjusting the YAVA 638 carburetor greatly affects the fuel supply and thereby creates the correct air-fuel mixture. In cases where a lack of power is noticeable or popping noises are heard in the exhaust system, it is necessary to adjust the needle valve that injects fuel into the combustion chamber.
ADJUSTING THE IDLE SPEED OF THE CARBURETOR JAVA 638 2928CE
First, using the spool stop, we set the minimum stable speed (screw_1) (for a run-in engine this is 600-1000 rpm). Then, by rotating the quality screw (screw_2), we look for the position at which the speed will be maximum. This is done slowly. Each time the screw must be turned no more than 1/4 turn and wait a while until the rotation speed stabilizes. Of course, we determine the speed using the standard tachometer. Keep in mind that unscrewing the quality screw (screw_2) more than two turns is ineffective; with further unscrewing, there will be practically no depletion. After the position of the highest speed is found, lower the spool slightly until the speed drops to the previously set one. Then you can try to increase the speed with the quality screw, that is, clarify the position of the quality screw. Adjustment of the Java carburetor is carried out only on a warm engine.
SETTING THE FUEL LEVEL IN THE FLOAT CHAMBER OF THE JAVA 638 2928CE CARBURETOR
Theory (Java 638 2928CE carburetor adjustment): The float mechanism consists of a double plastic float, a float chamber and a needle valve. In order to correctly adjust the fuel level in the float chamber, the carburetor is disconnected from the engine and the bottom cover is removed from the carb. The level must be set at a distance of 11 mm from the plane of the connector between the carburetor body itself and the plastic float chamber.
Solution (Java 638 2928CE carburetor adjustment): place the body with floats on the edge of a half-liter glass jar and connect it to the fuel tank with a thin hose. Open the tank tap and wait for the fuel level to settle. Considering that the height of the collar at the bottom of the body is 2 mm, it should be 9 mm from the top edge of the can. If the level does not work out this way, then you need to bend the tongue between the floats until the level is 9 mm from the edges of the can
Main dosing system
When the throttle rises to a height of five millimeters, the main dosing system is activated. Here a complete mixture is created for enhanced engine performance. However, before creating the mixture, the fuel passes through an annular channel. A small amount of air gets into it there. After entering the diffuser, the fuel is enriched with air from the main flow.
The quality of the mixture can be influenced by changing the angle of the injection needle or the size of the main hole. In this case, the hole plays the main role of enriching the mixture when the throttle is raised, while the needle only plays a role in the middle position. When the diffuser is fully open, maximum output must be achieved. This can be achieved with a higher quality of the combustible mixture. In this case, you can select the jet of the required size and install it. Usually the new jet is a standard one, in which the hole is enlarged.
Econostat
The econostat is a system that enriches the mixture at a high throttle position. Its device is very simple. The essence of the work is to take fuel from the float chamber with a pipe. Through the channels, the fuel rises into the diffuser and is sprayed in front of the throttle. This helps air bypass the throttle when it opens low.
In conclusion, we note that after each work carried out, adjusting the YAVA 638 carburetor is very important, see the video about which at the end of the article. It is also necessary to carry out timely maintenance of the carburetor, the essence of which is to clean the main working elements. Washing should be done as often as possible, preferably with diesel fuel or gasoline. It is better to treat resinous areas with caustic substances, for example, acetone. Otherwise, the system will not cause you problems.
For Java 638, a new type of carburetor was created in order to increase engine power. The diffuser diameter was increased to 28 mm (previously 26); introduced additional systems and complications. The only element left from the previous carburetor is a cylindrical spool, which, in comparison with Soviet K-62 carburetors, ensures uniform and fine atomization of the mixture. The carburetor is attached to the engine through an insert ring made of gasoline- and oil-resistant rubber. By turning the carb 90 degrees, it is very easy to remove the cover, move the needle to a different position, clean the jets and float chamber. (See continuation)
Idling
Immediately after the engine starts, the system begins to idle. Like a starting carburetor, this system operates when the throttle is low. It consists of a hole, emulsion pipes, a bolt that regulates the quality of the mixture and translational channels. Since the air supply is much lighter than fuel, adjustment is made using a bolt. The more you tighten it, the lower the air flow will be. Do not overdo it with the air supply; if there is too much of it, the mixture will become leaner and the loss of power will become very noticeable.
Refinement and tuning
Since the new Java 638 is very popular and the demand for this motorcycle does not subside, craftsmen continue to refine both the appearance of the motorcycle and its characteristics. On the Internet you can find many reviews and interesting technical solutions for tuning this motorcycle.
The change in appearance is sometimes so dramatic that it is difficult to believe that this motorcycle was once a classic java. The wheel rims are replaced with cast light alloy ones, the old front steering wheel fork is replaced with a more advanced, longer one, the seats and headlight are changed. There are simply no limits to the imagination of inventors.
To improve driving characteristics, drum brakes are replaced with higher quality disc brakes. To increase the service life of the engine, the bearing seats are changed, thereby improving their lubrication.