How to check the accelerator pump for malfunctions
The verification scheme itself is not complicated.
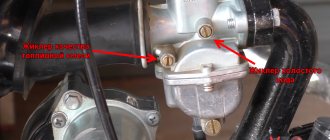
The throttle lever is turned manually by acting on the pump lever. During this procedure, fuel should spray out from the nozzles in streams, without touching any walls, but simply falling to the bottom of the intake well. If the streams are weak or crooked, then the jets, channels and nozzles need cleaning and adjustment. To accurately determine the stability of the accelerator pump, it is necessary to measure the amount of gasoline sprayed during 10 injection phases. To do this, you need to remove the carburetor and, after manually performing the injection procedure ten times, measure the amount of gasoline using a ten-cc syringe. The volume should range from 5.25 to 8.75 milliliters. If the volume does not fall within these parameters, it means that the accelerator pump is not working correctly or is faulty. If the accelerator pump is faulty, when you sharply press the gas pedal, dips will be clearly felt, both while driving and at idle.
We install autostart with our own hands
Before you begin the installation work of the autostart on the VAZ, you need to prepare everything required for this. Installing one alarm will not be enough; it will require long and painstaking work. To bring your plan into reality, you will need to prepare the following:
- alarm system with auto start, in this case you can use the simplest model from the manufacturer StarLine;
- a temperature sensor and a controller are purchased separately;
- small electric drive, can be used from a Ladovsk washer;
- a thin cable, preferably soft, made of copper or aluminum, but it is better to give preference to the copper option;
- wiring in the required quantity, it is better to prepare with a reserve;
- In addition, patience will be required, since setting up equipment and autostarting a carburetor is a long and painstaking process.
Scheme for installing autostart on a carburetor
You can start assembly by turning off the manual choke, which is installed on any VAZ carburetor engine. In this case, you don’t have to pull out the cable, but secure it securely under the hood. There is a high probability that it will be useful for something in the future. If you have an auto choke on your car, then it will have to be completely disassembled. The carburetor is completely disassembled and all sensors are removed from it. The last step before assembly is to switch the feed drive to external.
Stages of installing a do-it-yourself autostart on a carburetor
To install a start-up signal on a carburetor engine, the following series of actions must be performed sequentially:
- First of all, all the components of the structure are placed in their places. The electric drive can be installed on the engine wall. The temperature sensor is mounted on the engine. You should not use an old sensor, as there is a high probability of making a mistake. The microcontroller will need to be placed next to the electric motor, although in some situations it is better to attach it to the carburetor.
- Using a previously prepared cable, the engine is connected to the damper.
- All parts of the suction pump should be connected to a microcontroller, which in turn has a direct connection to the signaling system.
- Next comes a test test, if the system gives a response, then you can move on to the next stage, if there is no feedback in the carb, then you have to recheck the entire connection again.
- The entire system is tested and brought to perfection. The microcontroller will have to change several operating modes taking into account the temperature sensor readings. You should also adjust the length of the cable as much as possible. Once the system has been tested, the first test run can be performed.
The final stage of installing autorun
It is possible to fully start the engine using the key fob only after installing the air damper servomotor. The device, as a rule, is placed on the wall of the engine compartment, while others, on the contrary, try to mount the element directly on the carburetor. By installing this element, you can forget about the position of the air barrier. This device is produced under the Sadko brand. The model is produced in two types:
- Standard equipment, which includes a microcontroller, control unit, cable, electric drive and temperature sensor.
- The maximum configuration, which contains all the previously listed devices, as well as some additions.
Adjusting the ignition angle
Sluggish acceleration of the car and instability of the idle speed are also often associated with incorrectly set ignition; this procedure is mainly carried out in car repair shops using special equipment. But if you wish, it’s easy to make the adjustment yourself, and without a strobe, and quite accurately:
- with the engine stopped, loosen the three nuts securing the distributor (the third fastening is located at the bottom, it is not visible from above);
- we start the car, turn the distributor-distributor clockwise (to “+”), and if the ignition was late, the idle speed will increase noticeably;
- we select the optimal position of the distributor (the operation of the internal combustion engine should be smooth, without failures), reduce the speed using the quantity screw, turn off the engine, fix the distributor-distributor with one nut for now, and check the results of the ignition adjustment on the fly.
We recommend: How to remove the secret from a car wheel without a key
If, under heavy load and sharp acceleration, your fingers begin to noticeably “knock” (engine detonation appears), you should move the distributor a little to “minus”, then check the car again while driving. This way you can set the ignition quite accurately, and sometimes even better than with a strobe light.
Adjustment of XX on Pekar
Adjusting the idle speed on the St. Petersburg K-151 carburetor is of fundamental importance. This is a special mode of engine operation that requires stable operation
This is exactly what is achieved by correctly setting the idle, which also helps to minimize the amount of carbon dioxide in the car’s exhaust, which is important from the point of view of modern environmental requirements
Over time, as a result of clogging of the filter mesh, the amount of fuel burned in the XX mode increases beyond the norm, and in this case the situation can be corrected by appropriate adjustment.
This operation is not particularly difficult:
- First you need to warm up the CA to operating temperature;
- then you need to find the fuel assembly quality screw located on the rotation shank and remove the limiter from it. Please note that the rotation limitation function is not present on all Pekar modifications. If your car does not have it, just proceed to the next step;
- We adjust the quality screw, for which we look for the position of the screw at which the power unit will produce the maximum number of revolutions when operating at idle. This point should be determined by ear (more accurate methods require the use of special equipment);
- Now we move on to the quantity screw located nearby, by adjusting which you should increase the crankshaft rotation speed by 100-120 rpm. After this, you need to completely tighten the quality screw, which will lead to a drop in speed by the same amount (within 100-120 rpm).
If, when turning the quality screw back, the speed does not drop as a result of a slight leaning of the mixture, then this indicates the presence of carburetor malfunctions.
Adjusting the PZ30 carburetor at high engine speeds
If at medium engine speeds the main jet and the regulating needle are responsible for the fuel supply, then at high speeds the needle is raised up and all that limits the flow of fuel is the throughput of the main jet. It was also said that at maximum speed the spark plug is blown out and will almost always have a whitish tint.
This raises two questions. How to adjust the PZ30 carburetor at maximum speed? How to determine the quality of the air-fuel mixture at maximum speed?
With the first question, the answer is obvious. You will have to regulate the quality of the mixture only by replacing the main jet and nothing else. But the second question is more interesting, but quite solvable.
Having unscrewed the throttle so that the engine speed rises to 65-70% of its maximum, you need to sharply turn the throttle to maximum and see what happens. If the motorcycle refuses to accelerate or even stalls, this will mean that the air-fuel mixture is lean and it is necessary to install a jet with a larger hole.
To check for a rich mixture, you should dial up the engine speed to maximum and sharply reduce it all to the same 65-70%. If you hear popping noises in the exhaust pipe, this will indicate a rich mixture, which means a smaller diameter jet is needed.
An important point is that in the case of a lean mixture, you can also hear popping noises, but they will come from the intake tract, that is, from the carburetor side.
It should be noted that after replacing the main jet in the PZ30 carburetor, you will have to re-adjust the idle speed and air-fuel mixture at medium speeds.
Checking the pump's functionality
To check, you will need to perform several preliminary steps:
- Pump fuel into the carburetor.
- Remove the air filter housing.
- Remove the carburetor cover so that you can see the operation of the mechanisms inside.
After this we perform a fairly simple test:
- Turn the throttle lever. At the same time, the pump mechanism should turn on. We look carefully at the system from above.
- Straight streams of gasoline should appear from the pump nozzle, which then enter the inlet well without problems. The streams should be continuous, even and strong for several seconds.
This is normal operation of the mechanism. If the accelerator pump malfunctions, you may observe the following defects:
Weak oblique jets of fuel that do not even reach the intake well. The channels may be clogged, then it is necessary to clean the jets. If gasoline flows into the walls of the mixing chambers, you need to check the direction of the nozzles and correct it. Pliers will help here; you will have to slightly bend the nozzles with them.
This work must be done carefully, otherwise parts may break.
Replacing a carburetor on a Ural motorcycle
Before starting the installation, you need to prepare, adapt the mounting locations for the mixer on the cylinder, the cables on the right steering wheel console, and the air filter pipe.
- The distance between the centers of the holes on the PZ30 carburetor flange is less than the center-to-center spacing of the studs on the cylinder. It is required to make (purchase) adapters - eccentrics. Externally, the adapter screw looks like three successively joined parts:
- thread to suit the size of the stud, the length is determined by the depth of the cylinder bore;
- area without thread to suit the thickness of the sealing gasket;
- threaded part with an offset center, with a diameter suitable for a flange eye.
- Modify the adjusting bushings on the cables and the holes in the handle.
Go through the remote control with a 7 mm drill and cut an M8 thread.
The bushing is made in the form of a cylindrical part. It is screwed into the remote control using an M10 threaded connection. The cable housing has an M8 thread. In the middle there is a washer with a notch.
The modification is as follows:
- M10 change to M8;
- grind off the notch for four to six edges for ease of holding with a wrench.
The work can be done in two ways
Safe, professional way. Remove the upper end stops of the cables and process them on a machine in a vice. The process is lengthy, the quality of the cutting is guaranteed, and the possibility of damaging the cable and hands is eliminated.
A method for extreme sportsmen. Sharpen with an angle grinder by eye. The uniformity of processing leaves much to be desired. There is a risk of injury and damage to the product.
- Instead of a rubber pipe, it is possible to stock up with zero air filters that are attached directly to the carburetor.
- Product assembly.
- Set the eccentrics to the appropriate distance and secure the carburetor.
- Secure the cables on three sides (steering wheel, accelerator, accelerator pump). Achieve synchronous control of two mixers by changing the stroke length of the cables.
- Connect the air filtration system.
- Start the engine and adjust the speed.
It will also be interesting
24.09.2021
Self-adjustment of the carburetor
As a rule, when setting up a DAAZ 2107 carburetor, car enthusiasts adjust fuel consumption and idle speed. Let's look at these stages.
Idle speed adjustment steps
Setting up the carburetor in this mode is easy:
- A carburetor with a properly adjusted idle speed allows the car engine to operate stably even with very low CO levels. To do this, the car engine warms up for 10 minutes. After this, the fuel quality screw in the carburetor is turned out as much as possible. Fuel quality and quantity screws in the DAAZ 2107 carburetor
- Then, using the quantity screw, the engine speed is increased (it should be about 100 revolutions higher than normal). After this, the engine should run for 2-3 minutes. If no problems are observed with the motor, the number of revolutions is reduced to normal, but not by the quantity screw, but by the quality screw. If after this no interruptions in the operation of the motor are observed, the adjustment is considered complete. Now the car engine will operate stably even with a very small amount of CO.
Rules for adjusting fuel consumption
To change fuel consumption, you need to adjust its level in the carburetor float chamber.
- First, the top cover is removed from the carburetor. Before starting the adjustment, remove the top cover from the DAAZ 2107 carburetor
- The hole in the carburetor cap is responsible for increasing the volume of fuel in the float chamber, which is periodically closed by a spring-loaded needle valve (the tongue in the photo below is indicated by the letter A). The carburetor cover is installed vertically. The float should not touch it. After this, use a ruler to measure the distance between the float and the lid. It should not exceed 6.5 mm (the maximum permissible deviation from this value is 0.25 mm). Needle valve of a DAAZ 2107 carburetor with an adjusting tongue marked with the letter A
- If the distance between the float and the carburetor cap does not correspond to the norm, it is reduced (or vice versa - increased) by bending the above tongue of the needle valve.
- After adjusting the closing level of the needle valve, you should adjust its opening level, which also depends on the amount of free play of the float in the chamber. To do this, the carburetor cap is held vertically, but the float is moved to the other side as shown in the photo below. After this, the distance between the cover and the float is measured again. It should not exceed 14 mm (maximum permissible deviation is 0.5 mm). Measuring the maximum opening distance of the needle valve on the DAAZ 2107 carburetor
- If this distance is greater (or less) than normal, it must be adjusted using the stop located on the float bracket. This stop can either be bent or straightened. The opening of the DAAZ 2107 needle valve is regulated by a special stop on the float bracket
- Once the exact distances have been set, adjustment and assembly of the needle valve can be considered complete. The car engine will operate stably, consuming a minimum amount of fuel.
So, even a novice car enthusiast can remove the carburetor. Certain difficulties may arise only at the stage of adjusting this device, but they are also quite surmountable. All you need to do is follow the above instructions exactly.
Source
Adjusting a removed pz30 carburetor
After the break-in run, it is advisable to perform preventive maintenance of the fuel system.
Important note. The carburetor contains many small parts. It is logical to prepare, spread a clean cloth for storing the removed spare parts.
Step-by-step instruction
- Close the tap on the fuel tank. Carefully pull off the fuel hose and drain the residue into a clean container.
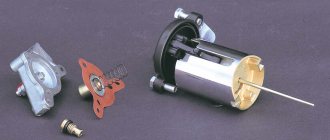
- Unscrew the top cover, remove the twisted, leaf springs. Remove the cylindrical valve. Pull out the accelerator cable and move it to the side together with the cover.
- Disconnect the accelerator pump control cable.
- Remove the air duct.
- Unscrew the fastening nuts on the cylinder. Remove the carburetor.
- Unscrew the three fastening screws of the bottom cover. Inspect the roof from the inside. Remove possible plaque and debris. Wipe with a soft cloth soaked in gasoline.
- Turn the carburetor over. Using an awl, push out the axle and release the bracket with the floats. Disconnect, ideally clean the needle. Rinse and wipe the seat. Check the free movement of the needle.
- Place the needle on the middle protrusion and restore the bracket back.
- Make sure the flat surface of the floats is parallel to the line of the carburetor body. Raised floats cause a lack of fuel, submerged floats cause excessive consumption. Changing the horizon of the floats is done by bending down or up the protrusion in the middle of the bracket. During seasonal maintenance, they unscrew, clean, and change the jets. Screw on the lid.
- Observing from the side of the flange, use the spring-loaded idle screw to slightly open the main air damper by 1 mm. Using a stretched tube, tighten the mixture quality adjustment screw until it stops, and unscrew it 1.5 - 2 turns.
- Install the carburetor on the motorcycle. Start and warm up the engine. Continue setting the modes, turning the attached hose in the direction of enriching the mixture.
Malfunctions and their elimination
Freezing of the economizer housing
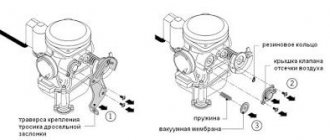
The K-151 carburetor on some engines has one unpleasant feature. In humid subzero weather, the fuel mixture in the carburetor actively condenses on its walls. This occurs due to the high vacuum in the channels at idle (the mixture moves very quickly, which leads to a decrease in temperature and the formation of ice). The economizer body freezes first, since air enters the carburetor from here, and the flow cross-section of the channels here is the narrowest.
The trunk of the air intake hose can be thrown directly to the manifold. Or make a so-called “brazier” - a heat shield made of a metal plate, which rests on the exhaust pipes and to which the air vent hose is connected (see figure).
Also, in order to reduce the risk of the economizer freezing problem, before the trip we warm up the engine to an operating temperature of 60 degrees. Despite the thermal insulation gasket from the engine, the carburetor still receives some heat.
Flange straightening
With frequent disassembly and removal of the carburetor, as well as with excessive force when tightening the flange to the engine, its plane may be deformed.
There are many ways to solve this problem. But the simplest and most accessible method is the following:
- We heat the plane of the carburetor flange using a gas burner. First, we remove all the components and parts of the carburetor (fittings, levers, etc.).
- Place the plane of the float chamber on a flat surface.
- As soon as the carburetor heats up, place a thick, even piece of hard metal on top of the flange. We don’t hit the piece too hard, moving it to different places each time. Basically, the bending of the flange occurs along the edges, in the area of the bolt holes.
Useful video
For more information about the method of straightening a flange, we recommend watching this interesting video:
To prevent further bending of the flange, simply tighten it evenly once to the engine and do not remove it again. As we saw above, the carburetor can be cleaned and adjusted without removing it from the engine.
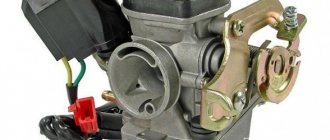
The principle of operation of the carburetor
First, the fuel is sent to the float chamber. When the required level is reached, the float rises and closes the valve through which fuel is supplied. When the float drops, the fuel supply resumes.
Next, the fuel goes into the mixing chamber, where a combustible mixture is created. Air is supplied from above, which combines with the fuel. The chamber contains a spray tube with a jet, as well as a throttle and diffuser. The jet is a plug that prevents fuel from leaking out of the float chamber. The damper connected to the pedal is called the throttle. When pressed with your foot, it opens and the combustible mixture enters the cylinder. As a result, the car picks up speed. The diffuser contains a distribution tube.
At the moment of start-up, a vacuum is formed in the mixing chamber, and fuel is sprayed from the atomizer. A flow of air rises, which, when mixed with fuel, transfers the fuel into the cylinder.
To increase speed or drive in a loaded car, you need a mixture highly enriched with fuel. A similar situation occurs when driving at idle, at low speeds. A simple carburetor cannot provide such conditions.
To enrich the mixture with fuel, an accelerator pump is used. When the pedal is pressed sharply, air passes through, which moves faster than the fuel. This is due to the lack of fuel in the flammable liquid. With a pump, the power unit works more powerfully.
The idle system is ideal for low speeds. In this mode, the power unit operates on a rich mixture. However, a metering system alone is not enough, because at idle the throttle opens only partially. In the newest carburetors, the combustible mixture is formed near the throttle, since in this place, even if the throttle is not fully open, the necessary vacuum is created.
To start the engine, a mixture that is enriched with fuel is required. For this purpose, a damper with a valve is provided in the mixing chamber through which air passes. There is a knob on the dashboard of the car to control the valve. When the handle is pulled out, the valve opens slightly and the volume of air in the mixing chamber decreases. And the amount of fuel in the mixture increases. As a result, even the first portions of the mixture are sufficiently saturated, and the engine starts quickly. With a trigger, the engine runs even at low temperatures.
The capabilities of the dosing device allow you to create a mixture suitable for engine operation in different modes. Using the system, the mixture composition is automatically adjusted when the engine is running at low and medium loads. In this mode, fuel is supplied through a metering system. However, even with the throttle fully open, there is often not enough fuel. For this reason, when the throttle is almost fully open, the lever connected to it acts on the economizer drive rod - this opens an additional passage from the float chamber. As a result, the engine operates more powerfully.
Tuning the PZ30 carburetor at medium speeds
When the carburetor float was adjusted, it was possible to notice that the PZ30 has two jets: the idle jet and the main jet. The maximum amount of fuel is limited by the main jet, and the amount is adjusted by a needle that rises and falls when the throttle handle moves.
From this it is not difficult to conclude that the air-fuel mixture will have to be adjusted by moving the metering needle, and not by turning any screw.
You can determine the quality of the mixture in garage conditions purely by eye, by the color of the spark plug insulator. A black insulator will tell us that the mixture is rich and the fuel supply should be limited. A white insulator indicates a lean mixture; accordingly, the amount of fuel should be increased. The insulator has a brownish tint when the air-fuel mixture is normal. You can read more about the color of the insulator and what problems it indicates in a separate article, “What does the color of a candle mean?”
There is one more very important nuance when setting the air-fuel mixture for medium engine speeds. In order for the insulator to become an indicator of the quality of the mixture, you will have to drive several kilometers, maintaining stable average engine speeds. In this case, you should not allow the engine to idle (the spark plug will immediately turn black) and you should not turn the engine to high speeds, as this will blow out the spark plug.
So, you drove several kilometers along an empty highway at medium speed, pulled over to the side of the road and immediately turned off the engine. After this, you need to wait until the engine cools down to a temperature at which you can hold your hand on it. We unscrew the spark plug and see the black insulator. Unscrew the carburetor cap and move the locking ring on the needle one notch up. That is, we lower the needle and limit the amount of fuel in the air-fuel mixture. If the insulator is white, then the stopper needs to be moved down one notch, thereby increasing the fuel supply.
We repeat the motorcycle ride and, depending on the result, move one more division in the desired direction or rejoice at the brownish tint of the spark plug insulator.
In some special cases, there is nowhere to move the locking ring on the needle, and a normal air-fuel mixture was never obtained. In such a situation, you will have to replace the main jet with a larger one if the mixture is lean, or a smaller one if the mixture is over-rich.
Well, the icing on the cake of all these manipulations is that your idle speed will most likely be lost and you will have to adjust it again.
There is no idle speed (XX) of a car engine with an Ozone carburetor
On VAZ 2105, 2107 car engines with an Ozone carburetor, lack of idle is a common malfunction. There may be no idle speed at all (the engine runs at idle only when the choke is extended and the carburetor air damper is closed), or the idle speed is intermittent (the engine “troits”), “floating” - from high to low. The reasons for unstable idle speed of engines with Ozone carburetors lie mainly in a violation of the composition of the fuel mixture prepared by the carburetor at idle. The fuel mixture is either lean (due to clogging of the jets or a fuel supply failure), the engine will stall or shake, or, conversely, too rich (the carburetor “overflows”), which floods the spark plugs, leading to their failure.
In any case, the engine will not idle normally.
List of reasons leading to lack of idle speed on VAZ 2105, 2107 car engines with Ozone carburetors
— Idle speed not adjusted
For some reason, the screws for adjusting the “quantity” and “quality” of the carburetor fuel mixture are out of adjustment. Set the initial position of the screws - tighten them all the way, then turn them out one and a half to two turns and adjust the idle speed. See photo above.
— The fuel jet of the idle system is clogged
As a result of clogging, virtually no gasoline enters the fuel mixture, causing it to become lean. The jet is located in the plug screw or solenoid valve of the Ozone carburetor (depending on the modification). It must be removed, cleaned, blown with compressed air, and its seat must be cleaned.
— The air jet of the carburetor idle system is clogged
Not enough air enters the fuel mixture, causing it to become lean and cause rough idling. It is necessary to remove the carburetor cover, clean the air jet and the channel leading to it.
— The carburetor solenoid valve is faulty
On modifications of the Ozone carburetor with a solenoid valve, it may fail. In this case, the valve shut-off needle closes the hole in the CXX fuel nozzle, thereby stopping the fuel supply at idle. Check the valve by removing the wire from it with the engine running, the engine should stall. Or turn on the ignition and remove and place the wire end on the valve terminal. A click should be heard from the valve being activated. The valve itself may be faulty or its wiring may be faulty.
— The shut-off needle valve in the carburetor float chamber has failed
The valve does not hold fuel; its level in the float chamber rises, causing leakage from the diffuser nozzles at idle (“overflow”). In this case, the fuel mixture becomes very rich. Check the tightness of the needle valve, check and, if necessary, adjust the fuel level in the float chamber.
Checking the tightness of the Ozone carburetor needle valve
— The engine air filter element is clogged
If the filter element of the engine air filter is severely clogged, the amount of air entering the fuel mixture at idle is reduced, causing it to become over-rich and, accordingly, have low ignition ability. Replace the filter element.
heavily contaminated car engine air filter element
— The adjustment screw of the additional air of the idle system is misadjusted
Ozone carburetors have an additional screw that allows you to add some additional air to the CXX channel. Tighten the screw until it stops, and then back it out a quarter turn. After this, adjust the engine idle speed.
— “Suction” of foreign air into the carburetor
Excess air enters the carburetor through loose connections and loose fittings. leaky hoses. It leans the fuel mixture causing unstable engine idling. Notes and additions
— In addition to malfunctions associated with the Ozone carburetor, the lack of idle speed can be affected by malfunctions of the ignition system, malfunctions of the power system and malfunctions of the engine itself. Therefore, in the absence of obvious reasons, it is best to solve the idle problem comprehensively, starting with the ignition system, then check the power system, and only then try to adjust the carburetor.
More articles on Ozone carburetors
— Ozone carburetor idle system
— Cleaning and purging of Ozone and Solex carburetors
— Disassembling the Ozone carburetor
twokarburators.ru
Description of carburetor pz 30
The peak of mass popularity and popularity of motorcycle technology in domestic spaces occurred in the 70s and 80s of the last century. Mopeds “Riga”, “Verkhovyna”. Light vehicles “Minsk”, “Voskhod”, “Kovrovets”. Motor scooters “Tourist”, “Tulitsa”, “Ant”. Heavy stroller models “Ural”, “Dnepr”, “Izh”. The cult dream of the reckless drivers “Jawa”, “CZ”.
A serious problem with most models was the power supply system:
- high fuel consumption (the cheap price of gasoline eliminated the problem);
- “dips” when the throttle is turned sharply, especially at medium and high speeds;
- constant need to adjust the carburetor depending on the load.
The beginning of the 90s changed the political map. The iron curtain fell. Mechanical engineering was going through a difficult period. The market began to fill with imported used two- and three-wheeled units, mainly from the Indo-Chinese region. Enterprising compatriots organized a flow of spare parts to support imported foreign rubbish. Internet trading has started. Carburetors became available for engines with a volume of 150 - 200 cubic centimeters.
The pz 30 carburetor is produced by Chinese machine manufacturers for mass-produced middle-class motorcycles.
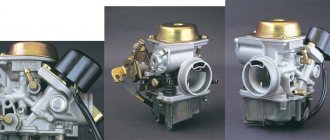
The mixer, traditionally copied from the design of the famous Japanese company Keihin PD, has undergone some changes:
- walls are strengthened;
- the diffuser cross-section has been increased;
- accelerator pump installed.
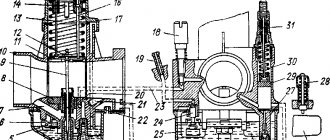
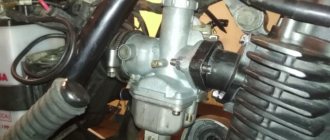
Externally, the PZ 30 carburetor resembles an inverted capital letter “T”, with a volumetric cover fitted at the bottom - a float chamber.
A horizontal passage with one flange (inner diameter is 30 mm) through a sealing gasket is seated on two studs and screwed to the engine cylinder. The other side (42 mm cross-section) is connected by a rubber curved pipe to the air filter.
Three holes from the channels are drilled into the chamber from below:
- idle speed (closer to the flange);
- transitional regime;
- main fuel supply.
The internal throttle valve, mounted on an axis piercing the walls of the chamber, rotates within an angle of 90 degrees to three fixed positions (fully closed, slightly open at an angle of 30 degrees, completely open), and changes the amount of air flow.
A cable is inserted into the vertical pipe to control the fuel supply throttle valve, which contains an adjustment needle.