Hello, dear readers. From the previous four posts, we realized that modern carburetors are very complex devices, and we have much more to discuss in their design. Today we will find out what else is included in the carburetor design in addition to the main metering system and the idle system, which have already been discussed.
If you do not make special requirements for mixture formation, the carburetor will work well, having in its design only the main metering system and the idle system. However, their capabilities are not enough to simplify starting a cold engine, eliminate dips in the dynamics of speed gain when opening the throttle sharply, or maintain the best throttle response without losing maximum power. To eliminate these effects and further improve engine performance, a number of carburetor auxiliary devices are used, which will be discussed in this article.
What is a starting enrichment
A starting enricher (electrovalve) is a device designed to supply an additional amount of air-fuel mixture into the combustion chamber during a cold start of the scooter engine. The fact is that when starting the scooter when cold, the engine requires an enriched mixture. The supply of such a mixture is ensured by the carburetor solenoid valve .
If the starting enrichment is in good working order and there are no breakdowns in other engine elements, the scooter engine starts easily even at temperatures around zero degrees.
Scooter starting enrichment device
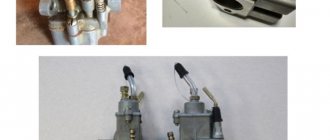
There are two types of starting concentrators - manual and automatic.
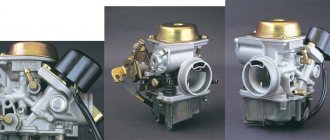
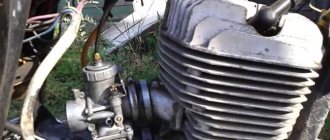
The manual (mechanical) starting enrichment requires adjustment - it must be opened at startup and closed after the engine warms up using a cable on the steering wheel. But manually opening and closing the additional channel for supplying the mixture is inconvenient. An automatic starting enricher (thermoelectric valve) is installed on most modern 2t and 4t scooters. We will learn about the device of the automatic starting enrichment further.
Solenoid valve body- Ceramic heater
- Drive (powder)
- Stock
- Pusher
- Damper
- Fuel chamber
- Float chamber
- Starting fuel jet
- Spring
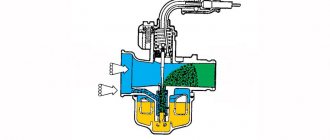
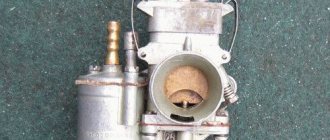
The scooter carburetor has a small additional fuel chamber 7, which is connected to the main float chamber 8 through the start nozzle 9. The tube from chamber 7 leads to the mixing chamber into which air is supplied and from which the air-gasoline mixture goes into the engine. A valve 6 can move in the mixing chamber, similar to a carburetor throttle valve, only much smaller in size. Just like the throttle valve, the starting valve contains a spring-loaded needle that closes the fuel channel when the valve is lowered. Valve body 1 is wrapped in thermal insulation (polyethylene foam) and covered with a rubber boot. This enricher design is used on almost all modern scooters.
Older models may use a design without an electric heater, heat is transferred to the drive through a copper heat-conducting cylinder directly from the scooter's engine cylinder, and a membrane . One cavity of the flask, where it is located, is connected through a thermal valve to the intake manifold, which is mounted on the cylinder head.
The principle of operation of the scooter carburetor solenoid valve
When the engine is cold, the valve with the spool needle 6 is raised as high as possible (open). The needle opens the fuel supply channel, and the flap opens the air supply hole. At the first engine revolutions, a vacuum is created in the emulsion channel and gasoline located in chamber 7 is sucked into the engine through channel A, causing a strong enrichment of the mixture and facilitating the first flashes in the engine. After the engine has started, but has not yet warmed up, it still needs a rich mixture. The enricher works like a parallel carburetor - gasoline enters it through jet 9, mixes with air and enters the engine.
When the engine is running, alternating current from its generator is always supplied to the contacts of the ceramic heater 2 of the thermoelectric valve of the starting system. Heater 2 warms up drive 3. As the engine and drive warm up, the rod gradually extends by 3 ... 4 mm and drives the damper through pusher 5. Thus, the engine warms up along with the thermoelectric valve, the spool with the needle drops and closes the air and fuel channels, and the mixture gradually becomes leaner. After 3...5 minutes, the damper closes completely and the degree of enrichment of the mixture on a hot engine is regulated only by the carburetor idle system .
When the engine stops heating of the valve stops , the damper drive cools down (the powder is compressed) and under the action of spring 10, pusher 5, rod 4 and damper 6 return to their original position, opening the channels for subsequent start-up. Cooling down and returning to its original position also occurs within a few minutes.
The disadvantage of this type of enrichment is that it operates separately from the engine. For example, very often, especially in warm weather, while the engine is still hot and there is no need to enrich the mixture, the thermoelement is already cooling down. We start the engine and it gets a rich mixture.
Acceleration pump
The accelerator pump is designed to compensate for the lean mixture when the throttle is opened sharply. Over-depletion occurs due to a sharp decrease in vacuum due to a sharp increase in the cross-sectional area of the diffuser. As a result, there is a dip in engine speed.
General view of a diaphragm accelerator pump. Number 1 marks the diaphragm adjustment screw
To eliminate the dip when accelerating, an accelerator pump is introduced into the carburetor design, which injects a strictly defined amount of fuel directly into the carburetor diffuser when the throttle is sharply opened.
There are two types of accelerator pumps: plunger and diaphragm. The accelerator pump is driven by the throttle valve directly or through a lever system. For example, on Dellorto carburetors of the PHF and PHM series, the diaphragm accelerator pump is driven by lever 3 sliding along an inclined plane in a special groove 4 of the throttle valve. When the throttle valve rises, the lever slides along the inclined plane of the groove, bends back and presses the diaphragm.
Pump diaphragm drive system: 1 - accelerator pump housing; 2 - diaphragm; 3 - lever; 4 - groove with an inclined plane
The engine may need enrichment at the initial moment of a sharp rise in the throttle, or a less intense but longer enrichment throughout the lift. By changing the angle of inclination and the length of the inclined plane, you can adjust the beginning of the injection moment and its duration. In another way, the amount of injected fuel can be adjusted with a screw that sets the diaphragm stroke. By rotating the screw clockwise, the stroke of the diaphragm decreases, which leads to a decrease in the amount of injected fuel; rotation counterclockwise increases it.
With other pump settings unchanged, the injection duration can be adjusted by the nozzle through which fuel is supplied to the diffuser. A large jet gives shorter injection time, a small one gives a longer injection time. In this way, the pump flow can be adjusted to the specific engine requirements.
Accelerator pump nozzle: The nozzle in the housing is fixed with a special screw 1, which is accessible from outside the carburetor, which makes it easy to replace during the setup process.
How to check the solenoid valve and starting enrichment on a 4t scooter?
Many owners of Honda scooters and owners of mopeds of other brands have to independently repair and maintain their equipment, as well as perform tuning. Sometimes situations arise when it is problematic to start a cold moped due to the fact that the fuel does not fill the required volume of the float chamber, or the gasoline is mixed with air in insufficient concentration. Having figured out how to check the solenoid valve on a scooter, you can solve these problems yourself and quickly warm up the engine in the morning. Let's look at this in more detail.
Starting enrichment on a 4t scooter - description and purpose
Not all motorcycle enthusiasts know what an electric valve on a scooter is for. This device is also called a starting enricher. It is responsible for the volume of the air-fuel mixture, which fills the cylinder chamber through a nozzle when starting a cooled scooter engine. A feature of small-capacity motorcycles is the engine’s need for a rich mixture during a cold start of the scooter engine. The fuel entering through the carburetor is mixed with air in a certain concentration thanks to an electric valve connected to the carburetor.
The starting enricher is responsible for the volume of the air-fuel mixture
If the starting enrichment is functioning and there are no breakdowns of the power unit, starting the engine is not a problem even in the cold season. There is no doubt about the importance of the electric valve in ensuring trouble-free starting of the engines of modern mopeds and scooters. However, if difficulties arise with starting the engine, interruptions in operation and excessive power consumption of the engine, it can be assumed that problems have arisen with the starting enrichment. That is why it is important to know its structure and be able to check its functionality.
How does an electric valve work on a scooter?
To enrich the fuel-air mixture, a fuel enrichment device with a mechanical drive and an automatic control system is used. Let us consider the operating principle and features of each of these enrichment systems.
Manual
The manual enrichment system, which requires precise adjustment, is inconvenient to use. To start the scooter engine after parking overnight, you need to press the lever on the steering wheel, which transmits force through the cable to the pusher. After the power unit starts, warms up and reaches operating temperature, it is necessary to return the manual enrichment lever so that the volume control flap and needle return to their original position. As experience in operating scooters shows, such a system has a number of inconveniences.
Most models of modern mopeds are equipped with an automatic starting enrichment
Auto
An automatic type start-up enricher, called a thermoelectric valve, is installed in most models of modern mopeds with two-stroke and four-stroke engines.
The device consists of the following parts:
- housing in which the solenoid valve is located;
- ceramic heater powered from the on-board network;
- spring-loaded drive with a rod connected to a pusher and a valve.
The device is connected to an air channel that saturates gasoline from an additional float chamber before feeding it into the combustion chamber of the cylinder. One feature of scooter carburetors should be noted. They have two float chambers - additional and main, connected to each other by a starting jet.
A small tubular channel from the additional float chamber is connected to the mixing chamber, which is responsible for supplying air with gasoline to the engine. The cross-section of the mixing chamber is blocked by a valve, structurally similar to the throttle valve in a carburetor. Lowering the damper causes the spring-loaded needle to move, closing the fuel supply channel. The solenoid valve body is thermally insulated and located in a rubber boot. All modern scooters have a similar thermoelectric valve design.
Old scooter models are equipped with a starting enrichment without electric heating
Older scooter models are equipped with a starting enricher without electrical heating. The transfer of thermal energy to the drive is carried out thanks to a copper heat-conducting cylinder connected to the scooter motor. Instead of a powder drive, a membrane drive is installed. In this case, the intake manifold of the cylinder head is connected to one cavity of the bulb.
Troubleshooting
The first and main sign that the equipment needs repair is the inability to start the engine. Scooter repair begins with identifying the fault and then eliminating it. In this case, the breakdown must be looked for starting from the place where the thermal energy of the burnt fuel is converted into mechanical energy of the rotating crankshaft of the engine. So let's get started:
— determine whether fuel enters the combustion chamber,
— is there a spark between the spark plug contacts?
If all of the above factors are present, then the following malfunctions are possible:
1. There was a breakdown of the spark plug insulator. To do this, simply replace the spark plug.
2. The ignition timing is off, and the fuel mixture does not ignite at the moment when the piston almost reaches its top dead center (TDC). Here you can no longer do without an indicator, with the help of which the position of the piston in the cylinder relative to TDC is determined, and at what moment a spark appears on the spark plug, igniting the fuel mixture. In this case, repairing the scooter will consist of setting the correct ignition timing recommended for this type of engine.
If there is no spark at the spark plug, then the following problems may occur:
1. The spark plug is faulty.
2. The candle holder is faulty.
3. The armored wire is broken.
4. The ignition coil has burned out.
5. If the ignition is electronic, then either the ignition unit or only the Hall sensor may be damaged.
If the fuel mixture does not enter the combustion chamber, this may be caused by such problems.
If the scooter is two-stroke:
1. fuel filter clogged;
2. The carburetor is clogged or broken.
If it is a four-stroke engine, then a malfunction of the gas distribution system (burnouts or bent valves) may be added to the breakdowns.
How does a scooter carburetor solenoid valve work?
The starting enrichment on a 2t scooter and on a four-stroke moped works according to a fairly simple algorithm. On a cold power unit, the spool needle occupies the upper position. It is responsible for opening the fuel channel, and the position of the damper affects the volume of supplied air. The first revolutions when starting the engine cause a vacuum inside the emulsion channel, and gasoline is sucked into the engine.
The result is a highly enriched mixture, making it easier to start a cold engine. Before reaching operating temperature, the power unit needs to be fed with an enriched mixture.
The enricher in this mode performs the function of a parallel carburetor - fuel entering through the nozzle is mixed with air and directed to the engine.
Troubleshooting
Malfunctions of electrical equipment and fuel systems are the most regular of all problems that arise among scooter owners.
It often happens that a breakdown suddenly occurs to the scooter. Repairing the carburetor, as a rule, allows you to resume the functioning of your “faithful horse”.
Usually, to do this, it is enough to remove the carburetor, clean the dust from the outside and the tarry deposits of gasoline and other debris inside. Clean and blow out the air and fuel channels and jets, check the condition of the fuel needle and throttle valve, and then reassemble and adjust it.
Fixing more complex breakdowns at home is not always possible, since specific tools are often required that are not widely available.
Thus, for a technically literate person, repairing a scooter with your own hands will not be very difficult if you have minimal knowledge and skills in handling equipment, as well as the necessary tools.
Operating principle of a membrane enricher
The membrane starting enrichment works on a different principle. When the engine is not warmed up, the valve is in the open position. Starting the engine causes a vacuum in the area of the intake manifold, which is transferred to the membrane thanks to the thermal valve. Under the influence of reduced pressure, the membrane tries to rise, opening a channel responsible for supplying additional air volume.
Further heating of the cylinder to operating temperature causes the valve to close and lower the spring-loaded valve associated with the needle. As a result, the supply of additional fuel is cut off. Such a system with a membrane functions in a clear connection with the engine temperature, which ensures a more correct dosage of fuel.
The membrane starting enrichment works on a different principle.
Signs that a check is needed
If difficulties arise with starting the engine and in a number of other situations, it is necessary to be able to check the functionality of the starting enrichment. Thoughts about a malfunction of the solenoid valve may arise in different cases.
Let's take a closer look at the main reasons:
- the first morning start of a cold scooter engine is problematic;
- it is difficult to start a cooled scooter engine after a long stay;
- fuel consumption significantly exceeds the consumption indicated in the passport;
- The scooter's power unit is quite unstable at idle;
- a warm engine does not maintain speed, and a cold engine functions intermittently.
Any of these problems should make the scooter owner think about a possible malfunction of the solenoid valve.
A faulty enrichment device can be in two positions:
- with the solenoid valve needle constantly extended;
- in the initial state, when the needle does not protrude.
It is necessary to be able to check the functionality of the starting enrichment if difficulties arise with starting the engine.
Each case has a different effect on the operation of the motor. The first situation makes it difficult to start the engine of a cold scooter. An attempt to start the engine by pressing the kickstarter, as well as starting with an electric starter, are unsuccessful. In the second case, the engine starts without problems, but during operation it consumes an increased amount of gasoline. Increased fuel consumption is associated with engine operation on a highly enriched mixture.
More detailed diagnostics
To avoid problems with the moped and be completely confident in the serviceability of the scooter, you need to conduct a more complete check. One of the main characteristics of a working scooter motor is normal compression. More on this indicator of the condition of the piston group later.
Scooter compression check
- Unscrew the spark plug (at the same time assess its condition)
- Screw the compression gauge tightly into the spark plug hole
- We press the kickstarter lever several times, thereby creating pressure in the piston
Attention! During diagnostics, you should not try to start the scooter engine using an electric starter.
How to check the solenoid valve on a scooter
Let's try to figure out how to check the solenoid valve on a scooter or moped.
This is a simple operation. Let's start in order:
- You should check whether the enrichment channel is closed by the solenoid valve needle. Start the cold engine and observe the change in idle speed. At first they are increased and then decreased to the desired frequency. In this case, you can make a conclusion about the serviceability of the starting enrichment and not search for its faults;
- If the scooter starts without problems, but the engine speed does not decrease after reaching operating temperature and remains high, there is a high probability that the starting enrichment is faulty. In this case, it is necessary to check the functionality of the solenoid valve;
Checking the solenoid valve on a scooter
- If the power unit can be started only after long and exhausting presses on the kickstarter, the carburetor is not clogged, the gasoline level in the float chamber is set correctly, and the compression has not dropped, then most likely there are problems with the operation of the starting enrichment, and it needs to be checked.
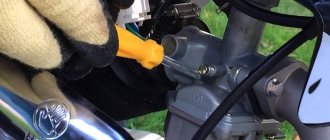
So, we have come close to testing the scooter's starting enrichment for operability. To perform this operation, it is necessary to disconnect the wires connecting the solenoid valve to the scooter's electrical network. Then you should unscrew the fastening of the solenoid valve to the carburetor body and remove it. Next, you will need to prepare a pair of insulated wires, the length of which will allow you to connect the terminals of the starting enrichment to the battery.
When connecting, there is no need to observe polarity, since the solenoid valve is powered from an alternating voltage network. It is important to pay attention that the ends of the wires freed from insulation do not touch each other. All that remains is to connect the wires to the chips and supply 12 volts from the battery to the enrichment unit.
With a working enrichment device, after a couple of minutes you can see the needle gradually moving out of the device body. The amount of stroke can be determined by measuring the extension of the rod before applying voltage and after turning off the power. For a faulty solenoid valve, five minutes after connecting to the battery, the needle will remain in the same position. If there are no defects in the wiring, then we can conclude that the enrichment unit is faulty.
How to make a relay regulator with your own hands?
To make a relay regulator with your own hands, you need a diagram and a little knowledge. The model of a homemade regulator is based on the principle of disassembling the generator and outputting a separate end of the wire from ground.
To collect the stabilizer you need:
- disassemble the generator and remove the stator from the engine;
- then you need to unsolder the ground from the generator, solder a separate additional wire for the winding to it and bring it out. This wire will be one end of the winding. The second end is the generator wire;
- After removing the wires, you need to reassemble the generator in reverse order.
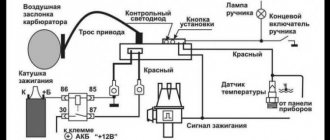
With this device, the generator has 2 wires (there should be 3 in total). You can connect the stabilizer according to this scheme:
Do-it-yourself relay-regulator manufacturing diagram
At the end of the process, you need to connect the yellow wire from the old regulator to the “+” terminal in order to obtain a constant voltage on the sides of the network. Check the resulting voltage regulator on the scooter. At this point, the process of creating a homemade device can be considered complete.
The relay regulator is a very useful thing and necessary for the normal operation of the moped. However, it requires attention and constant monitoring of its work. Therefore, if the device fails or its performance is unsatisfactory, it is better to replace it with a new one, the cost of which today ranges from 300 to 500 rubles.
Fix a malfunction of the solenoid valve on a Chinese scooter
How to fix a carburetor solenoid valve malfunction (139QMB engine) with your own hands using the example of the Chinese Super Sport Acar scooter
The solenoid valve on the scooter's carburetor is used for cold starting of the engine. And it so happened that the previous owner had big problems Super Sport Acar To do this, in the removed state, I connected it to a 12-volt charger. There was no movement of the needle either after 5 minutes (as it should be approximately) or after 10 minutes. The verdict is harsh - faulty, but since there were no shops with spare parts for the scooter within a radius of tens of kilometers, I had to make do on my own.
I took a sharp knife and cut off the top part where the wires fit. The plastic turned out to be relatively soft and this procedure did not take much time. I disconnected both parts and the solenoid valve was easily disassembled into the following parts.
I looked carefully and saw that the heating element (in the form of a tablet) had oxidized from the sides to the contacts. I cleaned both the element and contacts with fine sandpaper. I pressed the heating element between the contacts with my fingers and connected the device. After 10-15 seconds I felt that the element was heating up. Next, I took the part to which the heating element is adjacent and, using a lighter with a weak flame, heated up the copper part a little - the thin rod on the other side began to extend. Everything works... Next, I cut out a strip of soft aluminum, made a hole in the middle into which the cylindrical part of the solenoid valve fit, and crimped the assembled body. In the future, for reliability, I plan to put a screw with a nut in the upper part. And it is advisable to initially coat the cut site with cold welding for plastic or some other adhesive.
I installed the repaired solenoid valve on the scooter's carburetor and started the engine (139QMB). In the future, perhaps I will make this node manually controlled.
Which I had to do later because I carelessly damaged the housing and further operation became impossible. But in manual mode, cold starting worsened. Need to think…
PS This year I found a similar e-valve on the Aliexpress - Automatic Electric Choke Scooter Moped for only 250 rubles including shipping (in Russia I only saw it for 450 rubles).
Registration on the site is not difficult - Registration on AliExpress... the only thing is prepayment for the goods. I use Yandex.Money and don’t experience any difficulties in this matter.
Troubleshooting
What to do if the hoverboard does not charge? Here are some simple tips for troubleshooting:
- First, disassemble the hoverboard.
To remove the bottom panel, use a screwdriver or screwdriver with the appropriate bit. This will allow you to get to the inside of the vehicle and try to find the problem of poor charging.
The side of the scooter with the charging port is the area you need to work on. Be careful during disassembly. Do not lose screws or washers, or use a drill to remove screws or bolts that will not come loose. There will be several wires directly on the inside of the plastic cover you just unscrewed.
They are responsible for charging the hoverboard: they connect the charger ports and the lithium-ion battery. The other wire line goes to the motherboard. You can temporarily disconnect it to avoid an unexpected power surge (only if the board is disconnected by a connector). If the wires are soldered, it is better not to touch them.
Is there blackening of the wire or oxidation of the contacts, is there a large amount of dust present? This may well be the reason for the device to not work correctly. Accumulations of dust must be removed, damaged wires must be replaced, and contacts must be cleaned to a metallic shine.
Having completed such an impromptu diagnosis, screw the cover back to the hoverboard, tightening all the removed bolts one by one.
They will help you make diagnostics more efficiently and without risk to the scooter. True, it is no longer free.
If, despite all this, your scooter continues to work incorrectly, you will need to contact the manufacturer and request repair instructions. In the worst case, the hoverboard will have to be sent back to the manufacturer under warranty. It may be that the device was initially faulty and will be replaced under warranty. It often happens that a newly purchased hoverboard does not charge.