It's no secret that in order for a moped, scooter or car to move, fuel is needed. But its presence is not a guarantee that the vehicle will actually move. The main thing is the correct fuel-air mixture. And the carburetor is responsible for its quality.
The scooter, despite the simplicity of its structure, is no exception to this list. And a carburetor malfunction is a fairly common occurrence. Therefore, it is very important to know how much it costs. The average cost of this element of the fuel system is 900-1300 rubles .
What is a carburetor?
The carburetor is a very important element. Its only and main task is to thoroughly mix gasoline and air in certain proportions. Thanks to this, the power unit receives the required “dose” and works at full efficiency.
But as soon as the settings are slightly off, engine performance deteriorates sharply. It stops responding to the throttle, or the reaction is too late. The scooter stops starting and stalls at full speed. These are all signs that something is wrong with the fuel supply.
Carburetor needle adjustment
When adjusting the operation of the carburetor, situations are possible when the adjustment is not limited to optimizing the combustible mixture. In this case, it is necessary to adjust the carburetor needle.
To do this, we perform the following set of actions:
- move the needle one notch in one action;
- We release the gas sharply, if the engine stalls, then raise the needle;
- give full throttle, if there is no increase in speed, lower the needle.
Checking the result in action. Inspection of the combustion chamber spark plug.
Upon completion of the adjustment, you need to ride the scooter for 2-3 km. While stopping, inspect the part of the spark plug located in the combustion chamber. If the insulator has become dark in color (possibly blackened), then the combustible mixture is very rich, the carburetor needle must be lowered. If the indicated part of the candle is white, then the mixture is lean, the needle should be raised.
An indicator of the optimal combustible mixture and correct adjustment of the carburetor is the sandy or brick color of the combustion chamber spark plug insulator.
What determines the cost of a carburetor?
First of all, this is the engine volume, its cubic capacity. Different scooters have different motors, which means they need a certain “portion” of mixture to work correctly. But for some models this is one volume, and for others it is completely different. It is for this reason that modern scooters are divided into the following categories: 50 cubic centimeters, 110, 125, 150, 170, 180, 600 - maxi scooters.
For example, a new carburetor for an engine with a volume of 110 cc costs 980 rubles , for a 50 cc engine - 890 rubles .
The second factor that influences the final assessment of the cost of a given element is the scooter manufacturer , that is, its brand. As you know, scooters are produced in different countries, which means the cost of their maintenance will be completely different. A carburetor for a Chinese scooter will be much cheaper than for a Japanese one.
The third reason that determines the price tag is the carburetor manufacturer. Today in the world there are a huge number of firms and companies that manufacture spare parts for equipment that they do not produce. The leading positions in the spare parts market are the following three:
- Teikei.
- Mikuni.
- Keihin.
The carburetors manufactured by them are suitable for all brands of two-wheeled vehicles, which were discussed above.
The fourth reason that affects the price is the year of manufacture of the model. It’s clear here that the newer the scooter, the more expensive the spare parts for it. The older it is, the cheaper the repair costs.
What types of scooter carburetors are there?
All these spare parts are of the same type and practically do not differ from each other. However, each of them has its own unique characteristics in the form of the diameter of the throttle valve and its controls, the sizes of the jets and their throughput.
Based on this, we can safely say that there is only one type of carburetors for a scooter, and this is the one that the owner is used to seeing on his own. Therefore, the cost for it remains the same as for numerous others - 900-1300 rubles .
Carburetor 32 CVK Keihin (Japan)
After repeated questions about the design of these carburetors, I decided to write an article with photographs, so I propose it for your consideration.
This carburetor (the IMZ plant installs it on its motorcycles) is a common type for Japanese in-line riders, the differences are usually in the diameter of the diffuser and jets, although there are also small design differences depending on the volume, design and year of manufacture of the Japs.
The only thing that is not clear is why the scrupulous Japanese left the mount for 2 throttle cables (return cable), and of course they made the assembly cheaper, the screws were tightened without screws and washers.
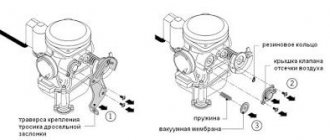
This is the entire carburetor disassembled (well, almost)
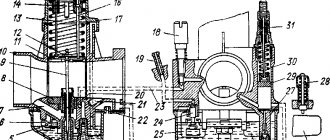
By unscrewing the 4 screws of the float chamber and removing the float with the needle, you will see this picture. We unscrew the main jet, then the spray column (the jet is screwed into it), an air channel goes into the area of the spray column through the air jet from the carburetor inlet diffuser, rinse, clean and blow through. The main well of the main needle is pulled out by pressing it from the side of the damper (with the main jet nozzles unscrewed).
The idle jet is made in one piece with the atomizer; several channels are connected under it, one of them is air, goes to the carb inlet diffuser and ends with the air jet.
The enrichment jet only works when the enrichment is turned on. Jet ratings: Main jet - 118 Idle jet - 38 Enrichment jet (starting) - 65
If the carburetor is used, check the valve seat and shut-off needle, they should be clean and should not show any signs of damage. The needle should have a perfectly even cone of the rubberized part and the spring-loaded pin should not jam when pressed.
Adjusting the fuel level: Hold the carb upside down, horizontally to the cut of the float chamber, and measure the height from the cut to the top point of the float. We set the desired height by bending the metal tongue on the floats.
When assembling the float chamber, do not overtighten the screws securing the cover, otherwise the cover body will move, the sealing gasket will shrink and in the near future will no longer seal the compartment, and the repair kit will not cost you cheap.
PS // There is no data on the fuel level for the Ural motorcycle yet, I’ll find it and add it then.
The bolt (needle) and shaft must be clean and when assembling, pay special attention to the order in which the parts are installed. There were cases when “particularly smart” people, having lost the washer, simply installed it without it, and the spring crushed the cuff into trash and clogged the channels. If the cuff is torn or torn, carefully remove all the pieces and blow out the channels. You can buy a cuff at the car market, in my opinion they come with a belt. kit from a VAZ 2105 carburetor.
Mixture quality bolt (needle): tighten until it stops and unscrew 1.5 turns (position for initial adjustment).
Pay attention to the holes in the idle channel; when operating a motorcycle with a faulty engine, some of the holes can become clogged with soot ejected from the cylinder.
Check the main needle; it should not be worn out. The diaphragm should be free of folds and cracks.
Compare the springs from the two carburetors, they should be the same length (do not stretch them under any circumstances)
When assembling this unit, check that the needle holder sits evenly on the needle. Straighten the diaphragm and carefully cover it with the lid, do not overtighten the screws so as not to damage the sealing edge of the diaphragm.
PS. Carburetor adjustment is carried out in the same way as with domestic ones.
How much does it cost to install a new carburetor?
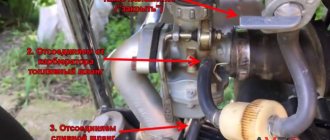
The scooter is considered the simplest to set up and maintain among equipment with a motor, except for walk-behind tractors, of course. Therefore, bothering and taking the scooter to a car repair shop in order to change the carburetor is stupid. You can replace and install a new “mixer” of fuel and air yourself, at home. There's nothing complicated about it. It is attached with just a couple of bolts. It is enough to unscrew them and disconnect the fuel pipes. That's it, the carburetor unsuitable for further work is disconnected. Now you need to do the same thing, only in reverse, with a new carburetor.
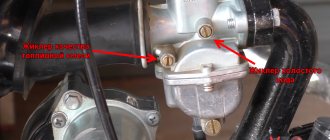
Adjusting the carburetor on a scooter (moped)
The functionality of the carburetor of a scooter (moped), as reported by the source of this article, prokarbyrator.ru, has factory settings. But since adjustment by the manufacturer is carried out under the conditions of the place of manufacture and differs from the place of operation, the owner of the scooter (moped) needs to adjust the carburetor.
Adjusting the carburetor on a scooter (moped)
For this purpose, all carburetors are equipped with an adjustment system. There are no factory settings for carburetor functionality that are set once and for all.
Instructions for adjusting the carburetor on a scooter
Due to the fact that there is no uniform setting for the operation of the carburetor permanently established by the manufacturer, the protection of the unit from making errors during on-site adjustment is weakened.
Correct adjustment can be made by performing the following sequential steps:
- place the scooter on the folding stand;
- warm up the engine;
- we adjust the idle speed by rotating a special bolt (the speed should be minimal in number, but stable);
- We provide freedom of access to the carburetor;
- Let's start adjusting the composition of the combustible mixture;
- to regulate the composition of the mixture, according to the manufacturer's instructions, each model has its own special bolt, so look at the instructions for the purchased scooter model;
- We take into account that carburetor models of different designs differ in the direction of rotation of the bolt (for some models, when rotating clockwise, the mixture is enriched with gasoline, for other models it is the opposite);
- We perform a sharp gas supply “full throttle” under load;
- we look at the result of regulating the combustible mixture (choking or detonation of the engine is an indicator that the adjustment was performed incorrectly; if the engine “picks up” and a confident increase in speed occurs, then the adjustment was performed successfully);
- We let off the gas sharply (if the engine does not stall and produces the set speed at idle, then the fuel mixture has been adjusted correctly).
For some models to operate effectively, it is necessary to adjust not only the fuel mixture, but also the carburetor needle.
