In modern realities, one of the most necessary things for a motorcyclist is a trunk. This can be especially noted among lovers of long trips and travel. It should be noted that novice motorcyclists often have the question of how to make a trunk for a motorcycle with their own hands.
The luggage racks themselves can be divided into 2 types: these are structures for attaching cases, and separate ones for directly securing cargo. In modern times, the first option is somewhat more practical and popular.
But let's consider both variations.
If you pay attention, on the component market, elementary elements are quite expensive. An ordinary trunk, which you can make with your own hands, and quite quickly, will cost more than 10 thousand rubles on the market. Consider whether you need to buy a motorcycle rack, or whether it is better to make it yourself.
How to make a motorcycle trunk with your own hands
In modern realities, one of the most necessary things for a motorcyclist is a trunk. This can be especially noted among lovers of long trips and travel. It should be noted that novice motorcyclists often have the question of how to make a trunk for a motorcycle with their own hands.
The luggage racks themselves can be divided into 2 types: these are structures for attaching cases, and separate ones for directly securing cargo. In modern times, the first option is somewhat more practical and popular.
But let's consider both variations.
If you pay attention, on the component market, elementary elements are quite expensive. An ordinary trunk, which you can make with your own hands, and quite quickly, will cost more than 10 thousand rubles on the market. Consider whether you need to buy a motorcycle rack, or whether it is better to make it yourself.
Luggage rack for attaching panniers
This design is used when it is necessary to transport small loads. It can be made from several metal tubes or rods. If you want a more designer solution, you can make it from a sheet of metal, which will complement the style of the bike quite well. At the same time, if the production is carried out from twigs or pipes, then the creation of additional parts will be required, since it is necessary to create a completely flat plane on which the trunks will be hung. In order not to provide those additional components, it is best to completely manufacture the part from a solid sheet. Or you can make the top part solid, and fasten it using rods or tubes.
This design is intended strictly for attaching the case at the top. At the same time, it is not advisable to use metal less than 3-4 millimeters thick for manufacturing; this will ensure sufficient rigidity of the trunk itself, and will also improve the overall appearance. For a greater design solution, you can engrave the sides or cut out “windows”. You can do this yourself using a drill or grinder.
If you want something more original, you can contact specialized workshops that have equipment for laser cutting and engraving. So let's look at the full manufacturing process:
First you need to cut out the layout from cardboard. We attach the sheet to the trunk and mark the boundaries of the trunk lid along the contour of its bottom. In some cases, the trunk already has its own mounting area; in this situation, it is necessary to make the top of the trunk strictly under the platform of the bag itself. Also, when measuring, we provide protrusions along the width, since the entire structure will need to be secured; for this, the edges will need to be bent.
Next, after measuring, making a mock-up of the site, and directly preparing it, it is necessary to prepare the fastenings. It is advisable to provide elements for fastening to the frame. At the same time, there are no clear instructions for them; here it is necessary to be guided strictly by the shape of the motorcycle frame itself. But you should pay attention that the best variation would be the mounting tubes provided at the edges of the platform that go to the frame.
After that, all that remains is to paint it, and then secure the trunk itself directly. If in the future, in addition to the top, side trunks are also planned, then additional fastening elements should be provided. They can also be made from tubes or rods, secured to the top of the entire structure.
In some cases, the factory-assembled case includes connecting straps, while ultimately the side frames are strictly needed for support, in order to avoid friction with the wheel.
Motorcycle rack.
A motorcycle rack is undoubtedly a necessary and useful thing, especially for lovers of long journeys, and the need to make one with your own hands often arises among novice motorcyclists, since most factory products may not fit a particular bike and will still have to be remade after purchase. This article will describe a couple of options for making a motorcycle trunk, depending on the cargo being transported, or on the availability of panniers.
In general, a modern motorcycle trunk differs significantly from the trunks of Soviet times, since now you can easily purchase plastic or leather panniers (details about the manufacture of panniers are here). And the design of a modern trunk is designed specifically to secure not cargo, but panniers (plastic or leather) to the trunk.
And the cargo itself is already packed into trunks attached to the trunk. It is much more convenient and compact, and the items being transported are always dry and clean. Well, the safety of things in the cases is ensured, if, for example, you need to move away from the motorcycle somewhere along the way.
In addition, thanks to the panniers, the trunk itself, designed to secure them, is made much more compact and neat, unlike the trunks of previous years, designed for securing and transporting some bags or just cargo.
However, both options will be discussed below, that is, first we will consider a motorcycle trunk designed for securing panniers, and the second option is a regular trunk (Soviet type) for securing some kind of cargo or ordinary bags on it.
After all, some novice motorcyclists do not yet have panniers, and it is often necessary to travel somewhere far away, especially with the onset of the holidays, and in this case an ordinary trunk will help out, which you can make with your own hands in just a few hours.
In addition, a regular trunk (not intended for trunks) has a big advantage - it can be used to secure and transport some oversized cargo (for example, boards to the dacha), which will not fit into the trunks. But first, the manufacture of a more compact trunk designed specifically for panniers will be described.
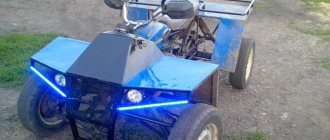
The simplest trunk for a small rear case, or for small and light things, such as the one in the photo on the left, is not designed for heavy loads, since it is attached to the fender, and not to the frame. But such a trunk costs more than 12 thousand rubles.
And the trunk in the photo below costs more than 14 thousand. So is it worth paying that kind of money when it’s not at all difficult to make it yourself, having several tubes, an angle grinder (grinder) and a welding machine.
Moreover, if desired, you can improve the fastening and attach the trunk to the frame in order to transport something heavy.
However, for items that are not heavy, you can attach the trunk and case to the fender (if the fender is made of steel).
A motorcycle rack designed for securing panniers.
Such a trunk can be made from a metal rod or tubes (diameter 10 - 14 mm), but the most accurate trunk (more precisely, the trunk platform for securing the trunk) will still be made from a steel sheet, or from a sheet of duralumin. In addition, even if you make the trunk from tubes or rods, you will still have to then make an upper platform to secure the trunk using a steel or aluminum sheet. After all, the lower part of modern trunks is designed specifically for landing on a flat plane.
Therefore, in order not to make additional parts (a platform and ears for attaching it to the rod), I advise you to make the upper trunk from a steel sheet (even better from stainless steel), and the lower fastenings of the trunk to the frame themselves can be made from a rod or pipe.
The design of the neat and compact trunk, designed to secure the top case and made of sheet steel, is clear in the photograph. It is advisable to use a steel sheet or stainless steel with a thickness of at least 3 mm, so that the rigidity is not small, but in order to lighten the weight of the trunk (more precisely, the platform) and improve the appearance, I advise you to contact a familiar milling machine to cut out the windows (see photo). Although simple straight windows, as in the photo, are quite possible to cut using an ordinary grinder, drills and a set of cutters.
By the way, now you can already find many companies that have CNC machines for laser cutting of sheet metal (or for cutting with a milling cutter, it doesn’t matter) and the services of such companies are not at all expensive. By turning to them, you can make a trunk no worse, or even better, than factory branded products. And the product you make will be exactly the right size for your bike and case.
First, we cut out the sheet of the top platform from cardboard (template), attaching the cardboard to the inverted trunk (to the bottom of the trunk) in order to mark the attachment points and from there draw the dimensions of the template for the top platform of the trunk. By the way, many factory plastic cases already have their own factory site, which also has a system for quick removal of the case and a lock securing the case. This means we make a trunk platform (first from cardboard) exactly under the factory platform from the trunk.
When cutting out the cardboard template (and then when cutting out the steel sheet), you should keep this in mind: in order for the trunk to have rigidity, after cutting out the lightening windows, and also in order to be able to secure the fasteners just below the platform, you will need to bend the steel sheet along edges at 90º or a little more (see photo and for this it is better to use a sheet bending machine), which means more material (steel sheet) will be required in width.
The bend of the trunk platform is needed for rigidity, and also in order to secure the platform to the motorcycle frame, or to the fender, if the fender is made of metal and not plastic and the cargo being transported is not heavy (for example, some warm clothes, or a camping mat) . Next, after making the platform, you need to make elements for attaching it to the frame or wing (preferably, of course, to the frame).
The design and configuration of the fastening elements of the trunk depends on the design of the motorcycle frame and here it is difficult to give precise recommendations, since everything is measured and done locally. Most often, motorcycle trunk fasteners are made of metal tubes or steel rod (but for individual fasteners, steel sheet can also be used).
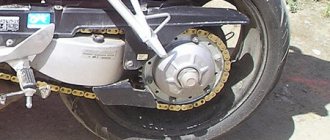
A trunk with a subwoofer mounted on the rear trunk of my Dnepr.
And here you should consider this: if you plan to transport something heavy on the trunk or in a trunk (for example, in my trunk there is a podium for a subwoofer and an amplifier, which together weigh 10 kg - see the photo where they are mounted on the trunk of my Dnepr ), this means that your trunk must have down pipes (which are attached to the frame at the bottom), which, after welding them to the trunk platform, have the shape of a triangle, when viewed from the side and are reinforcing gussets.
That is, the design of the attachment of the trunk platform to the frame should be such that, if possible, tubes are attached from the edge of the trunk platform, going to the bottom and secured to the frame. This design is quite rigid (after all, a triangle is the rigidest figure) and can withstand heavy loads.
The pipes themselves can be secured to the platform using bolts, but then you will have to weld ears with holes onto the ends of the pipes. But you can weld the tubes to the platform, but you will still have to weld ears at the bottom in order to be able to secure the trunk to the frame and, if necessary, remove it. Response lugs with holes are welded onto the frame, and where to weld them is measured locally by attaching the finished trunk to the frame (when applying it, it is useful to use a laser or regular level).
After attaching the down pipes to the trunk area and the counter lugs to the frame, all that remains is to paint everything and secure it with M8 or M10 bolts.
If you also plan to attach side panniers, then support frames are made (bent) from a steel rod (10 - 12 mm) or tubes and they are attached with the upper part to the upper trunk, frame, or fender. To secure the support frames to them, steel ears with holes should be made from a steel sheet 3-4 mm thick and welded.
Well, then both frames are applied from the sides to the fender or to the trunk, and through the holes of the lugs, counter holes are marked and drilled to secure the frames to the motorcycle (you can simply weld the side frames to the trunk, as in the photographs below, where the trunk for Yamaha is shown). It is advisable to weld ears with holes on the frames in advance to secure the side cases themselves.
However, some side panniers (depending on the design) have special straps, thanks to which both panniers are thrown over the rear fender (that is, hanging on belts), and the frames are only needed to support the panniers so that they do not catch on the wheel when the bike turns.
Motorcycle trunk with side shelves for carrying cargo.
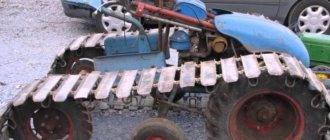
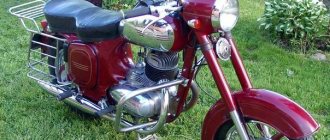
Since Soviet times, a regular trunk for securing and transporting cargo (not panniers) has been made entirely of steel rods or metal tubes (for example, with side shelves for bags, such as in the drawing just below). And many owners of Yavs, Izhas and other motorcycles traveled across the vast country with such luggage racks.
motorcycle rack Java
But below we will describe the trunk for more modern touring motorcycles, and if you want to make it more beautiful, then you can, as for the trunk described above, make a cargo area from a steel sheet, and make the remaining structural elements from a steel bar or tube. However, it depends on you, but below we will describe the manufacture of a trunk entirely from steel tubes.
However, to bend pipes normally, you need at least a simple pipe bender, and not everyone has one. Therefore, to make a beautiful bend, simply use a steel rod in the bend areas, which can be bent beautifully without a pipe bender; just heat it with a torch and bend it, for example, in a bench vice. By the way, almost all trunks of Soviet times (as in the drawing) were made of rod.
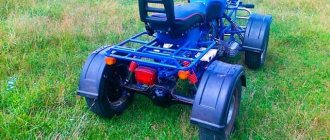
The photo on the left shows a rack that is sold in some online stores and is designed for off-road motorcycles. This rack for a Yamaha motorcycle costs $170 plus shipping. However, it is not at all difficult to make a trunk of this type yourself, and not only for a Yamaha motorcycle, but for any bike. Only the fastening elements are made depending on the configuration of the frame, saddle and rear fender of your bike.
As can be seen from the photograph, all structural elements are made of steel tube, but as mentioned above, steel rod can also be used. And although a structure made from a rod will be a little heavier, the rod can be bent without problems without having a pipe bender.
May the readers forgive me that all sizes are not indicated, but they are individual and depend on the size of a particular motorcycle (after all, it is unrealistic to describe the sizes for all bikes). And in order to clearly see in advance what size your trunk will be, it is first useful to bend a template in place from ordinary aluminum wire, and then bend a rod or tube using this wire template.
First, we cut and bend it from the rod, then we weld the top platform and the jumpers for it, then we bend and weld two identical side frames for the side bags, and then we connect (weld) the top platform and the side frames, using the four jumpers shown in the photo above with red arrows.
Moreover, the length of these jumpers depends on the height of the motorcycle saddle and everything is measured and electrically welded in place, and then the structure is removed and finally welded. All that remains is to again attach the welded structure to your motorcycle and mark where the mounting lugs, indicated in the photo with red arrows, will be welded, depending on the design of the rear part of the frame, fender and the layout of the rear part of the motorcycle.
Here, too, everything is individual and it is impossible to describe something specific, and sometimes there is simply nothing to attach the welded structure of the trunk to the motorcycle. In this case, we simply mark the frame in the right places with a marker and carefully clean off the paint, then in these places we weld the fastening lugs (made of sheet metal 3 - 5 mm thick), and in relation to the lugs with holes welded on the frame, applying the trunk we mark where You should weld the response lugs on the trunk itself.
Rack for a motorcycle made of steel pipes (additional support is indicated by the red arrow).
And one more thing, if you plan to sometimes transport heavy cargo (for example, some kind of iron or spare parts), then I recommend adding (welding) additional thrust bridges, which are indicated in the photo on the left with a red arrow, which will be attached to the fastenings of the passenger footrests and which will create two additional points of support. Also, a reinforcing triangular gusset (shown in yellow in the photo) should be made and welded from sheet steel.
This is much more reliable, and you only need two additional pieces of steel rod or tube, the ends of which are flattened and holes are drilled in them for the mounting bolts. Well, we grab these jumpers in place to the side frames from below, then remove the trunk and finally scald the entire structure.
All that remains is to clean, degrease, prime and paint. Of course, only two options for motorcycle racks, out of many designs, were described above, but I hope they will be useful to novice motorcyclists who love to travel, good luck to everyone.
If this article is useful to you, please share it on social media. networks by clicking the buttons below. Thank you.
RќСЂР°РІРёС‚СЃСЏ
DIY motorcycle trunk
Even before purchasing our Honda Silver Wing 600cc maxiscooter, my wife and I were already planning future trips. Well, what’s a long-distance bike without luggage, which is sometimes quite problematic to attach to a motorcycle? No ready-made version of side frames or cases can accommodate as much luggage as a homemade one.
First of all, we need to think carefully about where the mounting points for our trunk will be. It’s great if the motorcycle comes from the factory with a design that allows you to easily attach the rack to the frame. Sometimes it is worth resorting to studying the factory options of luggage racks that are on the market. For example, the company Givi specializes in producing such add-ons for motorcycles. That's what I did: I found photos of my motorcycle with installed side frames in a search engine, then adapted them to my trunk, modifying them a little.
Cases made from plastic canisters
Plastic canisters are the easiest option for converting into motorcycle panniers. They already have a suitable shape, they are not expensive and can be easily processed with any available tool.
So, to make a pair of motorcycle panniers, you will have to use 3 cans. If you plan to make only one case for the rear trunk, then you will need a couple of canisters for the blanks.
This consumption occurs due to the fact that each case requires a lid larger than the cut hole. This will allow you not to worry about leaks when driving in the rain.
It is this lid that is cut out from the second canister. And since the canister has two flat sides, you can cut out a couple of caps.
Hinges are installed on one side of the lid and the motorcycle case, and latches are screwed on the outside. We check how the panniers work when opening and closing.
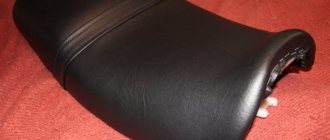
It's time to give the panniers for motorcycle trips a finished look; the easiest way is to spray paint them. You can go brutal and, regardless of the price, sew covers made of leatherette or genuine leather for the trunks.
We install locks and latches permanently; it is worth using a thread locker to ensure that nothing comes loose during the trip. Also, do not forget to use rubber gaskets or rubber washers to prevent leaks through the connection holes.
Additionally, you can decorate the saddlebags with biker-themed stickers. The main thing is not to overdo it and not get tackiness instead of brutality.
Agree – such a case looks great even separately from the motorcycle! If you put the handle on top, you can travel without a two-wheeled friend.
Metal trunks from fishing boxes
The panniers are very easy to make from two fishing boxes. The plumbing work is minimal as the hinges and latch are already installed on the drawer lid. It is only necessary to make suitable fastenings and decorate them (for example, cover them with thin foam rubber and then cover them with leatherette). Thus, a winter aluminum box with dimensions 31 x 20 x 30 cm (volume 18 liters, weight 1.4 kg) costs only 980÷1100 rubles. There is no doubt about the strength of this design due to the fact that the box is designed for an adult in full winter gear to sit on it.
Cases for motorcycle travel made of aluminum canister
The manufacturing technology of an aluminum canister is not too different from that described above.
As you can see, everything is quite simple here - we cut off the top part, installed hinges and fasteners, glued an elastic band along the top of the open case for sealing and the motorcycle case from an aluminum canister is ready!
You can get confused and make the top cover separately, the simplest thing is to glue it out of fiberglass with epoxy; for this, a block is made from an easily processed material, for example, polystyrene foam and covered with fiberglass.
The foam from the roof is etched with acetone and the covers can be placed on homemade motorcycle trunks.
We paint the frames of the motorcycle in the same color and you can, having installed luggage cases on the back of the motorcycle, go to the exhibition of the motorcycle fraternity.
Since the lids are made with a margin of width, they are placed on the remains of the canisters, blocking the rain from accessing the rider’s belongings.
Homemade leather trunks
Leather has been and remains the most favorite material for various biker accessories. You can sew trunks from this material yourself.
Required tools and materials:
- tape measure, metal ruler, marker, narrow construction knife, needle with a thick eye, groove cutter;
- a piece of leather (saddle leather, 3÷4 mm thick), thick synthetic threads, accessories (buckles, fasteners, rivets, etc.).
How to make leather trunks:
- From thick cardboard we cut out patterns for all parts of the future case (sides, bottom, closing flap, etc.), taking into account seam allowance (0.7÷0.9 mm).
- We lay out the finished patterns on the back of the leather and trace them with a marker.
- We cut out the blanks using a construction knife.
- Using a groove cutter and a wooden mallet, we make holes in the places where the individual parts are fastened.
- We sew all the parts together using a thick needle and nylon threads.
- We strengthen the corners with special rivets (holniten).
- We attach all the necessary accessories (buckles, frame holders and decorative elements). The result: we have made strong and durable trunks.
To make a motorcycle hip bag, leather with a thickness of 1.0÷1.5 mm is sufficient.
The advantages of such a material as moisture-resistant plywood (in the manufacture of trunks) include:
- ease of processing using an electric jigsaw or circular saw;
- availability and low price;
- ease of connecting individual parts to each other using glue, self-tapping screws, wooden blocks and metal corners.
The disadvantage of this material is the impossibility of manufacturing motorcycle side racks with complex curved geometric shapes from plywood. Such a box is attached in the same way as metal or plastic products.