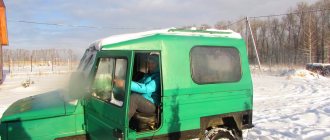
An ATV is an excellent off-road solution. It is popular among fans of extreme recreation, fishermen, hunters and anyone who needs to get into places where a car cannot pass. This type of transport is easy to operate, has excellent maneuverability and is quite stable while driving.
Factory-made ATVs are quite expensive, so craftsmen choose the economical option: they make such machines themselves. Of course, this solution is not for everyone: you must not only have golden hands and the tools necessary for the job, but also have a good understanding of the structure of a car, motorcycle and the ATV itself.
If you have a persistent desire to make this miracle of technology yourself, you should start with planning. It is necessary to decide on the models on the basis of which the transport will be assembled, and draw up drawings for them. Be sure to think about what tools will be needed during the work process and make sure that they are in good condition. No matter how boring this activity may seem, nothing will come of it without prior preparation. If for some reason it is not possible to make a drawing yourself, you should find a ready-made version.
Next you will need the sources. From a technical point of view, an ATV is a cross between a car and a motorcycle. Accordingly, to make it you will need a motorcycle and a car. It is optimal to select domestic models on the secondary market; it will be inexpensive, but the quality is quite satisfactory for the construction of an ATV. It is better to use a small car like an Oka or Niva. Among motorcycles, the Ural is very popular for such purposes; you can take the IZH.
Technology
When the drawings are ready, the sources have been purchased, and the tools are waiting in the garage, you can begin making a homemade ATV. Ultimately, people’s lives and health depend on the quality of work, so we must take our time and do everything consistently.
First you need to select the engine and cooling system. Typically a motorcycle engine is used because it uses less gas and takes up less space, but a car engine can also be used. Since it can overheat in summer, it is better to take a model with air cooling, optimally forced (using a cooler).
The frame must be assembled so that the engine can be fixed on it. It will be located in front or behind - it doesn’t matter, the main thing is that it is securely fastened. There are two options here:
- Making a new frame from scratch from pipes. In this case, you must have equipment that allows you to bend the material.
- Take a motorcycle frame as a basis, remove the unnecessary and add the necessary.
Before making the final frame, it is advisable to do spot welding and consult the drawings.
How to make an ATV with your own hands based on a finished frame?
It is necessary to remove everything unnecessary from it, leaving only the frame itself. The rear part is removed, and pipes are extended at the front, and the bridge is welded.
Next, spare parts from the car and additional metal pipes are taken; the best option would be water pipes. To make a frame for the body you will need a 70x40 pipe. Its length should be equal to or greater than the length of the spring, and its width should be the same as that of the bridge.
The cardan must be connected to the box using a rubber coupling, and to the bridge using flanges. The drive is easy to do with your own hands using a chain from IZH.
If you plan to install springs on shock absorbers, it is advisable to leave the rear pendulum with silent blocks.
After making the frame, you need to mount the engine on it. You can use a homemade muffler.
Transmission
It must be installed efficiently so that there is no play. The engine and drive can be removed from the motorcycle, and the wheels can be used from the car. The trunk is easily made from pipes with thin walls. There are two possible control options:
- Using the steering wheel (in this case, the base from the car is taken).
- Using a motorcycle handlebar. The fuel tank comes with the steering wheel. For a homemade steering shaft, a 20 mm pipe with 2.8 walls is suitable. There should be a limiter at the bottom.
The suspension can be made either front or rear. There are two options for making the rear:
- The rear axle of the car is used. It will need to be shortened. The design will be heavy, but there will be a differential, which will be useful on the highways.
- A gear-shaft design is used. A gearbox is mounted on the rear axle, and wheels are mounted on the disks. This is a lighter version of the suspension for a homemade ATV. It lacks a differential, but this is not critical.
The front suspension is used from a motorcycle. It is possible to make an all-wheel drive model, but this is much more labor-intensive work, and also requires certain skills in turning.
The pendulum arms are installed so that when turning the ATV wheels do not catch the engine. If you are using a Ural frame, you should move the wheels further out. Two bipods are welded to the steering column: on the left and right wheels. The front pillar should be inclined.
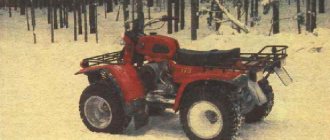
How to make an ATV from a Dnepr motorcycle? Basic provisions
Today, Soviet-era motorcycles are not very popular and are increasingly being scrapped. This depends on the fact that it is difficult to get spare parts for repairs, and old equipment tends to break down often and constant repairs are not something any motorcycle enthusiast can withstand.
As a result, such rare units either rust in the yard or are used for spare parts. But some craftsmen have adapted to converting old motorcycles into ATVs. One of the most suitable for these purposes was the Dnepr.
Assembly steps
The entire conversion process consists of four stages: • frame improvement; • installation of engine and gearbox; • suspension modernization; • installation of body kits, painting.
Necessary materials
To convert the Dnepr motorcycle into an all-terrain vehicle, you need to acquire some spare parts, without which it is impossible to create an ATV: • steering; • two bridges; • brake system; • suspension.
The main tools include a grinder and a welding machine. Without them there is no point in starting construction.
Control
Before you start creating an ATV, you should decide on its control. For this purpose, a car or motorcycle can be used. In order not to complicate the design of the all-terrain vehicle, it is recommended to use the existing steering system from the Dnepr. Otherwise, you will have to buy the necessary spare parts.
Not a single project of future technology can be completed without a drawing, on which it is necessary to mark the location of all the main elements of the ATV. This will simplify assembly and make it possible to present the final result. In the end, you may end up with a powerful unit capable of driving on any road.
ATV frame
The first step is to slightly change the existing frame, which will serve as the basis of the ATV. To do this, you need to move the vertical tubes of the struts under the saddle back by 40 mm. Next you need to cut off the rear fork and weld the rear axle to the swingarm. Then you need to assemble the struts from the pipes and install them near the suspension bushings.
The front bumper and trunk can be made from a pipe with thin walls with a diameter of 30 mm. You just need to set the welding machine to minimum so as not to burn through the metal.
Suspension
Initially, you need to pay attention to the back. To modernize it, you can use several options. You can install a universal joint and gearbox from a motorcycle, which will greatly simplify the assembly process, but installing a car axle requires the presence of a differential.
For this reason, many prefer the second option and use bridges from passenger cars. Oka is an excellent donor for these purposes. Its bridge does not have very large weights, which in turn will have a good effect on the driving performance of the ATV. But even that will have to be shortened a little. This will take a lot of time and effort, but the presence of a differential will more than pay for this work on the track.
All-terrain vehicles with such axles perform much better on the road. To bring it to the required size, you need to remove the support cups and spring mounts. After this, you should take out the end flange, cut the bridge and insert it back. We connect the resulting contraction by welding. Axle shafts from Oka can be converted into a driveshaft.
The front suspension gives more design options. It makes no sense to install suspension arms from a car, since the weight of the ATV is not large enough. In this case, you can try to build the front suspension with your own hands. This makes it possible to choose the required size and slightly reduce the weight of the all-terrain vehicle. In most cases, it is made from a metal pipe with a cross-section of 25 mm. Ball bearings from Zhiguli are used as supports. It is advisable to purchase a new brake system, since it may be faulty on old cars, and this is the most important element in vehicles.
Engine
The engine can be taken from Dnepr. But since the weight of an all-terrain vehicle is greater than that of a motorcycle, it is necessary to come up with additional cooling of the internal combustion engine to avoid overheating. You can install a fan with forced activation. It is important to consider the age and mileage of the donor, since the reliability of the parts may not be the highest.
Painting
After installing all the units and parts, you can begin the exterior finishing. If you want to give your ATV a unique look, then you should contact a professional painter to get a quality paint job. But to do this, you first need to make all the cladding elements from sheet metal.
Lighting
There are no special instructions here either. You can install any headlights, turn signals and brake lights. The main thing is not to overdo it, so as not to spoil the appearance of the ATV. You can use optics from the Dnepr donor motorcycle.
ATV with four-wheel drive
To make it, you will need a steering system from a car, a drive from a manual transmission, suspension and differentials. The suspension, like the steering, can be removed from the car. In such cases, the frame is cooked completely from scratch, based on the size of the engine of the future ATV. On the front suspension, you should take into account the space for the drive gearbox.
Using automotive products purchased on the secondary market, you can relatively inexpensively assemble vehicles for difficult roads and rural areas. One of the budget options for the source is the Ural motorcycle, since it is inexpensive, has rear-wheel drive and a four-stroke engine. Due to its positive aspects, it is popular.
A self-made ATV is not only a convenient and practical vehicle, it is a reason for pride and an opportunity to demonstrate your skills. Outwardly, it may be inferior to factory designs, but in terms of its technical characteristics, home-made ATVs are no worse.
Perhaps the only negative (apart from the time spent, since doing what you love is never a burden) is the need to involve auto experts in order to obtain documents and be able to register the ATV.
How to make an ATV with your own hands is a difficult and responsible task, but feasible for a master who has mastered welding and turning. The effort and time spent are paid off not only by large savings, but also by the result obtained - an exclusive, original model of a quadric that no one else has.
Features of assembling a homemade vehicle highly depend on the chosen base - the engine and other elements that are used by the craftsman.
6 best options for a base (“donor”) for those who have set the goal of how to make an ATV.
- Motorcycle "Ural".
- Motorcycle "Izh".
- Motor scooter "Ant".
- Another motor scooter (scooter).
- Car "Niva".
- Oka car.
Most often, some structural elements are taken from a motorcycle, others from a car.
In addition to the parts (components) for the quadric, its creator will need:
- assembly “shop” - a fairly spacious garage equipped with good heating and lighting will be useful in this capacity;
- a set of equipment and tools;
- blueprints.
You may also be interested in our specialist's article, which talks about how to make.
DIY ATV
An ATV from a store is not a pleasure accessible to everyone. Therefore, many craftsmen make quadrics with their own hands. And in this article we will talk about the most interesting of them.
In making an ATV, everything that can be found in the garage and nearby can be useful. Each vehicle made by hand is unique and individual, so it is difficult to talk about drawings and diagrams.
Few people describe in detail the process of building their brainchild, which makes it extremely difficult to find specific information. But there are also exceptions.
How to make an ATV with your own hands
in 2012, the talented designer S. Pletnev shared the drawings and nuances of building his brainchild.
What was used in the design of the vehicle:
- Front and rear wheels from Niva Chevrolet 15 inches
- Engine a-m Oka
- Oka gearbox
- Inter-wheel gearboxes from the rear axles of the VAZ “classic”
- CV joint from a VAZ-2108 car, 12 pcs.
- Fuel tank 20l canister
- Passenger support from the headrest of the Oka
- Clutches from Oka
- Steering wheel from a Ural motorcycle"
- Instrument panel from Oka car
Main technical characteristics of the ATV:
| Weight | 430kg |
| Length | 2300 mm |
| Width | 1250 mm |
| Handlebar/saddle height | 1250 / 900 mm |
| Ground clearance, | 300 mm |
| Wheelbase | 1430 mm |
| Track | 1045 mm |
| Maximum speed | 65 km/h |
ATV drawings:
The transmission is made from AvtoVAZ units with some modifications. For example, to reduce speed and increase torque, a chain drive was used instead of the main pair.
Inter-wheel gearboxes are borrowed from the classics, the axle shafts are removed and replaced with CV joints from the front-wheel drive VAZ. Constant velocity joints are also used in other transmission units.
The suspension is independent on triangular wishbones. Shock absorbers from Oka.
Homemade muffler of 2 sections, insulated with asbestos.
The body kit is made of fiberglass. The creation of such plastic took 10 kg of epoxy resin, 1 kg of plasticizer and the same amount of hardener. 15 meters of fiberglass and 5 meters of glass mat.
The ATV body kit is made of fiberglass. I glued it for the first time, and therefore first studied the recommendations for performing the relevant work. But as it turned out, this process is painstaking, although the result is worth it.
- The bumpers and guardrails are welded from 20mm round pipes.
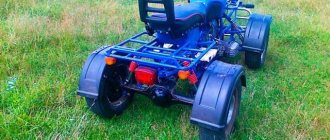
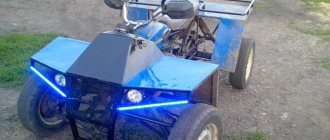
- Photo of the finished ATV:
- Material based on the article: https://modelist-konstruktor.com/razrabotki/853
ATV from a motorcycle
- This quad is made on the basis of the Ural motorcycle.
- All the details are in the video.
ATV with IZh Jupiter engine. Transfer case from Ant motorcycle.
ATV Cobra MIX
- Generator, forced cooling, lowering gear, electric starter from tens, engine from a Ural motorcycle.
- Video of a homemade ATV in action:
Homemade buggy "Raptor"
Homemade ATV with an Oka engine
Source: https://anarchymotors.ru/article/kvadrotsikl-svoimi-rukami.html
Preparation for work, tools and equipment
First of all, you need to carefully consider when, where and for what purposes the future ATV will be used - hunting and fishing, motorcycling in nature, transporting goods, etc. It is on this basis that you need to make a choice of a “donor” vehicle, deciding how powerful the engine is needed, what kind of suspension is suitable, what kind of trunk, etc.
You can take ready-made drawings from the Internet, create them from scratch yourself, or combine both options and ready to remake them at your own discretion.
List of required tools:
- welding machine;
- Bulgarian;
- drill;
- a set of keys;
- various small tools - calipers, hammer, knife, screwdrivers, pliers, etc.
To make your own frame, you will also need equipment for bending pipes. If you don’t have one, you can rent it or outsource the necessary work to another craftsman. Only with remarkable skill can you bend the pipes manually by heating the bend with a gas cutter or torch.
Quad components:
- engine;
- frame;
- rear and front suspension;
- steering;
- brake system;
- cooling system;
- muffler;
- electrical equipment - battery, headlights;
- body, body kit
It is quite possible to make a muffler yourself. Everything else is to purchase used parts on the shadow market.
Parts selection
ATV frame
Depending on the “donor” and the design of the quad, you either have to make the frame yourself, or you can reconstruct a finished, used one.
The most important thing is that the engine is securely bolted to the bottom along the frame, which can be located either front or rear. The transmission and drive should also be firmly attached to the frame to avoid play.
The material used is ordinary water and gas pipes with a wall thickness of no more than 3 mm:
- for spars - 25 mm;
- for crossbars and struts - 20 mm.
The pipes are connected using spot welding, followed by solid welding. Ears for attaching shock absorbers and levers are welded to the frame immediately. Brackets - during installation of units and components.
Reconstruction of an existing frame
To reconstruct a finished frame, you should remove everything, leaving the frame, dismantle the back part and build up the front. Then weld elements for fastening a complete set of components and assemblies of the ATV. When reconstructing a motorcycle frame, the seatposts should be moved back by 40 - 45 cm.
The front and rear luggage racks are cut out of a metal sheet and welded to the frame. Finally, the finished frame is painted; there is no need to varnish it.
Engine
The engine is suitable for a car, motorcycle or scooter. Some “Lefties” even construct an ATV from a walk-behind tractor with their own hands, since newer models are equipped with four-stroke engines, the power of which in heavy devices reaches 15 “horses” - versus 11 hp. "Ant."
The engine of a scooter has the advantage of low fuel consumption; in addition, the scooter-based quad is the lightest, which makes it easy to pull it out when stuck in mud and sand. But a quad to transport cargo and/or drive off-road requires a more powerful engine.
The engine power of the Izh-1, Izh-2 and Izh Jupiter is 24 hp, the old Ural is 32 or 36 hp, the two-cylinder engine of the old Oka is 35 hp. , a three-cylinder car of a later release - 53.
To travel in hot weather, the ATV needs a cooled engine. Cooling was not installed on older motorcycles, so you will have to pick it up (for example, from a VAZ 2108 will do) and install it.
The suspension can be used both rear and front. The easiest way is to take the front one from a motorcycle.
2 rear suspension options:
- The rear axle of the car, shortened to fit the dimensions of a quad. The advantage is the presence of a differential. Disadvantage - the design will be heavier.
- Cardan-gear design - with a gearbox mounted on the rear axle.
Please note: the quad all-terrain vehicle requires an independent suspension with high ground clearance.
The suspension arms are bolted to the frame through rubber-metal hinges - silent blocks.
The front suspension strut must be tilted, otherwise the ATV may roll over.
The shock absorbers are suitable from Izha, but if the budget allows you to purchase gas-oil shock absorbers with pumping, the driver will be able to adjust the suspension according to road conditions.
Steering and chassis
The steering system of an ATV can be based on a car - with a steering wheel, or with a motorcycle steering wheel. Some craftsmen combine both types: motorcycle handlebars, levers and shafts at the top, car tie rods at the bottom. It is advisable to take the fuel tank along with the motorcycle handlebars.
A homemade steering shaft is made from a 20 mm pipe with walls up to 3 mm. A travel limiter must be installed at the bottom.
When making a quad on a car base, it is better to replace a gear pair with a chain drive. This will greatly simplify and reduce the cost of maintenance.
The input shafts from the gearbox must be directed directly to the rear and front axles.
The wheels are most often taken from small-sized VAZs (“Oka” or “Niva”) and are shod with tires that correspond to the operating conditions (weather, terrain, etc.). The brake system is selected depending on the wheels. The steering knuckles are also from Niva or Oka.
Four-wheel drive
If you choose a four-wheel drive vehicle, vehicle steering, differentials, and a manual transmission are required.
The existing frame will not fit in this case; a new one should be welded to suit the engine size.
The suspensions, like the steering system, must be taken from the car. On the front it is necessary to provide space for installing the gearbox.
Installing an all-wheel drive model requires not only special skills of the craftsman, but also additional labor costs. The alternative is to buy a ready-made all-wheel drive unit - it costs money.
Frame
Making the body is far from the simplest stage of the story called “how to assemble an ATV with your own hands.” Suitable materials are fiberglass and fiberglass; it is easier to make a body kit from the second.
First, you need to draw, cut and construct a “blank” of the body from pieces of durable foam plastic, glued or fastened with polyurethane foam. Then apply several layers of fiberglass on it, coating each with epoxy resin and inserting metal fasteners between them to attach the body to the frame. In conclusion, dry the body thoroughly, then prime, sand and paint.
An ATV is an all-wheel drive vehicle and a motorcycle, an endurocross bike, in one package. The features of this type of transport are compactness, tires with deep treads for better off-road traction, 1-2 seats and no roof over your head. This type of transport first appeared in Japan in the 1970s and won the hearts of many off-road romantics. Such transport will be of interest to hunters, fishermen, and those who like to conquer impassable terrain. Many of us dream of such a toy for adults. We will tell you how you can make your dreams come true with your own hands.
Choosing an ATV engine
The most important part for your all-terrain vehicle will be the power unit. Motorcycle engines are most often used (they are economical and small in size). Let's say, an engine from Ural or Minsk, IZH Planet or IZH Jupiter will do. You can adapt an engine from a VAZ or Oka to your ATV. To avoid engine overheating in hot weather, you need to choose a model with an air cooling system.
The most popular option is to transfer automotive forced cooling.
Modernization of an existing frame or drawings from scratch
Before any undertaking, you need an action plan and a design drawing or a finished frame. If you are comfortable with mathematical calculations, then you can calculate everything yourself. If you can’t make a drawing, you can contact a specialist or look for a design diagram that suits you on the Internet.
The easiest way is to take a finished motorcycle frame as a basis and weld all the missing parts onto it. The order of your actions is as follows: disassemble the old motorcycle. We leave only the frame. We cut off the rear part of the frame with the pendulum fork mount. We extend the frame with pipes and weld the bridge (use jibs and gussets). First turn the car axle over so that the quad can go forward and not backward (because on the Ural gearbox the direction of rotation is reversed at the output).
Remember that in case of replacement, the axle gearbox must be easily removed.
We are looking for spare parts for a car: 2 front hubs, a rear axle (so that the discs match the fasteners with the hubs), a driveshaft, front suspension arms, tie rods, a ¾-inch round water pipe.
If there is no donor motorcycle, then the frame is best made from durable alloys: pipes, profiles, spot welded together. For the load-bearing parts of the frame, you can buy water pipes (VGP 25×3.2). You must have equipment that will allow you to bend the pipes in the right place.
For the body, we prepare a frame from a 70×40 pipe. The length should be no shorter than the spring, and the width should correspond to the size of the bridge. When using jibs, do not forget about the torsional rigidity of the structure.
We connect the cardan to the box using a “Ural” rubber coupling. Through the hinge crosspiece we connect the cardan to the bridge with a flange. If the donor was IL, then the drive is carried out by the original chain.
If your quad has springs on shock absorbers, then leave the rear suspension pendulum along with the silent blocks. Weld the bridge to the fork (don't forget to reinforce the seams with wide gussets to prevent vomiting later). Instead of a cardan, use an axle shaft from an Oka or VAZ. We leave the springs and shock absorbers as is, do not touch them. When the frame structure is ready, we proceed to attach the engine to the bottom of the frame using bolts. The engine can be located at the rear or at the front (it makes no difference). The muffler can also be homemade, two-section.
Now we carefully mount the transmission on the rear wheels so that there is no play. The drive comes with the engine from an outdated motorcycle. Wheels on the quad can be installed from Niva. If you need a trunk, you can weld it from thin-walled steel pipes. The bumper can be replaced by "kanguryatniks".
Control type
In order for your all-terrain vehicle to be safe to operate, you will have to take care of the type of control. Your ATV can have 2 types of controls:
a steering wheel (we take the base from the car - tie rods) and a steering wheel from a used motorcycle (lever and shaft).
The steering shaft can be made from a pipe with a diameter of 20 mm and a wall thickness of 2.8 mm. Place a travel stop at the lower end. Thus, at the bottom the shaft rests on a thrust bearing, and in the middle it rotates in a detachable nylon bracket-sleeve.
Suspension: front and rear
Your ATV can be equipped with either rear or front suspension. For the rear suspension, the following solution is suitable:
1.
To make the design lightweight and simple, you need a gear-shaft system. In this case there is no differential.
2.
The structure will be very heavy if you use a road bridge (it has to be shortened). In this case, there is a differential that will be needed when driving.
For the front suspension, you can use the suspension from the Ural or IZh as a basis. Installing the front suspension is more time-efficient - it is faster than all-wheel drive, where you will need the help of professional turners, electricians, and welders (some modification will be required).
To attach the pendulum arms, the motorcycle frame is lengthened at the front. It must be installed so that the turning wheels do not touch the engine cylinders. Therefore, on the Ural frame, the wheels are placed further forward. To increase geometric cross-country ability, the suspension arms should be as long as possible
(you need to make these yourself). To the steering column (made from a “Ural” cardan) at the bottom we weld two steering bipods side by side: on the right and left wheels. The hubs are attached using the original ball hubs.
When installing the front strut, remember to tilt the strut. This will prevent the steering wheel from being knocked out on bumps and will help return the steering wheel to its place when turning. If there is no tilt, you can fly by inertia; returning the steering wheel to the reverse position off-road will be very problematic.
Four-wheel drive quad bike
For a four-wheel drive ATV you will need:
— drive from a mechanical transmission with a power take-off gearbox to the front wheels;
Wheel differentials;
Front-wheel steering (car-like);
Independent suspension (possibly multi-link) or dependent suspension.
If it is not possible to assemble everything yourself, they take the suspension from Oka or front-wheel drive VAZs.
We are preparing the frame from scratch for the Oka engine. In the front suspension we leave room for the front wheel drive gearbox. You can do it yourself: we cut off the “stockings” of the bridge and remove the suitable axle shafts from the VAZ from the differential. We turn the engine backwards. Now the axle shafts have become cardan shafts that drive the front and rear axles.
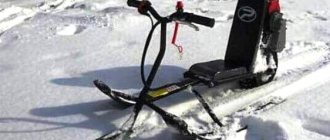
A considerable number of offers on the ATV market for young drivers today allows you to choose a modification with different characteristics and for any wallet. If you are not ready to spend a significant amount on purchasing an ATV, you have a creative streak, minimal technical knowledge and some special skills, you can make an ATV for a child with your own hands. Of course, you will also need some tools.
You can find many interesting ideas for an ATV on the Internet, perhaps you have your own ideas. Implementing them will certainly bring you great creative joy and will allow you to get an original ATV at minimal financial cost.
What will it take to create a children's all-terrain vehicle?
First of all, decide on the appearance of your unique ATV and its dimensions. You can make an off-road unit for a child of any complexity - it all depends on your knowledge and skills. If you don't want to spend months building an electric ATV, go with a simpler design that can be improved in the future as your child grows older.
The basis of any vehicle is the frame. A do-it-yourself drawing of the frame of a children's ATV is necessary to maintain the dimensional accuracy of all structural elements. Surely you can make the drawing yourself. If you anticipate the possibility of strengthening and upgrading your ATV in the future, then the frame should have a good margin of safety in the suspension. For the frame, you can use it as a square profile of a suitable size (for example, 25x25mm), a ¾-inch pipe or a ready-made structure from a donor model - it all depends on your desire, imagination and capabilities. If you make the frame yourself, pay attention to the quality of the welds.
Wheels, braking and steering systems, shock absorbers are the next stage of assembling an ATV for a child. Most craftsmen recommend choosing new wheels - you can, for example, take wheels for a go-kart or even for a garden wheelbarrow with a diameter of 320 mm. If you are making an ATV for an older child, he will probably want to ride it off-road - then choose wheels with wide tread and buy stamped wheels (even the simplest ones). This will increase the safety of the ATV and allow the child to overcome serious obstacles.
Drive to two rear wheels for a children's ATV from an electric motor of sufficient power through a gearbox (homemade or ready-made) is a good solution. The gas button on the steering wheel will delight your young driver and make the children's ATV look like a real one. The steering system is an important element that ensures the safety of the little driver and ensures that he can easily control his little car.
ATV from MT motorcycle
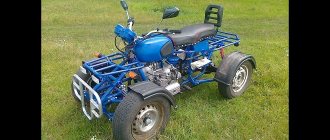
ATV built on the basis of the Dnepr MT motorcycle: photo, description, test video.
Craftsman Alexander Gilyanov assembled a homemade ATV with his own hands; the donor for the homemade product was a heavy-duty motorcycle Dnepr MT.
The Dnepr motorcycle is ideal for building an ATV; it is equipped with a 2-cylinder, 4-stroke, boxer engine with a power of 32 hp and a gearbox with reverse gear.
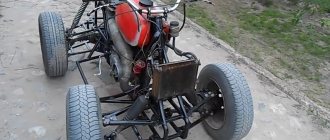
The photo shows the main stages of assembling an ATV.
The motorcycle was completely disassembled and the front end had to be lengthened.
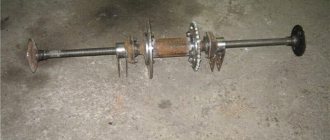
The suspension arms are welded from a square pipe.
Shock absorbers from a motorcycle are installed.
Hubs and wheels from VAZ.
DIY electric quad bike: engine and battery
The battery and engine for a homemade ATV are selected based on the capabilities and needs of the driver. So, you can use a pair of engines from a Volga or a screwdriver, take an electric motor from a donor vehicle (for example, an electric scooter), or use your own idea. The main thing is that the electric motor provides sufficient speed for the child - 5-8 km/h is enough for the smallest ones, older children will need a higher speed, which means a more powerful motor.
As for the battery, it is important to install it in such a way that there is no need to disassemble the entire structure to recharge. A battery from a donor scooter, uninterruptible power supply, or another one you can find will do.
When all the main components are assembled, it’s time to deal with the appearance of the ATV - after all, aesthetics are extremely important for the baby. Ideally, you can use body kit elements from an old non-working model of a children's ATV, but your imagination can give you other original ideas.
Working on assembling an ATV will not only allow you to get a unique vehicle for little money. It will bring pleasure not only to adults, but also to children, since making a children's ATV with your own hands is a fascinating activity, very interesting and useful for every man.
Editor
"Children's ATVs"
Engine tuning Dnepr
The main feature of any Dnepr MT model is the engine lubrication system. It should be improved first of all, since this is a disease of all Dnepr motorcycles. The problem is that the oil is poorly cleaned at low engine speeds (up to 3000 rpm). There is no oil filter in the engine. Its role is played by a “centrifuge”, which should be replaced with a “cap-plug” and an external automobile oil filter should be installed. And in the “guitar” of the engine, make grooves for the sealing rings for stable oil pressure.
This procedure will allow:
- increase the oil pressure in the system
- improve the quality of lubrication of the crankshaft and other rubbing parts
- increase oil change intervals
- double the service life of the Dnepr motorcycle engine
Now you don’t need to remove and disassemble the engine every 10,000 km to clean the centrifuge; you just need to replace the external oil filter with a new one.
When the oil supply system is back to normal, it's time to think about increasing power. Standard crankshaft bearings, connecting rods, as well as the crankshaft itself have a huge margin of safety! But the rings and pistons leave much to be desired. The ancient design of standard piston rings does not allow achieving high compression in the cylinders. To install VAZ car rings, you need to bore the motorcycle cylinders to the third repair size of 79mm and tuning the pistons.
Thanks to such rings and new pistons, you will not only get an increase in power from increased compression, but also get rid of oil wastage, excess carbon deposits in the cylinder heads and a clean exhaust. The starting of the motorcycle will be greatly improved. In addition to this, cut off 2mm of metal from the upper steps of the cylinders to increase the compression ratio and switch to 92-95 gasoline.
Let's move on to tuning the timing system - gas distribution mechanism. The main role of this process is played by the camshaft. The camshaft cam profile determines the torque range and the peak of maximum power. If you want to achieve maximum power, you need a camshaft from the MT 10-36 .
Of course, a good way to increase power is tuned carburetors. As a rule, they can be found at Japanese motorcycle dismantling sites. An excellent option would be carburetors such as Keihin CVK32 and the like. Many carburetors are suitable for different ATVs and other equipment with a similar engine size.
It will be necessary to replace the old contact ignition system with a new microprocessor one. This could be either Sovek or Saruman which is more perfect. Well, to realize such power on the highway, the 8th pair of gears in the gearbox must be replaced with a 9 or 10 pair.