The chain drive of a motorcycle, unlike a car transmission, requires periodic adjustment, which consists of changing the degree of tension. Tensioning the chain on a motorcycle allows you to get rid of free play in the transmission, which is usually followed by a strong shock that destroys the most important components of the motorcycle. However, you need to understand that excessive tension will lead to rapid wear of the chain itself, since during operation of the rear suspension it will stretch greatly, gradually losing its shape. Therefore, every motorcyclist should know about the methodology for performing such a procedure.
000_moto_0811_070
The service life of a chain on the same motorcycle can vary significantly depending on operating conditions and maintenance.
Sharp accelerations, wheelie riding and mud reduce it quite noticeably. The service life of a chain on the same motorcycle can vary significantly depending on operating conditions and maintenance. Sharp accelerations, wheelie riding and mud reduce it quite noticeably.
After work, I often stop by an old friend’s workshop. The pleasant atmosphere and the opportunity to tinker with the hardware yourself are very invigorating. One day, a new snow-white R6 stops at the entrance and a young guy asks if the service is still working. As usual, he needed to check the chain tension and lubricate it. After 10 minutes, satisfied service workers shook hands with the equally satisfied owner of the Yamaha. “What a wonderful client,” I thought then, still not understanding why he didn’t do such a simple procedure himself.
Manufacturers of modern goods are purposefully turning us into white-handed people. We don’t wash our cars, we don’t wash our clothes, we don’t hem our clothes. Many people no longer cook food at home. And they are unlikely to prepare anything edible if all the restaurants in the area close. Simply because they have never done it. Moreover, some believe that wasting time on such nonsense is beneath them. Maybe so, but I am sure that a person should still have a choice. I may not do something because I don’t want to, but not because I don’t know how. It's worth knowing! Be able to ride a horse, be able to cook deliciously, be able to take care of your own home, be able to drive a car and motorcycle well and be able to maintain them.
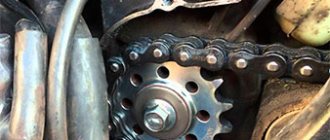
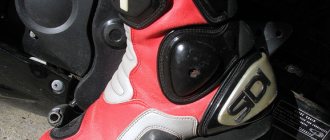
The chain drive is one of the most loaded components on a motorcycle. In powerful motorcycles, the forces generated in it reach several tons. And when accelerating and braking, they change direction. This often happens very abruptly, and at this moment the chain experiences serious stress. If the chain is loosely tensioned (sags a lot), then at the moment of load change, this excess supply of chain will first be selected, and then, when its free play ends, a sharp blow will occur, harmful to all elements of the transmission. By the way, it’s also unpleasant for the driver to drive such a motorcycle that jerks whenever the gas is opened or closed, especially in a sluggishly creeping traffic jam. The second disadvantage of a sagging chain is that when the tension is weak, its unloaded shoulder tends to move in a straight line by inertia, which is why it rests imperfectly on the sprocket teeth, thereby wearing them and itself out.
Is it possible to tighten the chain so that it does not sag at all? No, because as the rear suspension operates, the distance between the drive and driven sprockets changes. And the tensioned chain will be subjected to enormous loads (stretch greatly) if you do not leave it with a little slack, which will be removed during suspension operation. (And the shafts with bearings with a tightened chain, I note, will have a hard time.) The reason is that the axis of the pendulum and the axis of the drive sprocket on most motorcycles are located at a distance from each other, so the maximum tension occurs approximately in the middle of the suspension stroke - when the axles of the secondary the gearbox shaft, pendulum and rear wheel lie in the same plane.
There are many ways to adjust chain slack. Shorten or lengthen the chain itself, increase or decrease the diameter of the sprockets, move the mounting point of the pendulum... When tuning racing motorcycles, all these methods are used. But the easiest way to change the chain tension is to move the rear axle mounting point along with the driven sprocket. It is this solution, familiar from bicycles, that is used on all motorcycles.
There are two basic ways to move the axle mounting point. The first one is linear. The motorcycle pendulum has longitudinal slots along which the axle moves. Additionally, tensioners are installed. They come in different designs, but have a common principle: when you turn a screw or nut, the axis moves along the slot, respectively, loosening or tightening the chain. You just need to figure out the direction. It is also important to understand that while the nut on the wheel axle is tightened, you should not turn the tensioners - they can only be damaged by stripping the threads (however, after completing the adjustment, it is not harmful to tighten them so that they do not unwind on the road). Therefore, the axle nut must be unscrewed first. There are always marks on the pendulum and tensioners to help maintain wheel alignment. But in any case, I recommend tensioning the chain more or less synchronously, alternately gradually tightening the right and left tensioners.
If you ride your motorcycle aggressively, like to lift it onto the rear wheel and brake sharply, then the chain may stretch unevenly. Therefore, before checking the tension, hang the rear wheel and spin it in neutral gear. If the chain slack doesn't change as the wheel rotates, good. If the chain either tightens or loosens, it means that it is stretched unevenly and is damaged by ferrous metal. Well, if there is a need to “drive” it another hundred or two kilometers, adjust the sag to the “tightest” position.
The second option for the chain tension system is eccentric. A round hole of sufficiently large diameter is cut in the pendulum, inside which a bushing with an eccentrically drilled hole for the wheel axle rotates. Turning the eccentric moves the wheel axis, allowing you to change the chain tension. More often this option is found in cantilever (one-sided) pendulums, but it also happens in ordinary ones. These systems require a little more skill. Adjustment usually requires a large diameter hex wrench. On older motorcycles, it happens that the eccentrics stick to the pendulum. It is important not to damage them by applying excessive force, but to patiently pour kerosene on them and try to move them, using not too rough percussion tools.
One of the most frequently asked questions is what position the motorcycle should be in when measuring chain slack. Standing on the ground under your own weight, with the rear wheel hanging out (on the center stand) or under load (with the driver and passenger seated)? And what should this sag be? The recommendation of the vast majority of manufacturers is to evaluate sag when the empty motorcycle is standing on two wheels (on a side stand) and the rear shock absorber is loaded only with its weight. Sag for road motorcycles is usually in the range of 30–45 mm, and for off-road motorcycles with increased suspension travel it can reach 55 mm.
After the adjustment is completed, you need to check if everything worked out as expected. If the wheel is level, the marks on the tensioners on the right and left show the same thing, and the chain has the desired slack, then everything is done correctly. All that remains is to lubricate the chain. It's up to you to decide who you like best. If there is no central stand, then the easiest way is to hang the rear wheel by tilting the motorcycle towards the side stand, start the engine and put it in gear. When the wheel starts to rotate, direct a stream of lubricant from the bottle onto the inside of the lower chain branch. The main thing is to lubricate the internal rollers and seals. Lubricant on the connecting plates only collects dirt and, in general, is not needed for the transmission to operate. The main thing is not to direct the jet from the cylinder past the chain - onto the rim or tire. Hardened lubricant is very difficult to remove from the rims, but there’s probably no need to talk about why you shouldn’t lubricate the tire.
There were also automatic lubrication systems that made it possible to lubricate the chain on the move, but they did not take root on modern motorcycles, giving way to relatively expensive, but also durable lubricants.
It is, of course, worth choosing a lubricant in accordance with the type of motorcycle and, most importantly, its operating conditions. So, expensive lubricant for racing motorcycles will not work well off-road. By the way, the chain has the hardest time in mud and sand baths. Therefore, a good lubricant should not only easily penetrate into all crevices, but, when dry, form a durable film that does not collect too much dust. In case of force majeure, of course, any oil is better than dry friction, but remember that depending on the operating conditions and care of the chain, its service life on motorcycles of comparable power can vary significantly - from 5 thousand km to 30–40 thousand .
Another pressing question: to clean or not to clean the chain before lubrication and if to clean, then how. Of course, only those who have a chain lock with a latch can afford to remove the chain and wash it in a bath with a brush. It’s hardly worth removing the pendulum for this, and there are aerosol cleaners on sale that make this procedure as simple as possible: just rinse the chain generously from the can and dry it. But for off-road motorcycles, this is often not enough. The only thing that helps to clean the chain well is a bath with brushes, through which the chain passes, poured through the nozzles with diesel fuel or a special washing liquid. The liquid is usually run in a circle through a fine filter. However, few people have such a device even in the workshop, let alone while traveling. Therefore, many generally limit themselves only to lubricating the chain - and with regular care, the transmission lives a long time. The main criterion for good care is that each chain link should move freely, without jamming (this can be easily checked by slightly loosening the chain). And it is better to do all operations with the chain immediately after returning: the lubricant penetrates the warm chain more easily, and somehow protects it from rust.
OK it's all over Now. To be honest, reading this article will probably take longer than adjusting and lubricating a motorcycle chain, so think for yourself whether it makes sense to go to a service center with such a problem or take care of yourself to the envy of those who don’t know how to do anything themselves.
Examination
First, you should determine whether your chain needs tension - for this you need to take a control measurement. The motorcycle must be placed on the side stand, removing panniers and other foreign objects from it. As a tool, you should take a tape measure, a ruler or a fairly large caliper. Make sure there is no load on the suspension and start taking measurements.
Very often the question arises, how should the chain be tensioned to avoid accelerated wear of motorcycle components? It is best to check the operating instructions developed by the motorcycle manufacturer, since the standard indicator may be individual for a particular vehicle. If this is not possible, you should use average values equal to:
- 15–25 mm for sport bikes;
- 30–45 mm for domestic equipment and medium-power road motorcycles;
- 35–50 mm for touring motorcycles with a large engine capacity;
- 50–60 mm for motocross motorcycles and off-road vehicles.
When checking, it may be discovered that the actual indicator is outside the acceptable range. In this case, it is necessary to urgently tension the chain to avoid motorcycle breakdown in the near future. In addition, it is worth performing another check, assessing the technical condition of the circuit. Gradually spinning the rear wheel, determine the degree of sagging at each point - if this indicator differs significantly, the part urgently needs to be replaced. If your chain is very stretched, but you need to get to a store or service center, then to adjust you need to choose a position with minimal slack.
004_moto_0811_070
The screw tensioner requires at least two keys - with one we loosen the axle nut (you may have to keep the axle from turning with another key), and with the second we adjust its position.
The screw tensioner requires at least two keys - with one we loosen the axle nut (you may have to keep the axle from turning with another key), and with the second we adjust its position.
Reasons for replacement
Noise, vibration and slipping of sprocket teeth are the first warning signs. Further, the chain in some cases will require tightening 1-2 times a week . Moreover, it is the uneven wear of the sprockets that leads to noticeable jerks in movement, even at low speeds. The danger of this situation lies in the risk of damage to the crankcase walls by a broken chain or even jamming of the rear wheel. Considering that the chain tension on a motorcycle can be maximum, and the speed of the vehicle is quite high, this can cause a serious accident on the road.
The sprocket on a motorcycle is replaced together with the chain due to the rapid failure of the new chain when working with a worn one. Often, when selling used motorcycles, only the chain is changed, but the old sprocket quickly “eats” it.
The chain must be replaced immediately if:
- You have discovered missing rivets or a lock;
- The rollers are deformed and damaged;
- Rusty, jamming links were found;
- She stretched to her maximum allowable size;
- The seals in the link drums have become hard or cracked.
Don't put off repairs if your motorcycle needs urgent service. Falling at high speeds due to a stuck wheel is very serious.
006_moto_0811_070
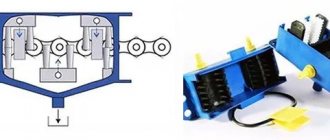
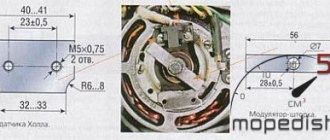
The snail tensioner is simpler and more convenient: you only need one key, positioning accuracy is ensured by fixed notches on the snail and embossed dots opposite each number.
In addition, the required chain tension is ensured automatically if you turn the “snail” only by hand, without a key. One division roughly corresponds to one chain link. That is, in the case shown in the photo, you can easily take a chain 2 or 4 links longer. The snail tensioner is simpler and more convenient: you only need one key, positioning accuracy is ensured by fixed notches on the snail and embossed dots opposite each number. In addition, the required chain tension is ensured automatically if you turn the “snail” only by hand, without a key. One division roughly corresponds to one chain link. That is, in the case shown in the photo, you can easily take a chain 2 or 4 links longer.
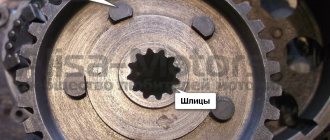
SCOOTER. ENGINE TIMING GEAR ASSEMBLY (50CC)
contents .. 60 61 62 63 64 65 66 67 68 69 70 .. 1. Install a new cylinder head gasket.
ATTENTION!
The cylinder head gasket is made of soft metal (copper, aluminum) and after tightening the cylinder head nuts it is deformed, thereby ensuring a tight connection. Reinstallation of the cylinder head gasket is not permitted. 2. Install the timing chain guide. 3. Install the cylinder head. 4. Set the piston to TDC according to the marks on the flywheel. This is usually the "T" mark on the flywheel. Align the mark with the tide on the engine crankcase.
ATTENTION!
The following operation is one of the most important when assembling the engine
It is important to align all the marks very accurately. An error in installing the chain even by 1-2 teeth will result in the engine not working correctly, and it will probably even lead to serious damage to the timing and cylinder-piston gas parts when trying to start the engine! 5
After making sure that the timing chain has not jumped off the drive sprocket on the crankshaft, install the camshaft into the cylinder head, at the same time putting a chain on its sprocket so that the marks on the camshaft sprocket are parallel to the plane of the edge of the cylinder head, and the cams are directed downward (inward). heads).
On the rocker arm support are the letters “EX” - which means “EXHAUST” - release. The "EX" mark should be located above the exhaust valve.
ATTENTION!
• Check the correct axial alignment of the camshaft (make sure that the camshaft bearings are correctly positioned on the beds). It is likely that on some scooter models there will be an “IN” - “INTAKE” - inlet mark on the holder. Accordingly, the “IN” mark must be located above the inlet valve.
ATTENTION!
If the copper washers are severely deformed (flattened), they must be replaced, since if the washers do not fit tightly due to oil leakage, the pressure in the lubrication system will drop and the motor will quickly fail. Sealing this connection with any sealant is unacceptable. 7. Install sealing copper washers on the studs. 8. Screw on all four cylinder head nuts without tightening them. 9. We recess the working rod of the timing chain tensioner inside the housing. 10. Reinstall the timing chain tensioner and tighten its mounting bolts.
12. Sequentially, crosswise tighten the cylinder head nuts in 3-4 steps. The final tightening torque is 10-15 Nm (More accurate values can be found in the repair instructions for the specific scooter model). 13. Screw in and tighten the additional cylinder head bolts. 14. Using a socket wrench for the central bolt of the flywheel, or with your hands holding the flywheel, slowly turn the engine crankshaft clockwise 3-4 turns to make sure that the timing timing is set correctly and the piston does not collide with the valves.
16. Adjust the valve clearances (see). 17. Rotate the crankshaft several turns and once again check that the valve clearances are set correctly. 18. Install the cylinder head cover and tighten its bolts. 19. Place the crankcase ventilation hose onto the fitting in the cylinder head cover. 20. Install the cylinder cooling casing.
ATTENTION!
Do not forget to remove the paper from the intake manifold if you covered it from dirt during disassembly. 21. Install the inlet pipe assembly with the carburetor.
ATTENTION!
In most cases, when installing an exhaust system, the exhaust pipe gasket will need to be replaced. It is better to replace it with a new one during assembly. 22. Install the exhaust system. 23. Fill the engine with oil.
009_moto_0811_070
How to check wheel alignment?
First, look at the motorcycle from the front and, turning the steering wheel, make sure that the front wheel is exactly in the center of the rear one (if you look along the sides of the front wheel, you can see the equal thickness of the rear tread). How to check wheel alignment? First, look at the motorcycle from the front and, turning the steering wheel, make sure that the front wheel is exactly in the center of the rear one (if you look along the sides of the front wheel, you can see the equal thickness of the rear tread).
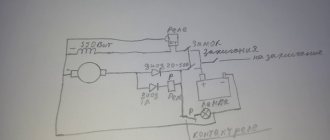
Ignition advance
Some motorcyclists who understand proper ignition settings prefer advanced ignition settings. If we talk about this process more simply, then with this ignition, the motorcycle engine has a little more power and starts much easier. The thing is that with ignition set to advance, the spark plug produces a spark a little earlier than the piston in the cylinder reaches top dead center. Thus, we get a small increase in power and easier starting in bad weather conditions, for example, during cold weather.
Answering the question of how to advance the ignition on a 4T scooter, we can say that this is no more difficult to do than a normal setting. If you are already familiar with how to set marks on a 4t scooter and how to set up the ignition itself, then you will not have any difficulties. All you need to do is not completely connect the marks on the rotor and magneto housing. About half a centimeter is enough to get the ignition to advance.
011_moto_0811_070
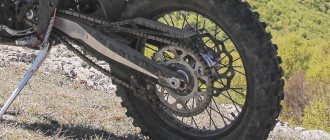
When the front wheel is aligned, look again, but at a less acute angle, so that you can see both sides of the rear.
On the left and right, this angle (it can be clearly seen from the front wheel) should be approximately the same. The photo shows that our rear wheel is facing to the left (in the direction of travel of the motorcycle). When the front wheel is aligned, look again, but at a less acute angle, so that you can see both sides of the rear. On the left and right, this angle (it can be clearly seen from the front wheel) should be approximately the same. The photo shows that our rear wheel is facing to the left (in the direction of travel of the motorcycle).
Photo report: How to check the timing chain of a scooter?
It’s always like this in life: one thing is good, the other is bad. Exactly the same principle applies to various types of mechanical torque transmissions. Chain transmission was no exception here. On the one hand, there is nothing simpler, more reliable, lighter, more compact and cheaper than a chain drive. On the other hand, we get eternal “hemorrhage” with chain stretching, sprocket wear, endless cleaning, lubrication, maintenance and tensioning of this very chain. But there is nothing to be done, the chain transmission has a lot of advantages over other types of mechanical transmissions, so these types of transmissions are used almost everywhere. However, today we will not talk about the chain transmission as such, but about a method for diagnosing the timing chain driving the camshaft of a scooter engine.
To change or not to change?
Suppose you “overhaul” your engine: you change the seals, crankshaft, gaskets and other devices, but you doubt whether to replace the timing chain with a new one or not. If you doubt it in vain, change it for a new one at the first opportunity. And now I will explain why. See for yourself: a chain has an average service life of approximately 18,000-20,000 km of a scooter (personal experience), approximately the same as the average service life of the engine itself. And for example, after driving 6,000 km, the crankshaft jammed or the engine leaked, or something else happened that requires complete disassembly of the engine.
And what happens? The chain, after 12,000 km, will exhaust its service life and become unusable, but the crankshaft and other parts will be in good order and you, like it or not, will have to again, because of the chain alone, half the engine. Is it necessary? The chain is a consumable item. Never skimp on it!
Examination
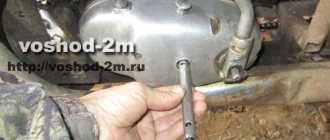
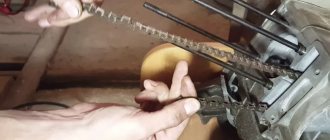
Personally, I never check timing chains. I simply throw them in the trash, no matter how awesome they seem to me. For me, a chain is a consumable, just like a spark plug, oil or oil seal. But if it’s important to you, or money is tight, you can use the old fashioned method. We stretch the chain along its length, hold it with our fingers and try to position it in a horizontal position
If the chain describes an arc that closely resembles an angle of 90 degrees, then feel free to throw it in the trash. If the chain bends slightly and describes a small arc, then such a chain is quite suitable for further use
For clarity, I took a new and heavily worn chain, put them together and checked for horizontal deflection. As you can see: the new chain (above) described a barely noticeable arc, while the worn and useless one sagged like snot, almost at an angle of 90 degrees. The worn chain turned out to be almost a centimeter longer compared to the new one.
How to replace the timing chain of a scooter engine?
It’s very simple, my friends: you remove the engine from the frame, disassemble it and replace the chain with a new one. There are no special secrets in this matter, just as there are no special ways to “cheat fate” and replace the chain without disassembling the engine. The chain can only be replaced by completely disassembling the engine. There is, of course, one guy on YouTube who rivets the old chain, then rivets the new one, connects both chains, pulls out the old one, starts the new one, and then rivets the whole thing back, but that’s porn. I don’t suffer from such crap, since the result of such “repairs” is not always predictable. The timing chain is in no way designed to be riveted or riveted. During the riveting process, it can easily be pulled or twisted, and this is a sure way for the chain to fly off the sprocket while the engine is running, and then, depending on your luck... Maybe everything will work out, or maybe the valves will bend. And one more point: a beginner will not be able to rivet a chain efficiently. This work is not as simple as it might seem at first glance. Therefore, don’t suffer from bullshit and disassemble the engine.
013_moto_0811_070
When installing a new chain, it is important that the bottom leg does not rub against the chain catcher.
When tensioned, the chain always moves away from the trap, so if there is a risk that the chain will touch it, choose a longer chain when purchasing. In general, if in any doubt, take a longer chain: cutting off links from it is much easier than extending them. When installing a new chain, it is important that the bottom leg does not rub against the chain catcher.
When tensioned, the chain always moves away from the trap, so if there is a risk that the chain will touch it, choose a longer chain when purchasing. In general, if in any doubt, take a longer chain: cutting off links from it is much easier than extending them.
Professional approach
Many motorcyclists treat chain tensioning as a routine procedure, during which significant tolerances can be made and the position of the rear wheel can be adjusted “by eye”. This approach when setting the required chain tension is unacceptable - all operations must be performed as carefully and accurately as possible, using special tools. If you want to extend the life of the chain and avoid severe wear on the transmission when using the motorcycle in extreme conditions, you should purchase a special laser gauge to set the optimal wheel position. In the most difficult cases, if you cannot understand the structure of the adjusting mechanism or cannot loosen it, you should contact the specialists of a motorcycle service station. They will carry out all the necessary work, providing you with a guarantee of the quality of the result and the reliability of the motorcycle.
016_moto_0811_070
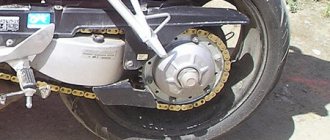
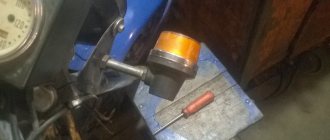
To clean and lubricate the chain, it is convenient to place the motorcycle on the center stand (or hang it on the side using an additional support), start the engine and engage first gear.
We spray the compounds onto the inner surface of the lower branch of the chain, making sure that they do not get on the rim and tire. To clean and lubricate the chain, it is convenient to place the motorcycle on the center stand (or hang it on the side using an additional support), start the engine and engage first gear. We spray the compounds onto the inner surface of the lower branch of the chain, making sure that they do not get on the rim and tire.
About adjusting the ignition of a 4t scooter
Knowing how to set up the ignition of a 4T scooter on your own, you can save time and money, since you will not need to contact a motorcycle repair shop. The procedure is simple, even if you have no experience it takes a little time, but you will need to be patient. Regardless of the type of ignition, an important role is played by how the marks are set.
Correct adjustment is a guarantee of stable and smooth engine operation even in cold weather conditions. Often, in used vehicles, the ignition is broken: this can happen for various reasons, ranging from elementary shaking when driving to improper handling of the equipment. In order for the scooter not to let you down and for you to be able to start it whenever you want, you will need to learn how to carry out this procedure yourself. To do this, you will need to have several keys that allow you to remove the valve cover if the engine is four-stroke.
Despite its simplicity, a motorcycle chain requires regular maintenance and checking the tension.
Tension force: tension the chainTension
There are two main chain slack control mechanisms used by various manufacturers. The complexity of the procedure in both cases will be approximately the same, but it is worth paying attention to the basic recommendations related to tension. The durability of the transmission, as well as other important components of the motorcycle, will depend on the correct execution of such an operation.
Longitudinal movement
The most common system is one with longitudinal slots in the pendulum - they allow you to move the axle by adjusting the distance between it and the gearbox shaft. To complete the work you will need two keys - 17*19 and 13*14. Having placed the motorcycle on the center stand or suspension, use a large wrench to unscrew the wheel shaft mounts - this will significantly loosen it, which is a necessary condition for adjusting the tension. Next, you need to pick up a smaller wrench and unscrew the lock nuts on both sides of the wheel.
Now you will need to learn how to tension the chain - there are adjustment bolts on both sides that move the wheel along the slot. Strong tension on one side can cause the wheel to skew, resulting in the need to completely disassemble the rear swingarm. Therefore, experts recommend turning the bolts one by one, making 1–2 turns. Do not forget to periodically check the degree of chain tension by pulling it with your finger - you can overdo it, which will force you to spend a lot of time finding the right position. Some motorcycles use special tensioners; to set them to the optimal position, you need to move them with a screwdriver or simply move them by hand.
When you manage to find the optimal position for the rear wheel, you will need to secure it to prevent further movement. First, the locknuts are tightened, and only then the motorcycle axle is fixed. Carefully check that all connections provide the tightest possible fit and do not allow the wheel to move. After this, measure the tension again and try how the motorcycle behaves on the move.
Eccentric mechanism
Some manufacturers suggest using a more complex but reliable eccentric mechanism. Working with it is absolutely not difficult, but you will need more skill than in the option described above. Most often, an eccentric mechanism is used to regulate chain tension in one-sided cantilever pendulums, although there are exceptions.
It is very important to know how to make adjustments correctly - you do not need to unscrew bolts or locknuts to do this. The only tools you need to prepare are a large hexagon - its size is determined by each manufacturer individually and may vary depending on the specific model of motorcycle. By turning the adjusting screw, you move the axle along the eccentrically drilled hole, changing the degree of its tension.
Unfortunately, you often have to deal with cases of oxidation of the adjustment mechanism - especially if the motorcycle was used in a marine climate. In this case, you will have to use brute force. To turn the hexagon, hit it with a rubber or wooden mallet. Be careful, as too strong a blow may strip the threads of the mechanism, after which you will have to repair the pendulum.
Additional actions
If you know how to tighten a motorcycle chain, it wouldn't hurt to check the condition of the sprockets and other transmission parts. If signs of significant wear are detected, they should be replaced immediately, since breakdowns of this type seriously affect the reliability and durability of the motorcycle transmission. If you find that the chain is very stretched, it is better to get rid of it immediately - especially if you like to ride at high speed or perform stunts by tipping the motorcycle onto its rear wheel.
In addition, when regularly tightening the chain, it should also be cleaned and lubricated. It is better to use special products in cans that are supplied under high pressure - they effectively wash away all foreign deposits and also penetrate into all internal parts of the chain drive, contributing to its effective lubrication. The procedures are also performed with the rear of the motorcycle raised, which allows you to quickly spin the wheel if necessary. There are also special devices for cleaning the chain. The device is fixed to the transmission mechanism of the vehicle, after which all that remains is to engage first gear and ensure a continuous supply of cleaning agent to the receiving tube.