How to check the solenoid valve and starting enrichment on a 4t scooter?
Many owners of Honda scooters and owners of mopeds of other brands have to independently repair and maintain their equipment, as well as perform tuning. Sometimes situations arise when it is problematic to start a cold moped due to the fact that the fuel does not fill the required volume of the float chamber, or the gasoline is mixed with air in insufficient concentration. Having figured out how to check the solenoid valve on a scooter, you can solve these problems yourself and quickly warm up the engine in the morning. Let's look at this in more detail.
Post navigation
Admin
You may also like
Japanese-made scooters – Honda, Yamaha and Suzuki
Bendix scooter device
2t scooter carburetor design
Starting enrichment on a 4t scooter - description and purpose
Not all motorcycle enthusiasts know what an electric valve on a scooter is for. This device is also called a starting enricher. It is responsible for the volume of the air-fuel mixture, which fills the cylinder chamber through a nozzle when starting a cooled scooter engine. A feature of small-capacity motorcycles is the engine’s need for a rich mixture during a cold start of the scooter engine. The fuel entering through the carburetor is mixed with air in a certain concentration thanks to an electric valve connected to the carburetor.
The starting enricher is responsible for the volume of the air-fuel mixture
If the starting enrichment is functioning and there are no breakdowns of the power unit, starting the engine is not a problem even in the cold season. There is no doubt about the importance of the electric valve in ensuring trouble-free starting of the engines of modern mopeds and scooters. However, if difficulties arise with starting the engine, interruptions in operation and excessive power consumption of the engine, it can be assumed that problems have arisen with the starting enrichment. That is why it is important to know its structure and be able to check its functionality.
Signs that a check is needed
If difficulties arise with starting the engine and in a number of other situations, it is necessary to be able to check the functionality of the starting enrichment. Thoughts about a malfunction of the solenoid valve may arise in different cases.
Let's take a closer look at the main reasons:
- the first morning start of a cold scooter engine is problematic;
- it is difficult to start a cooled scooter engine after a long stay;
- fuel consumption significantly exceeds the consumption indicated in the passport;
- The scooter's power unit is quite unstable at idle;
- a warm engine does not maintain speed, and a cold engine functions intermittently.
Any of these problems should make the scooter owner think about a possible malfunction of the solenoid valve.
A faulty enrichment device can be in two positions:
- with the solenoid valve needle constantly extended;
- in the initial state, when the needle does not protrude.
It is necessary to be able to check the functionality of the starting enrichment if difficulties arise with starting the engine.
Each case has a different effect on the operation of the motor. The first situation makes it difficult to start the engine of a cold scooter. An attempt to start the engine by pressing the kickstarter, as well as starting with an electric starter, are unsuccessful. In the second case, the engine starts without problems, but during operation it consumes an increased amount of gasoline. Increased fuel consumption is associated with engine operation on a highly enriched mixture.
How does an electric valve work on a scooter?
To enrich the fuel-air mixture, a fuel enrichment device with a mechanical drive and an automatic control system is used. Let us consider the operating principle and features of each of these enrichment systems.
Manual
The manual enrichment system, which requires precise adjustment, is inconvenient to use. To start the scooter engine after parking overnight, you need to press the lever on the steering wheel, which transmits force through the cable to the pusher. After the power unit starts, warms up and reaches operating temperature, it is necessary to return the manual enrichment lever so that the volume control flap and needle return to their original position. As experience in operating scooters shows, such a system has a number of inconveniences.
Most models of modern mopeds are equipped with an automatic starting enrichment
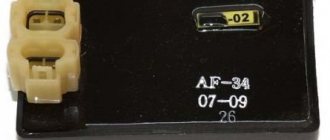
Auto
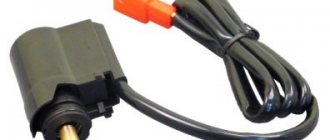
An automatic type start-up enricher, called a thermoelectric valve, is installed in most models of modern mopeds with two-stroke and four-stroke engines.
The device consists of the following parts:
- housing in which the solenoid valve is located;
- ceramic heater powered from the on-board network;
- spring-loaded drive with a rod connected to a pusher and a valve.
The device is connected to an air channel that saturates gasoline from an additional float chamber before feeding it into the combustion chamber of the cylinder. One feature of scooter carburetors should be noted. They have two float chambers - additional and main, connected to each other by a starting jet.
A small tubular channel from the additional float chamber is connected to the mixing chamber, which is responsible for supplying air with gasoline to the engine. The cross-section of the mixing chamber is blocked by a valve, structurally similar to the throttle valve in a carburetor. Lowering the damper causes the spring-loaded needle to move, closing the fuel supply channel. The solenoid valve body is thermally insulated and located in a rubber boot. All modern scooters have a similar thermoelectric valve design.
Old scooter models are equipped with a starting enrichment without electric heating
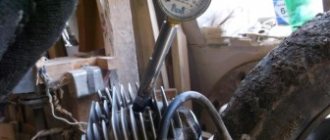
Older scooter models are equipped with a starting enricher without electrical heating. The transfer of thermal energy to the drive is carried out thanks to a copper heat-conducting cylinder connected to the scooter motor. Instead of a powder drive, a membrane drive is installed. In this case, the intake manifold of the cylinder head is connected to one cavity of the bulb.
What is the carburetor of a Chinese scooter and its capabilities, disadvantages, tuning
The carburetor circuit of a Chinese scooter is, in principle, standard and suitable for both 2t and 4t engines. The design of the carburetor allows certain actions to be taken to improve its performance, however, if the engine is two-stroke, the efforts will not make sense.
The simplest approach is to replace the carburetor with a more advanced one, for example, with an accelerator motor, if you have a fairly old version without it. Most often, simple tuning is limited to replacing the main fuel jet, this is especially true for engines with low power. Replacing the nozzle helps to increase the fuel channel and, due to this, add a little power to the engine.
Quite often, more serious tuning involves the use of a 150 cc scooter carburetor. Interesting models with a diffuser diameter of 17.5 mm. It is great for 70cc piston. Less often you come across a large diameter of 19-24 mm, it is just ideal for a bored 150 cc piston engine. However, the diameter must be selected correctly, otherwise the motor will begin to choke.
How does a scooter carburetor solenoid valve work?
The starting enrichment on a 2t scooter and on a four-stroke moped works according to a fairly simple algorithm. On a cold power unit, the spool needle occupies the upper position. It is responsible for opening the fuel channel, and the position of the damper affects the volume of supplied air. The first revolutions when starting the engine cause a vacuum inside the emulsion channel, and gasoline is sucked into the engine.
The result is a highly enriched mixture, making it easier to start a cold engine. Before reaching operating temperature, the power unit needs to be fed with an enriched mixture.
The enricher in this mode performs the function of a parallel carburetor - fuel entering through the nozzle is mixed with air and directed to the engine.
The current generated by the generator of the running engine is supplied to the contacts of the heater that controls the thermoelectric valve of the intake system. Due to heating, the temperature of the powder drive increases, which causes the rod to gradually extend up to 4 mm. The force is transmitted to the pusher, which ensures the movement of the damper.
The starter enricher on a scooter works according to a fairly simple algorithm.
As the engine warms up, the spool with the needle lowers, followed by the air-fuel channel closing. After five minutes, the damper closes completely and the mixture becomes lean. Now the gasoline enrichment system on a warm engine is regulated by the carburetor.
After stopping the engine, the valve stops heating, and as a result of powder compression, the damper drive using a pusher and rod returns it to its original position. The system is ready for subsequent startup. The cooling and return process takes no more than two minutes. The enricher has a drawback - it works separately from the motor.
As a result, in the warm season, on a hot engine that does not need a rich mixture, the engine, when the thermoelement has cooled, is powered by a rich mixture.
Why adjust the carburetor?
Carburetor adjustment may be required in the following cases:
- The spark plugs are serviceable, but do not work very well; their color has changed to black or yellowish.
- The engine does not provide the required power
- Scooter won't start
- Fuel consumption has increased excessively.
All these problems in most cases are caused by an insufficiently enriched or, conversely, overly enriched mixture with oxygen, and they can be corrected by correctly adjusting the carburetor.
The settings, regardless of whether you have a 2t or 4t scooter, have three phases and are made as follows:
- Idle speed adjustment
- Setting the fuel level
- Adjusting the quality of the mixture.
On some carburetor models there is no screw that adjusts the fuel quality, so you have to disassemble the carburetor to change the position of the needle.
The idle speed adjustment is carried out after the engine has warmed up: this takes no more than 15 minutes. For this purpose, the design provides an idle screw. It allows you to make the engine stable by selecting the desired idle speed. When the screw is tightened, the speed will increase, and when it is rotated counterclockwise, it will decrease.
It is important to adjust the quality of the mixture. If it is too lean, the scooter will ride with difficulty, and the engine will noticeably lack power. If the mixture is too rich, the spark plugs will turn black and quickly fail. Fuel quality adjustment is usually carried out using a screw located on the carburetor body. To enrich it you need to turn it clockwise, to lean it counterclockwise. If there is no screw, the carburetor is opened, the locking ring on the needle moves up for a richer mixture, down for a leaner one.
Adjustments are made as follows:
- Start the engine and warm it up for 10 minutes, after which you need to turn it off
- The screw must be tightened clockwise until it stops, but without force.
- After this, it is unscrewed counterclockwise 1.5 turns
- The engine needs to be started and the screw turned an additional 1/3 turn in the same direction. Wait 2 minutes
- As the speed increases, you need to unscrew the screw an additional 1/4 turn and observe the reaction for about 2 minutes. If the speed does not drop, repeat the steps
- If the speed begins to decrease, the screw must be turned clockwise 1/4 turn.
Ideally, the engine will operate exactly at 1.5-2 propeller revolutions, but its position depends on the quality of the fuel. In the case of a needle, the quality of the mixture will vary depending on the position of the needle locking ring. The disadvantage of such a carburetor is the small number of needle positions and the need to disassemble it each time to make adjustments.
You can adjust the fuel level in the chamber as follows:
- Unscrew the drain screw
- The phone is lifted up
- You need to check the fuel level while the engine is running. The melting level is slightly below the skirt located on the float chamber cover
- Most often, the level rises above normal and the carburetor overflows, so you need to adjust the float so that it fires earlier. To do this, the needle holder is usually bent. A lot of force is not required, only a few mm are needed.
Operating principle of a membrane enricher
The membrane starting enrichment works on a different principle. When the engine is not warmed up, the valve is in the open position. Starting the engine causes a vacuum in the area of the intake manifold, which is transferred to the membrane thanks to the thermal valve. Under the influence of reduced pressure, the membrane tries to rise, opening a channel responsible for supplying additional air volume.
Further heating of the cylinder to operating temperature causes the valve to close and lower the spring-loaded valve associated with the needle. As a result, the supply of additional fuel is cut off. Such a system with a membrane functions in a clear connection with the engine temperature, which ensures a more correct dosage of fuel.
The membrane starting enrichment works on a different principle.
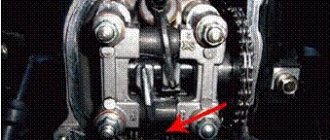
How to check the solenoid valve on a scooter
Let's try to figure out how to check the solenoid valve on a scooter or moped.
This is a simple operation. Let's start in order:
- You should check whether the enrichment channel is closed by the solenoid valve needle. Start the cold engine and observe the change in idle speed. At first they are increased and then decreased to the desired frequency. In this case, you can make a conclusion about the serviceability of the starting enrichment and not search for its faults;
- If the scooter starts without problems, but the engine speed does not decrease after reaching operating temperature and remains high, there is a high probability that the starting enrichment is faulty. In this case, it is necessary to check the functionality of the solenoid valve;
Checking the solenoid valve on a scooter
- If the power unit can be started only after long and exhausting presses on the kickstarter, the carburetor is not clogged, the gasoline level in the float chamber is set correctly, and the compression has not dropped, then most likely there are problems with the operation of the starting enrichment, and it needs to be checked.
So, we have come close to testing the scooter's starting enrichment for operability. To perform this operation, it is necessary to disconnect the wires connecting the solenoid valve to the scooter's electrical network. Then you should unscrew the fastening of the solenoid valve to the carburetor body and remove it. Next, you will need to prepare a pair of insulated wires, the length of which will allow you to connect the terminals of the starting enrichment to the battery.
When connecting, there is no need to observe polarity, since the solenoid valve is powered from an alternating voltage network. It is important to pay attention that the ends of the wires freed from insulation do not touch each other. All that remains is to connect the wires to the chips and supply 12 volts from the battery to the enrichment unit.
With a working enrichment device, after a couple of minutes you can see the needle gradually moving out of the device body. The amount of stroke can be determined by measuring the extension of the rod before applying voltage and after turning off the power. For a faulty solenoid valve, five minutes after connecting to the battery, the needle will remain in the same position. If there are no defects in the wiring, then we can conclude that the enrichment unit is faulty.
Don’t be upset and try to repair the solenoid valve - the cost of a new one, depending on the model of the moped, varies between 5-7 dollars. When purchasing, it is advisable to have an old starting enrichment with you or clearly find out from the seller whether the spare parts he offers correspond to the brand of the scooter.
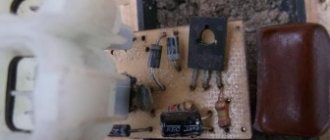
Fix a malfunction of the solenoid valve on a Chinese scooter
How to fix a carburetor solenoid valve malfunction (139QMB engine) with your own hands using the example of the Chinese Super Sport Acar scooter
The solenoid valve on the scooter's carburetor is used for cold starting of the engine. And it so happened that the previous owner had big problems Super Sport Acar To do this, in the removed state, I connected it to a 12-volt charger. There was no movement of the needle either after 5 minutes (as it should be approximately) or after 10 minutes. The verdict is harsh - faulty, but since there were no shops with spare parts for the scooter within a radius of tens of kilometers, I had to make do on my own.
I took a sharp knife and cut off the top part where the wires fit. The plastic turned out to be relatively soft and this procedure did not take much time. I disconnected both parts and the solenoid valve was easily disassembled into the following parts.
I looked carefully and saw that the heating element (in the form of a tablet) had oxidized from the sides to the contacts. I cleaned both the element and contacts with fine sandpaper. I pressed the heating element between the contacts with my fingers and connected the device. After 10-15 seconds I felt that the element was heating up. Next, I took the part to which the heating element is adjacent and, using a lighter with a weak flame, heated up the copper part a little - the thin rod on the other side began to extend. Everything works... Next, I cut out a strip of soft aluminum, made a hole in the middle into which the cylindrical part of the solenoid valve fit, and crimped the assembled body. In the future, for reliability, I plan to put a screw with a nut in the upper part. And it is advisable to initially coat the cut site with cold welding for plastic or some other adhesive.
I installed the repaired solenoid valve on the scooter's carburetor and started the engine (139QMB). In the future, perhaps I will make this node manually controlled.
Which I had to do later because I carelessly damaged the housing and further operation became impossible. But in manual mode, cold starting worsened. Need to think…
PS This year I found a similar e-valve on the Aliexpress - Automatic Electric Choke Scooter Moped for only 250 rubles including shipping (in Russia I only saw it for 450 rubles).
Registration on the site is not difficult - Registration on AliExpress... the only thing is prepayment for the goods. I use Yandex.Money and don’t experience any difficulties in this matter.
Signs of burnt valves
One of the main signs of a burnt-out valve is the engine tripping, which also indicates other problems not related to the valves, the elimination of which is cheaper and easier to repair. In addition to engine tripping, engine power decreases and fuel consumption increases.
The main indicator of the presence of a malfunction in the engine is its tripping in all operating modes (for example, with a faulty spark plug, tripping of a warmed-up engine operating at high speeds may not be noticeable).
Carburetor design (video)
For clarity, we suggest watching a video instruction about the design of carburetors and the principle of their operation:
Knowing the structure of the carburetor and understanding what needs to be connected where, you can easily disassemble, reassemble, clean and adjust it yourself, regardless of what brand and model of scooter you have, with some skill. All these procedures will not take much time and will help you save money on car services. The ability to carry them out will help you out when the engine does not want to start.
Causes of burnout
Valves burn out for various reasons, including:
- factory defects or low-quality spare parts;
- incorrect valve adjustment or malfunction of hydraulic compensators;
- valve wear (valve stem or guide bushing);
- early or late ignition;
- lean mixture.
No one is immune from purchasing defective and low-quality spare parts, so buy spare parts from trusted sellers who value their reputation. If the valves are adjusted incorrectly (they are tightly clamped), the engine operation will be noticeable by the characteristic “tractor” sound. In this case, due to non-compliance with the thermal clearance, the valve overheats, which will invariably lead to its burnout.
If the ignition is set incorrectly, combustion of the combustible mixture occurs when the valve is open and leads to its malfunction. A lean mixture is dangerous because the combustion temperature of the combustible mixture increases, which leads to overheating and burnout.
Consequences
In the best case, burnt valves lead to increased fuel consumption and reduced vehicle power. However, this can quickly move on to more complex problems:
- damage to the cylinder head, cylinder, piston from fragments of a burnt out valve;
- breakdown of the cylinder block with large fragments;
- burnout of the valve seat, which leads to the need to replace the cylinder head.
In addition, fire from an ignited combustible mixture with an unburned valve can enter both the intake manifold and the exhaust system, reducing their service life.
How to determine
Valve failure can be determined by several methods:
- Diagnostics by disassembling the engine. This method is reliable and accurate, but to do this it is necessary to disassemble the engine - remove the cylinder head. Due to the fact that this process is labor-intensive, time-consuming and requires certain skills and tools, it is worth moving on to it if all other causes of engine tripping have been excluded.
- Diagnostics using special tools. This method is the most preferable, because using it, you can quickly and with a higher probability determine the cause of the tripping without disassembling the engine, however, this will require a special device - a compression gauge. A decrease in cylinder compression leads to a loss of power and indicates that the car engine requires disassembly and repair.
- Engine tripping and reduced compression of cylinders 3 and 4 occur as a result of a malfunction of the vacuum brake booster. Low compression indicates a malfunction of the valves and problems of the cylinder-piston group - malfunctions of the piston rings, wear of the cylinder and piston. To eliminate problems with the CPG, you need to pour oil into the idle cylinder and crank the engine. If at the same time the compression increases, then the problem is the CPG is worn out, otherwise the valves are burnt out.
- Diagnostics without the use of special tools. Valve failure can be determined with high probability and without tools by following certain steps, which we will discuss in the instructions below.
Video: Signs of valve burnout
Something else useful for you:
Instructions
How to determine valve burnout without special tools? In this manual, we will look at how to determine burnout without resorting to special tools and disassembling the engine (provided that the ignition and power systems are adjusted in accordance with the requirements and are not the cause of the trip).
- We determine the faulty cylinder. To do this, the engine must be running and safety precautions must be observed. We disconnect the high-voltage wires from the distributor or from the spark plugs one by one and listen to the engine. If the sound of the running engine has changed and the tripping has become noticeable, then this cylinder is working. When you disconnect the faulty cylinder, the engine will operate the same as before it was disconnected.
- We determine the serviceability of high-voltage wires. We determine the serviceability of the wires in the same way as the serviceability of the spark plugs - by moving from a serviceable cylinder to a faulty one. In a dark room, if the wires are faulty, sparking can be observed.
- Checking the distributor and ignition coil. To check the serviceability of the distributor, capacitor and ignition coil, remove the spark plug, connect it to a high-voltage wire and crank the engine with the starter. In this case, the electrode of the spark plug is located at a distance of 1-2 cm from the vehicle’s mass. If a bright and blue spark appears as a result, this indicates their serviceability.
- Checking the vacuum brake booster. A faulty brake booster affects compression in cylinders 3 and 4. To diagnose its serviceability, disconnect the hose going from the vacuum pump to the motor and plug it. If the engine runs smoothly, replace the brake booster. If the elements of the electrical equipment and brake systems are in good condition, then you will have to disassemble the engine and repair it.
- Malfunction of the cylinder-piston group. A CPG malfunction differs from valve burnout by the presence of exhaust gases in the engine crankcase, which can be noticed by disconnecting the breather hose from the air filter. And the presence of oil on the spark plug electrode indicates a malfunction of the CPG.
- If, as a result of the diagnostics, no deficiencies are identified, then we can talk about burnout and the need for repairs.
- We determine the serviceability of the spark plug. The easiest way, which does not require knowledge, is to replace the spark plug. To do this, at the diagnostic stage it is not necessary to buy new spark plugs; swap spark plugs from the working and non-working cylinders. If at the same time the cylinder with the spark plug from the faulty cylinder stops working, then this indicates a malfunction of this spark plug, and if it works, then the problem is not in the spark plug.
In addition, you can determine a non-working spark plug by inspection. A faulty spark plug has the following external defects:
- spark plug electrodes with soot, soot and “wet”;
- the body has cracks;
- There are black dots and stripes on the body (the spark plug is broken). The electrodes of a serviceable spark plug are light or slightly brown in color, the body is without damage or black marks.
Having sufficient skills and tools, you can replace the valves yourself, but since this procedure is very responsible, complex and requires special tools and devices, it is better to entrust it to specialists.
If the engine fails, do not put off diagnosing the cause until later, even if the budget does not allow for repairs in the near future. It is necessary to identify the reason why the engine is unstable. And if this reason is not related to burnout of valves and wear of the cylinder-piston group, then the car can be operated in a gentle mode, which will lead to increased fuel consumption and the possibility of stalling at the wrong moment. But otherwise, it is better to stop using it to avoid higher repair costs.
Electrics and electrical equipment of a scooter
Dedicated to all owners of Chinese scooters...
To begin with, I would like to present a wiring diagram for a Chinese scooter.
Since all Chinese scooters are very similar, like Siamese twins, their electrical circuits are practically no different.
The diagram was found on the Internet and is, in my opinion, one of the most successful, since it shows the color of the connecting conductors. This greatly simplifies the diagram and makes it more comfortable to read.
(Click on the image to enlarge. The image will open in a new window).
It is worth noting that in the electrical circuit of a scooter, just like in any electronic circuit, there is a common wire . On a scooter, the common wire is the minus ( - ). In the diagram, the common wire is shown in green . If you look more closely, you will notice that it is connected to all the electrical equipment of the scooter: headlight ( 16 ), turn relay ( 24 ), instrument panel backlight lamp ( 15 ), indicator lamps ( 20 , 36 , 22 , 17 ), tachometer ( 18 ), fuel level sensor ( 14 ), horn ( 31 ), tail light/brake light ( 13 ), start relay ( 10 ) and other devices.
First, let's go over the main elements of the Chinese scooter circuit.
Egnition lock.
Ignition switch ( 12 ) or “Main switch”. The ignition switch is nothing more than a regular multi-position switch. Even though the ignition switch has 3 positions, the electrical circuit uses only 2.
When the key is in the first position, the red and black wires are connected. In this case, the voltage from the battery enters the electric circuit of the scooter, the scooter is ready to start. The fuel level indicator, tachometer, sound signal, turn relay, and ignition circuit are also ready for operation. They are supplied with power from the battery.
If the ignition switch malfunctions, it can be safely replaced with some kind of switch like a toggle switch. The toggle switch must be powerful enough, because the entire electrical circuit of the scooter is, in fact, switched through the ignition switch. Of course, you can do without a toggle switch if you limit yourself to short-circuiting the red and black wires, as the heroes of Hollywood action films once did
.
1 is shorted to the housing (common wire). In this case, engine operation is blocked . Some scooter models have an engine stop button ( 27 ) to block the engine, which, like the ignition switch, connects the white- black and green (common, body) wires.
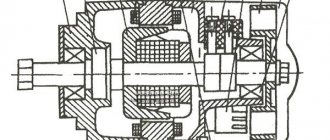
Generator.
The generator ( 4 ) produces alternating electric current to power all current consumers and charge the battery ( 6 ).
There are 5 wires coming from the generator. One of them is connected to a common wire (frame). The alternating voltage is removed from the white wire and supplied to the relay regulator for subsequent straightening and stabilization. The yellow wire removes voltage, which is used to power the low/high beam lamp, which is installed in the front fairing of the scooter.
Also in the design of the generator there is a so-called hall sensor . It is not electrically connected to the generator and there are 2 wires coming from it: white- green and red - black . The hall sensor is connected to the CDI ignition module ( 1 ).
Relay regulator.
Regulator relay ( 5 ). People may call it a “stabilizer”, “transistor”, “regulator”, “voltage regulator” or simply “relay”. All these definitions refer to one piece of hardware. This is what the relay regulator looks like.
The relay regulator on Chinese scooters is installed in the front part under a plastic fairing. The relay-regulator itself is attached to the metal base of the scooter in order to reduce the heating of the relay radiator during operation. This is what the relay regulator looks like on a scooter.
In the operation of a scooter, the relay regulator plays a very important role. The task of the relay regulator is to convert the alternating voltage from the generator into direct voltage and limit it to 13.5 - 14.8 volts. This is the voltage required to charge the battery.
The diagram and photo show that there are 4 wires coming from the relay-regulator. Green is the common wire. We have already talked about it. Red is the output of positive DC voltage 13.5 -14.8 volts.
The regulator receives alternating voltage from the generator through the white wire to the relay. Also connected to the regulator is yellow wire coming from the generator. It supplies the regulator with alternating voltage from the generator. Due to the electronic circuit of the regulator, the voltage on this wire is converted into a pulsating one, and is supplied to powerful current consumers - the low and high beam lamps, as well as the dashboard backlight lamps (there may be several of them).
The supply voltage of the lamps is not stabilized, but is limited by the relay regulator at a certain level (about 12V), since at high speeds the alternating voltage supplied from the generator exceeds the permissible limit. I think those who have had their dimensions burned out due to malfunctions of the relay-regulator know this.
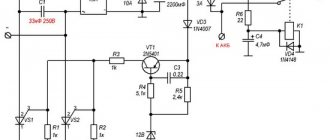
Despite all its importance, the device of the relay regulator is quite primitive. If you pick apart the compound with which the printed circuit board is filled, you will find that the main relay is an electronic circuit consisting of a thyristor BT151-650R , a diode bridge on 1N4007 , a powerful diode 1N5408 , as well as several wiring elements: electrolytic capacitors, low-power SMD transistors, resistors and a zener diode.
Due to its primitive circuitry, the relay-regulator often fails. Read about how to check the voltage regulator here.
How to determine for yourself that the timing valve has burnt out
Valve burnout is a common problem in gasoline and diesel engines. This malfunction occurs both on relatively “fresh” engines and on power units with an impressive mileage. At the initial stage, it is extremely important to accurately determine the nature of the malfunction, since further operation of the engine with burnt valves greatly aggravates the consequences of such a breakdown and leads to expensive repairs.
Why do valves burn out?
Valves burnout occurs for various reasons. For engines that require periodic valve adjustment, valve burnout often occurs due to untimely adjustment of the valve thermal clearance. On engines with automatic adjustment of the specified gap, failure of hydraulic compensators also often leads to the valve burning out.
The main causes of engine valve burnout are:
- valves are tightly clamped;
- the valve guide is worn;
- the valve stem itself is worn out;
- the engine runs on a lean mixture (especially with LPG);
A burnt-out valve can collapse at one moment, after which fragments of the valve fall into the engine cylinder. As a result, serious damage to the piston, cylinder head or cylinder head defects may occur. In the latter case, there is a risk that a large piece of the burnt valve will pierce the engine cylinder block, which is the actual destruction of not only the cylinder head and piston group, but also the cylinder block. In such a situation, prolonged operation of the engine with a burnt-out valve may lead to the need to replace the entire engine.
Determining valve burnout without removing the cylinder head
The first step is to determine which cylinder is not working. The testing methods are in many ways similar to diagnosing faulty spark plugs. To check, you should start the engine, after which, with the engine running at idle speed, you will need to remove the caps from the spark plugs one by one.
Then you need to unscrew the spark plug on the inoperative cylinder and replace it with a known good one, and also check the high-voltage armored wire of this cylinder for functionality. It would also be a good idea to check the ignition coil, etc. Subsequent starting of the engine will show whether the problem lies in the elements of the vehicle’s ignition system or whether further diagnostics are necessary.
If the nature of the engine’s operation does not change after installing the working spark plug, replacing the high-voltage wire and checking other components of the ignition system (the engine continues to rev), then there is a high probability of more serious breakdowns:
- timing valve burnout;
- CPG malfunctions;
Burnout of the valves means that compression in the cylinder is reduced due to a violation of the tightness of the combustion chamber (leakage during the fit of the intake or exhaust valve, destruction of the disc and/or valve seat). Wear of the cylinder-piston group and piston breakage also lead to low compression in the problem cylinder. Also, the cylinder may not work due to stuck or broken piston rings.
Low compression clearly indicates a malfunction, but one caveat should be taken into account. It will not be possible to establish a burnt-out valve and rule out problems with the CPG only based on the compression indicator. The fact is that compression in the engine can decrease both as a result of a burnt-out valve, and due to broken piston rings, as well as a number of other defects. For this reason, in parallel with the compression measurement, additional engine diagnostics should be carried out.
- The easiest way to determine valve burnout after you have measured the compression in the cylinders is to pour several “cubes” of engine oil through the spark plug well. Then the compression must be measured again. An increase in compression in the cylinder after adding oil will indicate that an oil film has formed, acting as a “seal”. This phenomenon is typical in the case of piston wear. If the compression indicator has not changed, it means that the valve has burned out, since the oil in the cylinder in this case will not affect the compression in any way.
- Also, to determine whether the valves are burned out, you should inspect the spark plug on the problem cylinder. A clear sign of valve burnout is that the spark plug is completely dry, that is, it does not have a characteristic oil deposit. There may also be smoke or air coming out of the engine breather. The intensity of smoke production directly depends on the degree of wear of the CPG.
As for breakdowns that are associated with the piston, in this case the spark plug is covered with oil, and the appearance of bluish smoke can be observed from the breather. Note that oil on a candle is an indirect sign. Even if the spark plug is dry or covered with a slight soot, but smoke comes from the breather, then this symptom indicates problems with the piston or piston rings. On new engines with low mileage, there is a high probability that the piston rings are stuck.
Let us add that the appearance of engine oil that comes out through the breather also indicates a malfunction of the partitions between the piston rings. Taking into account the above, you can accurately determine why the compression in the engine has decreased, identify problems with the cylinder-piston group, or determine burnout of the timing valves.
Ignition circuit elements.
One of the most important electrical circuits in a scooter is the ignition circuit. It includes the CDI ignition module ( 1 ), ignition coil ( 2 ), spark plug ( 3 ).
CDI ignition module.
The CDI ignition module ( 1 ) is made in the form of a small box filled with compound. This makes it difficult to disassemble the CDI unit if it malfunctions. Although the modular design of this unit simplifies the process of replacing it.
There are 5 wires connected to the CDI module. The CDI module itself is located in the bottom of the scooter body near the battery compartment and is secured to the frame with a rubber clamp. Access to the CDI block is made difficult by the fact that it is located in the bottom part and is covered with decorative plastic, which has to be completely removed.
Ignition coil.
Ignition coil ( 2 ). The ignition coil itself is located on the right side of the scooter and is mounted on the frame. It is a kind of plastic barrel with two connectors for connection and a high-voltage wire output that goes to the spark plug.
Structurally, the ignition coil is located next to the start relay. To protect against dust, dirt and accidental short circuits, the coil is covered with a rubber cover.
Spark plug.
A7TC spark plug ( 3 ).
The spark plug turned out to be cleverly hidden on the scooter, and it can take quite a long time to find it the first time. But if we “walk” along the high-voltage wire from the ignition coil, the wire will lead us straight to the spark plug cap.
The cap is removed from the candle with a little effort. It is fixed to the spark plug contact with an elastic metal latch.
It is worth noting that the high-voltage wire is connected to the cap without soldering. The insulated stranded wire is simply screwed onto the screw contact built into the cap. Therefore, you should not pull the wire too hard, otherwise you can pull the wire out of the cap. This can be easily fixed, but the wire will have to be shortened by 0.5 - 1 cm.
It's not so easy to get to the spark plug itself. To dismantle it, a socket wrench is required. With its help, the candle is simply unscrewed from its seat.
Starter.
Starter ( 8 ). The starter is used to start the engine. It is located in the middle part of the scooter next to the engine. It's not easy to get to.
The starting of the starter is controlled by the starting relay (10).
The start relay is located on the right side of the scooter frame. The starting relay receives a thick red wire from the positive terminal of the battery. This is how the start relay is energized.