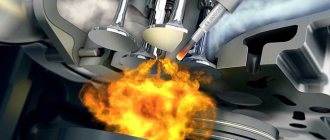
During the operation of the scooter, fuel and oil combustion residues gradually accumulate in the exhaust system, which leads to noticeable deterioration in performance, whether it is a two-stroke or four-stroke engine.
An exhaust system clogged with carbon deposits can cause a decrease in engine power, interruptions in operation, and contribute to excessive fuel consumption. When driving with a sharp opening of the throttle, the engine responds very slowly and the acceleration of the scooter is very weak.
The exhaust pipes of two-stroke engines are more susceptible to carbon deposits than four-stroke engines, although on two-stroke engines this problem has a greater impact on engine performance. The engine is choking on its exhaust gases.
Contamination can be identified quite simply; you need to dismantle the part and blow into the inlet pipe. If at the same time you feel resistance to the air flow, then it is necessary to clean it. There are several cleaning methods that differ in their effectiveness and labor intensity.
Do-it-yourself scooter muffler cleaning
During the operation of the scooter, fuel and oil combustion residues gradually accumulate in the exhaust system, which leads to noticeable deterioration in performance, whether it is a two-stroke or four-stroke engine.
An exhaust system clogged with carbon deposits can cause a decrease in engine power, interruptions in operation, and contribute to excessive fuel consumption. When driving with a sharp opening of the throttle, the engine responds very slowly and the acceleration of the scooter is very weak.
The exhaust pipes of two-stroke engines are more susceptible to carbon deposits than four-stroke engines, although on two-stroke engines this problem has a greater impact on engine performance. The engine is choking on its exhaust gases.
Contamination can be identified quite simply; you need to dismantle the part and blow into the inlet pipe. If at the same time you feel resistance to the air flow, then it is necessary to clean it. There are several cleaning methods that differ in their effectiveness and labor intensity.
What is the carburetor of a Chinese scooter and its capabilities, disadvantages, tuning
The carburetor circuit of a Chinese scooter is, in principle, standard and suitable for both 2t and 4t engines. The design of the carburetor allows certain actions to be taken to improve its performance, however, if the engine is two-stroke, the efforts will not make sense.
The simplest approach is to replace the carburetor with a more advanced one, for example, with an accelerator motor, if you have a fairly old version without it. Most often, simple tuning is limited to replacing the main fuel jet, this is especially true for engines with low power. Replacing the nozzle helps to increase the fuel channel and, due to this, add a little power to the engine.
Carburetor internal cleaning
There are two ways to clean the inside of a scooter carburetor. The first involves washing the unit in gasoline and blowing it with a pump or compressor, onto which a special nozzle with a pointed tip is attached. To perform the second method, you will need to purchase a special can for cleaning the carburetor containing a special flushing liquid. Using this method eliminates cleaning with gasoline, since the can is a kind of compressor and itself blows through the carburetor using its high pressure.
This is interesting: Selection of Kayaba shock absorbers by car brand
Both of the above methods are equally effective; just choose the one that is most convenient for you.
When cleaning the carburetor, all channels must be washed and blown
Particular attention must be paid to the jets, which always unscrew when cleaning. You also need to remove the starting enrichment and wash its channel so that the carburetor, upon completion of cleaning, is absolutely clean both inside and outside
The float returns to its place, the unit is assembled in the reverse order, and the oil and fuel hoses are reconnected. In order for the scooter to start, gasoline must be pumped into the float chamber, as well as the idle speed and mixture quality must be adjusted (only in case of deviations in operation).
The principle of operation of a scooter carburetor
The carburetor design of a 4t scooter is not very complicated. The basic principle of its operation is as follows: a certain amount of fuel and oxygen enters the float chamber of the device, where they are mixed in the required proportions and supplied to the combustion chamber of the engine.
The design of a 4-stroke scooter carburetor may vary slightly depending on the model, but in general it is the same for all types of carburetors. The float version of products is most often used. It is distinguished by the presence of a float chamber in which fuel is mixed with air, after which the finished mixture is fed into the cylinder. In order for air to enter the fuel in the required proportion, the carburetor includes the following elements:
- Jets.
- A needle that meters the supply of oxygen.
- Spool.
- Throttle valve.
Sometimes the design of a 4t carburetor on a 50cc scooter includes an element such as an accelerator pump. It works in tandem with a starting mixture enricher. These devices help the scooter engine to work correctly and start in damp and wet weather.
The correct operation of the motor depends on the coherence of the devices, so it is important to pay attention to their settings
Scooter starter booster
Most often, scooters are equipped with an electric starting enrichment; on older models you can find a manual one. The task of this device is to create the right mixture in order to start the engine after a long period of inactivity.
The carburetor has an additional channel for connecting the enricher. If the device is automatic, the channel opens itself when you try to start the scooter and closes as the engine warms up. If the enrichment is manual, you need to close its valve yourself. The operating principle of the device is as follows:
- Inside the housing there is an element heated by electricity, which pushes out a needle that blocks the fuel channel.
- After the engine is stopped, the needle will be retracted.
Float chamber device
Mixing of fuel with air in the carburetor occurs with the participation of the float chamber; Thus, the finished fuel, saturated with the required amount of oxygen, enters the combustion chamber, where it explodes and sets the scooter in motion.
From the gas tank, fuel enters the carburetor through special pipes. But mixing cannot occur in them, so first the fuel ends up in the float chamber, and only then it is enriched with oxygen and further moved. To ensure that gasoline does not flow continuously, but in the right quantity, the carburetor is equipped with a special system with a float and valve. When the chamber is full, the float rises and the valve blocks fuel from entering the carburetor; when the float is lowered, the flow of fuel resumes.
Fuel dosing system design
The mixture is supplied to the cylinder in finished form, so it is necessary to control its quality. For this purpose, the carburetor has a special needle with grooves and a locking ring. The position of the needle depends on the position of the ring: the higher it is, the richer the mixture, and vice versa. Modern carburetor models allow you to tune them without disassembling them.
For proper operation of the device, the diameter of the main jet is important. It is selected based on motor power and diffuser size. When tuning, the nozzle hole can be enlarged.
Idling - principle of operation
If you need to start the scooter after a long period of inactivity or when it is cold, adjust the carburetor idle jet. This is necessary in order to enrich the mixture with oxygen at startup. As a result of correct adjustment, the engine will idle smoothly and stop stalling.
The system has a special valve that, at the right time, blocks the possibility of mixing fuel and air. In order for the engine to stop stalling, we make adjustments with the quality screw, adjusting the idle speed to the desired value. The adjustment screw is located on the side and is accessible while the engine is running. There is no need to disassemble anything, just carefully turn it with a screwdriver to the left or right. As a result, the speed will rise or fall.
If the quality of the mixture is insufficient, we achieve maximum idle speed. When the engine warms up, it will be enough to reduce the speed again to normal.
Preparing for cleaning
If the piston group of the scooter is not worn out and the spark plug is working properly, but the vehicle is poor and picks up speed jerkily, then in 80% of cases the cause of the problem is dirt in the carburetor. To prepare it for external cleaning, the carburetor must be removed from the scooter - to do this, you must carefully disconnect the oil and fuel supply hoses, contacts of the starting enrichment, as well as mounting bolts from it.
When performing the above manipulations, you need to carefully ensure that not a single detail is lost.
After disconnecting the carburetor from the main structure, you need to thoroughly clean its outer side of dirt by rinsing the unit in gasoline and then wiping it with a dry cloth. Then the carburetor must be prepared for internal cleaning - to do this, you need to unscrew the two bolts that secure the float chamber cover and thoroughly rinse it from the inside with gasoline and a rag. After this, you need to carefully remove the float, making sure that its delicate plate does not bend when removed. The carburetor is now ready for internal cleaning.
How to connect a Yamaha scooter carburetor - detailed details
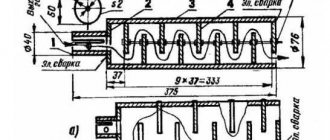
Experienced scooter riders rarely have difficulty connecting the carburetor, for example, after routine cleaning or other manipulations. But novice motorists may encounter a problem when, after removing all the hoses, installing them in the right place can be problematic. Several lessons will publish carburetor wiring diagrams for all major scooters. Naturally, these are three lessons on Japanese scooters Yamaha, Honda and Suzuki, as well as the basic subtleties of connecting Chinese and European carburetors. Today we'll start with the Yamaha carburetor. At first glance, the layout of the parts is slightly different than, for example, Honda scooters, but the principle is always the same, you can’t fool physics, and no one has yet invented fundamentally new carburetors.
So, the figure shows a typical carburetor that is installed on most Yamaha scooters, in particular Jog, Aprio and other models that are so popular with us. Look carefully, most likely this is the model you have installed.
Now let's look at all its elements in detail. For details we will use 2 diagrams. On the first, you will visually determine how to properly connect a Yamaha carburetor, and on the second, you will become more familiar with all the elements using a drawing.
- This is a starting enrichment. Attached to the carburetor body with two bolts through a rubber seal. The enrichment unit is powered by the scooter's 12V power supply. As everyone already knows, it is needed for cold starting of the scooter, since a cold scooter needs a richer mixture.
- Fuel supply fitting. Names here you need to connect the gasoline supply hose.
- The same bolts that secure the enrichment unit. To remove it, simply disconnect the power supply to the solenoid valve and unscrew these two bolts.
- Mixing chamber cover mounting bolt. By unscrewing it, we gain access to the throttle. Can raise or lower the needle, replace the throttle cable. When cleaning the carburetor, it is necessary to remove the throttle.
- Connector for connecting the enrichment unit to the network. It has two wires. Green goes to ground, yellow - power from the generator. But usually polarity is not important. To test the enricher, you need to apply voltage to it from the battery (again, polarity does not matter). Within a few minutes, the enrichment needle should come out along with the rod by a few mm.
- Connection fitting to the air filter. This is where the rubber elbow from the air vent is put on.
- Screw the quality of the mixture (I think everything is clear here). If you twist it clockwise, the air supply decreases and the mixture becomes richer.
- Float chamber mounting bolts, there are 4 in total.
- Idle speed screw. The more we tighten the screw, the higher the idle speed and vice versa.
- Connection fitting for the engine oil supply hose. It is the smallest in cross-section, it is impossible to confuse it.
- Connection to the atmosphere. There is no need to wear anything here, leave it as is.
- Hose supply from the vacuum tap.
Chemical
Can be cleaned chemically. This method is considered more effective compared to using a cable. As a cleaning “chemical,” you need to take a household sewer pipe cleaner, such as “Mr. Muscle,” “Cat,” or another similar alkaline-based product.
By the way, the effectiveness of cleaning exhaust pipes depends on the quality product used.
To begin, plug one end of the exhaust pipe, ensure a tight seal, then pour the powder into the muffler, fill it with hot water, and leave it like that for a day.
The next day, pour out all the “dirt” along with the cleaning composition and rinse well with running water from a hose. After that, dry it and install it on the scooter.
Signs of a blockage
The signs of a clogged muffler on a car are simple:
- Weak acceleration and poor traction. The car does not produce the required power at certain speed levels (rpm).
- Failure of the catalyst (catalytic converter) of the exhaust system. It was caked over time due to abnormal engine operation and due to the difference in air temperatures in winter.
- Deterioration of exhaust gas permeability.
- The appearance of black smoke from the exhaust pipe.
- External damage.
- Increased fuel consumption.
- The appearance of the smell of exhaust gases in the car interior.
- Floating engine speed (the engine suddenly stalls).
One of the symptoms of a clogged muffler is the appearance of uncharacteristic sounds from the exhaust pipe (roaring, rattling).
How to clean a scooter muffler | Scooter-mania.ru – scooters and motorcycles
Many owners of two-stroke scooters and motorcycles, after a certain mileage, begin to notice that the engine power is gradually decreasing, they begin to look for the reason: they check the condition of the piston group, the carburetor, but find nothing.
The reason for the loss of power of a two-stroke engine does not always lie in the condition of the engine itself; very often, the reason for the loss of power is simply a muffler clogged with soot, that’s all...
The muffler of a two-stroke engine can be cleaned in three ways:
Mechanical method: a window is cut out in the muffler body, then all available tools, wires, cables are used, all soot is cleaned out and after that the window is welded shut.
I personally don’t like this method, because it takes too much time and, besides, you need to have your own welding machine or pay a welder for the work, and the main drawback in this method is the welding seam, which does not look very aesthetically pleasing.
The chemical method consists of pouring water into the muffler with some kind of chemical cleaner diluted in it. I used caustic soda to clean the muffler - there is one advantage to this method - this is that the appearance of the muffler will not be affected in any way when cleaning using "chemicals" ".
The chemical method doesn’t quite suit me either, as all these cleaners cost money, plus on top of everything you have to prepare a solution and then pour it into the muffler, close the holes and position the muffler vertically, it’s impossible to clean it in one go, you have to repeat it all over again, and it takes even more time than the first method, and you also need to wear protective gloves and goggles - in general, this method is not for me.
The thermal method (my favorite) involves heating the muffler in order to burn off all the soot and unburnt oil; you can heat it with a blowtorch, which is very time-consuming and expensive; burning one muffler takes 2-2.5 liters of gasoline.
I prefer to burn the muffler in a stove; you can also burn it on a fire, or even on a grill - it doesn’t matter. This method does not require any monetary outlay, is very effective (tested more than once) and in terms of time, everything takes no more than 30 minutes, although there is a minus - this is that after burning the muffler will have to be repainted.
So, we throw the muffler in the oven or whatever you have and in half an hour we will have it as good as new.
Tuning and cleaning of carbon deposits from the motorcycle exhaust system
If you feel that the power and maximum speed of your scooter have begun to drop, the carburetor has become rich, it is not necessary to change the piston and turn the carb, check the exhaust system.
First, remove the exhaust pipe. Figure out the fastening on site, as it is different for different scooters. Try starting it without a muffler and drive it, if you are not afraid :)) If the power increases noticeably, then the muffler is clogged. Although it is not a fact that with the clogged muffler removed, the scooter will immediately drive well. He may not have enough fuel and will not drive normally at all. In two-stroke engines, any changes to the intake and exhaust system can greatly affect the performance of the engine.
You can try a chemical cleaning method. First, we burn the muffler well with a blowtorch until all the remaining oil and gasoline burns out of it. In a word, smoke and fire should stop coming from the holes. Then we tap it with a hammer, knocking out everything that has fallen off inside.
We buy a chemical to clean deposits in kettles (and more). You can try using citric acid. Dilute with hot water. Plug one of the two muffler holes and fill with the prepared solution. Place it so that water does not flow out and heat the muffler with a blowtorch. The water in it will boil. You need to boil longer. Then cool, shake well and pour off everything that has been poured. We repeat again from the beginning. A long process, but can bring good results without cutting the exhaust pipe. Special additives and cleaners from Liqui Moly and Hi-Gear, which are present in our assortment, help speed up the development of events.
Mechanical
The most radical, at the same time the most labor-intensive method that gives the best result is cutting and removing carbon deposits with various scrapers and tools, and subsequent sealing by welding. In this case, you need to know the internal structure of the system. Usually, a rectangular window is cut out on the side, through which work is carried out. After the muffler is welded, it will have to be painted to restore its aesthetic appearance.
It is easier to remove carbon deposits using a cable. You need to take a piece of cable of the required length, clamp one end into the chuck of an electric drill, fluff the other, and gradually move it inward, turning the cable with a drill at low speed. In some cases, they get a positive result.
Checking for contamination
Before cleaning your car muffler, you first need to check how dirty the exhaust system is. When checking the exhaust pipe, you must perform the following steps:
- Check outlet pressure.
- Measure the concentration of CH and CO impurities (many car repair shops have a gas analyzer).
- Determine the pressure in the catalyst using a pressure gauge (with a minimum measurement value of 0.5 bar). The lack of capacity of the catalytic converter is indicated by the indicators of the device when you press the car gas pedal.
- Inspect (through the light) the honeycomb of the catalytic converter, having first removed it.
On new cars (Lada Kalina of recent years of production), you can check whether the muffler on the car is clogged using two oxygen sensors (Lambda Probe). The pressure in the catalyst is shown by a sensor that is installed at the outlet in the lower part. The car's electronic control unit will show an error if a major breakdown is detected.
How to clean a muffler on a scooter
Any vehicle needs timely cleaning of individual elements, and one of these is the muffler, which is found on all scooters, mopeds, and cars. Cleaning can be difficult sometimes, but we'll teach you how to do it quickly.
The process of carbon deposits appearing is very simple: any scooter needs oil, and when it burns, carbon deposits accumulate on the muffler over a certain period of time, because it is the muffler that releases all the exhaust from the moped. Also, a muffler for a 2t scooter prevents your scooter from running loudly by collecting all the sound and passing it through special compartments inside. But let's get to the point, because a clogged muffler can cause many breakdowns.
Consequences of a clogged muffler:
- Slow speed
- The scooter starts to choke
- The scooter is difficult to start
As you can see, if the required exhaust does not flow, the result can be very disastrous, ranging from the inability to start your scooter.
Muffler cleaning
We will show you only one method for cleaning the muffler from carbon deposits, because it is not only the most popular, but also the simplest.
- First, remove the muffler completely.
- Next, you should prepare a very strong fire or kerosene lamp.
- After this, it is recommended to cut the muffler.
- Heat the muffler to high temperature, and then shake out all the carbon deposits with a stick or other available means.
- The last step is to weld the muffler back and put it in place.
- Done, you have successfully cleaned the muffler. Now your scooter will sound much better, and starting and accelerating will be even easier.
Are there any advantages to direct flow?
Why are some motorcyclists desperate to turn up the volume on their steed? Their classic argument: “Loud exhaust saves lives.” This argument works in occasional situations that are typical on our roads, but there is no scientific evidence of the benefits of loud exhaust in avoiding accidents.
Moreover, this argument presupposes the correct behavior of road users when they hear a motorcycle roar. But this is an extremely risky assumption: the driver may be frightened by a loud roar next to him and behave completely differently from what is expected of him, which can be dangerous for the motorcyclist. A loud exhaust may be noticeable, but it is unlikely to be a more effective means of preventing accidents than safe driving skills coupled with reflective elements on equipment and a mandatory helmet on the head.
Even if the "loud exhaust saves lives" argument works in some situations, it doesn't do enough to compensate for the unpleasantness of it. To be honest, many motorcyclists use forward flow to attract attention and show off their own “coolness”, without caring about their safety or those around them.
This justification for using direct flow is too selfish, don’t you think? On one side of the scale is the joy of motorcyclists, on the other is the peace of those around
Which of these is most important?
[SOLVED] cleaning a scooter muffler
As you know, there are five ways to solve the problem of a clogged muffler: 1. Cable on a drill, not effective for barrel-shaped mufflers 2. Burning with a blowtorch. In city conditions there will be complaints from neighbors for smoke, there is a possibility of burning out the muffler, it needs to be repainted, it rots faster. 3. cut, clean and solder - you need a welding machine and experience in welding, or a welder with this experience 4. rinse with a cleaning agent - it is not very effective if you just use your hands. 5. buy a new muffler
I'm talking about the fourth method. Introductory note: after a winter overhaul (CV, variator, belt, seals, gaskets, CPG, battery), the scooter ran super-duper. And suddenly he began to pull worse and worse and... generally terrible. An attempt to blow into the muffler showed that it was severely clogged. And this is how I washed it.
1. First, I poured flushing oil in half and half with diesel fuel (so that it wouldn’t stink too much) for an hour and a half. shook his hands
Attention: when draining, the liquid does not flow out all at once. Part from the inlet pipe, part from the outlet
2. I used a pump from a UAZ for forced pumping of the heating system - the cost is not high, and the tube perfectly fits the diameter of the outlet tip of the muffler. So I started pumping it with water first. Comet, then with Chistin, then with Ferry. Powered by charger. display current consumption is from 4 to 8 amperes. The result is that the scooter simply flew away. (
70cc is not a speed, really) 60 km/h goes.
Conclusions: Komet and Pemolux are not suitable, they form a too sticky substance with oil that is difficult to wash off with water. Chistin Does not wash off oil but cleans carbon deposits. Ferry dissolves the oil.
What to choose for tuning the exhaust system?
Well, complete exhaust systems, which embody all the possible advantages of tuning, are intended for truly advanced superbikers or citizens who do not have financial problems at all. The cost of such a system ranges from one and a half thousand dollars for “just carbon” to three “kilobucks” for a real racing exhaust made of titanium.
And finally, one piece of advice: do not try to tune the exhaust by gutting the original muffler. The sound will indeed become loud, but it will not be singing, but shouting. It can't be compared to a real tuning voice.
Source
Cleaning a scooter muffler using lye
If the scooter gradually loses power, but the carburetor, cylinder and transmission are fine, then it’s time to check whether the muffler is clogged. Since oil is constantly burning in two-stroke engines, it is not surprising that sooner or later the muffler becomes clogged with carbon deposits. And carbon deposits can reach such a thickness that it will significantly reduce the diameter of the passage holes inside the muffler. The exhaust system will not be able to work as expected, and engine power will drop.
Therefore, it makes sense to occasionally check whether the muffler is clogged. I don’t know how often to do this - probably no more than once every 5000 km. To check, you need to remove the muffler and blow into its pipe, previously wrapped in a napkin. If the air flows with resistance, it means the muffler is clogged.
There are 3 main ways to clean a muffler:
- chemical, for example using alkali or solvent
- burning from outside, for example, in a fire
- cutting, burning and brewing back the drink
I don’t have a welding machine, so the third method is automatically eliminated. And in general, sawing, burning, boiling, then painting - it’s easier and cheaper to buy a new muffler, I don’t see any point in doing such work. The second method, with burning in a fire and tapping, does not require a welding machine, but the muffler will still be damaged in appearance, and this is also not my option. After all, I am a lover of chemistry, and my muffler is not so clogged as to take radical measures. So, we clean with chemicals!
For cleaning you will need alkali - caustic soda, also known as caustic soda. It can be purchased in the form of the “Mole” cleaner for clogged pipes for just over 8 rubles. I took 2 bags.
In order to remove the muffler, we need a 10 and 12 socket wrench.
First you need to open the seat and use a 10mm wrench to unscrew the 4 bolts securing the seat to the frame. For a Honda Tact scooter, you will need to unscrew and remove the oil tank cap. After unscrewing the bolts, remove the seat.
Now you need to loosen the two nuts securing the muffler to the cylinder. There is no need to unscrew them completely, just unscrew them by about 5-6 mm.
Next, use a 12mm wrench to unscrew the bolts securing the muffler to the engine crankcase.
The muffler has been removed and you can take it into the house.
It is necessary to plug the exhaust hole of the muffler with a rubber plug.
We put “Mole” into the muffler. In general, this should be done with rubber gloves. I didn’t realize it right away, so the “Mole” bit me slightly.
Now fill the muffler with hot water
Carefully! The reaction of dissolving caustic soda in water will also add heat, so the muffler will get very hot!
Shake the filled muffler and leave it for a day.
It's time to dump the crap. Well, I have a new muffler, so I didn’t see anything bad in the output.
After draining, rinse it well with a shower hose. In this case, the bath turns into a nightmare, so the procedure should be carried out in the absence of household members. Well, or in the presence of those who do not understand anything :). Then you will have to spend a long time using other cleaning products.
After washing, all that remains is to shake out all the water from the muffler. And then I immediately dried it with a hairdryer at the lowest temperature. This needs to be done outside because it will stink a lot.
So, for just 17 rubles you can clean the muffler. If you do not neglect its condition, the muffler will serve your scooter for a very long time!
Please note: This article and the images in it are subject to copyright. Partial or complete reproduction on other resources without permission is prohibited
Do-it-yourself motorcycle exhaust system cleaning
In a previous article, we looked at the purpose of a well-selected exhaust system. Cleaning the exhaust system is necessary for better circulation of gases. If we return to the previous article (“Motorcycle exhaust system - what is its main task?”), we will see how important the circulation of gas flows inside the pipes is. When the exhaust system is dirty, the engine begins to suffocate to a greater extent due to the fact that it is difficult for exhaust gases to leave the pipes, and new ones have no way out until the previous ones have left. Exhaust gases begin to flow back into the engine.
Cleaning the exhaust system is quite a labor-intensive undertaking. Of course, for a meticulous owner, the moment of the big wash doesn’t come very quickly, but sooner or later you realize that the mufflers need cleaning, and too much soot has already accumulated in the muffler.
How to clean the muffler?
_________________When I was fifteen years old, I was saving up for a brand new moped. I lived only with this dream, Until one day I met you. You charmed me, invited me to a pop disc. There were a lot of different drinks. You got me into that night persuaded.
Cleaning the exhaust system of a scooter from carbon deposits
Two-stroke engines are much simpler in design than four-stroke engines. However, this simplicity requires certain sacrifices, and these sacrifices are manifested in the exhaust system of the scooter. A two-stroke engine runs on a mixture of oil and gasoline, which, when burned, leaves a layer of soot on the walls of the combustion chamber and the exhaust system. Moreover, the higher the quality of the oil. The less it leaves soot, but cheap oil can seriously damage the exhaust system. More carbon deposits remain and if the intake muffler or air filter is not sealed, then quite a lot of dirt and dust enters the system through them. Therefore, after cleaning the exhaust system, also check the tightness of the air filter and its connection to the carburetor.
If you see how the scooter literally begins to lose power and speed before your eyes, and the carburetor is too rich in the mixture, do not start by replacing the pistons or carburetor, but first clean the exhaust system.
First of all, remove the exhaust pipe, the mounting there is different for different scooters, but it’s not difficult to figure it out, try how the scooter drives without a muffler, if the power increases significantly, it means the muffler is clogged. True, without a muffler, the scooter may not run at all. The two-stroke engine is so closely connected to the exhaust system that the slightest changes can have a very critical effect on it.
Now look into the hole in the exhaust pipe where the exhaust from the cylinder enters. If carbon deposits are visible there, it needs to be removed from there. This can be done conveniently using a large screwdriver. After this, try to blow out the muffler, you can use your mouth, just don’t forget to wipe it with a cloth and put a napkin under it. A clean muffler is very easy to blow through, but if you cannot do this, you will have to clean it thoroughly.
Cleaning a muffler is not an easy task. The most effective way would be to open it, scrape everything out and burn it with a blowtorch, but in this case the appearance of the muffler will be greatly damaged and it will be difficult to restore it. One of the advantages can also be noted that when opening it, you can remove a couple of partitions there, this will increase the engine power. Without opening the muffler, you can heat it until red with a blowtorch, and then try to shake the dirt out of it by tapping it with a hammer, although the effectiveness of this method is very, very low, and you will still have to repaint the muffler.
You can clean the muffler chemically; to do this, heat it with a blowtorch until fire and smoke stop coming out of it, then shake out everything that fell off in the process. Close one of the muffler holes, and pour a solution for descaling teapots or just a solution of citric acid into the second, then heat the muffler with a blowtorch so that the liquid in it boils. Boil it longer, cool and drain the solution, it is advisable to repeat the process, it turns out long, but very, very effective.
Why adjust the carburetor?
Carburetor adjustment may be required in the following cases:
- The spark plugs are serviceable, but do not work very well; their color has changed to black or yellowish.
- The engine does not provide the required power
- Scooter won't start
- Fuel consumption has increased excessively.
All these problems in most cases are caused by an insufficiently enriched or, conversely, overly enriched mixture with oxygen, and they can be corrected by correctly adjusting the carburetor.
The settings, regardless of whether you have a 2t or 4t scooter, have three phases and are made as follows:
- Idle speed adjustment
- Setting the fuel level
- Adjusting the quality of the mixture.
On some carburetor models there is no screw that adjusts the fuel quality, so you have to disassemble the carburetor to change the position of the needle.
The idle speed adjustment is carried out after the engine has warmed up: this takes no more than 15 minutes. For this purpose, the design provides an idle screw. It allows you to make the engine stable by selecting the desired idle speed. When the screw is tightened, the speed will increase, and when it is rotated counterclockwise, it will decrease.
It is important to adjust the quality of the mixture. If it is too lean, the scooter will ride with difficulty, the engine will noticeably lack power
If the mixture is too rich, the spark plugs will turn black and quickly fail. Fuel quality adjustment is usually carried out using a screw located on the carburetor body. To enrich it you need to turn it clockwise, to lean it counterclockwise. If there is no screw, the carburetor is opened, the locking ring on the needle moves up for a richer mixture, down for a leaner one.
Adjustments are made as follows:
- Start the engine and warm it up for 10 minutes, after which you need to turn it off
- The screw must be tightened clockwise until it stops, but without force.
- After this, it is unscrewed counterclockwise 1.5 turns
- The engine needs to be started and the screw turned an additional 1/3 turn in the same direction. Wait 2 minutes
- As the speed increases, you need to unscrew the screw an additional 1/4 turn and observe the reaction for about 2 minutes. If the speed does not drop, repeat the steps
- If the speed begins to decrease, the screw must be turned clockwise 1/4 turn.
Ideally, the engine will operate exactly at 1.5-2 propeller revolutions, but its position depends on the quality of the fuel. In the case of a needle, the quality of the mixture will vary depending on the position of the needle locking ring. The disadvantage of such a carburetor is the small number of needle positions and the need to disassemble it each time to make adjustments.
You can adjust the fuel level in the chamber as follows:
- Unscrew the drain screw
- The phone is lifted up
- You need to check the fuel level while the engine is running. The melting level is slightly below the skirt located on the float chamber cover
- Most often, the level rises above normal and the carburetor overflows, so you need to adjust the float so that it fires earlier. To do this, the needle holder is usually bent. A lot of force is not required, only a few mm are needed.
Do-it-yourself scooter muffler cleaning
- Mechanical
- Chemical
- Thermal
During the operation of the scooter, fuel and oil combustion residues gradually accumulate in the exhaust system, which leads to noticeable deterioration in performance, whether it is a two-stroke or four-stroke engine.
An exhaust system clogged with carbon deposits can cause a decrease in engine power, interruptions in operation, and contribute to excessive fuel consumption. When driving with a sharp opening of the throttle, the engine responds very slowly and the acceleration of the scooter is very weak.
The exhaust pipes of two-stroke engines are more susceptible to carbon deposits than four-stroke engines, although on two-stroke engines this problem has a greater impact on engine performance. The engine is choking on its exhaust gases.
Contamination can be identified quite simply; you need to dismantle the part and blow into the inlet pipe. If at the same time you feel resistance to the air flow, then it is necessary to clean it. There are several cleaning methods that differ in their effectiveness and labor intensity.
Mechanical
The most radical, at the same time the most labor-intensive method that gives the best result is cutting and removing carbon deposits with various scrapers and tools, and subsequent sealing by welding. In this case, you need to know the internal structure of the system. Usually, a rectangular window is cut out on the side, through which work is carried out. After the muffler is welded, it will have to be painted to restore its aesthetic appearance.
It is easier to remove carbon deposits using a cable. You need to take a piece of cable of the required length, clamp one end into the chuck of an electric drill, fluff the other, and gradually move it inward, turning the cable with a drill at low speed. In some cases, they get a positive result.
Chemical
Can be cleaned chemically. This method is considered more effective compared to using a cable. As a cleaning “chemical,” you need to take a household sewer pipe cleaner, such as “Mr. Muscle,” “Cat,” or another similar alkaline-based product.
To begin, plug one end of the exhaust pipe, ensure a tight seal, then pour the powder into the muffler, fill it with hot water, and leave it like that for a day.
The next day, pour out all the “dirt” along with the cleaning composition and rinse well with running water from a hose. After that, dry it and install it on the scooter.
Thermal
The next cleaning method can be called thermal, that is, it is calcined with a blowtorch or simply in a fire. It should heat up, which is called “red hot”. You can direct the lamp flame inside the exhaust gas system. Do this until no more smoke is emitted from the burnt remains.
After such firing, shake out all the carbon deposits, blow it with compressed air from a compressor, and paint it with heat-resistant paint.
We hope that at least some of the cleaning methods described above will help restore the performance of the exhaust system. Accordingly, increase engine power and work quality.
Two stroke and four stroke scooter
A scooter, as you know, can be with a two-stroke or a four-stroke engine. The operating principle of the entire exhaust system differs radically among analogues.
The muffler on a four-stroke scooter removes gases in a relatively shorter time, doing this with minimal noise. In addition, tuning the muffler in this case will be quite simple. On the other hand, in both cases, when carrying out tuning, it will be necessary to change the pipes.
Types of mufflers for scooters
For the muffler of a two-stroke scooter, selecting components that make it possible to carry out tuning will be much more difficult. The standard muffler itself for such scooters is more difficult to manufacture and configure.
The exhaust system of a two-stroke scooter works as follows. During the process of cleaning exhaust gases, part of the power is returned to the engine. This happens at certain speeds and if you manage to implement this whole process by tuning, the scooter will be unrecognizable.
You can install a high-quality and correctly tuned resonator on a two-stroke scooter. This will give a noticeable increase in dynamics up to a quarter. But in this case, it will be important to carry out professional settings of the entire power system.
Method two: manual cleaning
This method is especially popular among garage owners. It requires open space and a special tool. The work should be performed according to the following algorithm:
- Cut the exhaust pipe lengthwise using a grinder.
- Clean it thoroughly from the inside by hand (you can use cleaning products and any available tools).
- Carefully weld the pipe and return it to its original place.
It should be borne in mind that the more often you repeat this method of cutting and brewing, the more fragile the product itself will become.
We must also not forget that after such work the part must be covered with an anti-corrosion solution - welding provokes the formation of microcracks, which can serve as an excellent springboard for the formation of rust. Of course, this inexpensive but quite practical method of cleaning a car muffler can only be used by those car owners who have a garage and their own welding machine.
Cleaning the muffler by opening it
Car behavior
A clogged car muffler is the cause of unpleasant situations.
Installing a muffler on a car
While traveling by car you may:
- noise;
- rattling;
- dense black smoke coming from the exhaust pipe;
- grinding.
This is why cleaning a car muffler is necessary after it becomes clogged.