Adjusting the Voskhod motorcycle carburetor
The Voskhod motorcycle of the first production was equipped with a carburetor type K-36B, which has two metering systems - main and idle, as well as an enrichment device.
To rinse and clean it is necessary to disassemble in the following order: 1 – close the gasoline tap and disconnect the gasoline hose; 2 – unfasten the latches and remove the housing cover along with the cables, spool and fuel corrector; 3 – remove the rubber coupling; 4 – unscrew the two fastening nuts and remove the carburetor; 5 – remove the sealing gaskets; 6 – perform complete disassembly.
Wash the removed parts with clean gasoline, inspect and reassemble in the reverse order. The factory settings ensure maximum and optimal engine efficiency.
Operating principle
The purpose of the carburetor is to prepare the working mixture for supplying it to the engine cylinders. This mixture is gasoline and air in the proportions required for engine operation. If this ratio is violated, the engine will not operate smoothly. When the mixture has a lot of gasoline, then in layman's terminology it is called saturated, and if, on the contrary, there is little, then it is lean. But in any case, a failure in the proportions of the working mixture will have a bad effect on performance.
Different models of chainsaws may have different carburetor designs, but according to the principle of operation they are all identical. Air moves through a special channel at a speed that can be adjusted by closing or opening the damper. Gasoline, in turn, enters the carburetor through jets and mixes with air there, creating a special mixture that enters the engine.
The pressure in the float compartment of the carburetor, where gasoline is present before mixing, is close to atmospheric. When the damper is opened, there is more air, as well as gasoline, due to which the engine speed increases. This creates a vacuum in the air channel and gasoline is drawn into the air flow. This is the principle of operation of a carburetor.
In order for the chainsaw to operate smoothly and efficiently, and also without high fuel consumption, its carburetor must be adjusted accordingly. Before such work, you must first check the air and gasoline filters. If dirt is found on them, they should be replaced.
Setting up a chainsaw for most models is usually done using three screws - high and low speed and idle speed.
The following signs should indicate correct configuration:
- The chain should not move at idle.
- The motor runs smoothly.
- There should also be no interruptions in work at start-up.
Repairing a chainsaw carburetor with your own hands must be done very carefully, because any mistake made can lead to serious consequences, even to the point of complete engine failure. If you do not have enough experience, it is better to seek the help of a specialist.
Adjusting the K-36B carburetor
Adjustment at idle speed is carried out as follows: 1 – before starting the adjustment, you need to start and warm up the engine. 2 – set the fuel corrector coin to the farthest position from you; 3 – by turning out or screwing in screw 14, set the minimum possible engine speed; 4 – tighten screw 13 all the way, gradually unscrew it, achieve clear, stable operation of the engine; 5 – set screw 14, lower or raise the throttle to the minimum stable idle speed.
The quality of the mixture is adjusted in operating modes by moving the metering needle 6 in the throttle valve to one of the five annular grooves, while raising the metering needle ensures enrichment of the working mixture, lowering ensures depletion.
How to properly adjust the carburetor on a chainsaw with your own hands
The factory settings of the chainsaw carburetor provide optimal fuel and air suction parameters. But during operation, they can become confused due to vibration - even a ¼ turn shift in any of the screws can lead to a serious change in the parameters for preparing the air-fuel mixture and it is necessary to adjust the chainsaw carburetor.
The chainsaw carburetor is adjusted using three screws marked H (High), L (Low) and S. The last screw, depending on the brand and manufacturer, may have other names, for example T or LA.
- H: is responsible for the operation of the main jet and regulates the maximum speed.
- L: adjusts the position of the idle jet and allows you to set low speed.
- S/T/LA: designed to regulate engine idle speed.
To know how to properly adjust the carburetor on a chainsaw, you need a technical passport - it indicates information about the angles of rotation of the adjusting screws. After this, we proceed directly to the adjustment. By the way, here you will need a screwdriver to adjust the chainsaw carburetor or a regular flat-head screwdriver:
Place the chainsaw on a flat surface, preferably a table or something similar
IMPORTANT: The chainsaw must be positioned so that the bar points in the opposite direction. The engine must be turned off. Using a wrench or screwdriver, unscrew the fastenings of the housing casing cover and remove it to get to the carburetor. Remove the air filter that covers the carburetor for the chainsaw
The manufacturer may install a shock-absorbing foam insert on top of the carburetor - this must also be removed. Now begins setting up the chainsaw carburetor. Screws L and H must be tightened until they stop. Tighten them slowly and carefully so as not to break them. Unscrew both screws approximately 1.5 turns. Start the engine and let it run for about 7-10 minutes so that it warms up well - you won’t be able to adjust the chainsaw’s carburetor on a cold engine. After the engine has warmed up, set it to run at medium speed. Slowly begin to tighten the idle screw counterclockwise. You need to turn it until the motor runs smoothly. If the engine starts to stall, you need to continue adjusting the chainsaw carburetor and gradually return the screw clockwise.
After the carburetor of a Chinese-made or any other chainsaw has been adjusted, it is necessary to “drive” the engine at different speeds.
K-36B carburetor diagram
1. Fitting. 2. Fuel corrector. 3.Fuel corrector spring. 4. Locking needle. 5. Throttle valve spring. 6. Dosing needle. 7. Mixing chamber housing. 8. Air intake channel. 9. Sprayer. 10. Main jet. 11. Fuel corrector jet. 12. Float. 13. Idle speed adjustment screw. 14. Throttle set screw. 15. Throttle valve. 16. Cover of the mixing chamber housing. 17. Cable guide. 18. Leaf spring. 19. Float release button. 20. Float chamber cover. 21. Float chamber housing.
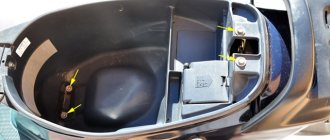
What carburetor is used on the Ant scooter?
On the “early” Ant scooters with a cast iron engine (Tulitsa, Tourist), K62G carburetors with a diffuser diameter of 26 mm and a mixing chamber diameter of 28 mm were installed. Later the engine was boosted. They installed a reed valve on the inlet and changed the shape of the cylinder and cooling fins. In parallel with this, new K65G carburetors began to be installed on scooters. They are similar in design to the K62G.
Carburetor of Ant scooter model K62G. Side view and air damper side
The diameter of the diffuser and mixing chamber remained the same. Only the throughput of the GTZ changed (130 ml/min and 125 ml/min for K62G), the diameters of the atomizer (2.63 mm and 2.6 mm), the diameter of the needle and the transition hole. There are minor differences in the corrector design. On the K62G carburetor, a needle immersed in the well of the float chamber is used to further enrich the fuel. On the K65G, fuel is taken directly from the chamber using a fuel corrector nozzle.
Adjusting the K-62V and K65P carburetor
Adjust the idle speed in the following sequence: 1 – screw screw 18 until it stops, which regulates the air supply for idle speed. Then unscrew one turn. 2 – Open the throttle slightly using the throttle. 3 – Start the engine and warm it up. 4 – Using bolt 16, lowering the throttle valve, achieve minimal stable engine operation. 5 – Unscrew screw 18 to set the maximum speed. 6 – Using bolt 16, lower the damper again to minimum speed. 7 – Check the adjustment. Sharply open the throttle with the throttle. If the engine stalls or there is a failure in operation. When switching from idle to main working. The adjustment is incorrect. Screw 18 needs to be used to enrich the fuel mixture - tighten it by a quarter. Or repeat the entire adjustment. 8 – Adjusted correctly, if there is no dip and the motor does not stall. And it continues to gain momentum.
The principle of operation of a lawn mower carburetor
Why does the engine stall? Why does the carburetor shoot?
The throttle valve determines the amount of air supplied, and the engine power directly depends on this.
Spare parts for brush cutters Repair
and
adjusting the carburetor
of the brush cutter.
Even more information about repairs and tool selection is on our website www.LookTool.Ru, come in, we welcome everyone.
Fuel is sucked into the carburetor system by a pump (its membrane). Then it passes through the fitting in the carburetor. The liquid then moves through the inlet and outlet valves of the pump. Filtered with a mesh. It moves through the needle valve into the membrane chamber.
Step-by-step operation of the device:
- Air supply into a tube with an air baffle (damper). The partition regulates the intensity of the air flow.
- The fuel supply system is certainly narrowed by the mixer to speed up the flow.
- Gasoline through the float chamber and the nozzle tube with a narrowing. A chamber with a float regulates the temporary volume of gasoline. Check the hose from the tank to the carburetor and adjust the needle. Overfills fuel. Adjusting the carburetor The carburetor overflows the regulators on the trimmer. In the float chamber the pressure level is neutral, but in the tube with a narrowing it is already small. Due to the pressure difference, fuel leaks through the nozzle.
- Acceleration of the air flow promotes the transfer of fuel (gasoline) and its atomization. Ultimately, an air-fuel mixture of the required proportion or density appears.
- The air-fuel mixture seeps into the engine cylinder through the fuel pipe.
The level of air density in the system depends on the area of the open air damper. The wider the damper is open, the greater the fuel consumption and power.
Simply put, adjusting the carburetor on a lawn mower is creating a good fuel consistency due to the correct air supply.
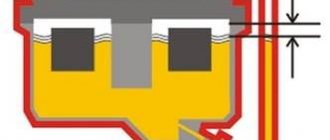
Adjustment with dosing needle
The dosing needle for adjustment has five positions and is fixed with a special lock. Raise the needle one notch and increase the fuel supply. We lower it and reduce the fuel supply.
Under normal conditions, the needle is installed in the central groove.
When operating a motorcycle at high temperatures of plus 35 degrees and above, as well as in rarefied air at an altitude of 2000 and above above sea level. The needle should be released one division.
And vice versa at low temperatures of minus 15 degrees and below. The needle should be raised one notch
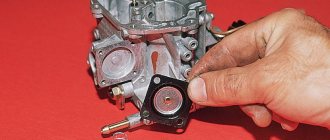
Adjusting the fuel level
For this purpose, there is a brass adjusting element on the float, as shown by the white arrow in the photo.
The entire adjustment process comes down to setting the float in a certain position. Remove the bottom carburetor cover and turn it upside down with the float.
We look from the side so that the mark on the float from the mold (black arrow shows) is parallel to the carburetor plane (red arrow shows).
In this position of the float, the fuel level will be within 12 ... 14 mm. This level is necessary for normal engine operation.
Scheme of the carburetor K-62V motorcycle Voskhod
1. Idle fuel jet. 2. Main fuel jet. 3. Float chamber. 4. Sprayer. 5. Float axis. 6. Float lever bushing. 7. Air channel. 8. Nozzles. 9. Dosing needle. 10. Body. 11. Throttle. 12. Needle lock. 13 Throttle spring. 14. Throttle lift limiter (removed after engine break-in). 15. Throttle control cable. 16. Throttle lift adjusting screw. 17. Cover. 18. Idle speed adjustment screw. 19. Fitting for fuel intake. 20. Transition hole. 21. Idle air channel. 22. Drainage hole. 23. Idle air channel. 24. Locking needle with washer. 25. Float. 26. Float sink.
Motor carburetor K65G-1107010
- Detailed description
- Guarantees
- Installation
Mixing chamber diameter – 28 mm
Diffuser diameter – 26 mm
Throughput, ml/min:
- fuel jet – 130
- idle dosing tubes – 50
- fuel corrector jet – 255
Ambient temperature range at which the engine starts and stable operation is ensured in all operating modes from -20 degrees C to +50 degrees C
| Gross weight): | 0.99 kg |
| Overall packaging dimensions: | 92x82x168 mm |
Warranty period, months: 24
Guaranteed shelf life, months: 24
Resource: 160,000 km km
Certificate validity period: 01/29/2021
Instructions for installation and operation of the carburetor
1. Installing the carburetor on the engine.
The carburetor is installed on the engine in the following sequence:
- Remove cover 1 with throttle assembly, disconnect throttle 2, break off limiter 3.
- Assemble the unit, attach the throttle cable (instead of the cable blank 19) and install it in the carburetor.
- Use the throttle stick to raise and lower the throttle. Make sure it opens and closes the diffuser completely.
- Use screw 4 to raise the throttle so that the distance between its lower edge and the diffuser generatrix is 2 - 3 mm (see diagram).
- If the carburetor has a cable-driven corrector, unscrew part 20, remove the corrector assembly and attach the cable to piston 21.
- Place the unit in place.
- Install the assembled carburetor onto the engine through a standard gasket and secure with nuts, tightening them evenly to avoid deformation of the flange.
- Adjust the position of the stops of the throttle drive cable shell 22 and the corrector (if equipped) 20 so that the cable shells have an axial play of 2 - 3 mm.
- Screw screw 7 completely with a little force, and then unscrew it 0.5...1.5 turns.
- Connect the fuel hose to fitting 8.
2. Preparing the carburetor for starting the engine.
After opening the fuel tap, make sure there is no fuel leaking from the carburetor.
- Open the starting device (or corrector-enrichment). To open the starter, you need to lift it and turn it 90 degrees. handle 9.
- To make it easier to start a cold engine at a temperature below + 50 degrees C, fill the float chamber by pressing the plunger 10 and holding it until fuel appears from the drain hole 11.
- Turn the engine crankshaft by pressing the kick starter 1-2 times and turn on the ignition.
- Start the engine with the throttle raised by 4 - 6 mm.
- After starting and warming up the engine, close the starting device (corrector).
3. Adjusting the carburetor on a warm engine.
Before starting adjustments, it is necessary to check the technical condition of the engine.
- Use throttle lift screw 4 to set the minimum stable engine speed, and then, slowly rotating screw 7, achieve maximum speed.
- Reduce the speed again with screw 4 and adjust with screw 7 to maximum.
Repeat this operation 2 – 3 times.
- Check the correct idle speed adjustment by opening and closing the throttle. If the engine stalls when the throttle is opened sharply, it is necessary to tighten the quality screw 7 by 1/4-1/2 turn (the mixture becomes richer); If the engine stalls when the throttle is suddenly closed, unscrew screw 7 by 1/4 -1/2 turn (the mixture becomes leaner).
- Adjustment of the quality of the mixture at operating modes of the engine, depending on climatic conditions and technical condition of the engine, is carried out by moving the metering needle 12 relative to lock 13. The nominal position of the lock is the middle groove of the needle. When the needle lock moves upward, the mixture becomes leaner; when it moves downward (towards the conical part of the needle), it becomes richer.
Special instructions for use.
Operation is not allowed if fuel is leaking.
The carburetor must be operated with a sealed air filter installed by the manufacturer.
Changing the filter design, as well as installing filters from other vehicles, is not allowed.
The fuel entering the carburetor must be free of mechanical impurities.
Carburetor parts should only be flushed with fuel.
Solvent washing is not permitted.
After washing, blow with compressed air or dry.
Eliminating overflow in the carburetor
A lot can be written about how to eliminate carburetor overflow. Our resource decided not to describe each method of solving a problem separately, but to present how to act when it appears, clarifying all the details. In general, the repair procedure is as follows:
First, you need to check all components that can be checked without removing the carburetor, and then repair them or replace them if a problem is identified. Such elements of the fuel system include: gasoline pump (disassembled, the integrity of the diaphragms and other elements is checked); check valve (its appearance is examined and integrity violations are identified);
carburetor gaskets (check for gasoline leaks at their locations); solenoid valve (to check, just unscrew the valve and connect it to the network; if after 30-120 seconds the needle has not moved out a few millimeters, the unit requires replacement). If no problems are identified, the carburetor is dismantled.
After removing the carburetor, you need to: First, check the operation of the throttle valve and the integrity of the needle diaphragm; Secondly, disassemble the unit, checking the integrity of gaskets, jets, their O-rings, floats, locking needles and other elements, the failure of which can cause overflow; Third, clean and bleed all carburetor fuel passages. Naturally, when problems are identified, they are eliminated, the part is reassembled and put into operation.
At the same time, before installing the carburetor, it is important to set it up correctly. Everything related to setting up the carburetor is individual for each unit, so we will not focus on this. Note that in some cases it is enough to adjust the mixture quality screws or the size of the jets, and in some cases you will have to “play” with the level of the float chamber or the position of the diaphragm needle.
Well, at the last stage, if the measures presented above did not produce results, all that remains is to take the carburetor or take the entire faulty vehicle to a specialist. Do not forget that the carburetor is a very complex device, so sometimes only a professional can handle its repair.
In general, dealing with a carburetor that overflows gasoline is not so difficult. The main thing in the analysis process is to act taking into account your knowledge and the provisions presented above. We hope today’s material answered your questions. Good luck with the repairs and on the roads!
NHẬN XÉT • 34
And what kind of knitting needle is that sticking out, what is it for, you didn’t say anything about it. Maybe it's for suction?
Fuel supply is regulated by a jet
Guys, help me, why is it that when you start the Minchik and give it gas, the gas pumps into the air very badly, you start driving the crap, it won’t go, you close the tap, there’s not enough gas, it starts to drive as it should, and it starts to rip. What should I do? The carb costs 65, I tried the needle on I also tried all the fuel supply settings, no shit. What could be wrong?
It looks like you yourself don’t know what - why film?
And my idle speed is too high. I can't adjust. What to do? Igloo up and down?
Evgeny Sviridov look for air leaks, especially through the right crankshaft oil seal
Is the needle installed on the top or bottom relative to the spring?
1:20. – quality screw. ..opens air into the pan.. and the more you unscrew it, the poorer the mixture.
When you turn the gas handle sharply and lower it, it shoots like this. that I’m afraid to leave my iron horse on the move))! What is the reason?
Amir Talgatovich Kabiev ignition
Why does the carburetor force fuel into the air cylinder, but not into the piston at all?
carb is broken or clogged
Denis Manko change the reed valve and you will be happy
The fuel screw screams
This air supply screw! Not fuel! Don’t confuse people
For me it just picks up speed after switching on
@DSFY dude you wrote a year after I left a comment. I sold my motorcycle a long time ago, bought my license and moved to a car))) outside the window it’s 2019_))))
@DSFY between head and carb
@Ansar ansar what kind of gasket?
The air is sucking, I fixed this problem yesterday
DIS Balans gasket leaks
propeller that supplies fuel
and if you put it on Minsk, then by 2 turns or 3 turns
thank you, it helped, my ant turned from a dozing old man into a BEAST.
I have one of these on my ant, everything seems to work, it drives well, and has an idle speed, but it just doesn’t want to start with the handle.. what’s the reason? At first everything worked, how do I set the needle? Because this needs to be changed in the ignition?
@Andrey Astashov I have a problem: there is no idle speed, the choke is raised, it works fine, but without the choke it stalls. Help. I changed the h.h. jet and raised the needle to the last, the risks still don’t want to.
heh, but mine starts with the key))) Assembled from scratch, the body is an old Tula model, and the rear wheels from a Lada are healthy, consider it to be given a second life. But the carburetor doesn’t want to plow properly, before that it was K62, but I killed it with dust, and I don’t want to lose the mower, but after watching the video I’ll try to adjust it, in any case, thanks for the information.
Repairing the carburetor of the Mole walk-behind tractor
The carburetor of the Mole walk-behind tractor was produced in Soviet times. Despite the fact that the Soviet industry was famous for its high level of performance and reliability, this carburetor still had several flaws. To understand them, you first need to completely analyze it into its components:
- Remove the cover by unscrewing the bolt on it. Underneath we find a gasket made of gas-resistant material, as well as a spring that needs to be pulled out.
- We take out the damper located there, under the cover.
- On the reverse side there is a float chamber, which also needs to be unscrewed. We remove the gasket.
- Then you need to remove the float by removing the pin from the corresponding hole. There is a special needle under the float, which also needs to be removed. On it we find a small elastic band, which under no circumstances should be lost, so we carry out all manipulations very carefully.
- We unscrew the fitting under which the gasoline filter is located.
- Then you need to remove the jet. After this, we need to pull out absolutely all the “internals” located in the carburetor body.
Such disassembly is necessary, because we gain access to the internal contents, which are considered the most problematic.
In other words, we turn this screw, but the mixture does not change, it remains constantly the same.
To change this, you need to make some repairs to the carburetor located inside the Mole walk-behind tractor. The main cause of problems with mixture adjustment is one circumstance. The fact is that inside the carburetor there is a special channel that runs to a tube located in the center of the carburetor.
A bulldozer is a tracked or wheeled earth-moving machine that belongs to the class of special equipment. Monster bulldozers are the largest in the world of special-purpose vehicles.
The market of our country offers products from a large number of world-famous manufacturers of snow removal equipment. It's all about the legendary German snow blower Huter.
In this pipe, in theory, there should be a through hole connecting this very channel. The problem is that on some factory units this pipe is installed askew, which leads to the fact that the channel and the hole on the pipe do not match.
There are cases when this hole is completely absent on the pipe, or it is of insufficient diameter. To carry out repairs, we need to perform several sequential steps:
We unscrew both adjusting screws. Please note that the screws have different tapers - the mixture quality screw has a larger taper. To pull out the pipe located inside, we need to slightly heat the part that is located outside
To do this, you can use a small fire on a gas stove, or heat it with a regular lighter. We warm it until we can hold the case in our hands. After that, we insert the pin into the hole where the cover fastening bolt was located. Using a hammer, carefully hit the inserted pin until the pipe pops out. As practice shows, the hole is drilled only on one side of the pipe, i.e. it's not end-to-end
We need to make a symmetrical hole on the other side of this tube, or modify the one that exists. If there is a second hole, but it is smaller in diameter than the first, then we need to sharpen it a little. To do this, we use a regular round needle file and bore the edges of the hole. Then we install the tube in its original place. This must be done in such a way that the through hole on it and the hole on the channel coincide exactly. Before inserting the tube into place, you need to slightly heat the carburetor body again so that it fits into place without problems. We insert the tube into place and, using the same pin that we used to push the pipe out, we insert it into place. We knock lightly so that the pipe does not go far inside - on the back side we should see a hole located just above the through hole, which should coincide with the channel. You need to make sure that the hole is strictly in the center. We take a thick wire and insert it into the channel hole. If everything is done correctly, then the wire should freely pass further through the through hole on the pipe and come out of it as a continuation of the carburetor channel. If the wire gets stuck, then you need to tap the pin a little more, pushing the pipe a little further. Next you need to reassemble the carburetor in reverse order.
That's the whole process of necessary changes in the carburetor design. Thanks to them, the adjusting screw fully fulfills its responsibilities for changing the quality, which, in fact, was required of it.
Adjusting the Voskhod motorcycle carburetor
The Voskhod motorcycle of the first production was equipped with a carburetor type K-36B, which has two metering systems - main and idle, as well as an enrichment device.
To rinse and clean it is necessary to disassemble in the following order: 1 – close the gasoline tap and disconnect the gasoline hose; 2 – unfasten the latches and remove the housing cover along with the cables, spool and fuel corrector; 3 – remove the rubber coupling; 4 – unscrew the two fastening nuts and remove the carburetor; 5 – remove the sealing gaskets; 6 – perform complete disassembly.
Model range of chainsaws Druzhba
The advantages of the Druzhba chainsaw, in addition to those mentioned above, are that it cuts smoothly and accurately, is highly productive and all the parts are in a durable case. Its disadvantages include significant weight - more than 12 kg with dimensions of 86.546x50 cm and a cable starter.
The main difference between modifications of the Friendship chainsaw is engine power:
- Friendship 2 has a power of 2 kilowatts, manual start and, unlike the 1st model, an element for chain braking.
- Druzhba 4, which received “gold” at the World Technology Exhibition in Brussels in 1958, has almost one kilowatt more power, sawing effortlessly, with shaft revolutions of more than five thousand, a half-meter log in one minute.
- Friendship 4M-electron, having a non-contact electronic ignition system, uses the engine resource with greater efficiency, with almost the same power - 3 kW. The cylinder's chrome coating adds wear resistance, and rubber gaskets reduce overall vibration. In modification 4A, an oil pump is installed for forced lubrication of the chain.
Like any other technical device, the Druzhba 4 chainsaw requires constant carburetor adjustment, attention, regular care and preventive maintenance. At least once a year it is necessary to fine-tune the Druzhba 4 carburetor, including its adjustment.
Adjusting the K-36B carburetor
Adjustment at idle speed is carried out as follows: 1 – before starting the adjustment, you need to start and warm up the engine. 2 – set the fuel corrector coin to the farthest position from you; 3 – by turning out or screwing in screw 14, set the minimum possible engine speed; 4 – tighten screw 13 all the way, gradually unscrew it, achieve clear, stable operation of the engine; 5 – set screw 14, lower or raise the throttle to the minimum stable idle speed.
The quality of the mixture is adjusted in operating modes by moving the metering needle 6 in the throttle valve to one of the five annular grooves, while raising the metering needle ensures enrichment of the working mixture, lowering ensures depletion.
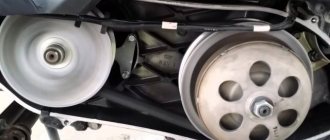
Which carburetor can be installed instead of the original one and why?
Today, thanks to the influx of Chinese spare parts in our country, the question of choosing an alternative carburetor for a scooter disappears by itself. PZ 26-27 carburetors from Chinese engines with a volume of 110-150 cm3 will fit well on the Ant scooter, but only with replacement of the jets (main and idle). You will also have to make a flange to attach the carburetor to the engine cylinder. At the bottom of the carburetor there is a recess with a drain hose that can touch the clutch release lever.
To install the carburetor, you will need to warm it up and bend it to the side, taking into account the squeeze. If this option does not suit you, you can simply make a longer pipe (see figure). Then the lever will turn freely without touching the carburetor. In addition, you will need to select a pipe for the air filter.
This is what a PZ 27 carburetor installed on an Ant scooter looks like instead of the original K65G
Fits into place like a native one
An accelerator pump comes as a bonus to the PZ 27 carburetor. Of course, it will be of little use on a motor scooter, so you don’t have to bother with installing an additional cable.
Carburetors with a large diffuser diameter PZ 30 or Jikov from the Java 638 motorcycle, despite laudatory reviews on the Internet, are unsuitable for installation on scooters. Carburetors with a large diffuser diameter should be installed only on forced high-speed engines. When installing such a carburetor on a standard engine, even with the selection of the necessary jets, you are unlikely to be able to set up a stable idle speed.
K-36B carburetor diagram
1. Fitting. 2. Fuel corrector. 3.Fuel corrector spring. 4. Locking needle. 5. Throttle valve spring. 6. Dosing needle. 7. Mixing chamber housing. 8. Air intake channel. 9. Sprayer. 10. Main jet. 11. Fuel corrector jet. 12. Float. 13. Idle speed adjustment screw. 14. Throttle set screw. 15. Throttle valve. 16. Cover of the mixing chamber housing. 17. Cable guide. 18. Leaf spring. 19. Float release button. 20. Float chamber cover. 21. Float chamber housing.
Adjusting the K-62V and K65P carburetor
Adjust the idle speed in the following sequence: 1 – screw screw 18 until it stops, which regulates the air supply for idle speed. Then unscrew one turn. 2 – Open the throttle slightly using the throttle. 3 – Start the engine and warm it up. 4 – Using bolt 16, lowering the throttle valve, achieve minimal stable engine operation. 5 – Unscrew screw 18 to set the maximum speed. 6 – Using bolt 16, lower the damper again to minimum speed. 7 – Check the adjustment. Sharply open the throttle with the throttle. If the engine stalls or there is a failure in operation. When switching from idle to main working. The adjustment is incorrect. Screw 18 needs to be used to enrich the fuel mixture - tighten it by a quarter. Or repeat the entire adjustment. 8 – Adjusted correctly, if there is no dip and the motor does not stall. And it continues to gain momentum.
Video
krassawa Blog Fills the spark plugs with gasoline, why and how to start the engine
You can learn how to set up the saw's carburetor in the video below. In this video, the master shows how to step-by-step adjust a Chinese-made chainsaw without using a tachometer. Conducts post-adjustment checks in various modes.
Adjusting a chainsaw carburetor, although it looks like a fairly simple process, requires a very careful and responsible approach. The article describes the process in sufficient detail, but if you have never adjusted a chainsaw, you should turn to specialists, this will help save time, nerves and money.
A chainsaw is a tool that is useful in any country house, even for amateurs, not to mention professional workers. But, like any other device, a chainsaw needs constant care and prevention. One of the most common procedures is to adjust the carburetor of a chainsaw due to incorrect settings in the past.
Adjustment with dosing needle
The dosing needle for adjustment has five positions and is fixed with a special lock. Raise the needle one notch and increase the fuel supply. We lower it and reduce the fuel supply.
Under normal conditions, the needle is installed in the central groove.
When operating a motorcycle at high temperatures of plus 35 degrees and above, as well as in rarefied air at an altitude of 2000 and above above sea level. The needle should be released one division.
And vice versa at low temperatures of minus 15 degrees and below. The needle should be raised one notch
Adjusting the fuel level
For this purpose, there is a brass adjusting element on the float, as shown by the white arrow in the photo.
The entire adjustment process comes down to setting the float in a certain position. Remove the bottom carburetor cover and turn it upside down with the float.
We look from the side so that the mark on the float from the mold (black arrow shows) is parallel to the carburetor plane (red arrow shows).
In this position of the float, the fuel level will be within 12 ... 14 mm. This level is necessary for normal engine operation.
Scheme of the carburetor K-62V motorcycle Voskhod
1. Idle fuel jet. 2. Main fuel jet. 3. Float chamber. 4. Sprayer. 5. Float axis. 6. Float lever bushing. 7. Air channel. 8. Nozzles. 9. Dosing needle. 10. Body. 11. Throttle. 12. Needle lock. 13 Throttle spring. 14. Throttle lift limiter (removed after engine break-in). 15. Throttle control cable. 16. Throttle lift adjusting screw. 17. Cover. 18. Idle speed adjustment screw. 19. Fitting for fuel intake. 20. Transition hole. 21. Idle air channel. 22. Drainage hole. 23. Idle air channel. 24. Locking needle with washer. 25. Float. 26. Float sink.