What voltage should the alpha moped generator produce?
PROBLEM: THE MOPED BATTERY WILL NOT CHARGE
1. Check the fuse and its contacts (clean if necessary). If the fuse is blown, it must be replaced. If the fuse is blown, the engine will not start.
2. Check the battery contacts. If necessary, clean with sandpaper and tighten the fasteners.
3. Check all wires and plugs of the battery charging system. First of all, check the ground - the blue or black (usually) wire that connects the negative terminal of the battery to the moped frame. Sometimes cleaning the battery terminals is all you need to get your moped working again.
4. Check the voltage when charging. If your battery is completely discharged, charge it using a charger or install a known good battery on your moped.
5. Connect the multimeter to the battery (plus to the positive terminal, minus to the negative terminal).
6. Look and remember the readings of the device (the normal value is 12.8 Volts, the lowest acceptable value is 12.3 Volts).
7. Start the moped engine, turn on the low beam headlights, increase the gas so that the engine runs at approximately 3000 rpm and look at the multimeter readings. They should be greater than the battery voltage when the engine is not running (but not more than 14.5 Volts).
If these readings are equal to or less than the initial ones, then the cause of the malfunction may be both the relay-regulator and the moped generator.
Read below on how to replace the relay regulator. Read how to check and replace the generator here - (coming soon)
PROBLEM: THE MOPED BATTERY IS BOILING, THE BULBS BURN OUT.
1. Connect the multimeter to the battery (plus to the positive terminal, minus to the negative terminal).
2. Look and remember the readings of the device (the normal value is 12.8 Volts, the lowest acceptable value is 12.3 Volts).
3. Start the moped engine, turn on the low beam headlights, increase the gas so that the engine runs at approximately 3000 rpm and look at the multimeter readings. They should be greater than the battery voltage when the engine is not running but not higher than 14.5 Volts.
If the readings exceed 14.5 Volts, then the relay regulator must be replaced.
CHECKING AND REPLACING THE RELAY REGULATOR.
ATTENTION! There is no point in “dialing” the relay-regulator with a multimeter; you just need to change it to a known good one!
The relay regulator has the dimensions of a matchbox, sometimes a little larger, its body is made of aluminum and has fins for better cooling. The relay-regulator is usually installed behind the front facing of the moped or screwed to the frame. Disconnect the connector, unscrew the relay regulator and install a new one.
Source
Starting current coefficient
There is another important nuance that must be taken into account - the inrush current coefficient. When most electrical appliances start up, their power consumption increases for the first few milliseconds. For example, a standard 800 W microwave oven has a starting current coefficient of 2, so in the first second its energy consumption will be 1600 W. In most cases, these coefficients are distributed as follows:
- All heating electrical appliances that no longer perform any functions (electric kettles, boilers, incandescent lamps, irons, heaters, etc.) have a coefficient of 1, that is, they do not consume more energy at the time of startup;
- TVs, computers, laptops and similar equipment have a minimum inrush current coefficient of 1.1.
- Most power tools (jigsaws, drills, screwdrivers, grinders, industrial hair dryers and similar devices) operate with a coefficient of 1.3-1.4.
- The highest coefficient (3-4) is for refrigerators, concrete mixers, vacuum cleaners, water pumps and air conditioners.
Thus, you can calculate that if, during a power outage, 3 incandescent lamps of 100 W each are on in your home, a computer is running at 400 W, a refrigerator at 600 W, and you decide to clean with a vacuum cleaner at 1800 W (starting current coefficient 2.5) then you need a diesel - a 5.8 kW generator or gas generator, while it is advisable to leave some reserve and install a 7 kW power plant. If you try to perform these operations with an electric generator whose power is 4 kW, unwanted overloads will occur and the protection system will work. Therefore, calculating the optimal performance of a home station is of great importance.
How to check the generator on a scooter?
The scooter generator is one of the most important parts of the scooter; its malfunction means that it is impossible to continue moving; a spark simply will not appear. But if you doubt whether your generator is working or the reason for the malfunction of the scooter is in another part, it is strongly advised to check the generator. Many people don’t know how to check the generator on a 4t scooter, because this relates more to electrics, which scooterists hardly understand. Also, the verification problem will be in the absence of the main tool - a multimeter tester. Experts identify several reasons for generator failure:
- short circuit formation;
- mechanical failure or wire breakage;
- significant reduction in rotor magnetization.
Before checking the generator for serviceability, we will consider the main faults. Practice shows that the generator breaks down most often on Chinese scooters, where the most common failure is the rotor losing its magnetization. The rotor often loses magnetization precisely because the scooter falls, that is, there is a direct impact. Also, if there is a nearby magnetic field, the rotor discharges.
To check the charge on the generator, you will need to use a proven method; the main task is to find out the output voltage. First of all, completely disconnect the generator from the scooter, then use the control device and start the engine. After starting, you can check the output voltage; the working generator should show at least 5V with the engine running.
The second stage is checking the output voltage of the switch; for this you will need a multimeter. The testing process begins by connecting the commutator to the generator stator, this is done using wires from both parts. Then you need to disconnect the wire related to the switch block from the ignition coil winding terminal. The next step is to connect two terminals - one goes to the engine ground, the second to the main wire on the ignition coil. This main wire is connected to the commutator.
After this, you will have to set the voltmeter to the main “direct current” mode and crank the engine with the kickstarter. By these actions we can find out the output voltage of the switch to the ignition coil. Then connect the switch wire to the coil. Under normal conditions, the output voltage of the scooter should be 200 V. For many, such a test may seem too complicated, because most of the terms are unfamiliar, and not everyone can use a multimeter, but if you really want, you can try and check the generator on a Chinese scooter.
Using a multimeter, you can find out the presence of voltage and its indicators, so you will have to start the procedure by removing some parts of the plastic located in the engine area. On the scooter you will have to find a large bundle of wires, which is located on the engines. Find the wire that should connect to the generator. The next stage is to measure the parameters of the circuit, the main task of which is to power the generator coil with electricity. Important: before this test you will have to disconnect the wiring from the generator, after which you can check the resistance. In normal operating condition, the generator should produce a resistance of 80 to 150 ohms. Deviation from the norm indicates a malfunction of the generator and the need to replace it. In some cases, the presence of incorrect resistance lies in the wiring, which is faulty. This can be determined by removing the generator and checking the coil resistance separately; if it gives optimal data, the reason is in the wires, in particular their short circuits.
Detecting the above faults is not an easy task; most scooter owners are not able to check the generator for serviceability, which is why they turn to specialists. If you have the financial means, it’s easier to buy a new generator, so you decide how to solve this problem yourself.
How to check the generator on an alpha moped with a multimeter
Checking a scooter's generator is a fairly important and sometimes necessary procedure for every owner of this two-wheeled vehicle. Unfortunately, it can be difficult to establish its functionality, especially if you do not have deep knowledge in the field of electrical engineering, as well as the necessary tool - a multimeter tester . If you have such a tool, then before checking the generator you will need to familiarize yourself with the concepts of alternating and direct current, voltage, electrical impulse and tester indicators.
To check the generator on a scooter, you need to remove the plastic around the engine, and then measure the indicators - first of all, the voltage . You need to remove the casing as carefully as possible, otherwise you will damage the fastening system.
Find the place where the bundle of wires comes out of the engine and move along it to the connector - the place where the generator is connected to the scooter’s on-board network. Then you will need to measure the resistance of the circuit that powers the generator coil. Disconnect the wiring from the generator and measure the resistance of the connector wires. In theory, the resistance in the coil should be from 80 to 150 Ohms. If during measurement deviations from these values are found, you should not immediately think about a malfunction.
Try removing the generator from the scooter and measuring the resistance of the coil itself by connecting the tester directly to it. When taking readings from the coil, carefully inspect the condition of its terminals - damage that leads to a decrease in resistance may be the cause.
If during diagnostics you find out that the coil resistance readings are within the normal range, then the cause of the malfunction most likely lies in the wires themselves, coming from the coil or at the output points. Check the wiring and make sure there are no shorts in the wires.
First rules
How to calculate parameters, prevent overloads and short circuits, and also not overpay for fuel? This is the main question when choosing a reliable electric generator for your home, cottage or other facility. First of all, you need to check all the electrical equipment in the room, record the energy consumption of each device and calculate the amount. Most likely, the resulting amount will be quite high, and you should also remember about the inrush current coefficients and the required power reserve.
In order not to install a large 20 kW generator with a fuel consumption of 7 l/h, you need to select only those electrical appliances that you will need during power outages and the launch of an emergency power system. The lighting system, refrigerators, alarms and similar devices must be connected to the network. It is also important to run heating equipment with an electrical control system. Irons, hair dryers, vacuum cleaners and washing machines can wait until the city's power supply stabilizes. You should calculate which energy consumers will work all the time in non-stop mode, and which ones you will connect to the network periodically. For example, you may not run a microwave oven and an electric kettle at the same time so as not to create a high load. You can turn off the lights while using the computer or TV, and so on. Taking into account all these factors, you can approximately calculate the required operating efficiency of an electric generator.
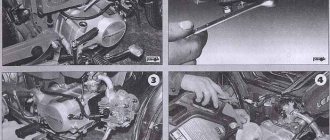
Troubleshooting and repair of electrical equipment of the Delta moped
- The absence of a spark or its strength is not sufficient for ignition. To do this, unscrew the spark plug and evaluate its appearance. You should also check for a spark when turned out.
- When troubleshooting the ignition system, install a working spark plug and try to start the engine.
- Using a multimeter, check the contact between the motor and the frame.
- The performance of the generator can be assessed by measuring the coil resistance. Resistance is measured between ground and a black wire with a red stripe. If there is no resistance or it is very low, the generator is to blame for the problem. To confirm this fact, you should dismantle the generator and check the resistance directly on the coil.
- If the generator is working, check the integrity of the circuit. The electrical diagram of the Delta moped allows you to determine the procedure for troubleshooting and troubleshooting.
- Then the resistance at the terminals of the ignition unit is checked. Since this element cannot be repaired, if problems are identified, it should be replaced.
There may also be problems with the battery charging system. A sign of problems will be a constantly discharged battery. The cause may be a malfunction in the power supply system. Problem identification is done using a multimeter.
If the power supply system is damaged, no current flows to the battery. Until the battery is discharged, the scooter will work, and then the engine can only be started by charging the battery or replacing it with a new one.
The electrical circuit of the Delta moped simplifies the troubleshooting process. When performing welding work, you should remember that without disconnecting the switch you can easily destroy all electrical equipment.
Modern scooters made in China have a similar layout. The engineers of the Celestial Empire did not bother and assembled all the critical components according to a single scheme. Even if there are differences, they are minimal.
This statement is also true for the electrical components of the moped. Any owner periodically encounters problems associated with these nodes. The electrical circuit of a Chinese 4t scooter is not a complex system; it contains only the main elements necessary for the full operation of the unit.
Knowing the main electrical wiring components and their purpose, you can quickly find the problem and fix it.
Common causes of problems with scooter generators
In conclusion, it is worth noting that the failure of a scooter generator is one of the most common problems faced by owners of two-wheeled vehicles. If a malfunction occurs, you may encounter external signs such as a poor battery charge, a weak spark, or some problems with the electrical system. Typically, the reason for the incorrect operation of the generator is:
Before repairing the generator, you must carry out diagnostics and find out the cause of the malfunction, and only then begin repairs or take the device to a workshop.
How to check the scooter generator for serviceability
A failed generator blocks the operation of the entire scooter as a whole, since the entire scooter system is somehow connected to it. If there is a breakdown in the electrical system, a weak spark, or a poor battery charge, in addition to other equipment, a breakdown of the generator cannot be ruled out.
There are not many breakdowns in this case, these are:
- wire break (for example, due to wire breakage or fumes),
- short circuit ,
- significant reduction in the magnetization of the generator rotor.
Let's consider each of the points in more detail. For example, let’s take one of the Chinese scooters, since it is these devices that are most often subject to such breakdowns. What causes the rotor magnetization to decrease? This phenomenon can be observed due to an impact (for example, during a fall) or being near elements of a high magnetic field. As a result, the output current of the generator drops significantly during operation, and normal operation of the scooter is impossible.
Overheat.
Plug Type: Extremely white insulator with small black flecks and premature electrode erosion.
Consequences: loss of scooter power at high speed or under load.
Probable causes: the spark plug is not screwed in enough; The scooter's engine cooling system is not working properly; ignition of the scooter too early; The thermal range is incorrectly selected - the candle is too “hot”.
Remedy: check the torque of the scooter's spark plug; operation of the scooter engine cooling system; adjust the ignition timing; select the correct spark plug heat rating.
Type of spark plug: melted and burned central and grounding electrodes (or one of the electrodes) of the scooter spark plug; bubbling insulator with metal deposits on it.
Consequences: significant loss of scooter engine power; ignition interruptions. Continued use of such spark plugs may cause serious damage to the scooter engine.
Probable causes: thermal overload; significant overheating of spark plug parts due to glow ignition - combustion begins before a proper ignition spark appears; use of low-quality fuel; burning out of the remaining air-fuel mixture in the combustion chamber due to an incorrectly adjusted fuel system of the scooter or the ignition timing of the scooter; The thermal range is incorrectly selected - the spark plug is too “hot”.
Remedy: check the scooter engine, ignition system and fuel system, as well as the quality of the working mixture and the ignition timing of the scooter. Install new spark plugs with the correct heat rating.
Design and principle of operation of a scooter generator
To the average person who is not experienced in electrical matters, a scooter generator may seem like a very complicated device. This is partly true: electric current is an invisible thing to the eye, and if we can see or touch mechanical faults, then we can only guess about faults in the electrics of a scooter or identify them using special measuring devices.
However, “it’s not the Gods who burn the pots” and if a person has a desire for something, then this article will be a good help, but for those who don’t want anything, there’s no point in continuing.
The scooter generator is a flywheel type generator with permanent magnet excitation. This type of generator is used on the vast majority of scooters, as well as mopeds and small motorcycles.
Designation of the main elements of the generator
The scooter generator consists of a rotor (in collective farm language - “anchor”) and a stator. The rotor is mounted directly on the crankshaft and while the engine is running, the rotor rotates around the stator coils
The stator is attached directly to the engine crankcase. And while the engine is running it remains motionless. The stator is a metal base made of several plates of special transformer iron. On the base of the stator there are special projections (coils) on top of which a copper wire is wound in a strictly defined order - forming the generator windings.
Depending on the generator model, there may be two or three windings. The generator shown below has three windings: supply, control and high-voltage
Permanent magnets are installed on the inner surface of the rotor. Magnets have different polarities. The magnets in the drain are covered with a lid; if you remove it, you can see them
Each magnet forms a static (constant) magnetic field around itself. In turn, the field of each magnet will be different: blue is negative (“north”), red is positive (“south”)
If we insert the stator into the rotor in the same way as is done on the engine, then we will see that the stator coils will be in the magnetic field of the magnets located next to them
After we start the engine, the rotor magnets will begin to rotate around the stator coils. During the rotation of the rotor, magnets of different polarities will approach the coils, which always stand still, and the field in which the coils are located will change at a very high speed. Due to the rapid change of magnetic fields, magnetic induction will occur in the generator coils and the generator will begin to generate electric current.
JavaScript is disabled in your browser
Today, modern mopeds are equipped with a huge number of different electronic devices, which naturally operate using electricity. Whatever one may say, even a rechargeable battery needs current, so it requires periodic charging. Optics, battery, starter, tail lights and other electronic devices depend on the generator. The scooter's generator plays a major role in the correct operation of the moped, and the simplicity of its design should be like the ABCs even for novice motorcyclists. After all, this is classical physics - a school curriculum!
The moped generator is a simple flywheel magdino. Electric current is supplied directly to consumers during the rotation of the crankshaft, or more precisely during operation of the power plant. When the flywheel and magnets rotate, electricity is generated. A special charging coil is located inside the flywheel. The magnetic field oscillates in the coil itself, which leads to voltage indication.
A scooter's generator produces only alternating current, but some moped devices require direct current. For example, the battery is charged only with direct current. Let's figure out together how direct current differs from alternating current?
Everyone probably knows that electric current is a directed flow of charged particles along a trajectory from one pole to the next source pole. The process when the flow of charged particles does not change the nature of the movement constantly and does not depend on time is called direct current.
Alternating current refers to a process in which charged particles constantly change the nature and direction of their trajectory. This comparison is elementary and delving into all the nuances of the process does not make sense. In everyday life, examples of alternating current are batteries of mobile phones, tablets, cameras, computers, traditional batteries and other power sources. Just like a moped battery, all of these devices require DC current to charge properly. It is the charging device that converts the mains voltage into the desired one.
The battery requires recharging. The battery must be supplied with direct current. In order to convert alternating current into direct current, a special rectifier is used on the moped. For the current conversion process, diodes are usually used. Naturally, electric current can flow through the diode elements in only one direction, and the reverse process in our situation is filtered, and as a result we have the desired direct current. But that’s not all – all that remains now is to reduce the current indicator to the value we need. A special voltage regulator is responsible for this process in a moped - it is also a rectifier.
The current generated by the generator is passed through the rectifier and the desired voltage appears at the output. Without this conversion of electric current, correct operation of the entire moped as a whole is simply not possible, since the voltage indicator constantly fluctuates depending on the speed of the crankshaft of the power plant.
The moped battery is a constant consumer of electric current, charging which is carried out directly from the generator all the time, even if charging is no longer required. The power indicator of the generator, as a rule, is slightly greater than the power of all other electronic devices on the scooter, therefore, when installing additional optics on the moped, it is necessary to reduce the number of actual consumers and reduce the load on the generator by reducing the voltage consumption of these same consumers.
What is a voltage regulator used for?
The relay regulator stabilizes the voltage of the scooter generator at the required level, not allowing it to increase or decrease the value above or below the norm. This prevents on-board voltage surges from going beyond the established limits (depending on the boards this is 12-14 V) and ruining the work of consumers whose service life is designed to be no more than 13 V.
That is, this part takes on the impulses that arise during the operation of the scooter (turning on the headlights, the starter button) and transfers the resulting thermal shock to itself. In this case, all the heat that could settle on the contacts is generated in it and removed through the device.
In addition to stabilizing the voltage, the relay also converts alternating current into direct current, which is necessary for charging the battery.
Moped manufacturers install charging relays with different parameters on scooters and select them individually for each. Depending on the regulator circuit, the connectors also differ. Chinese models usually have 5 terminals (male), while Japanese models have 4.
Supercharging (pressure injection in Stirling)
To obtain significant output power, it is necessary to increase the pressure in the working area of the engine. Knowing that the Philips engine operated at 12 bar (175 psi), I would like to have an engine that was structurally strong and compact to operate at these levels of internal working gas pressure. The working fluid was air, and it was chosen on the basis of practicality. I wanted my generator to be oil-lubricated, just like the Philips Stirling - this feature greatly contributes to the quiet operation and long service life that you really want in a Stirling engine.
Features of electrical equipment
The wiring to the Delta and all electrical equipment is quite traditional.
- generator with flywheel;
- electric starter (with relay);
- ignition coils;
- electronic voltage relay;
- spark plug;
- battery;
- electronic switch;
- ignition switch;
- turn relay.
This list is quite understandable to most motorists who have experience in servicing domestic equipment. Moreover, the wiring of the Delta moped is traditional - 12-volt, with a minus to ground.
Signs that a check is needed
If the battery on your scooter often runs out, and it is still quite new, this means that there is a problem with the operation of the relay regulator. As practice shows, it burns out quite often. If the device is faulty, the battery stops charging completely and loses its capacity. This means you won’t be able to start the scooter with a button; you’ll have to start it with a kickstarter.
Another characteristic sign of incorrect operation of the device may be the frequent burnout of incandescent light bulbs. They themselves are durable and have a good durability, but are quite sensitive to voltage changes. This happens because the optimal voltage in the scooter network is considered to be 12-13 V. Increasing this value even by 2 V reduces the service life of electronics and components by 2 times.
The greater the deviation from the norm, the greater the likelihood that something will burn out in the scooter. Therefore, when starting the scooter from the starter due to a power surge and a faulty relay, the bulbs usually burn out.
Signs of a malfunctioning regulator are identical for all models of Chinese scooters. They are especially typical for charging relays for scooters of Chinese models with an engine capacity of 50 cc. Therefore, before making a decision to replace something in electronics, testing systems and devices should begin with the relay regulator.
For all models of Chinese scooters, the symptoms of a malfunction of the regulator are identical.
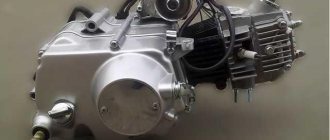
Engine Specifications
The moped is equipped with a 4-stroke air-cooled engine marked 1P39FMB. The marking means that the engine has a piston with a diameter of supposedly 39 mm and the engine has a volume of supposedly 49.9 cubic cm.
The advantage of such an engine is that there is no need to mix gasoline and oil. But unlike a 2-stroke engine, which is structurally simpler, here you need to monitor the valve clearance. Plus, the engine is equipped with an oil pump, a drive chain and a chain tensioner.
Alpha as standard has
- Electric starter.
- Electronic ignition 12V.
- Electronic tachometer on the dashboard.
- A simple diagram of the electrical equipment of an alpha moped allows you to replace failed elements with your own hands.
The source of energy in the Alpha moped is the battery. Additionally, a relay regulator is installed. The wiring is protected against voltage surges. The six-coil generator maintains voltage at any engine speed, and also ensures uninterrupted operation of the lighting and alarm systems.
Installation of additional lighting fixtures is not provided. Also, you cannot replace lamps with more powerful ones. The absence of complex connections in the electrical circuit allows even a novice to carry out repairs, which also affects the popularity of Alpha.
An electronic tachometer on the dashboard improves vehicle controllability and increases ride comfort. The low cost of Alpha leads to the fact that many factory components are not of high quality. Thus, the wiring insulation is made from cheap plastic. As practice shows, operation in the harsh Russian climate leads to the insulation cracking.
That is why many recommend replacing the factory plastic wiring with a new one with rubber insulation immediately after making the purchase. In this way you can insure yourself against various operational problems.
The problem with the Chinese Alpha motorcycle is in several things: shock absorbers, metal and wiring. The rest is replaced by the owner quickly enough (oil, gasoline, factory tires). It is the wiring that has many possible breakdowns and forces owners of Chinese mopeds to spend a lot of nerves trying to fix it. As a result, the wiring of the Alpha moped very soon begins to look like some kind of bird’s nest and you can’t do without a diagram. How to sort out tangled wires?
Read also: Lenses for xenon headlights
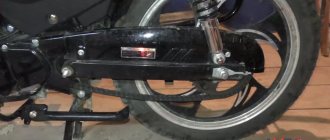
Appearance of Alpha RX
Alpha RX is an updated version of the previous classic moped. The new moped has become more interesting and elegant in appearance. The exterior has a modern look which I liked. The tank has been updated, a two-level seat has been installed - the passenger is now slightly higher than the driver. The passenger's visibility is now better. The wings are now made of plastic, but only the front wing is painted. This already saves the wings from corrosion.
The headlight became larger than that of the classic Alpha, a serious halogen lamp was installed, and the light became brighter. The rear shock absorbers have become more advanced in shape. The motorcycle is also equipped with serious lighting equipment - front and rear lights, turn signals with sound, high and low beams, a signal and a brake light.
Very easy to use. Repair is possible with a minimum set of tools, but you will have to stock up on additional open-end wrenches: 9, 11 and 15.
It comes in two versions for sale: with a 72 cc and 110 cc engine. But lately they have been supplied partially unserviceable with a 50cc piston that will need to be upgraded. These versions of the models are called Alpha 7 and Alpha 11.
How to check PP with a multimeter on a moped?
The relay regulator on a Chinese scooter is checked using a multimeter with a voltmeter function. For this purpose, a simple DT-830 (or equivalent) is usually used. It is better to carry out diagnostics and measurement of output voltage with the device removed.
Verification algorithm:
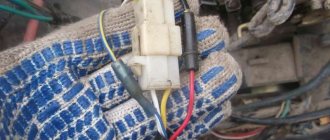
- You need to unscrew the fairing with the central phase and find on the frame a device with 4 wires: red, green, yellow and white.
- Then start the scooter and check the voltage at idle: measure it between the green and red wires, setting the multimeter to the maximum value of 20 V.
- If the multimeter display shows a figure of 14.6-14.8 V, this is normal. For stabilizers on Chinese mopeds, this is the operating standard voltage. If at idle the multimeter shows a value of 15-16 V, this is a high voltage indicator. This indicates a malfunction of the relay regulator.
- Then you need to check the voltage supplied to the lighting lamps. An alternating voltage is supplied to the central low beam (high beam) lamp, so the multimeter should be switched to the alternating current measurement mode with a parameter of 20 V.
- Next, we measure the voltage between the green and yellow wires (green is the general electrical network of the moped). If the multimeter shows a network voltage of up to 12 V, then the electrical appliances are operating without additional load.
- If at idle this value is 16 V or higher, and with a sharp increase in engine speed it jumps to 25 V, the device does not stabilize the voltage and, therefore, does not work. With such readings, the device must be replaced with a new one.
Using a multimeter, the relay regulator is checked on a Chinese scooter. On 4T scooters, the relay regulator is checked using a tester.
Typically a mechanical tester is used for these purposes, although there are also electronic models. In order to take a measurement, you need:
- switch the device to the “KiloOhm” mode and remove the regulator;
- then place the probes on the first pair of terminals (AB). The tester should show a value of no more than 18 kOhm;
- after that, we change the position of the probes on the terminals in the opposite direction (VA) and measure the voltage again - the arrow on the device should show 0;
- then we install the probes on the next pair of terminals (SD) and measure the readings on this pair;
- swap the probes (DS) and measure the indicator again;
- the remaining measurements have no contact and are not checked. The indicator when checking them should be zero.
In this way, regulators are tested on popular Japanese models with small engine volumes from brands such as Honda (Leard, Dio, Tact), Suzuki, Yamaha.
Replacing a faulty relay regulator on a scooter is not difficult.
Ignition circuit elements.
Electronic tachometer on the dashboard.
When the turn signals are on, it makes characteristic clicks with a frequency of about 1 Hz. Also, you cannot replace lamps with more powerful ones. Due to the electronic circuit of the regulator, the voltage on this wire is converted into a pulsating one, and is supplied to powerful current consumers - low and high beam lamps, as well as dashboard backlight lamps, there may be several of them.
This is what the relay regulator looks like on a scooter. Due to its primitive circuitry, the relay-regulator often fails. Basic Concepts In order to understand wiring, you need to understand a little about the types of current. The starting relay receives a thick red wire from the positive terminal of the battery. The alternating voltage is removed from the white wire and supplied to the relay regulator for subsequent straightening and stabilization. The start relay is located on the right side of the scooter frame. This is an ordinary key switch that switches the positive voltage from the relay-turns the gray wire to the lamps. There are three wires coming from the sensor. The fuel level indicator, tachometer, sound signal, turn relay, and ignition circuit are also ready for operation. Experienced owners, after purchase, replace it with rubber-insulated wiring. Also, you cannot replace lamps with more powerful ones. The toggle switch must be powerful enough, because the entire electrical circuit of the scooter is, in fact, switched through the ignition switch. Wiring Operation The large black wire connects: 2 yellow ones, green and red, where direct current flows. Valuable tips It is no secret that wire insulation is made of cheap plastic and it is better to replace the insulation with rubber before it crumbles after a few rains.
This can be easily fixed, but the wire will have to be shortened by 0.5 - 1 cm. But if we “walk” along the high-voltage wire from the ignition coil, the wire will lead us straight to the spark plug cap. Lamp power 25W, supply voltage 12V. Ignition coil 2. Moreover, which is typical, a fairly large number of beginners decide to buy a two-wheeled vehicle, choosing Alpha mopeds.
Therefore, you should not pull the wire too hard, otherwise you can pull the wire out of the cap. Structurally, the ignition coil is located next to the start relay. Therefore, if at idle the lamp shines very brightly, and not at full intensity, then it is better to turn it off and check the relay regulator. Alpha 72 (Voltage Regulator)
Alfa 110 moped wiring diagram
This abbreviation stands for Capacitor Discharge Ignition - ignition from a capacitor discharge. Sprinkle talcum powder on the inside of the tire.
Electrical diagram of Delta 50 mopeds without a tachometer The photo below shows a schematic electrical diagram of the Alfa, Delta moped and other mopeds that do not have a tachometer. Change the oil in the gearbox with a warm engine after the first km, and then regularly after km in the following order: remove the filler and drain plugs; drain the used oil; Screw in the drain plug and fill in approximately cm3 of oil; screw in the filler plug; let the engine run for 3-5 minutes, shift gears alternately. When starting a cold engine, press the float stop 22 fig. Problem identification is done using a multimeter. Place part of one bead of the tire in the recess of the rim, use a spudger and a wrench to push the entire bead of the tire onto the rim and slide it towards the rim flange. Brakes To adjust the front brake, a stop is installed on the brake pad disc. Check the operation of the gear shift mechanisms, clutch, and brakes. Protect the paper element from contact with oil and gasoline. Obe3obPasha Leave a comment Over the past few decades, the domestic moped manufacturer has completely left our market, and Chinese analogues and new models have taken its place. Electrical wiring for the 157QMJ engine (Simplified) or how to start the engine without a moped
Chinese mopeds
Single platform models
Today's realities are such that you can no longer see domestic models on public roads.
Times are changing, and the weakened banner of freedom from the hands of the domestic “Carpathians” and “Verkhovyna” was picked up by Chinese mopeds of the following series:
Let us state a fact: products from China have become widespread in the domestic motorcycle market.
- Alpha;
- Delta (DELTA);
- Dino;
- Irbis;
- Viper (VIPER);
- Zip Star;
- Leader;
- Mustang;
- Breeze;
- Dingo;
and other similar models, equipped with everything necessary for travel. These are all Delta “co-platforms” produced by the Chinese manufacturer Chongqing Wonjan motorcycle and the companies that bought a license from it.
For reference: It should be noted that Chinese technology has significantly displaced the products of domestic motorcycle manufacturers on the Russian market. This is noticeable not only in the form of finished products, but also in all kinds of components. For example, the Kovrov Motor Plant abandoned its own production of power units and installed the Lifan engine on its models.
Similarity of design
It is noteworthy that the electrical wiring of the Delta moped is similar to other models, which facilitates maintenance and increases the popularity of the vehicles.
Although seemingly complex at first glance, the electrical connection diagram is quite traditional.
Note! The photo above shows the wiring diagram for a Delta moped that does not have a tachometer on the instrument panel. It is identical for all models of this manufacturer, and differs only in the control of the semi-automatic transmission (Delta Racer model).
The video in this article will provide information regarding maintenance of similar models. For products with an instrument panel containing a tachometer, we publish part of the diagram, which also has differences in the controls. In this case, the wiring for the Delta moped is supplemented with several elements for connection.
The photo shows part of the electrical circuit of the Delta model with a tachometer
How to replace a faulty relay regulator on a scooter?
If the charging current is not supplied to the battery contacts when the generator is working properly, the stabilizer needs to be changed. Replacing it yourself is not difficult.
To do this you need to do the following:
- Place the scooter on the central support.
- Find the location of the device in a specific moped model. If you can’t find it right away, you can use the instruction manual.
- Dismantle the cladding. Depending on the moped model, the stabilizer may be located on the front (under the front plastic), in the rear, or under the seat. In this case, the underseat space is removed along with the seat.
- Unscrew the device from its seat while maintaining the fasteners. As a rule, the relay is attached to the scooter frame with a bolt, or less often with a self-tapping screw.
- Disconnect the connector and secure the new regulator with the fastener. The installed device must have a pinout and connector similar to the one replaced, and be suitable in terms of parameters for this particular scooter model.
- Connect the relay-regulator on the scooter to a standard connector and assemble the remaining spare parts in the reverse order of disassembly.
How to make a relay regulator with your own hands?
To make a relay regulator with your own hands, you need a diagram and a little knowledge. The model of a homemade regulator is based on the principle of disassembling the generator and outputting a separate end of the wire from ground.
As a diagram, you can take the relay-regulator connection diagram (Figure 3), and on its basis assemble a single-phase generator.
To collect the stabilizer you need:
- disassemble the generator and remove the stator from the engine;
- then you need to unsolder the ground from the generator, solder a separate additional wire for the winding to it and bring it out. This wire will be one end of the winding. The second end is the generator wire;
- After removing the wires, you need to reassemble the generator in reverse order.
With this device, the generator has 2 wires (there should be 3 in total). You can connect the stabilizer according to this scheme:
Do-it-yourself relay-regulator manufacturing diagram
At the end of the process, you need to connect the yellow wire from the old regulator to the “+” terminal in order to obtain a constant voltage on the sides of the network. Check the resulting voltage regulator on the scooter. At this point, the process of creating a homemade device can be considered complete.
The relay regulator is a very useful thing and necessary for the normal operation of the moped. However, it requires attention and constant monitoring of its work. Therefore, if the device fails or its performance is unsatisfactory, it is better to replace it with a new one, the cost of which today ranges from 300 to 500 rubles.
Air conditioning compressor from Chrysler
Around this time, I came across a refrigeration compressor and it turned out to be ideal as the basis for the engine I had planned. It was a Chrysler RV-2 automatic air conditioning compressor. The crank moved the pistons 90 degrees (V-twin design), with a 58.7mm bore and 33.4mm stroke.
In both cylinders, combined with the correct gas path, the displacement was 127.8 cc, which is more than double the volume compared to the Philips MP1002C engine. Being a refrigeration compressor, the design was made thoroughly and with sufficient margin of safety for such strong compression. In addition, this compressor contained a gerotor oil pump, which under pressure lubricated the edges of the large connecting rod bearings. Each aluminum piston had one compression ring and was connected through Alcoa aluminum connecting rods. This compressor turned out to be the most optimal for my idea.
Air conditioning compressor Chrysler RV-2
Years of development
Over the course of several years, I have designed and developed all the necessary components in order to adapt the compressor to work in a Stirling engine. I also designed a tubular support frame to support the engine. The frame is styled to resemble that used on a Philips generator set.
The heater head, displacer and inner cylinder are made of stainless steel 302 pipes of various sizes. I used a coil of copper wire as a regenerator. The cooler, located on the compression side of the engine, was made of aluminum tubes. Used a small 200 watt 12 volt belt driven generator that was originally purchased and intended to run on a garden tractor.