Some parts of your scooter will sooner or later need to be replaced or repaired, and one of them is the scooter air filter. Let's look at replacing and cleaning such an important element.
If you don't clean the filter on your scooter in time, you may feel a loss of power, notice carbon deposits in the combustion chamber, or your scooter will simply experience higher fuel consumption. Repairing the air filter on a scooter is necessary in any case, and let's face it, it's a very simple matter. Remember, you need to clean the filter every 500 – 1000 km. This period depends on the terrain in which you operate the scooter; therefore, if you ride in a village on a dirt road, you need to change or clean the filter as often as possible.
Nowadays, some scooter manufacturers are making their vehicles more suitable for difficult roads, so most Japanese brands produce scooters with an air filter that is protected from dust and dirt. So if you are the owner of something like this, you will need to clean the filter no earlier than after 2,000 km.
Maintaining the air filter on a scooter
The operation of the engine and its service life depend on the cleanliness of the air filter. With a dirty filter, the engine will not have enough air, which will result in a decrease in thrust, the spark plug, piston and head will become covered with soot, and the muffler will clog faster. Therefore, the scooter filter must be cleaned every 500 km. And you should not neglect this, otherwise the filter element will turn into stone.
I think only the lazy have not heard about this procedure. You just need to unscrew the screws of the air filter cover, remove the foam element and wash it. If we are talking about a scooter with a two-stroke engine, then the filter element of such scooters is saturated with oil, so it needs to be washed in gasoline.
However, I personally am not at all satisfied with the “wash in gasoline” clause. It’s dirty, smelly, and it’s unclear where to drain the gasoline afterwards. Therefore, personally, I simply wash the foam with washing powder or a product like Fairy. To avoid getting your hands dirty, you can use either plastic gloves or just two bags. You just need to rinse the filter twice and it will be completely clean.
After washing, the foam must be dried and, after soaking it in engine oil, installed back into the body. Oil impregnation is necessary, because only in this case will the filter work correctly, trapping fine dust. The easiest way to perform this procedure is this: put the foam rubber in a bag, pour a little oil into it and knead the filter well. A properly impregnated filter is when it is all slightly oiled, but the oil does not drain. To do this, you can simply squeeze out the foam rubber well.
Please note: This article and the images in it are subject to copyright. Partial or complete reproduction on other resources without permission is prohibited.
HOW TO CHOOSE THE CORRECT FILTER ELEMENT
If the question - why change the air filter is more or less clear, then many owners simply do not know how to choose an air filter for their car. This is largely due to the manufacturers themselves, who produce a huge number of modifications of devices. The materials of the filter element itself, the shape, degree of filtration, operating conditions, as well as the number of cleaning stages differ. To choose the optimal element, you should first read the recommendations of the vehicle manufacturer - be independent, and changing the type of filter installed is not always possible.
For many car owners, the determining factor when choosing a new air filter is its service life. Most manufacturers are now using increasingly modern materials and technologies so that they have to be changed less frequently, and the degree of air purification remains as high as possible. Despite all the achievements of the developers, it should be understood that almost any “air purifier” will sooner or later have to be replaced with a new one, so you should constantly monitor the engine’s operation, and if specific signs of air shortage appear, it is better to replace the filter element.
Often, many car owners, especially of expensive foreign cars, prefer to purchase not original air filters, the cost of which can be more than five thousand rubles, but cheap fakes. Owners of cars with a turbocharged diesel engine are especially guilty of this, since on such engines the filter replacement interval is more frequent, and its cost is more expensive - this is due to higher requirements in terms of air purification.
It should be understood that any counterfeit air filter does not fulfill its main task, only creating the appearance of protection. In addition to the lack of effective purification of the air entering the engine, counterfeits often and seriously reduce its volume, which leads to over-enrichment of the mixture, a significant increase in fuel consumption, and incomplete combustion of the mixture stimulates the process of premature wear of the main components of any engine.
16.3. Scooter repair. Air filter - removal, washing and installation
16.3. Scooter repair. Air filter - removal, washing and installation
SERVICE FREQUENCY
It is recommended to carry out this operation every 5–6 thousand km of the scooter. Some scooter models use replaceable paper air filters.
REMOVAL
To make it easier to replace the air filter element, it is recommended to remove the side trim of the scooter (see p. 64 “Covering - removal and installation”).
1. Unscrew the bolts of the air filter housing cover.
2. Remove the cover and remove the foam filter element.
WASHING AND IMPREGNATION WITH OIL
1. We wash the foam filter element with water and a neutral detergent (washing powder, dishwashing detergent or a special composition for washing air filters) and leave it until completely dry in the air.
ATTENTION!
The filter element must not be dried using hot air (hair dryer, heaters, open flame).
2. In order to properly impregnate the filter element with oil, you can use a special preparation “impregnation for air filters”, packaged in aerosol cans. If this is not possible, we use the “classic” method:
3. Pour approximately 30–40 grams of motor oil into a plastic bag.
4. Place the filter element into the bag.
5. Tie it and knead it in your hands until the oil is completely absorbed into the filter element.
6. As a result, the filter element should be uniformly colored according to the color of the impregnation.
ATTENTION!
The optimal amount of impregnation for each specific filter element is individual. The basic rule for monitoring the correct impregnation is that oil should not drain from the filter element, and at the same time, there should be no dry spots left on it. The entire surface of the element must be evenly saturated with oil.
We install the filter element in the reverse order.
ATTENTION!
Before installing the filter element, thoroughly clean the inside surface of the filter housing.
16.4. Scooter repair. Fuel filter - replacement.
SERVICE FREQUENCY
On most models of modern scooters with a four-stroke engine or a two-stroke engine with a separate lubrication system, a fuel filter is installed in the power system. It is needed in order to protect the carburetor and the cylinder-piston group of the engine from the ingress of fine dust and other particles that have entered the fuel. It is recommended to replace the filter once every 10 thousand km, or after parking the scooter for a long time. The fuel filter is located in the gap in the gas tank-carburetor line and is often dismountable, which allows it to be cleaned without replacing the filter element.
REMOVAL
1. Loosen the fastening clamps on the fuel hoses.
2. To avoid fuel spilling from the line, place a rag under the filter and remove it.
INSTALLATION
We install a new fuel filter in the fuel line.
ATTENTION!
There is an arrow on the filter housing indicating the direction of fuel flow. When installing, observe the direction “towards the carburetor”.
JavaScript is disabled in your browser
As you know, in a scooter engine, during its operation, it is not just gasoline that burns, but a mixture of gasoline and air, prepared in a certain proportion by the carburetor.
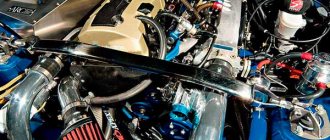
Without atmospheric oxygen, gasoline simply cannot burn. If the fuel passes through a fine fuel filter before entering the engine, the air is cleaned by the air filter. If air purification is not carried out efficiently, then particles of dust and other contaminants will very quickly lead to wear of engine parts, especially for parts of the cylinder-piston group. In addition to the quality of cleaning, a very important indicator for an air filter is its resistance to air flow. This parameter must match the engine settings, otherwise engine operation will be disrupted. It is impossible not to mention the so-called zero-resistance air filters, which some scooterists install on their equipment when tuning. Indeed, such filters increase engine power, since the engine “breathes” more freely and does not have to overcome air resistance at the inlet. But, at the same time, such filters filter the air very poorly, therefore, the engine life is reduced
It makes sense to use “nulevik” filters only on sports equipment, where it is important to win a competition, and where there is no question of engine life
The air filter has another function - reducing engine noise. If you have seen and disassembled the air filter housing of a scooter, you may have noticed that its design is not as simple as it seems at first. Chambers and partitions can be placed inside the case; the shape of the case itself is quite complex. Indeed, the filter housing is specially designed to participate in dampening the sound of the engine, just like the muffler. Any disturbances in the intake or exhaust system can not only “add a decibel” to the running engine, but also change the engine settings, which will disrupt its operation. Two-stroke engines are especially sensitive to interference in the intake or exhaust system.
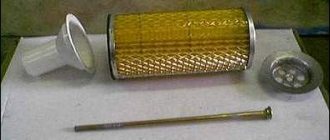
Now let's look at the types of air filters used on scooters. These can be either foam rubber, paper, or metal filters. Foam filters can be either multi-layer or single-layer. When dirty, such a filter can be easily cleaned by washing it in gasoline or detergent. After this, you must soak the foam filter element in engine oil, or apply a special composition for impregnating air filters to the foam rubber. You can treat foam rubber with oil like this: pour a little oil into a plastic bag, place a clean filter element there, knead the bag with the foam rubber in your hands so that the oil saturates it throughout its entire thickness. After this, squeeze out the foam, removing excess oil from it, and install the filter in place. The foam rubber should be completely saturated with oil, but oil should not drip from it. It is impossible to install a “dry” foam filter without impregnation with oil, since high-quality air purification will not be ensured. Over time, after a certain number of such cleanings, the foam filter element becomes unusable and must be replaced. By the way, make sure that the foam filter element is intact and that it is installed correctly in the filter housing so that even a small amount of unpurified air cannot enter the engine.
Paper filters, which are also often found on scooters, are not cleaned when they become dirty, but are simply replaced with new ones.
Metal filters are perhaps the most durable and easy to clean. In its design, such a filter resembles a metal mesh, with a fairly large total area, with tiny holes. Clean such a filter by washing it in gasoline or detergent, also using a small brush. After cleaning, the filter is dried and, like foam rubber, lubricated with oil or treated with a special composition for filters. The oil should be applied to the entire surface of the filter in a thin film, without gaps.
The timing of replacement or the timing of the next cleaning of the air filter largely depends on the conditions in which the scooter is operated. If you often have to ride on dusty dirt roads, then, of course, you will have to service the filter much more often than a purely “urban” scooter rider. Sometimes, when the scooter is used intensively, the filter has to be cleaned a couple of times a month, and sometimes more often. In any case, it is better to service the filter earlier than it is needed than to be late with this work.
When to clean or replace the filter
Scooter air filters serve to clean the air entering the carburetor and then into the engine as part of the fuel mixture. The filter element of a moped performs the same function. The consequences of untimely replacement or cleaning of them can be no less disastrous than with the wrong approach to this issue in relation to automobile air filters. In any case, the owner of a scooter or moped will start filling up more gasoline and will be annoyed that his iron friend has become sluggish and no longer accelerates to the km/h required by the passport.
Method three
An alternative to the “nulevik” The air filter creates additional resistance in the path of the intake air flow.
To overcome this resistance, the engine has to expend additional force, and the engine power deteriorates. This problem is overcome by using a zero-resistance filter device. The downside of the “nulevik” is its cost, which is several times higher than the price of conventional filter elements. It is possible to make a zero-resistance air filter with your own hands. You can make it from a Moskvich filter, the model is not important. We take sealant, a stationery knife, a round CD box. It is worth mentioning right away that a device made with one’s own hands will only superficially resemble a “nulevik” for a car; in other respects, it will not differ from a regular Moskvich air filter.
How to remove and replace the air filter of a scooter or moped
The engines of most scooters and mopeds have a “wet” type filter (on almost all Chinese vehicles) or a “dry” type filter (mainly on Japanese ones). “Wet” is made of oil- and petrol-resistant foam rubber and impregnated with a special oil that ensures the retention of small particles. The filter itself consists of two layers:
- internal, having a fine-mesh structure - to retain the smallest contaminants;
- external, with larger cells - for filtering large particles.
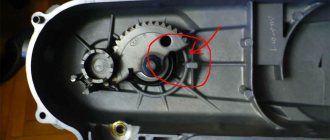
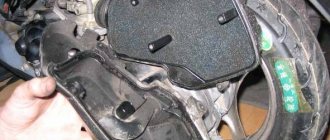
Air filters on scooters are installed in plastic housings in the form of a box (usually flat and oblong). The housing, whether on a moped or a scooter, can be located in different places: in front of the carburetor, above the variator, above the muffler, under the floor guard in front to the right of the engine.
- We remove all parts that may interfere with removing the filter;
- We clean the filter housing from dirt (on some models of scooters and mopeds it will have to be removed for this);
- We disassemble the housing - unscrew the screws around the perimeter and carefully remove its cover, trying not to damage the filter element;
- We carefully inspect the filter element looking for damage: through holes, tears, loose fit to the lid or edges of the housing;
- Carefully remove the filter from the lid;
- We carefully clean the body and its cover from dirt, wash it with gasoline if necessary, wipe it dry and make sure that there are no threads or dust left (they can subsequently get into the carburetor, where they will clog the jets and channels).
If the filter is damaged or needs to be replaced due to its service life, then carefully install a new filter element in place of the one that has become unusable.
In this case, its side with smaller pores should be turned inward (for foam rubber). It is also necessary to try not to tear the filter element and to ensure that it fits tightly to the edges of the lid and housing. We assemble the dismantled elements.
When to check your work?
Let's figure out in what cases it is necessary to check the operation of the scooter. For this you need:
periodic checks, cleaning, replacement of parts
With them, attention is directed to brittle, fragile parts; regular – parts sensitive to blockages. Dirt on them can lead to engine failure, overheating or jamming;. Maintenance leads to an extension of the life of motorcycle equipment
Maintenance leads to an extension of the life of motorcycle equipment
- current - when a violation is detected: rupture of connecting tubes, leakage of oil and the presence of stains from it, as well as cracks due to the influence of precipitation and temperature on the plastic;
- Preventive checks when changing oil, refueling, cleaning from dirt. Ignition and braking systems are also checked.
Preventive inspections and measures taken to replace unsuitable parts are important:
- fuel pump,
- gas tank,
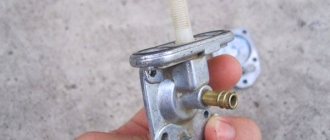
- gasoline tap,
- fuel filter,
- air filter,
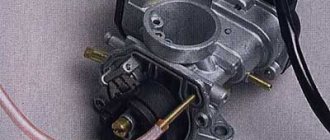
- carburetor,
- connecting tubes.
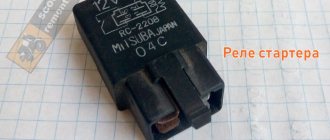
You can check the functionality of the fuel pump yourself.
Maintenance of filters for mopeds and scooters
Maintenance of scooter air filters consists of cleaning and soaking them in oil if they are “wet” foam rubber (“dry” ones are blown or washed in water with washing powder).
We purchase a special product for high-quality cleaning of air filter elements - for example, K&N. Although this composition is intended for filters from this company, it is also perfect for foam rubber ones. Read the instructions and use them in accordance with them.
We wash the foam filter element in any gasoline (preferably AI-92). Gasoline is poured into a suitable container, where the foam is washed. We wash it carefully and carefully - just let the foam rubber absorb the gasoline itself, and then squeeze it out. After washing, the filter is wrung out - again, carefully, without twisting it. Then dry the foam.
We rinse in warm water with washing powder dissolved in it - excellent cleaning quality at minimal cost. During washing, you must follow the same rules as when processing in gasoline. Then wring out the foam, rinse thoroughly, and then dry.
After washing and drying, moped air filters should be soaked in oil. Or special is the best option. You can use impregnating agent for air filter elements from K&M or similar, cheaper ones from other manufacturers. Spray the aerosol from the can evenly in linear (not circular) movements over the entire surface of the filter. We wait about 20 minutes and then check the uniformity of application. If necessary, we “paint over” all identified spots that did not get oil.
Motor, diluted with gasoline 1:1. In this case, you can soak the foam rubber in a suitable container. Do not pour a lot of oil - its excess can significantly worsen the throughput properties of the filter. When the foam in the container is saturated, it is compressed. This will allow the oil to be better absorbed and remove excess. Then we dry the foam rubber from gasoline.
Air filter foam maintenance
It's cold outside and many of you have parked your scooters for the winter, but there is equipment that is also used in winter. These are enduro and motocross motorcycles, as well as ATVs and snowmobiles. De facto, they are all equipped with reusable foam air filters , which require periodic maintenance. In this article we will look at how to operate such filters. The proposed method is only suitable for foam filters and is in no way suitable for paper and hard “zero” filters.
Cleaning the foam filter
In short, let's get started. Let's start by removing the filter . Often, in order to reach the filter, you need to unscrew the seat and part of the plastic body kit. Before removing the filter cover, you need to make sure that there are no deposits of dirt, sand or dust in the filter housing that may have entered the intake distributor during dismantling. If there is, it needs to be cleaned before removing the filter. We remove the filter and look into the air intake. It's great if you can see the carburetor directly. We are looking for dust deposits and dark deposits on the carburetor diffuser, which indicate that the air is not being cleaned well.
At the next stage, after inspecting the intake tract, you should plug it with a rag (which does not leave lint and does not unravel into strings, well, it’s clean, of course) or a special lid. Since the next step in order will be cleaning the inside of the air filter housing, you need to be sure that nothing gets into the middle of the intake pipe. Why do you need to clean the air filter box? The cleaner it is, the slower the cleaned (new) filter will clog, and the box itself is also a good dust collector, especially if a crankcase exhaust is connected to it, due to which an oily deposit forms on the walls of the air filter housing. It would be advisable to clean all this with a cloth soaked in gasoline or white spirit. When working with white spirit and other solvents, it is good to use glasses, gloves and work in a well-ventilated area!
Now the fun part begins, which is actually cleaning and washing the removed foam filter .
There are a lot of specialized motorcycle chemicals for servicing filters, but a significant part of it is not approved for use in Europe due to toxicity and, accordingly, may not be officially supplied to our country. Some similar kits even come with a branded washing bucket, but considering the price products like this, I wouldn’t want to go bankrupt servicing the filter. But it needs to be serviced constantly, and no tuning bucket will reduce its dirtiness. That's why smart scooterists choose white spirit! It is prohibited to use gasoline, as there is a danger of affecting the glued seams of the air filter, and even more so, more aggressive solvents, which can directly turn foam rubber into glue, are not suitable. You need to purchase your own plastic bucket with a sealed lid and store a couple of liters of white spirit in it just for flushing purposes. This cleaning is rough and preliminary, so a couple of liters filled in is enough for repeated use.
You need to put something like a grate on the bottom of the bucket. This is so that the washed dirt particles quietly fall into the sediment and remain there without rising to the top, catching them with the filter when washing.
We immerse the filter in a bucket of white spirit and lightly “massage” it. We periodically pull it out, carefully squeezing it out (without fanaticism and without twisting it!), and examine it to make sure that there is less and less dirty oil.
After “rubbing” in white spirit has ceased to produce visible results in cleaning the filter, you need to carefully unscrew it and carefully check for ruptures, cuts and simply natural aging. If a tear in the filter cloth begins somewhere, even if it is not through, the filter must be replaced with a new one.
Cleaning the air filter
If there are no signs of aging or tears, we move on to the next part of the wash, this time in warm water and using kitchen detergents (no aggressive chemicals like washing powder!). If the previous stage is needed to get rid of oil and grease, then this stage actually washes out particles of dust and sand from the pores of the air filter. It is necessary to rinse until the water stops turbidity. We squeeze the filter (by squeezing it in your hand, no spiral twisting!) and let it dry without using hair dryers, dryers or other heating devices. It is advisable to give it a shape as close as possible to the original (for this you can make a box from wire, say).
Scooter air filter lubrication
Then it needs to be lubricated. Manuals for old scooters recommend using engine or transmission oil for impregnation, but the disadvantage of this approach is that such oil is quite fluid and after some time collects at the bottom of the filter. But the air goes through the upper section. The thicker the oil, the more suitable it is for impregnation.
Special impregnations for filters , which are sold in the form of sprays, contain, if you take it apart, the lubricant itself and a thinner, which after applying the lubricant evaporates within 15 minutes. Before installation, wait fifteen minutes to give the volatile components time to evaporate. Since this lubricant does not penetrate deep into the filter, it traps dust even worse. And last on the list are specialized liquid oils, which are sold in regular bottles without pressure. Absolutely all professional oils are painted in bright colors, so that the stage and uniformity of impregnation can be assessed by the color of the filter. Liqui Moly Racing Luft-Filter-Oil is specifically blue, but it also comes in red and green.
How to clean the air filter on a scooter?
Some parts of your scooter will sooner or later need to be replaced or repaired, and one of them is the scooter air filter. Let's look at replacing and cleaning such an important element.
If you don't clean the filter on your scooter in time, you may feel a loss of power, notice carbon deposits in the combustion chamber, or your scooter will simply experience higher fuel consumption. Repairing the air filter on a scooter is necessary in any case, and let's face it, it's a very simple matter. Remember, you need to clean the filter every 500 – 1000 km. This period depends on the terrain in which you operate the scooter; therefore, if you ride in a village on a dirt road, you need to change or clean the filter as often as possible.
Nowadays, some scooter manufacturers are making their vehicles more suitable for difficult roads, so most Japanese brands produce scooters with an air filter that is protected from dust and dirt. So if you are the owner of something like this, you will need to clean the filter no earlier than after 2,000 km.
How often does it need to be replaced?
The frequency of replacing the air filter depends on the degree of use of the 4 T scooter, as well as the responsibility of its owner and the quality of the roads.
If the vehicle is operated on dusty country roads from morning to night, then the period of use of the air purifier will be short. Average statistical data indicate that it is necessary to change the cleaning structure every 5 thousand kilometers if the vehicle is not used regularly. The service life will also be affected by the quality of the filter itself. Original models will last much longer.
What types of air filters are there?
The most common type of air filter used is parallon. It is one of the best materials that absorb dust and do not let it pass further. But in some cases, you may encounter a paper filter that is not as high quality. Another disadvantage is the impossibility of repair, that is, cleaning. So if it gets dirty, all you have to do is replace it.
How to remove the air filter?
This is also quite an important process, because different scooters have different designs. Let's look at the most common methods for removing the filter cover. First you need to remove the side plastic (in case it bothers you), then you need to unscrew the screws connecting both sides of the air filter cover. The last step is to disconnect the foam element, and if it is dirty or has fuel deposits, it should be cleaned or replaced. Often, a similar procedure is suitable for Japanese scooters with standard mounts; for example, on the Honda Dio AF 34, the air filter has a similar design.
Checking the throttle cable for binding
Turn the throttle and release it. It should freely return to its original position.
If the handle returns stuck, then you need to disassemble the throttle handle and remove the cable. To do this, remove the mirrors and disassemble the instrument panel.
Use a rag to remove all dirt and old grease from the throttle grip.
Lubricate the cable. Using a syringe, pour engine oil into the cable housing.
Check the cable again for binding by pulling it by hand. If it still sticks, replace it with a new one.
Lubricate the throttle mechanism with the same oil.
Reassemble everything and check the throttle return function again.
Cleaning the air filter.
Now we have moved on to the main stage - cleaning or replacing the foam element. If, unfortunately, you do notice its poor condition, the easiest way is to wash it. It is necessary to wash the air filter if it is not torn or otherwise damaged. The washing process itself is very simple, you can rinse the filter well in warm water, and if you wish, you can add detergent. Another reliable option would be to buy a filter cleaner.
Air filter impregnation agent
Another option for better cleaning is to clean the filter with gasoline. The foam should be washed with a small amount of fuel, and then rinsed in clean gasoline. Afterwards, you don’t have to wait for the filter to dry, so you can immediately put it on the scooter.
So, the air filter can be cleaned in gasoline, in ordinary water and using washing liquid. After you have completed this procedure, you need to saturate the paralon with a special product. Alternatively, you can use regular fuel oil. The impregnating material serves as an adhesive for dust and other contaminants; it is what will prevent deposits from getting further into the engine.
That's all. If you have questions or would like to share your air filter repair options, please comment below.
008_MOTO_0410_062
The “zero” filter consists of layers of non-woven material laid between two metal meshes and impregnated with a special sticky oil.
The finest dust simply sticks to the oil, while larger grains of sand get stuck in the gauze. The advantage of this design is the replacement of one dense filter layer with several less dense ones. The engine breathes easier and can add power at high revs. The disadvantage is the need for more frequent maintenance, somewhat less cleaning efficiency and expensive oil and cleaner. The “zero” filter consists of layers of non-woven material laid between two metal meshes and impregnated with a special sticky oil. The finest dust simply sticks to the oil, while larger grains of sand get stuck in the gauze. The advantage of this design is the replacement of one dense filter layer with several less dense ones. The engine breathes easier and can add power at high revs. The disadvantage is the need for more frequent maintenance, somewhat less cleaning efficiency and expensive oil and cleaner. Any intervention can have a very serious effect on engine performance. Also, never install alarm units, xenon headlight transformers, etc. inside the air filter housing. These warnings are based on life experience. One of my friends, for example, “to lighten the design” threw out the compensation chambers of the intake tract of the carburetor CBR1100XX. At the same time, the piston was bored out on the motorcycle, a sports jet set and a “gauze” filter were installed. After assembly, the motorcycle worked perfectly in place, but when picking up speed it immediately began to become terribly “poor.” Naturally, the reason was sought in the carburetor settings, filter and many other places. However, only the return of the intricately shaped tanks to their place instantly and completely cured the long-suffering “Drozd”.
So, the most popular filters among racers and simply tuning enthusiasts are “gauze”, multi-layer ones (they are also called “zero resistance” filters). They are distinguished from paper ones by the filter material itself and the method of its installation. If the purpose of installing a gauze filter is to improve the dynamic performance of the motorcycle, the following must be taken into account. Replacing a standard (paper) filter with a “gauze” filter without adjusting the carburetors often leads to a deterioration in engine performance, and not vice versa. An engine that receives more air (mainly at medium and high speeds) does not have enough gasoline, and running on a lean mixture, as we know, does not add power. And the carburetor vacuum flaps do not work quite correctly, since they are set at the factory to a different vacuum in the intake manifold. There are kits for adjusting the carburetors of popular sports motorcycles, but you will have to tinker with them if you want to get a really good result - to choose the best combination of jet diameter, needle lift height, quality screw speed.
Most modern motorcycles are equipped with fuel injection, so instead of adjusting the carburetors, you will need to change the injection control program. Companies specializing in tuning sports motorcycles produce programmable control units that allow you to enrich or lean the mixture using a computer, and change the ignition timing. In order not to get lost in the variety of settings, most motorcycles already have preset programs that take into account, among other things, the installation of “gauze” filters. Any intervention in the design of the motorcycle upsets the balance set by the factory engineers, so be prepared to gain in one area (for example, power at maximum speed), but lose in another (for example, traction in the mid-range). However, many people tune their motorcycle “out of love for art”
In this case, the main thing is not to do any harm, and how much the device was actually improved is not so important. Subjective assessment, fueled by the funds spent on your pet, will always have a “plus” sign.
And no measurements at the stand are needed!