Our company is committed to protecting your confidential information. Our privacy policy explains what information we collect about you, how we use the information we collect about you, and how you can tell us if you would prefer to limit the use of such information.
By providing your information you consent to the use of such information in accordance with this privacy policy. If we change our privacy policy, any changes will be posted on this page without notice.
What kind of personal data do we collect about you?
We collect information about users of our website in a number of ways, including through the use of log files stored on the client's system, through registration, and through email messages sent to us through our website. The information collected includes the following: If you send us an email, you will automatically provide us with your mailbox address as well as other personal information included in the body of your email.
If you call our technical support center or leave a voicemail, you agree to provide us with your name, contact phone number(s), your email address, and any other personal information that you agree to provide to our technical specialists in order to so that our technical specialists can respond to your request.
We collect and store information from all visitors to our website that they either actively provide to us or through their mere browsing of our website: computer Internet Protocol (IP) address, browser type, operating system type, date and time of access to our website, address of the Internet resource from which the user was redirected to our website. We use such information to track traffic to our website, count the number of visitors to different sections of the website, and to make our site more useful.
content .. 1 2 3 9 ..Honda CB400. Fuel system
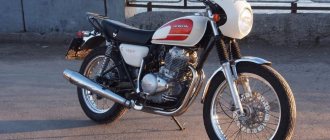
Honda CB400N
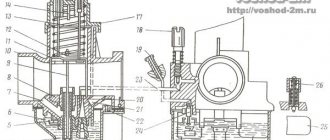
Carburetors (removal and installation) (CB400N). 1 ignition module bracket bolt, 2 ignition module, 3 air filter housing side cover screw, 4 air filter side cover, 5 clamp screw, 6 air filter housing bolt, 7 ventilation tubes, 8 • crankcase ventilation tube, 9 auxiliary air tube, 10 clamp, 11 starter cable, 12 carburetor, 13 accelerator cable, 14 air filter housing.
Carburetors (removal and installation, 2) (CB400N). 1 fuel pipe, 2 bracket fastening screw, 3 washer, 4 spring, 5 bracket, 6 bushing, 7 carburetor mounting stud (5 mm), 8 carburetor mounting stud (6 mm), 9 spring (carburetor No. 3), 10 tee ( air line), 11 bushing (5 mm), 12 bushing (6 mm), 13 spring (carburetor No. 1), 14 spring, 15 adapter (air line), 16 tee (air line), 17 tee (fuel line), 18 locating pin (5 mm), 19 locating pin (6 mm), 20 spring (carburetor No. 4), 21 spring, 22 adapter (air line), 23 tee (air line), 24 tee (fuel line), 25 locating pin (5 mm), 26 locating pin (6 mm).
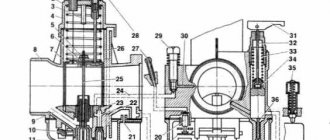
Carburetor (disassembly and assembly) (CB400N). 1 vacuum chamber cover screw, 2 vacuum chamber cover, 3 spring, 4 spool valve, 5 needle holder, 6 o-ring seal, 7 emulsion tube spring, 8 dosing needle, 9 washer, 10 float chamber screw, 11 float chamber, 12 o-ring seal , 13 float axis, 14 float, 15 needle valve, 16 main jet, 17 sprayer, 18 idle jet, 19 quality screw, 20 • spring, 21 washer, 22 • o-ring seal, 23 screw, 24 shut-off valve body, 25 ring seal, 26 shut-off valve, 27 trigger plunger nut, 28 spring, 29 trigger plunger.
- spring,
- needle holder,
- O-ring, 4 dosing needle,
5 washer.
1 starting device housing, 2 starting device, 1 shut-off valve, 2 housing, 3 screw fastening device. nia.
Throttle position sensor (CB400FIII). 1 sensor cover, 2 throttle position sensor connector, 3 mounting screw, 4 throttle position sensor, 5 adapter.
Honda CB400F(CB1)
14
Air filter housing (CB400F). 1 wiring harness, 2 heat shield, 3 air filter cover, 4 filter element, 5 housing mounting bolt, 6 crankcase ventilation tube, 7 air hose, 8 air filter housing, 9 mounting bolt, 10 additional filter cover, 11 filter element, 12 additional air filter housing, 13 air jet, 14,15 spark plugs.
Carburetors (removal and installation, 1) (CB400F). 1 clamp, 2 starter cable, 3 throttle cable, 4 fuel pipe, 5 carburetors, 6 spacer.
Carburetors (removal and installation, 2) (CB400F). 1 starter rod, 2 spring, 3 starter lever, 4 starter cable bracket, 5 rear bracket, 6 front bracket, 7 carburetor spring No. 3, 8 tee (air line), 9 tee (fuel line), 10 carburetor spring No. 4, 11 spring, 12 adapter (air line), 13 outlet tube, 14 tee (fuel line), 15 spring (carburetor No. 1), 16 spring, 17 adapter (air line), 18 outlet tube, 19 tee (fuel lines).
Carburetor (disassembly and assembly) (CB400F). 1 vacuum chamber screw, 2 vacuum chamber cover, 3 spring, 4 spool, 5 needle holder, 6 spring, 7 spring seat, 8 dosing needle, 9 washer, 10 float chamber mounting screw, 11 float axis, 12 needle valve, 13 seat valve, 14 washer, 15 fuel filter, 16 main jet, 17 sprayer, 18 idle jet, 19 plunger nut, 20 spring, 21 starter plunger, 22 quality screw, 23 spring, 24 washer, 25 O-ring, 26, 27 guide bushing.
content .. 1 2 3 9 ..
What do we do with the information we collect?
We use personal data to provide you with the services you ask us to provide. Unless you notify us that you no longer wish to receive this type of information, we may provide you with periodic communications about our products and services. By providing us with your personal information by email or telephone, you consent to our use of your information in the manner described in this paragraph.
We may conduct statistical analyzes of user behavior (for example, by analyzing website usage data collected passively from all users) to determine the relative degree of consumer interest in different areas of our website. Such analysis will help us in our efforts to further improve the product.
Life with X4
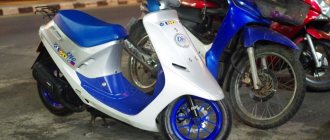
Back in 2006, after trying a lot of different equipment, I decided to switch from an old Yamaha V-Max to a Honda X4. The choice was obvious. I was completely satisfied with the power of the Vymax, but quite the opposite with its maneuverability! As a result, the X4 was approved as a comparable and more modern analogue. At that moment, I didn’t even think that my choice would result in half a million kilometers.
Immediately after the purchase, I began modifying the motorcycle. Both externally and essentially. One of the biggest disadvantages of the X is its gluttony, coupled with its small gas tank. Naturally, the iron immediately went under the knife, or rather, under the saw. But a boiled tank has both pros and cons. In the process of modernization, whatever one may say, the anti-corrosion treatment of the internal surface is disrupted. If the tank is not re-treated, it begins to leak after a couple of seasons. In short, don't repeat my mistakes! The second disease affects not only the Honda X 4, but also many other models of this manufacturer. Yes, this is a permanently burning relay-regulator. I couldn’t think of anything better than to carry a couple of spare ones with me.
Ergonomics remains unchanged. It turned out that “X” suits me perfectly in height and weight. When I switched to it from a Yamaha, things stopped leaking on long trips. It's no secret that the Honda X 4 had two trim levels - LD and regular. Regular ones went until 2000, LD after. My motorcycle is a kind of symbiosis. Most of the parts are taken from the LD, and the shock absorbers are from the regular basic version. They are stronger and last longer. No electrical additions were initially planned. Many people like to retrofit backlights, navigators, etc. In fact, the less electronics and all sorts of gadgets, the better. A simple motorcycle breaks down less!
There is a suspicion that Japanese engineers designed the Honda X4 more for city driving, good rough asphalt and fast country roads. But it was not there! Over the past 11 years, we have traveled through 54 countries together, covering a total of 507,000 km.
Easier and quieter destinations are not our choice. Often the roads along the route leave much to be desired. In such conditions, another drawback of the X is revealed - the low landing. On passes, rocks and ruts, touching the road surface with your belly is a common occurrence. It’s good that mufflers act as a kind of crankcase protection. Naturally, this motorcycle was not intended for paths where enduro bikes are difficult to navigate, but its fate was destined for a restless owner... In countries such as Sudan, Guinea, Mali, Togo, Benin, the motorcycle underwent a serious test drive in the heat, off-road and lack of normal gasoline. Regarding fuel, I can say that “X” is absolutely not picky. There were cases in Africa when I poured terrible unknown liquids into it, bought from local residents. The motorcycle rode and did not complain. In normal civilian conditions, most X-drivers use 95, but I regularly use 92. Long experiments have shown that for the engine there is no difference between the 92nd and 95th. If you move in the range of 160–180 km/h, the consumption turns out to be completely dismal. Something about 15 liters per 100 km. At a speed of 120–150 km/h, consumption drops to 10–12 liters per 100 km. If you don’t drive, it’s quite possible to achieve 7 liters per hundred.
After five years of ownership, the X 4 was able to clearly illustrate by its example that the best is the enemy of the good. Attempts to switch to Harley - Davidson Softail and Yamaha Warrior did not lead to anything. It's all not mine. An old faithful friend is dearer and closer. And the excitement for new motorcycles subsided in my soul. On long trips it’s easier for me to travel with a vehicle I’ve learned and know what to do if it suddenly breaks down. There is no longer any desire to experiment with new motorcycles, the goal is to ride a million (I have repeatedly heard that SIB engines are million-dollar), and then we’ll see. I have become so familiar with “X” that I can hardly afford to part with him. His maneuverability has repeatedly saved my life in the most, at first glance, hopeless situations.
Surprisingly, in 450,000 km, I have never climbed into the engine or even changed the clutch. Japanese reliability is not an empty phrase! Already in preparation for a trip around the world, he made major repairs. I believe this repair will be enough to last up to a million kilometers. Globally, in cohabitation with an elderly Honda X 4, close to me in spirit, I am not satisfied with only one offensive moment. These motorcycles are no longer produced! But I couldn’t find an adequate replacement... I don’t know yet what I’ll do when my “X” runs out of power. I’ll probably start experimenting with the Sibishka engine.
Anti-fine > 23 August 2021 09:16
Synchronization of carburetors of the Honda CB400 NC31 motorcycle.
Equipment necessary for synchronizing carburetors.
We plug the other end into the fuel hose. We hang the bottle itself somewhere higher. We usually hang it on a wire on the handlebars of a motorcycle.
Synchronization of carburetors of the Honda cb400 NC31 motorcycle.
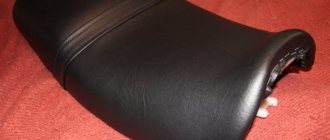
1) Remove the saddle and gas tank.
2) Connect our bottle with a dropper. 3) Unscrew the screws that serve as plugs for the synchronization holes. This is the most interesting thing for a beginner! Find them!)) Usually in such articles this point is not given due attention, although the first time you always look for them for quite a long time. We searched just long enough to empty this helmet:
In the end, we found the plugs, of course, and so that you can save your health, I photographed them along the way) The plug for the hole for synchronizing the rightmost cylinder is located on the cylinder jacket between the ribs.
But the search for the plugs of the two middle cylinders took a long time and I was tortured trying to photograph them so that they would be easy to find. In the end, here it is:
1) Red. The screw, which is the plug for synchronizing the second carburetor from the left. 2) Green. Far left carb. 3) Green. Clamp securing the second carb from the left to the intake manifold.
1) Red. Blank screw for synchronizing the second carburetor from the right. 2) Green. The carb on the far right. 3) Green. Second carb from the right. 4) Green. Clamp securing the second carb from the right to the intake manifold.
Well, I hope you can find it easily now.
4) Unscrew the plugs of the synchronization holes and screw the synchronizer fittings into them.
At the same time, the motorcycle takes on a slightly steampunk appearance)
We connect the device by pulling the synchronizer tubes onto the fittings.
5) Start the motorcycle and calibrate the synchronizer. At the beginning of the article, when I talked about the synchronizer, I talked about the adjusting screws. When the screws are fully tightened, the device does not show anything, and when they are too loose, the synchronizer needles jerk too much. Our goal is to find a position for the adjusting screws so that the needle dances a little, just a little. They even made a short video about this to make it clearer.
Then you can have a little fun)
And you can start synchronizing.
6) Synchronization of carburetors of the Honda cb400 NC31 motorcycle.
As you already understand, we didn’t get around to synchronizing the carburetors this time, I don’t have a video. I’ll take it when I synchronize the carburetors on my motorcycle and post it in a separate post. For now, I’ll just explain in pictures how this is done, although it’s not as clear as on video.
In short: between the carburetors there are three adjusting screws. In the photo I numbered the carburetors in red and these screws were indicated in green. We have to start the motorcycle and look at the instrument readings. First, by tightening the first green screw, we synchronize the operation of the first two carburetors. Then we repeat the procedure, tightening the second green screw. Thus, we synchronize the operation of the carbs: the first with the second and the third with the fourth. Then we tighten the third green adjusting screw, which is located in the middle, thereby synchronizing the operation of two pairs of carburetors.
The adjustment screws are not at all easy to reach. It is convenient to tighten them when the gas is slightly open. These screws spin, the engine soon becomes hot and you have to tighten them with the engine turned off. But this only causes trouble the first time, then everything is like clockwork.
I tried to photograph the adjusting screws so that it would be clear where they are. In principle, they are not difficult to find - they all have springs)
In the photo: 1) Red. Adjusting screw 1 and 2 carbs. 2) Green Leftmost carburetor. 3) Green. Carburetor second from left. 4) Green. A bar that opens the choke on all 4 carbs.
We ensure that the device shows the same value for all four carburetors. That's all.
7) We assemble the device, screw in the plugs, and assemble the motorcycle.
Well, that’s all, I hope the article will be useful to someone, and I also hope that I showed how simple the process is, synchronizing motorcycle carburetors.
ATTENTION! We provide services for synchronizing carburetors of Honda cb400sf and Honda cb600 Hornet motorcycles! The prices are very good!
Synchronization of motorcycle carburetors in a professional service station
Tuning VAZ Oka. We invite all owners of VAZ LADA cars to join the club of VAZ lovers - watch the video
A motorcycle carburetor is subject to a huge number of risks, the main ones being improper tuning and timing. For each engine, motorcycle carburetors are synchronized individually. Manufacturers use different layouts of power plants and apply various technical and design solutions.
Motorcycle problems are caused by low quality gasoline and deposits resulting from the use of budget fuel. Corrosion will quickly turn equipment into a pile of scrap metal, unsuitable for use. Professional maintenance and synchronization of carburetors will prevent future breakdowns.
The task of synchronization on a motorcycle is to prevent the operation of the intake system. Servicing systems is not a simple procedure and requires certain knowledge. Synchronization of motorcycle carburetors in Moscow from our company is carried out by experienced specialists who have all the necessary tools to carry out a comprehensive service.
What does carburetor synchronization affect?
- motorcycle power - incorrect timing can cause a significant drop in power. The vacuum in the intake pipes will be uneven and will not allow you to use the entire resource of the bike.
- Engine response - poor response is the first sign of problems. In our service center, synchronizing motorcycle carburetors, the price of which is discussed individually, will allow you to achieve high-quality feedback between technical systems.
- acceleration dynamics - slow acceleration is a direct consequence of malfunctions in the carburetor, which requires urgent service.
The main stages of synchronizing a motorcycle carburetor
Our company’s employees will service your bike in a short time, regardless of the condition of the vehicle, its power and class. Specialists act according to mandatory steps and follow synchronization technology.
- Primary diagnosis. We will conduct a comprehensive inspection of the motorcycle. Before disassembling the device, mechanics warm up the engine and study external signs of engine operation.
- Disassembly and washing. Accuracy is one of our basic principles. Carburetor disassembly is carried out by competent specialists who check the integrity of the connections and thoroughly clean each part.
- After the carburetor is “spilled” and assembled, adjustment is carried out using a synchronizer. We have modern equipment at our disposal that allows us to quickly and safely service both road and sports bikes.
Signs you need to sync
Communities Volkswagen Club Blog How to lubricate the door mechanism
Synchronizing carburetors is far from an action that should be carried out at the time you want to do it. The first rule of working with elements of the fuel system is not to touch them until they give you a reason to do so, but what reason is needed to require carburetor synchronization? There are actually several of them. In general, the list of signs indicating the need to check and adjust the synchronization of the functioning of carburetors is as follows:
- fuel consumption has increased;
- The idle ones began to “float” and cannot be adjusted;
- Excessive vibration has appeared in the operation of the motor;
- the engine operates unevenly;
- black smoke is coming from the exhaust system or the sound of gunshots is heard.
First of all, when such symptoms appear, it is enough to simply clean the carburetor. If the problems persist, you will have to synchronize the operation of individual nodes. Repair activities of this kind do not require a mandatory visit to a service station, because if desired, carburetor synchronization can easily be done with your own hands. To do this, you will need to know some of the intricacies of the procedure, which are covered in detail in the following paragraphs of the article.