Installing the ignition of IZh motorcycles involves adjusting the maximum distance of the switch contacts. And the second most important moment is the spark. On single-cylinder IZh motorcycles with a G-36 M 1 generator, the gap is set by turning eccentric 1 to the right or left, with screw 2 loosened. Before installation, turn the crankshaft and stop for a moment at the maximum contact divergence. In this position, adjust the gap. We set the maximum distance between the contacts to 0.35 mm - 0.45 mm.
It is recommended to set the ignition timing by removing the cylinder head. The piston must be within the dead center distance specified in the manufacturer's instructions. For example, for Planet 3 - (3.5-4.0 mm), Planet 4 - (3.0-3.5 mm), Planet Sport - (3.5-3.8 mm). In this position of the piston a spark should form. Adjustable by turning the entire jackhammer with the 10 bolts loosened.
On IZH-Yu motorcycles, the gaps between the switch contacts are adjusted in the following order: by turning the crankshaft with a pedal start, set one of the switches to the position of completely opening the contacts and, by loosening screw 4 using eccentric 3, set the gap, which should be 0.4-0 .6 mm. Then the gap is set in the same way on the second pair of contacts.
The ignition installation of IZh motorcycles is carried out with the spark plugs turned off. Inserting the dipstick into the hole under the spark plug in the right cylinder and turning the crankshaft using the kick starter, find top dead center and in this position make two marks on the dipstick: one at the level of the hole, and the second 2-3 mm higher. Then crank the crankshaft again using the kickstarter until the top danger reaches the point where the first m t mark was made. In this position, the contacts of the switch installed on the lower base should begin to open. Adjustment of the opening of the contacts is achieved by turning the base with loosened screws 2 and 7, which, having found the opening moment, are tightened. The tensile strength is determined using a light bulb connected to the switch terminal and ground.
After establishing the ignition timing in the right cylinder, proceed with the same operation and in the same sequence in the left one, turning the upper base of the switch with loosened screws 1 and 7.
Ignition Izh Planetka 5: options and adjustment functions
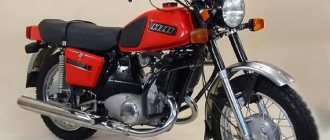
Probably, motorcyclists, despite the enormous selection of modern cars offered by foreign companies, trust Russian brands more. One of the favorite models of two-wheeled vehicles among Russian buyers to this day remains the IZH bike, which was produced at the Izhevsk Automobile Plant from 1987 to 2008.
How to correctly configure the ignition of Izh Planetka 5
It is best to make and adjust the ignition of an Izh Planetka using a special tool, which was once included in the factory kit of each individual model. If you don't have such a tool, use a regular caliper.
See:
What you need to set up the launch system on Izh Planetka 5, you will need the following tools:
- a probe, that is, a 12-volt light bulb with 2 wires;
- depth gauge (vernier caliper);
- special probes for precise measurement of gaps.
To correctly install the Izh Planet ignition, you must first remove the cover from the generator. If necessary, for convenience, you can unscrew the right crankcase cover.
In addition, to adjust the ignition of Planet 5, you should perform the following steps in turn:
- rotate the crankshaft clockwise, since proper torque setting will be performed when the switch is opened strongly;
- loosen the bolt slightly by immediately turning the eccentric;
- enter the required gaps (0.4, 0.6 mm);
- re-tighten the bolt;
- turning the crankshaft clockwise again, set the piston to the TDC mark;
- turning the crankshaft in the opposite direction, bring the piston 3. 3.5 mm to the TDC mark;
- loosen the bolts;
- set the start of opening contacts;
- retighten the bolts and turn the Planet 5 ignition on.
Solved the problem with charging and switching to 12 Volts
A collective farm is not a collective farm, but it worksThis modification includes (the price is average and varies everywhere):
1) BSZ (Contactless Ignition System) (Total cost 870 rubles) (For me 180 rubles):
— Switch (250 rubles) (I got it for 0 rubles)
— Hall sensor (DH) (120 rubles) (I got it for 0 rubles, but it burned out and spent 120 rubles)
— Ignition coil (250 rubles) (I got it for 0 rubles)
— Wiring (250 rubles) (I assembled it myself and only spent 50 rubles on terminals and heat shrink)
— Plank (You can carve it yourself) (Condensed milk 70 rubles)
— Carburetor studs (10 rubles — 2 pcs.)
2) Charging system (650-3300 rubles) (For me 150 rubles):
— Generator VAZ 2108 (New 3000 rubles, you can buy it for 500 rubles) (I found it for 0 rubles)
— Wiring to the generator (100 rubles + terminals with shrinkage 50) (I made it from the remnants of previous terminals and shrinkage, so 0 rubles)
— Ignition switch VAZ 2101 (150 rubles) Not necessary if you have Izhevsky
— Alternator belt VAZ 2108 (75-135 rubles) (I rolled up the free belt and bought a new one for 135 rubles)
3) A little ingenuity, a drill, a hacksaw, a file and free time
…………………………………………………………………………………………………………………………………………………………………………………………….
Job:
Immediately drill a hole in the frame for the bolt from the generator (Preferably without backlash) We estimate it by eye and drill it perpendicular to the frame or slightly to the left (if viewed from the side of the ignition cover) (The position of the belt on the anchor will depend on this)
We remove the right cover and unscrew the generator with contacts, throw off the wiring and, with a wide swing, throw the generator away..
We see the anchor and our hole on the frame... So everything is correct
We put the generator on and place washers between the frame and the generator (on the armature side) - you can tighten it, BUT I wouldn’t recommend it
Now we estimate by eye how the belt will stand (Or install some kind of elastic band to accurately mark the slot locations and make the necessary margin (10-15 mm)), make markings on the right side of the crankcase and make slots for the belt (I advise you to do it with a margin, the stiffness you you won’t break it in any way, but if the belt gets loose, you’ll tear the belts and swear at this project in bewilderment)
We did it - well done, now the hardest part
Belt installation:
To make it a little easier to fuck with this process, I recommend heating the belt on the battery a little (it will become softer)…
Now, with the help of a screwdriver and a sidekick behind the kick, we try to throw the belt on - the first time it will be difficult, but you just need to get used to it (we rode on 1 belt every day for 2 months. We replaced it because it stretched)
And so you threw the belt, now turn it with a kick a couple of dozen times so that the belt takes its place (If it turns over, it’s not scary, after it stretches a little you can turn it over and increase its resource)
Now we try to try on the right cover and make slits if necessary
We put on the wiring according to the diagram and are glad that we have a charger...
Now BSZ:
We are looking for a piece of plastic and driving it into the cover at the place where the contact protection is attached (let it be a 3K) and fasten it with screws, having previously drilled holes for the bolts, DC and the CV (Crankshaft) terminal.
We connect the wiring and put the switch in the right glove compartment... we cut it according to the diagram and connect the output to the DH to the DH itself, this whole structure hangs on the right cover - now you can tighten it and replace the screws securing the air filter with the studs for mounting the air filter on the carburetor of VAZ series cars, install the lock nut add washers if necessary
Now we put the bar on a standard screw (Screw-bar-washers (if necessary)-cam shaft)
and adjust it, set the OZ and try to start it.
Started up? — Excellent, that means you assembled everything correctly, feel free to install the seal and tighten it onto the nuts from the same filter...
EVERYTHING, the system is assembled and working...
Don’t forget to change the belt regularly (once every season or two) and monitor its condition
How to set the ignition on Izh Planeteka 5 without a micrometer
Ignition configuration on the IZH Planetka 3, 4 and 5 model.
To find out when the opening begins, use a light bulb. To do this, you need to connect the light bulb with wires from the textbook to ground, and connect the other wire to the terminal. Then you need to turn on the ignition of Planet 5. The engine should start when the contacts open - this will be indicated by a burning light.
See:
Having slightly unscrewed the bolts to install the ignition on the Planet, you need to turn them all the way (and clockwise). The light bulb will not shine here. Then slowly turn the contacts again, in the opposite direction, until the light comes on again. At this moment a spark should appear. So, of course, regulate the ignition of the Izh Planetka.
BSZ on IZ Jupiter 2 6volt, part 1
We roll on, it became boring to do nothing, on forums and social networks I read about Contactless Ignition System.I WILL SAY RIGHT AWAY: EVERYTHING WORKS ON 6 VOLTS
(new)
BOARD NETWORK
.
Many people have a question whether it will work on a 6 volt on-board network, because all the components in stores are for a 12 volt on-board network.
I took a break from the Internet, I found articles where YAVISTS installed this system on their motorcycles and it worked, information was provided there that almost all components start working from 5.5 (6.0) volts. I saw the same thing in the instructions for them.
So let's start collecting!
There are several options:
1) we buy ready-made parts (VAZ automobiles);
2) we collect everything ourselves (from A to Z);
3) we buy a complete set, just install it.
DETAILS ABOUT EACH:
1) we buy ready-made parts (Automotive “automotive industry”);
let's go to the store and buy:
1) Hall sensor from VAZ cars (Hall sensor, in Africa it is also a Hall sensor from any model, only the mountings are different)
2) Switch for electronic ignition VAZ (I recommend VTN 0529.3734. It is more expensive, but much more reliable, tested by many short circuits. I had an ASTRO and burned out at the first short circuit, and I almost forgot, almost everyone is afraid of the battery terminal falling off . VTN no.)
3) Silicone high-voltage armored wires with rubber caps:
4) A coil from Gazelle 406 or from OKI (two-output) (if it does not have the inscription “+” or “-“, then when connecting it does not matter how you connect + and -)
5) VAZ wiring for BSZ (we come to the store and ask for it for VAZ 2101-07 and VAZ 2108-09, no difference in principle. You can assemble everything yourself, but it’s just a waste of time!)
TYPICAL CONNECTION DIAGRAM
modulator drawing (metal)
——————————————————————————————-
——————————————————————————————-
2) we collect everything ourselves (from A to Z)
What can we say, the option is very complex in technical terms (parts, time, time again, but it seems to be the cheapest)
1) in place of the hall sensor you can assemble or buy (on the Internet, on social networks there are guys who sell them)
or
here is a site with a detailed description (I have one!) https://www.motoizh.ru/index.php?option=com...=article&id=656
2) The switch can be assembled according to various schemes
more details at:
https://www.twowheel.nm.ru/
in the section: Electronic ignition with Hall sensor
3) but you still need to buy a coil and armored wires too
assemble according to the diagram presented above
——————————————————————————————-
——————————————————————————————-
3) we buy a complete set, just install it.
No comments, just a lot more expensive than the first two points!
Differences from the second Planet
For many modern citizens, the information that domestic motorcycle manufacturers worked tirelessly to improve their models in an era of total shortages may come as a surprise.
Note! The fact takes place, moreover, it is supported by official documents, in particular 1970N04P16-17 - this is the outgoing number of the factory newsletter, which described the changes made.
In the photo - official materials of the Izhmash Design Bureau
The new generation motorcycle received:
- Direction indicator lights are a first in domestic practice;
- Semiconductor relay for controlling direction indicators (installed in the headlight);
- New size of wheels and tires (3.50x18 versus previous - 3.25x19);
- New brand increased capacity battery (old one on IZH Planet 2 - ZMT-6);
- And, of course, more engine power. The power unit now developed 18 hp.
Modifications
But the creator engineers did not stop there and, having released the five-millionth car from the production line, presented a modification of the IZH Planet 3-01.
Mirror and safety arches are the distinctive features of the new modification
Among the innovations it should be noted:
- Rear passenger footrests;
- Roll bars;
- Rearview mirror;
- New steering wheel design.
For reference: The buyer paid for the changes out of his own pocket. In particular, the price for IZH Planet 3-01 was 750 rubles, the version with a stroller was 1140, and the “rural version” was even more expensive. Fortunately, care instructions were included with purchase, which made maintenance easier.
IZH Planet 3-01 with wide wheels of smaller diameter - “rural version”
Distinctive features of electrical equipment
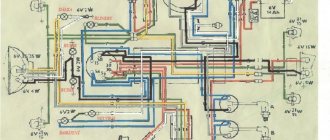
The wiring diagram used on IZ Planet 3 was traditional, and the main parameters of the electrical equipment are presented below in the table.
| Ignition system | Battery, ZMTR-10 |
| Mains voltage | 6 volts |
| Electricity source | Generator G-35M7 (later replaced by a modified G-36M8), 45 W |
| Ignition coil | IZH 56 |
| Voltage regulator relay | IZH RR-1 |
| Electrical wiring IZH Planet 3 | Single-wire, with “-” output to ground |
Colored original diagram (clickable)
Lighting devices
The following lighting devices were installed on the IZH Planet 3 motorcycle:
- Left and right direction indicators with A6-6 lamps;
- Turn signal switch P201;
- Turn signal relay RS-419;
- Brake light bulbs A6-15;
- Side light bulbs A6-2;
Appearance of instruments and controls
- Light mode switch with sound signal button P200;
- Transmission position sensor (neutral) with warning lamp A6 0.25;
- Headlight lamp A6-32+32;
- Indicator lamp A6 0.25 generator operation;
- Side light lamp A6-2 (front);
- Speedometer scale illumination lamp A6-1;
Headlight and direction indicators
Attention! For lovers of the “original” and authenticity, the photo below shows the “native” black and white wiring diagram of IZH Planet 3 with a breakdown of all the elements.
For connoisseurs of “antiques” - the original diagram from the instruction manual
Lighting devices for models with a stroller
Added to the existing list:
- Stroller brake light lamp A6-15;
- Stroller size lamp A6-2;
- Right direction indicator for stroller A6-6;
- Front side light of stroller A6-2.
Option with stroller
Note! The standard wiring of the IZH Planet 3 provided for disconnecting the sidecar for operating the motorcycle without it in a two-wheeled version. At the same time, the connecting terminals required care.
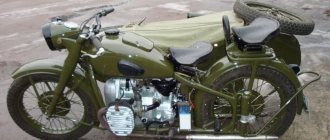
This is IZH Planet 3 - a symbol of the era of the seventies. If it's still collecting dust in your shed or garage, repair it and hit the road. Believe me, it will give odds to modern scooters in terms of reliability and endurance. Good luck!
A short article about installing a contactless ignition system on Izh-Planet or why I decided to abandon the magneto... And it all started with the carburetor. K62. Severely worn, but quite functional in appearance, it categorically refused to work normally. Normal is when there are good, stable low revs and smooth, confident acceleration. For me it’s the other way around - stable rpm is when it’s more than 1000, and instead of smooth acceleration there’s some kind of continuous jerking. I washed it probably 5 times. I looked for air leaks. The needle was raised/lowered. The level changed. I changed/flushed the jets. The UOZ was turning. The filter was changed. I changed the spark plugs. In short, he did everything except dance around with a tambourine. When I came home from the garage in the evening, I didn’t even think about sex. I even wanted to take the honestly earned 1000 rubles out of my pocket and give them for a brand new K68I, when suddenly the thought of a tractor magneto that provided the engine with a spark came to me. What if all the troubles are because of him? Now, every time I climbed into the carburetor, I looked suspiciously at the magneto, consoling myself with the fact that a spark is a spark in Africa. The last straw of using the magneto was that on the next ride through puddles in the forest I stalled. Just a glass of water from a good puddle from the front wheel put the motorcycle out of action... In general, it was decided that it was necessary to install a classic BSZ. Moreover, of all the components I only needed a hall sensor; the rest (coil, BB wires, connectors and switch) had accumulated over the past years. The only thing I wanted was that when installing the BSZ, I also had a magneto left, which can be used as an emergency ignition, for example, in the event of a generator or switch failure. There is no particular point in describing the circuit and installation. Everything has already been written and installed before me. True, I will say without hesitation that I was one of the first to write a normal article about BSZ on the website motoizh.ru 10 years ago. True, there are a couple of innovations in my BSZ. The first is the modulator. Not a classic disc with a cutout, but just a strip of steel bent into a semicircle and welded to the disc. The length of the strip in terms of degrees is equal to a sector of 120 degrees. The second innovation is a four-terminal coil from 2111. More precisely, I would say, these are 2 paired coils from a gazelle. There was simply nothing else available, and I didn’t want to spend money. Accordingly, only one coil is used. Moreover, one of the terminals of this coil is shorted to ground. There was an idea to put a second candle, as was done, for example, at Bros or VTH. But I didn’t want to remove the decompressor. In my opinion, there are also advantages to this design - you always have a spare coil with you. Well what can I say. After starting, I was simply stunned by how much the engine had changed. It works much softer and more stable. Idle speed was reduced by half. I can’t say anything about changing the smoothness of acceleration yet, since I need to put everything together and go for a ride. But even now I can draw conclusions: - spark is different - such crap as a tractor magneto is intended for tractors and has no place on a motorcycle. At the end of the post I have attached several photos and videos of the work.
In the video, by the way, you can hear a loud clicking sound. So, it’s not a finger, but a modulator strip that in some place touches the Hall sensor. You need to bend it a little.