It would seem that in our time, when protective headgear of any configuration can be freely purchased in a store, there is no need to go through the trouble of making a motorcycle helmet with your own hands. However, not all so simple. There are several quite compelling reasons to take up handicrafts:
- firstly, you will make the helmet according to your individual measurements, and it will fit you better than any store-bought one;
- secondly, if you are an experienced motorcyclist, then you probably have your own ideas about how to properly protect your head. You will implement these ideas by creating a new motorcycle helmet design;
- thirdly, a homemade motorcycle helmet can be given any configuration, no matter how bizarre, and it will be one of a kind, original and unique;
- fourthly, good models of helmets cost a lot of money, and by making a motorcycle helmet yourself, you will save some money.
Preparing for work
To make a motorcycle helmet, you will have to use very toxic, allergenic and hazardous materials. Therefore, it is better to work outside (in the warm season) or in a well-ventilated area, ideally under a hood. Be sure to stock up on a respirator, goggles, thin rubber gloves, a rubberized or oilcloth apron to protect your clothing, and a work cap or bandana to protect your hair from dust. Keep a container of clean, warm water near your work area so that if a toxic substance gets into your eyes or skin, be ready to immediately wash the affected area with plenty of soap and water. Before putting on gloves, soap or lubricate your hands with silicone cream.
For work, prepare the following materials:
- epoxy (polyester) resin - about 2 kg;
- fiberglass ASTT-6 - 5 m;
- fiberglass mesh - 2 m;
- high-quality leatherette - 0.5 m (an old or second-hand leather jacket is also suitable);
- a strip of knitted fabric or knitted elastic;
- three to four sheets of plexiglass;
- art plasticine or clay;
- wax mastic (you can take “Edelvax”), paraffin or vinyl alcohol;
- foam block or wooden block;
- several old newspapers;
- starch paste (a little bit);
- a large piece of flannel or flannel;
- M3 bolts;
- rasps and fine sandpaper (zero).
Individual features of the Predator model
Despite differences in production technology, all structural characteristics responsible for the level of safety are observed in each version.
The weight of the Predator helmet in the basic configuration is approximately 1,820 grams.
The kit includes light-colored protective glasses, and it is possible to install a molded protective mask. The space under the helmet is ventilated using a special two-channel system, which significantly increases the level of comfort.
In one of the standard versions, such a helmet has a size grid from XS (55-56 cm) to XXL (63-64 cm) and is made in matte black. It is decorated with 22 dreadlocks about 35 cm long and has a visor that must be opened with two hands.
Another manufacturer offers classic models weighing more than 2 kg, with 17-20 rubber or nylon dreadlocks, a double body with the possibility of reinforcement and a visor that can be opened with one hand. Different models of helmets are used as a basis; colors, decor and cost vary.
Making a motorcycle helmet
Before you make a motorcycle helmet, you need to clearly understand for yourself what you want it to look like. Don’t trust your imagination, but draw on paper, if not an ordinary, then at least a stylized drawing in three projections with the dimensions indicated. It makes sense to first study the design of the models you like in the store, look on the Internet for photos of helmets and reviews about their advantages and disadvantages. The more detailed your drawing is, the better the helmet will turn out. Please note that you only need to wear a closed motorcycle helmet: this model most reliably protects your head in case of accidents. Think about how the visor of your helmet should be: tightly closed or folding.
Making a Doodle
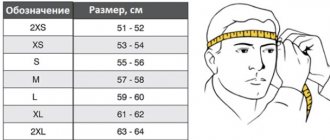
Be sure to measure your skull using pieces of bent wire. Take three measurements: the first - around the circumference of the head, the second - from ear to ear, the third - in the center of the head, from the back of the head to the nose. We do not unbend the resulting wire, but transfer the contours onto whatman paper, so that later, using the three resulting arcs, we can carve out of wood or polystyrene foam, or fashion a mannequin for a helmet from artistic (hardening) plasticine - the so-called “dummy”. To avoid carpentry work, you can do it easier and take a three-liter jar as a base, and sculpt plasticine on it, forming a blockhead. Be sure to deviate 2 cm from the measurements received. If you have a large nose, then the front allowance should be even larger, so that subsequently the tip of the nose does not rest against the visor.
Make some paste and cover the blockhead with small pieces of old newspapers. Do you remember how in childhood you made papier-mâché during labor lessons? This is it. Two or three layers are enough. Rest a little and let the papier-mâché dry thoroughly, but for now, think for the last time about the design features of the helmet: there will be nowhere to retreat further. At the same time, you can cut the fiberglass into small strips that you will use to cover the helmet shell.
Making a motorcycle helmet shell
When the papier-mâché has dried, cover it with a thin layer of paraffin, vinyl alcohol or mastic: this will make the finished motorcycle helmet easier to remove from the dummy. Now the most important stage begins - the formation of the shell of our helmet by pasting the blockhead with strips of fiberglass soaked in epoxy glue. This work requires special care. Take your time, take a stiff brush and carefully coat each strip with epoxy, and then glue it to the blockhead, remembering to smooth it with a gloved hand and a brush. Each subsequent strip of fiberglass should overlap the previous one by 1.5–2 cm. Omissions are unacceptable, otherwise the shell of the helmet, instead of a perfectly smooth shape, will end up resembling a lunar surface riddled with craters. Five meters of fiberglass should be enough for six layers of coating. Now it’s the turn of the fiberglass mesh, whose task is to finally level the shell. You must glue two layers of fiberglass mesh, and smooth it especially carefully so that there are no bumps or folds.
Epoxy resin takes about 48 hours to dry. Just in case, give your helmet a “rest” for three days: you are “sculpting” a real work of art, and there is no need for haste. After the epoxy has dried, bring the motorcycle helmet with your own hands to perfect smoothness by treating it with sandpaper and rasps. Dust from fiberglass is prickly and especially nasty. While working, take care of your eyes (wear glasses), respiratory organs (breathe through a respirator) and hair.
At the next stage, our perfect shell is in danger of being scratched. So wrap it up in flannel. We will make a helmet visor. Absolutely anything can happen in life, and in order to avoid problems later due to a split visor, don’t be lazy and make three or four visors. Believe me, you will need them!
We take plexiglass, heat it over the flame of the stove, press it tightly through a piece of flannel to the front of our shell and hold it until the plexiglass hardens. If you don’t succeed the first time, don’t worry, just repeat the procedure again, high-quality plexiglass should withstand this.
Now the shell should be removed from the blockhead. It is quite possible that during the formation of the shell, some of its sections were firmly stuck to the surface of the blockhead. If the shell cannot be removed, pour warm water into the cracks between it and the blockhead, which will melt the wax mastic or paraffin. You can also use thin wedges.
When the visor is ready, we make a pattern according to our drawing, apply it to the front of the shell and cut out a hole. In an integral type helmet, the visor is attached tightly, without the ability to lift it. This is not very convenient, but the implementation of this option is quite simple. We take six M3 bolts with thick rubber gaskets, in which holes are made for ventilation, and fasten the visor. Now all you have to do is paint your motorcycle helmet with high-quality enamel.
You may find that the ventilation ducts on the sides of the visor are not enough. In this case, you can make several holes in the forehead and back of the head. But don’t overdo it, otherwise you’ll simply be blown away. Before making a motorcycle helmet, study the organization of the ventilation system in the models of motorcycle helmets that are considered the best.
Sewing a balaclava
During those three days while the shell was drying, you had time to sew the liner. Remember our wire arches? The main part of the balaclava is a leather hoop, sewn to the size of the skull circumference with a small allowance. Two crossed straps rest on it, forming a dome. Two more straps, sewn on the sides of the head, descend from the hoop down to the chin: a buckle is attached to one of the straps, and holes are punched in the other. Velcro fastening is also possible.
It is recommended to first only sweep away the liner, and finally sew it only after trying it on inside the helmet. The hoop and the dome-forming straps are glued to the inner surface of the shell. If you wish, you can cut out and sew a removable lining from microfiber, which will be attached to the helmet liner straps: microfiber does not float and allows the body to breathe. A padded helmet is comfortable in both cold and hot weather.
To prevent insects and road dust from getting under the helmet, be sure to sew a “skirt”. To do this, take an elastic knitted or knitted strip, thread a lace along its entire length, and then attach it to the lining at the base of the helmet. The “skirt” will become dirty and soaked in sweat over time, so it must be removable.
Now you know how to make a motorcycle helmet of the simplest design. Don’t be afraid to experiment with the shape and thickness of the shell (although do not forget that it should not be heavier than one and a half kilograms), visor, balaclava, ventilation system. It is quite possible that your homemade motorcycle helmet will surpass the most expensive models from well-known companies in quality and ergonomics.
Manufacturer Features
Currently, each manufacturer produces helmets using its own technology. All products are different from each other and have individual characteristics. The general rule for everyone remains reliability, a high degree of security and compliance with quality standards.
In the model range of some manufacturers, there are exceptions among the standard types of motorcycle helmets.
For example, one of these options is a transforming helmet, the main feature of which is changing the position of the jaw protection. The design of the product allows you to remove the chin bar to the back of the head, turning the helmet from a closed one to an open one.
A large number of manufacturers are working abroad on popular equipment and popular equipment, however, among domestic products there are also interesting models that attract close attention, for example, the domestic “Predator” helmet.
Installation of decorations
Another popular option for “tuning” a motorcycle helmet is the use of attachments. We are talking about various decorative fins, wings, tails, ears, mohawks, horns, etc. Such accessories really “revive” the helmet and attract attention to it.
However, such an upgrade should be carried out carefully. Accessories should be harmoniously combined with the design of the bike and the overall style of the equipment.
Also keep in mind that such design details look beautiful, but in terms of practicality this is not the best solution. For example, if you are riding with a passenger, then the tail fluttering in the wind will hit him in the face. In addition, some decorations negatively affect the aerodynamics of the equipment.
How to decorate a motorcycle helmet?
The easiest way to decorate a motorcycle helmet is with stickers. Various patterns, signs, logos or inscriptions will make the equipment more interesting and help hide minor defects.
But advanced riders who want to make their helmet unique should pay attention to airbrushing. This is an expensive pleasure, but such drawings look super realistic. The list of advantages of such tuning includes:
- Durability. Airbrush, unlike stickers, withstands bad weather (snow, sand, rain, etc.).
- Visual change of helmet parameters. The finest elements of the design and smooth transitions even allow you to visually change the shape of the equipment.
Although airbrushing has one drawback - the high price. Of course, you can make a stencil yourself and apply the image, but this will require practice.
Additional options for the Predator model
Optionally, such a motorcycle helmet can be equipped with LED and laser modules, which operate on batteries and are located on the right side of the product body. The elements have a red backlight and are launched using a button.
In addition, mirrored and darkened visors may be available as additional equipment, added to change the image and protect from the bright sun.
The appearance can be improved with the help of different colors, a combination of carbon and lacquered coating, the presence of designer engraving, airbrushing and colored tips on dreadlocks. It is possible to add spectacular fangs made of plastic or carbon fiber to the lower part of the predator’s helmet. Feedback on the use of such accessories is very positive; it adds courage and determination to the entire look.
Cost of the Predator protective helmet
The price of the basic professional model of the Predator helmet varies depending on the manufacturer and can range from 20 to 35 thousand rubles.
Additional accessories are not included in the price and can be purchased upon request. All masters and motorcycle studios include personal equipment in the basic and additional package, producing individual and almost unique helmets for each customer. By adding additional options, the product becomes spectacular, but the price increases significantly.
