Reasons for adjustment
They say there is no smoke without fire. This folk wisdom also applies to our case. There is no need to get into the carburetor unless there is a reason to do so. What reasons could there be? Here are the main ones:
- the spark plug always floods;
- The engine runs intermittently and stalls.
Also, carburetor adjustment is necessary when using low quality gasoline for a long time or the air element is dirty. Let's move directly to adjusting the Yamaha Jog carburetor.
First, thoroughly clean the carburetor.
We pay special attention to all channels where gasoline is supplied. If you have already gotten around to repairing the carburetor, then at the same time you can change the spark plug
In addition, we reproduce the replacement of the air element. After the above steps, we proceed to adjustment. Pay attention to the old spark plug, it can “say” a lot. White candle – a mixture of white, black and rich. This leads to excessive fuel consumption and channel contamination.
Why adjust the carburetor?
- In case you notice a change in the color of the candle or it is not functioning well.
- When your scooter engine loses power.
- The scooter cannot be started.
- Gasoline consumption has increased.
If you notice one of these breakdowns, then do not rush to buy a carburetor for a Yamaha jog , it can be simply adjusted and configured correctly. There can be many reasons for the deterioration of the scooter's performance, such as poor quality of the mixture, poor fuel, etc. You can see more detailed reasons on our website, and we will return to adjusting the carburetor.
How to clean the carburetor on a moped - step-by-step instructions
Cleaning is necessary if a lot of dirt and condensation has accumulated. To ensure that this procedure is not necessary, it is advisable to disconnect and disassemble the carburetor. If it is clogged, it is useless to perform adjustments.
First, turn off the fuel supply valve, then you need to disconnect the fuel and drain hoses from the carburetor.
Next, you need to disconnect the inlet pipe from the carburetor, then unscrew the throttle valve cover and remove it from the carburetor. Now the part is held in place only by two bolts, which can be unscrewed with a 10mm wrench. That’s it, the carburetor has been removed. It is advisable to disassemble it on a white table so as not to lose small parts.
Next you need to disassemble the carburetor. First, unscrew the bolts located on the carburetor body. After this, the protective cover will be removed.
Next, the float chamber is pulled out; it is held on one pin, which is removed from the grooves. It can be removed without using tools. Together with the camera, a small cylindrical part with a cone-shaped tip will be removed - a shut-off needle, which is held between the float and the fuel supply channel
It is important to ensure that it does not fall on the floor and get lost.
Now, using a screwdriver with a straight bit, unscrew the jets, the idle speed adjustment bolt and the mixture quality screw.
The unit is disassembled, you can proceed to cleaning. First, attach the tube attachment to the aerosol canister for cleaning.
The accumulated liquid is poured out of the carburetor cap, then the internal cavity is treated with a cleaning aerosol. The jets are treated in the same way; the aerosol tube can be lowered into the recesses and holes. Then all the internal cavities will be cleaned, and all the accumulated dirt will come out. An aerosol with a nozzle can be used to treat all other carburetor openings.
Small holes need to be blown out so that there is no dirt there.
The cleaned parts are wiped dry with a cloth; it is important to wait until the applied aerosol has completely dried. Then assemble the carburetor in reverse order
It is difficult to make a mistake during assembly, since all the parts differ in size and are placed only in certain holes.
Disassembled carburetor of an Alpha moped
When installing a float chamber, first attach an element that shuts off the fuel supply through the hole near the jets. A pin is connected to the camera mount, after which the entire structure is placed on the socket. Next, the cover is mounted and the bolts are tightened. Tighten the mixture quality screw one and a half turns, then tighten the idle speed screw.
It is recommended to spray the assembled carburetor to keep it clean on the outside. Next, the part is put in its original place, first the fuel hose is connected. Then you need to open the fuel valve and wait a few seconds until the fuel fills. You can now start the engine, but it may not start or may be too loud. This means that adjustment is necessary.
You can learn more about how to clean the carburetor on an Alpha moped from this useful video:
How to connect a Yamaha scooter carburetor - detailed details
Experienced scooter riders rarely have difficulty connecting the carburetor, for example, after routine cleaning or other manipulations. But novice motorists may encounter a problem when, after removing all the hoses, installing them in the right place can be problematic. Several lessons will publish carburetor wiring diagrams for all major scooters. Naturally, these are three lessons on Japanese scooters Yamaha, Honda and Suzuki, as well as the basic subtleties of connecting Chinese and European carburetors.
Today we'll start with the Yamaha carburetor. At first glance, the layout of the parts is slightly different than, for example, Honda scooters, but the principle is always the same, you can’t fool physics, and no one has yet invented fundamentally new carburetors.
So, the figure shows a typical carburetor that is installed on most Yamaha scooters, in particular Jog, Aprio and other models that are so popular with us. Look carefully, most likely this is the model you have installed.
Now let's look at all its elements in detail. For details we will use 2 diagrams. On the first, you will visually determine how to properly connect a Yamaha carburetor, and on the second, you will become more familiar with all the elements using a drawing.
- This is a starting enrichment. Attached to the carburetor body with two bolts through a rubber seal. The enrichment unit is powered by the scooter's 12V power supply. As everyone already knows, it is needed for cold starting of the scooter, since a cold scooter needs a richer mixture.
- Fuel supply fitting. Names here you need to connect the gasoline supply hose.
- The same bolts that secure the enrichment unit. To remove it, simply disconnect the power supply to the solenoid valve and unscrew these two bolts.
- Mixing chamber cover mounting bolt. By unscrewing it, we gain access to the throttle. Can raise or lower the needle, replace the throttle cable. When cleaning the carburetor, it is necessary to remove the throttle.
- Connector for connecting the enrichment unit to the network. It has two wires. Green goes to ground, yellow - power from the generator. But usually polarity is not important. To test the enricher, you need to apply voltage to it from the battery (again, polarity does not matter). Within a few minutes, the enrichment needle should come out along with the rod by a few mm.
- Connection fitting to the air filter. This is where the rubber elbow from the air vent is put on.
- Screw the quality of the mixture (I think everything is clear here). If you twist it clockwise, the air supply decreases and the mixture becomes richer.
- Float chamber mounting bolts, there are 4 in total.
- Idle speed screw. The more we tighten the screw, the higher the idle speed and vice versa.
- Connection fitting for the engine oil supply hose. It is the smallest in cross-section, it is impossible to confuse it.
- Connection to the atmosphere. There is no need to wear anything here, leave it as is.
- Hose supply from the vacuum tap.
The principle of operation of ignition in a 4-stroke scooter engine
Modern scooters are equipped with contactless systems. They are considered the most reliable and easy to use, do not require complex connections, and provide a constant good spark on time. However, the setting is still important; even the presence of a spark does not always allow the fuel mixture to ignite, since its power also plays a role.
The main reasons for the operation of the ignition system are quite simple: its task is to create a spark to detonate the fuel mixture. If this does not happen, you need to carefully examine each node and find out why the spark disappeared.
- In order to check whether there is a spark at all, you need to unscrew the spark plug and apply it to the engine ground; this can be done using metal objects that are not covered with paint. You cannot hold it with your hand: if there is a spark, it can give you an electric shock, and the discharge reaches 40,000 volts, which the coil creates.
Broken ignition is the cause of engine failure
An incorrectly configured or faulty ignition often causes engine failure. It would be wrong to immediately climb into the cylinder and examine the insides of the scooter, especially since this will not solve the problem. Before touching the ignition system, you need to check for other reasons why the scooter may not work.
- The simplest thing is the lack of gasoline in the tank. Quite often, owners forget to refuel their vehicle, and such a trivial reason can be overlooked.
- The carburetor may be clogged, which prevents the formation of a mixture suitable for driving.
- The carburetor needs to be cleaned regularly, so it doesn't hurt to check whether fuel is flowing from it into the cylinder. It is possible that the fuel pipe is clogged. The jets and other parts of the device may become clogged with debris, which causes little fuel to flow or, conversely, the engine does not have enough air, and therefore it does not start.
- The scooter may also refuse to start if the fault is caused by spark plugs. They may be wet or not produce a normal spark. It is advisable to have a spare set and check with it. In any case, the spark plug needs to be unscrewed and inspected.
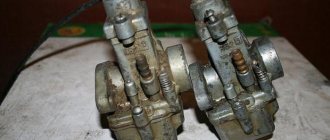
Yamaha Jog Carburetor Disassembly
- First you need to disconnect the gasoline hose, after preparing a separate tank of fuel.
- Next, you need to remove the main screws - the throttle and the mixture quality.
- The next step will be to remove the main parts - throttle, diffuser and spring.
- It is also necessary to remove the starting enrichment and float chamber.
Below is a diagram of the parts of the Yamaha Jog carburetor, shown in disassembled form.
If you have disassembled the carburetor, then you need to clean the channels and other parts. Cleaning a standard carburetor is discussed in this article: how to clean a carburetor. But what kind of adjustment is needed for this carburetor?
Adjusting the Yamaha Jog Carburetor
Let's say you've cleaned your carburetor and are ready to tune it. Reassemble everything in reverse order and start your scooter. In order for it to work at idle speed, you need to adjust it with a screw on the carburetor. On a Yamaha jog it is in a straight position, the slightly tilted screw is responsible for the quality of the mixture. First you need to tighten both screws to the maximum possible position. Next, unscrew the speed screw to the frequency you need (listen to the engine and if the wheel does not spin, but the scooter is running, the idle speed is set) and at the same time unscrew the mixture quality nozzle, but this should be done no more than ¼ of a full turn.
What to do if the carburetor is not adjusted?
If you've followed the above steps correctly and it doesn't help and your scooter feels rough, chokes, and misfires, you need a little more adjustment. It is recommended to unscrew the mixture quality jet another ¼ turn and look at the result. Ultimately, you can disassemble the carburetor and find the spool needle. It will have to be lowered by one notch, but then there is a possibility of loss of power of the scooter.
If these recommendations seem too complicated to you, do not despair, because for everyone, adjusting the carburetor is a very difficult job and therefore it is impossible to guess exactly. But we will try to make the task easier for you by providing a video where a specialist teaches how to adjust a Yamaha jog carburetor.
How to set the ignition on a scooter
With minimal experience, but good theoretical knowledge, you can set the ignition yourself. To do this, you just need to strictly follow the instructions below.
The most important part of tuning is to find the correct position for the timing sprocket to sit. In order to find it, they use special marks that are applied at the factory when assembling the engine.
The desired mark looks like the letter "T". In this position, the piston is at dead center. This is the extreme position after which the piston will return back. You need to rotate the rotor until the protrusion on the crankcase and the letter “T” coincide. This can be done using your hands or a kick starter. An electric starter does not need to be used.
If the piston has only moved down minimally, turn it further until the marks line up. It's not always possible to get the right position the first time. After they match, you need to study the other marks: they are located on the timing star. Usually these are three points or holes that are located on the outside of the star. They form a triangular shape if you connect them visually
Notice that one point is larger than the others. After adjusting the ignition, it should be on top, and the other two marks should remain opposite each other
They must stand horizontally.
If the ignition is contactless, it is adjusted as follows. In order for the engine to run smoothly and correctly, you need to adjust the ignition of the mixture at the right moment. To do this, after all the tags are installed in the right places, you need to understand how the contactless principle works in general.
A special feature of the BZS is the presence of special sensors, a switch, and two types of ignition coil winding. When the sensor is closed using a rotor equipped with a magnet, a pulse is generated that enters the commutator, it pumps up the current coming from the generator and directs it to the primary winding of the coil. After this, the charge enters the secondary winding, where a high voltage is generated, with the help of which a spark appears, used to detonate the gasoline mixture. Adjusting the ignition is the alignment of the marks on the crankcase and the star. Usually you have to remove the valve cover.
After this you need to do the following:
- Labels are set in the manner described above.
- In order to set the ignition angle, you can release the stator mount and adjust it in accordance with the technical requirements of your vehicle.
- Make sure that the marks or holes are in the correct position.
Disassembling the carburetor
Remove the carburetor from the engine (see Removing the carburetor).
Use a screwdriver to unscrew the two screws and remove the microswitch.
Unscrew the screw...
...and remove the microswitch bracket.
Remove the spring from the air damper axle rod.
Unsplit the lower end of the air damper rod, remove the washer and disengage the rod.
We remove seven screws...
...and remove the carburetor cover.
There is a cardboard spacer between the body and the lid.
We disassemble the carburetor cover, for which:
Unsplint the upper end of the air damper rod, remove the washer, disengage the rod...
...and remove it.
Unscrew three screws...
...and remove the pneumatic corrector cover with the cardboard gasket and spring.
Getting out of gear...
...and remove the rod with the membrane.
Unscrew the screw...
...and remove the econostat sprayer of the secondary chamber.
After washing the removed parts in solvent, we assemble the carburetor cover. Then we move on to the float chamber housing, and last we disassemble the throttle body.
Unscrew two screws...
...and separate the float chamber housing from the throttle body.
There are three gaskets installed between them - plastic and two cardboard.
Disassembling the float chamber housing
Unscrew the plug screw...
...and take out the float axis with the washer, the float itself and the valve needle.
Using a socket wrench or a 10mm socket, unscrew the needle valve seat with the sealing washer.
Use a 22mm wrench to unscrew the screw...
...and remove the mesh filter from it.
Remove the fuel fittings and sealing washers.
We unscrew and remove the two fuel jets of the main metering system.
Unscrew the screw and remove the primary chamber sprayer with the washer.
We unscrew the two air jets of the main dosing system...
...and take out the emulsion tubes. The primary chamber has a longer tube.
Unscrew and remove the air jet unit with the emulsion tube of the idle system.
Unscrew and remove the air jet of the idle system.
Using the “12” key, unscrew the plug...
...and use a screwdriver to unscrew the emulsion jet of the idle air system from the recess.
In the same way, on the opposite side of the carburetor, unscrew and remove the air and emulsion jets of the transition system.
Tapping the plastic handle of a screwdriver on the small diffuser...
...knock it out of its seat along with the spring and gasket.
We remove the second diffuser in the same way.
Unscrew the screw...
...and remove the displacer from the accelerator pump channel. Below it is the accelerator pump ball valve. Turning the body over, remove the ball from the channel.
We turn the adjusting screw of the accelerator pump all the way, counting the number of revolutions. During reassembly, this will help restore the factory settings.
Unscrew and remove the adjusting screw with the rubber sealing ring.
Unscrew the four screws...
...and remove the accelerator pump cover with the diaphragm and spring.
A cardboard spacer is installed between the membrane and the lid.
Disassembling the throttle body
Unscrew three screws...
...and remove the forced idle economizer housing with the gasket.
We turn out the screw for adjusting the mixture composition (quality) ...
...and the operational adjustment screw (quantity).
Unscrew two screws...
...and remove the forced idle economizer valve from the body.
Unscrew the other two screws...
...and remove the cover with the sealing gasket.
Use a 6mm wrench to unscrew the nut...
...remove the membrane from the rod and remove the rod from the body.
Carburetor parts are well washed from deposits with solvents for nitro paints Nos. 646, 647, 647, 650, acetone or toluene, but contact of strong solvents with plastic or rubber parts is not allowed. Before assembling the housing parts, blow with compressed air and blow through the channels.
The float mechanism is adjustable by bending the tongue...
...up to a size of 10.75–11.25 mm between the top of the float and the upper plane of the float chamber body.
It is better to do this in a car, pumping fuel with a manual pump. This adjustment can be made without installing a carburetor on the car. To do this, you need to install the carburetor on a horizontal plane. We put a rubber gas-resistant hose on the fuel fitting of the carburetor, in which we create a slight excess fuel pressure using any available means, for example, a syringe. You can simply raise the end of the hose to a height of 30–40 cm and pour fuel into it through a funnel. This pressure will be quite enough to fill the float chamber and take measurements.
Adjusting the fuel level
The float chamber allows you to have a constant flow of fuel in the carburetor, which is always replenished, but it is important to remember that you cannot have an excess of gasoline in the float chamber. Gasoline is drained using a special hose coming from the chamber; you will have to check the amount of fuel with the engine running
Raise the hose above the carburetor as shown in the picture below and check the fuel level. It should not differ much from the mark indicated in the picture. There is a holder antenna located on the needle inside the float chamber; it can be used to regulate the amount of fuel inside the float chamber.
This is interesting: Recommendations that can help with the issue of sound insulation of a car
Please also take into account the fact that before adjusting the carburetor, you should only have high-quality gasoline with a normal octane number. Otherwise, you will have to completely drain the bad gasoline not only from the gas tank, but also from the float chamber; it must have a special drain screw.
A simple and effective way to adjust the carburetor (Views: 2)
Alexander Kr.
The mixture is rich. Composition 12:1. The spark plugs will be black when idling for a long time (when trolling, for example). I won’t say anything about CO.
—- Message added at 12:54 —- Previous message posted at 12:44 —-
Can you give an example? It seems like this has never happened.
And further. A feature of adjusting the carburetor at XX (in carburetors only XX is adjusted with screws) is the dependence of the mixture composition on both the position of the quality screw and the position of the quantity screw. Therefore, the adjustment technique is not the same.
Attachments
Alexander Kr.
Thank you for enlightening me about ejection.
The instructions in the attachment are as incomprehensible as most service manuals for some reason. First, the need for adjustment is assessed and the adjustment itself is made in response to a sudden release of gas. But this is true if the mixture was lean. What if you're rich? The engine will respond normally to gas. So, is everything okay? Secondly, it is not clear which way to turn and what should happen. If you don't understand how to adjust, you can wind it in the wrong place.
I suggest turning it so as to create a deliberately lean mixture, so that it is clear that it is lean (the revolutions have dropped, the engine stalls). Then create a rich one, and so that the person understands that it is now rich (the revs have dropped again, now from excess fuel). Then it will be clear at what position of the screw the mixture is optimal.
—- Message added at 17:45 —- Previous message posted at 17:36 —-
I wrote incorrectly about the Suzuki service manual. The second position of the screw is when the speed decreases again.
Alexander Kr.
Yamaha Jog Carburetor Disassembly
- First you need to disconnect the gasoline hose, after preparing a separate tank of fuel.
- Next, you need to remove the main screws - the throttle and the mixture quality.
- The next step will be to remove the main parts - throttle, diffuser and spring.
- It is also necessary to remove the starting enrichment and float chamber.
Below is a diagram of the parts of the Yamaha Jog carburetor, shown in disassembled form.
If you have disassembled the carburetor, then you need to clean the channels and other parts. Cleaning a standard carburetor is discussed in this article: how to clean a carburetor. But what kind of adjustment is needed for this carburetor?
Adjusting and tuning the scooter carburetor
Carburetor adjustment must be carried out on a warm engine. Before tuning, you should clean and rinse the carburetor if there are signs of clogging.
The following manipulations are understood as setting and adjustment:
1) Idle speed adjustment; 2) Adjusting the quality of the mixture with a special screw on the carburetor; 3) Adjusting the quality of the mixture by moving the needle; 4) Adjusting the fuel level in the float chamber.
Let's look at each of these elements separately.