Two stroke and four stroke scooter
A scooter, as you know, can be with a two-stroke or a four-stroke engine. The operating principle of the entire exhaust system differs radically among analogues.
The muffler on a four-stroke scooter removes gases in a relatively shorter time, doing this with minimal noise. In addition, tuning the muffler in this case will be quite simple. On the other hand, in both cases, when carrying out tuning, it will be necessary to change the pipes.
Types of mufflers for scooters
For the muffler of a two-stroke scooter, selecting components that make it possible to carry out tuning will be much more difficult. The standard muffler itself for such scooters is more difficult to manufacture and configure.
The exhaust system of a two-stroke scooter works as follows. During the process of cleaning exhaust gases, part of the power is returned to the engine. This happens at certain speeds and if you manage to implement this whole process by tuning, the scooter will be unrecognizable.
You can install a high-quality and correctly tuned resonator on a two-stroke scooter. This will give a noticeable increase in dynamics up to a quarter. But in this case, it will be important to carry out professional settings of the entire power system.
Element Benefits
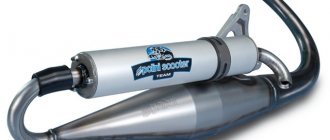
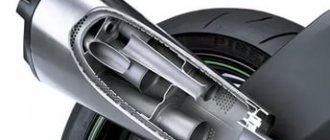
What is forward flow? This element is a device that is an excellent alternative to a standard muffler.
It is often installed on motorcycles and scooters, but in some cases, passenger cars are also equipped with this part.
Essentially, a tuning direct-flow muffler changes the exhaust system, thereby significantly increasing engine power. Such devices cost quite a lot, so among motorcyclists the question of how to make a direct-flow muffler with your own hands arises very often. Below we will tell you how to make this element of the exhaust gas system yourself.
Why do you need quality mufflers?
As you know, a certain amount of fuel combustion products accumulates in the cylinders of a moped engine. They must be thrown out and in this case it is the muffler that is responsible for this. In other words, this unit seems to smooth out the pulsations that are inevitable when combustion products are released at high speed.
The very design of the muffler, used not only on scooters and mopeds, but also on motorcycles and cars, implies a special exhaust system, which can be different, depending on what result the vehicle owner wants to achieve. For example, if the desire to improve the gas exhaust system is related to increasing the power of the scooter, a special type of muffler is required - a direct-flow muffler.
Direct flow type muffler
Direct-flow muffler device for moped
Installing this type of muffler will not only increase dynamic power, but will also significantly increase the noise emitted when gases escape. On the one hand, this is good, because this way you can attract the attention of other drivers, thereby increasing passive safety. As you know, drivers of large cars often complain that they do not notice motorcyclists, and mopeds and scooters even more so.
Making such a muffler from scratch or using a method that involves tuning is not difficult, but many technical aspects need to be studied.
Features of a direct-flow muffler
The features of direct flow are as follows: exhaust gases are ejected outside the engine immediately, the cylinders of the power unit have time to fill with the fuel mixture in the optimal amount.
I would like to remind all readers that at the moments of intake and exhaust, engine valves tend to open and close. Between these stages, a vacuum occurs, which allows the cylinders to be cleared of exhaust gases. As a result, free space is freed up, where the fuel mixture is supplied. It is easy to guess that the faster the cylinders are released from exhaustion, the faster they will be filled.
Thus, if you can ensure a faster exit of gases from the system, the performance and, as a result, the power of the scooter or moped will increase.
How to make an electric bike
If you don’t want to bother with a gasoline engine, there is another option - install an electric motor. It can be purchased or installed from another device. The first option for creating electric mopeds is preferable, since the engines already provide the necessary power.
Options for installing an electric drive on a bicycle are a wheel motor and a separate engine on a chain or belt drive.
The wheel motor differs from the usual one by the presence of a drive mechanism in the central part. It is connected to the control unit using wires. A significant advantage is the ability to make the bike front-wheel drive without making changes to the classic transmission. And if you wish, you can even install two motor wheels. Installation is quite simple, provided that the bike itself allows it. However, it’s a stretch to classify a bike with such wheels as a moped.
An electric moped, that is, an analogue of the one discussed above, is a completely different matter. Of course, an exhaust pipe will not be needed here - this is a plus both in terms of reliability and overall weight.
Assembling an engine from scratch at home will be problematic, so let’s look at how to install a ready-made shaft motor.
- Install a new sprocket and belt pulley onto the carriage axle.
- A shaft with a drive pulley is attached to the seat tube.
- The pulleys are connected by a belt.
- The shaft is connected to a power source through wires.
- Route the wires from the battery to the switch on the steering wheel.
The location of the battery is on the lower front tube of the frame or trunk. Electric motor operation diagram:
- When the electric motor is turned on, the rotating roller engages the rear tire tire, pushing it.
- The pulleys and front sprocket transmit torque to the transmission.
- Changing gear causes a change in torque output. At the same time, the rotation speed of the roller remains constant.
DIY electric bicycle:
Additionally, you can connect a second shaft to the front wheel by connecting it to the driven pulley of the main drive.
The engine allows you to reach the optimal speed faster and maintain it longer. A bicycle-based moped is a budget option to become the owner of a faster and more powerful vehicle. Transforming a bicycle into a moped in most cases does not make irreversible changes to the design, so it is possible to return everything to its place.
Cleaning the muffler
The cleanliness of the muffler affects the power of the moped
Before you start changing anything in the exhaust system, I would like to give one piece of advice. The power of the scooter is directly affected by the cleanliness of the muffler. If it were possible to see the exhaust in a cross-section of the muffler, the owner of the scooter would be very surprised. After a certain mileage, the scooter's dynamics decrease, and owners begin to look for the reasons for this, finding them in a complete rework of the standard muffler or its replacement.
The reason for the loss of power, meanwhile, may be hidden in the condition of the engine itself. This will help determine the specialist you should contact before tuning. But the most common cause of loss of dynamics is soot that clogs the muffler. In this case, it is recommended to carry out cleaning in three ways.
First method: mechanical
It involves cleaning the muffler section (it is done with a grinder). The inside of the muffler is cleaned of soot using a wire or cable. The section in the section is closed by welding.
Second method: chemical
It involves pouring water with some kind of cleaner into the muffler. For example, caustic soda is suitable for this purpose. This cleaning has the advantage that the appearance of the muffler will not be affected in any way.
Third method: heat treatment
The muffler is heated either on the scooter with a blowtorch, or dismantled in an oven or on a grill. It will be necessary to repaint the muffler only after it has cooled.
How to get the most out of a scooter with tuning?
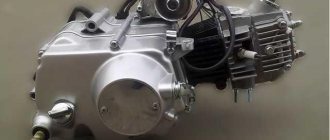
Scooter tuning is a fairly extensive process, but consists mainly of styling (improving appearance), chassis tuning (modifying driving characteristics) and engine tuning. The last point consists of many different operations that are aimed at increasing engine power, its better implementation and increasing acceleration and maximum speed. Below we will consider modifications to the engine and transmission.
It’s worth noting right away that the scheme is general and suitable for Italian, Japanese and Chinese models. Those who doubt the quality of Chinese scooters should be reminded that the level of production of modern models from the Middle Kingdom has increased significantly over the past 10 years, and most of the spare parts on the market for all models are from Chinese manufacturers.
There are many ways to speed up your scooter and, first of all, they depend on the current technical condition of the unit. Let's take, for example, an old scooter with an incorrectly configured variator, a clogged air filter, a dirty carburetor and a number of other problems that arise when the equipment is not properly maintained. Such an engine has great potential, but it can only be realized after proper tuning. After thorough cleaning and adjustment of all systems, even standard engine performance will seem like a significant improvement.
It follows that any work aimed at improving driving performance must begin with a complete revision of the engine.
Removing factory limiters is a very popular type of tuning and quite simple. Most of the Japanese equipment and similar Chinese equipment comes from the factory with special limiters that do not allow the engine to operate at full power. Fortunately, you can get rid of restrictions in any garage, and any tuning of a scooter with your own hands begins with the elimination of such restrictions.
When childhood illnesses are over, it is worth paying attention to real tuning, namely, improving or modifying existing components and assemblies. We are talking, of course, about the cylinder-piston group, carburetor, muffler, variator, air filter and ignition system
At this stage, the degree of involvement in improving a particular element depends on the budget. If funds are limited, then we will make the most of the existing set by modifying the described units.
If you have a certain budget for tuning, you can go the route of replacing parts with special tuning ones. Special parts designed for such modifications automatically improve the basic characteristics of the engine, plus they are designed for higher loads. We have figured out the general scheme of improvements, and below we will look at how tuning occurs, using examples of specific components.
Muffler conversion
As a rule, many craftsmen not only assemble a muffler, but remake a standard one. This makes it possible to spend less time and get a more acceptable option.
Tools and materials
Before you start tuning, you need to prepare the necessary tools. In this case, the following components will be needed:
- Welding machine, preferably with different operating modes;
- Pipe of appropriate size and diameter;
- Bulgarian;
- Several metal brushes for washing dishes.
Let's start tuning
First we dismantle the muffler. Then we take a grinder and cut out a piece of metal on top of the muffler. With this cut it will be much easier to work with the muffler. You should almost completely cut out the top part. After this, it is necessary to clean the entire internal space of the muffler, dismantling the cut-away elements.
It's time to work with the piece of pipe that we have prepared. Using a powerful drill or welding, we make many holes in the pipe. We place the pipe in the section of the standard muffler. We select in advance a pipe of such a diameter that it fits inside the standard one. It is desirable that the pipe be without any obvious flaws and perfectly straight.
Straight-through muffler in the process of assembly
The space in the cut that remains between the two pipes must be filled with metal pipe cleaners or similar materials. We weld the top of the pipe as it was. We reinstall all structural elements that were dismantled during the process.
As a result of the tuning, we will get a forward flow muffler that provides the desired result. The massive and rich roar of the engine, as well as the increase in power of the moped, will be evidence that everything was successful.
Making a direct-flow muffler from scratch
You can make such a muffler from scratch. This will be a completely new version made from several components. The difficulty of this operation, called tuning from scratch, lies in finding the diagram of the exhaust system of a particular moped.
Tools and materials
In this case, again, you need to prepare the necessary tools and materials.
- Purchase in a store or find two pipes with a diameter of 33 mm;
- Buy plexiglass;
- Bolts M8 and M3;
- Prepare glue and nails;
- Welding machine;
- Needles;
- Hacksaw for metal.
Let's start assembling
First of all, you need to cut 18 cm from one of the pipes. It is recommended to carefully process the place in the cut with a needle file. From the second pipe we cut a circle with a diameter of 1.5 cm. We process it using the method described above. Glue the cut out circle in the section of the first pipe. We cut off another piece of pipe, 18 cm long. We make many holes in it. This can also be done with a sharp nail.
We connect all the parts using a welding machine. We fill the cavity formed at the junction of two pieces of pipe with mineral wool. We wrap the finished product with a special fire-resistant material. The homemade muffler is ready. To install it, you will need to attach the element to the scooter body mount.
Making a muffler mounting element
From plexiglass, which is indispensable in this matter due to its strength and easy paintability, we cut out a special type of ring, the edges of which can be bent outward by 180 degrees. We attach the resulting circles with serifs to the moped using the required bolts. We polish the muffler using sandpaper. To be sure, the joints between the homemade product and the moped body will need to be lubricated.
Homemade muffler for moped disassembled
If homemade production causes certain difficulties, you can find a lot of models of mufflers already in finished form. They are usually inexpensive. On the other hand, only a homemade version can provide the ideally expected option.
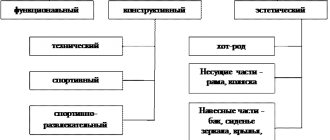
Appearance tuning Minsk
Every Minsk 125 owner has at least once thought about the appearance of his motorcycle. Perhaps we should start by repainting the frame and other parts of the motorcycle. The first thing to do is remove the handlebars, seat, tank, engine, wheels, fork and other parts to leave a bare frame. Sandblast the parts to be repainted or remove the old paint layer using special attachments for an angle grinder/drill. An attachment on a drill for an emery wheel with Velcro is also very effective for this. Be sure to get rid of pockets of corrosion. The next stage is puttying. This is necessary to get rid of deep scratches and level the surface. Parts with a leveled surface are degreased to prepare for priming. Apply primer in 2 layers. The dried soil should be sanded with 400 grit sandpaper. Then we paint it in the color we like in 2-3 layers, followed by a layer of varnish in 3 layers. The metallic color on your Minsk 125 motorcycle will look very impressive.
The next method of tuning Minsk is polishing the engine crankcase to a mirror finish. This procedure can also be done with your own hands using a set of sandpaper with grit from 120-180 to 2500. By sanding the surface of the engine in steps from coarse to finer, you will achieve an ideal matte surface. At the end of this work, use GOI paste, a felt circle and a drill to achieve the final mirror surface. The Minsk motorcycle engine will immediately be transformed!
This procedure applies to the rims, spokes and muffler - this will help them shine in a new way.
New road tires would be a good investment. The new tread pattern is not only effective when driving on wet asphalt, but also looks attractive. Replacing lighting equipment will also appeal to everyone. For example, LED turn signals and brake lights will not only give a modern appearance, but will also reduce the load on the generator, and will also increase road safety when driving at night. Separately, it is worth noting the efficiency of xenon installation. The recommended heat of light is 4300k as it is the most neutral white light, does not cause eye fatigue and provides the best illumination. A useful tuning in Minsk will be the installation of new chrome mirrors, which will also significantly increase riding safety and complement the transformation of the motorcycle. In conclusion, I would like to note that these tuning actions can be carried out selectively at will and combined according to your taste and financial capabilities.