MY MOTORCYCLE
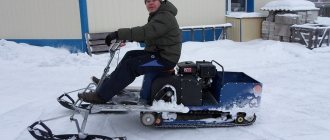
“ZDK-175 4ShP” was the name given to a new vehicle in Kovrov in 1992, prepared for production at the plant, which is still known as .
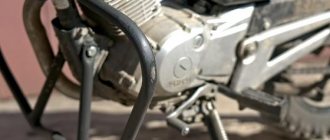
Abroad, such “four-wheelers” are quite common and popular, especially among farmers. As written in the operating instructions, “the motorcycle “ZDK-175 4Sh P” was intended for use in off-road conditions, sandy, snowy, swampy, rocky terrain, on roads with various surfaces, alone and with a passenger, as well as for transporting goods (towing a trailer) and performing agricultural work with implements.” The engine is from Voskhod-ZM01, slightly derated to obtain a more favorable torque characteristic (“high-torque”); in the main gearbox, a pair of third gear gears have a different number of teeth for the same reasons. Cooling - forced air supply (fan).
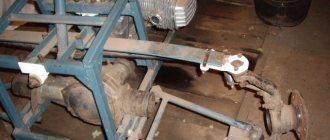
Torque is transmitted to the rear axle by a chain. The chain tension is adjusted using rollers. The rear axle is continuous, rigidly mounted on a tubular frame. In addition to the differential with the possibility of its mechanical locking, the rear axle has a mechanism that allows you to engage upshift or downshift, as well as reverse gear. From the rear axle gearbox comes a power take-off shaft to drive various auxiliary mechanisms. Torque from the axle shafts is transmitted to the wheels through wheel reducers. The front wheel suspension is independent, single-lever with serial spring-hydraulic shock absorbers.
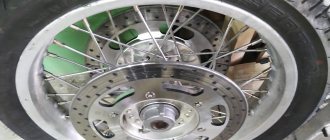
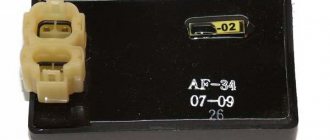
As on cars, wheel toe is adjusted by changing the length of the tie rods. The motorcycle has a rather complex braking system. The drive is mechanical and consists of several elements. The central distributor ensures a constant ratio of drive forces to the front and rear circuits. The brake design includes insurance elements in case of failure of one of the circuits; one will always work. A parking brake is also provided. The machine can be used on public roads, so it is equipped with a full set of lighting and alarm devices. In general, the electrical equipment systems, and ignition systems in particular, are almost no different from the Voskhod ones.
Technical characteristics of “ZDK-175 41PP” General data: weight (dry) - 222 kg; maximum load on the motorcycle (driver, passenger) - 200 kg; maximum towed trailer weight - 375 kg; maximum speed - 40 mph; maximum speed with a trailer - 20 mph; control fuel consumption per 100 km at a speed of 30 mph - 4.5 l; braking distance from a speed of 30 km/h is 8.2 m; minimum turning radius is 2.5 m.
Dimensions, mm: length -2150; width - 1050; height—- 1200; base - 1200; ground clearance - 180; gauge - 800.
Engine: type - single-cylinder, two-stroke, carburetor with crank-chamber return-loop scavenging; cylinder displacement - 173.7 cm3; cylinder diameter - 62 mm; piston stroke - 57.6 mm; maximum effective power at 5000 rpm - 8D (11) kW (hp); maximum torque at 3200 rpm - 18.7 (1.9) Nm (kgm); Engine cooling is air, forced.
Power transmission: motor transmission - chain (44 links); clutch - multi-disc, in an oil bath; gearbox - three-shaft, four-speed, in the same block with the engine; clutch control - manual; gearbox control - foot; transmission from the gearbox to the rear axle is chain (100 links); the rear axle includes a range, limited differential, wheel gears, reverse and power take-off shaft with sprocket; rear axle control is manual. Chassis: frame—tubular, welded; front wheel suspension - transverse single wishbone; brakes - drum type; brake control - foot control with mechanical drive on 4 wheels, manual with mechanical drive on the front wheels.
Source: mmoto.tk
DIY ATV frame drawings
The false tank has a complex shape. It was not possible to bend it out of hardboard. Therefore, having wrapped the engine with plastic film, I began to fill the space intended for it with layers of polyurethane foam. After each layer, drying is mandatory, otherwise the thick volume of foam may not dry out inside. Filled until the layers went beyond the contour. Finally, after the foam had completely dried, I began to draw out the desired shape with a knife. The edges were smoothed with coarse sandpaper.
Part of the Oka dashboard was used under the instrument panel. I secured it to the blank also using polyurethane foam. Since the foam is large-porous, the pores were filled with gypsum and then processed. When the shape of the blank began to correspond to the intended design and its surface became more or less smooth, I coated the blank with PF-115 paint. Since I was not going to make a matrix for gluing the body kit on the block, but immediately glued the body kit on it, followed by finishing the surface to an ideal state, putting plaster and painting the block could be neglected.
So, the blockhead is ready and to glue a high-quality product, it was required: 10 kg of epoxy resin, 1 kg of plasticizer for it and 1 kg of hardener, 15 linear meters of thin fiberglass fabric, 5 m of glass mat, brushes, gloves. It is highly advisable to wear breathing protection. And the more expensive they are, the more reliable they are. But, as you know, you can’t buy experience, so I gained it in the process of work.
I used transparent tape as a separating layer between the block and the product. The whole idiot covered it with stripes carefully, without any omissions. It only took 1.5 rolls of wide tape.
I diluted the resin in 200 - 300 grams with a hardener and plasticizer. I used measuring cups and syringes, which is not very convenient. Before this, I cut strips of fiberglass in such sizes that large canvases would lie on flat surfaces, and on uneven surfaces, pieces of fabric could repeat them without making folds. By the way, fiberglass stretches moderately along the diagonal of the weaves, “flowing around” the desired shape.
First, I thickly coated one area of the blockhead with epoxy resin, placed fiberglass on it and impregnated the top with resin again. The adjacent piece of fabric was glued using the same technology with an overlap of 3 - 5 cm. We had to work quickly - the resin sets quite quickly, and the higher its temperature, the faster. Yes, I also heated the resin a little near a powerful lighting lamp for better fluidity.
After covering the blockhead with fiberglass in one layer, I began to cover it with glass mat. The fiberglass mat I got was quite thick, and it turned out to be good for gaining the thickness of the product. But it does not hug uneven surfaces, so I used it only on flat (or slightly sloping) surfaces and without overlap. Impregnation with resin was carried out in the same way as when working with fiberglass. Just keep in mind that it takes a lot of resin to impregnate glass mat, so you need to dilute it more. After gluing the glass mat, uneven surfaces were glued in several layers with cloth. Each subsequent layer was applied after the previous one had set a little, so that the resin would not leak. And since the process of gluing the body kit took more than one day, after a day of break it was necessary to “roughen” the surface with coarse sandpaper and degrease it - after all, the resin cures completely during this time. The final layers on top of the mat were again covered with fiberglass, and not even just one layer.
Since I needed the surface, as they say, the smoother the better, and I didn’t have enough experience, dips and holes still remained - I filled them with resin alone, and with pieces of fiberglass applied there. There wasn't enough resin. I already bought more at the hardware store, in boxes. I liked working with it more because it was already packaged, and all I had to do was mix the ingredients. And it dried faster than the one purchased from the company.
After the glued body kit had completely dried, I made cuts in it, dividing the product into three parts: rear fenders and rear, false tank with seat, front fenders and front end. Carefully, slightly prying and pulling with his hands while picking, he separated the product piece by piece without much effort from the blockhead.
Now, having removed the parts, I began to process them separately, bringing them to the desired result. In general, ordinary preparatory and painting work using “all” technology: first, rough grinding with the removal of large bulges of resin and fiberglass; then painstakingly filling the recesses with putty and fiberglass; then grinding the outer surface and priming with a plasticizer. Finally - metallic painting and varnish with a plasticizer.
The blockhead also carefully cut it off and put it in the far corner - just in case. The body kit was attached to specially made and welded “in place” mounts on the frame.
Finally, I welded front and rear luggage racks from thin-walled steel pipes with an outer diameter of 20 mm, and in addition to them, “kangaroo bars” that replaced the bumpers.
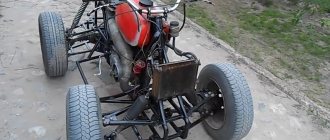
Homemade 4x4 ATV based on OKI and other equipment
We present to you a 4x4 ATV model with all-wheel drive, which is designed to conquer off-road spaces. This model was constructed by assembling various components, assemblies and parts of automotive vehicles from different manufacturers and brands - these are both domestic and foreign models. The ATV is assembled on the basis of an OKA vehicle.
Technical characteristics of the assembled ATV model: - parameters of width 1 m 55 cm, base 1 m 60 cm; - height parameters from the steering wheel 1 m 30 cm, from the seat 90 cm; - clearance height 43 cm; - weight 390-410 kg; - an engine from OKA was installed; -installed axle gearboxes from Mitsubishi; -rear and front steering knuckles and hubs from Niva; -use of Niva drive; -front and rear suspensions are installed on double wishbones; - torsion bars and springs are used as elastic elements; -Power steering from Subaru; - the center and cross-axle differentials are locked.
Step-by-step assembly of an ATV
1. We prepare diagonal spacers-amplifiers with a lever. Pipe Ф21х4.
2. the suspension has 4 levers, 2 for 1 lever = 16 units;
3. Turning work according to the drawing of the gearbox adapter. Centering and balancing.
4. Assembling suspension arms.
5. We used a steering rack, in particular a hydraulic distributor, from Toyota; after grinding the gear, we attach the cardan and insert it into the section of the steering shaft. Thanks to this we have a tight connection.
6. The ear is welded. hydraulic cylinder to the bipod, placing one side to the frame and the other to the rod.
7. Use of hydraulic booster without changing designs.
8. We shorten the cylinder to the required size for compactness.
9. Setting up the front suspension, next in line are the elastic elements.
10. We use springs from the Urals complete with shock absorbers, installing 1 piece on the front axle. on the wheel.
11. Torsion bar front and rear suspension, and other parts according to the drawing.
12. The transmission is almost assembled, the next step is to finalize the external frame.
Having completed the assembly according to the design drawings, we form and make the design. Very interesting, but painstaking and time-consuming work.
Source: usamodelkina.ru
DIY ATV body kit
Do-it-yourself ATV body kit - fiberglass. I glued it in for the first time, and therefore first studied the recommendations for performing the relevant work. But as it turned out, this process is painstaking, although the result is worth it.
First, I made the required contours of the body kit from a square steel pipe with a cross-section of 10x10x1 mm. Fortunately, this pipe bends easily even with your hands over your knee. The contour was welded to the frame using jumpers from the same pipe, in places where later (after gluing the body kit) the “tacks” could be easily cut off. Then I bent “wings” from hardboard (fibreboard) and fixed them with self-tapping screws to the contour and jumpers. Where the bend turned out to be steep, I attached separate strips of the same hardboard. The front end was made with polystyrene foam purchased at a hardware store. It was possible to use polystyrene foam or the same polystyrene foam, but polystyrene foam turned out to be a more suitable material - it cuts well with a sharp thin knife. I glued individual elements from it into the overall structure on polyurethane foam.
ATV based sunrise
The first Soviet ATV can be considered the ZID-175 4ShP, which was produced by the Degtyarev plant
During the existence of the USSR, the auto industry developed at an active pace, but mass production of such vehicles as ATVs was not established. The first Soviet ATV can be considered the ZID-175 4ShP, which was produced by the Degtyarev plant located in Kovrov.
Such four-wheeled motorcycles were usually used for work in summer cottages and short trips outside the city. The ZID-175 4ShP ATV can be operated even in rather difficult conditions. It moves through swampy, rocky, snowy, sandy terrain and other off-road conditions. In addition, the machine could also be used for plowing.
The ATV frame is very strong and reliable, so it can easily withstand many years of stress. The plastic parts of the case are also characterized by good endurance and wear resistance. Despite its rather modest dimensions - length 2.15 meters, width 1.05 meters, and height 1.2 meters - this small machine can easily drag loads weighing several hundred kilograms, despite the fact that the weight of the ATV itself is only 170 kilograms.
The ZID-175 4ShP has four reverse and four forward gears. On a good road, this four-wheeled motorcycle can easily accelerate to 60 km/h, and sometimes even higher. The designers equipped the rear axle with a reduction gear, a differential lock, and the ability to reverse. The car does not have a rear suspension, but the ATV is very maneuverable and extremely easy to control. The suspension of the front wheels of the ATV is independent, spring-mounted on wishbones with hydraulic shock absorbers.
The ZID-175 4ShP was equipped with a modernized ZDK-175 engine, the power of which was 11 hp and the torque was 20 N/m at 3800 rpm. At the same time, a fan was installed on the left side of the machine for forced cooling. The ATV is not very picky about the type of fuel and can easily run on AI-76, AI-80 and AI-92 gasoline. Fuel consumption is very economical - only 4.5 liters per 100 kilometers.
To forgotten estates. ATV tour in the Kostroma region.
A manager will contact you shortly!
The journey begins in Kostroma, where you need to get there on your own. We recommend buying tickets for trains departing from Moscow to Kostroma at 00:35 (arrival at 06:40) and back from Kostroma to Moscow at 23:20 (arrival at 05:40). We are ready to help with the purchase of train tickets; if necessary, leave a comment in the application.
Day 1
Route to the Denisovo estate
You will be met at the Kostroma railway station and taken to the recreation center. You will check into your rooms, have breakfast, and then receive instructions on how to operate an ATV and adjust your equipment. The route will start with flat terrain, where everyone can get used to the technology and practice their driving skills.
Then you will go on a journey through the picturesque area of the Kostroma region. Visit the ancient Denisovo estate - a monument of noble architecture of the 19th century. Along the route, flat sections of fields will alternate with hills, forest swamps and streams. Along the way there will be stops for rest, snacks and photos of the surroundings.
In the evening you will return to the base, where a hot dinner and a sauna will await you.
The length of the route is 40 km on ATVs.
Day 2
Route to the Sledovo estate
After breakfast, you will set out on the route to the Sledovo estate. The path will pass through forest and dirt roads with areas of complete off-road, endless fields and swamps.
There will be several passes along the route where you can relax, have a snack and have a photo shoot in nature.
You will visit the ancient Trinity Church in the village of Kostenevo, and then arrive at the final point of the route - the Sledovo estate. This is the family estate of the noble Kartsev family, built in the 18th century. During the excursion you will get acquainted with the history of the ancient estate and stroll through the beautiful park.
You will then return to base and have dinner. Afterwards you will be taken to the railway station in time for the departure of the train to Moscow.
ATV based sunrise
The first Soviet ATV can be considered the ZID-175 4ShP, which was produced by the Degtyarev plant
During the existence of the USSR, the auto industry developed at an active pace, but mass production of such vehicles as ATVs was not established. The first Soviet ATV can be considered the ZID-175 4ShP, which was produced by the Degtyarev plant located in Kovrov.
Such four-wheeled motorcycles were usually used for work in summer cottages and short trips outside the city. The ZID-175 4ShP ATV can be operated even in rather difficult conditions. It moves through swampy, rocky, snowy, sandy terrain and other off-road conditions. In addition, the machine could also be used for plowing.
The ATV frame is very strong and reliable, so it can easily withstand many years of stress. The plastic parts of the case are also characterized by good endurance and wear resistance. Despite its rather modest dimensions - length 2.15 meters, width 1.05 meters, and height 1.2 meters - this small machine can easily drag loads weighing several hundred kilograms, despite the fact that the weight of the ATV itself is only 170 kilograms.