Hello.
At the end of last season, everyone couldn't get around to replacing the chain and sprockets on my 2000 Honda cb 400 motorcycle. It’s all like “oh well, what’s left to get here” and the like. As a result, it got to the point that when I tightened the chain and sat on the motorcycle at the beginning of this season, the drive sprocket made a terrible crunch. It was impossible to drive like that, the chain and sprockets had to be changed. Naturally, I photographed a small manual for replacing sprockets and a chain on a Honda cb 400, but, in principle, this procedure is standard; on any motorcycle with a chain drive you have to perform the same manipulations. So, as you understand, the manual is suitable not only for the Honda cb 400, but also for other motorcycles by analogy.
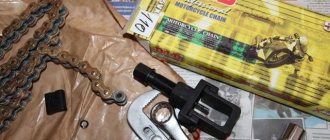
Yes, and please don’t laugh at the headlines of newspapers where chain cutting and other operations are carried out! I picked them up at the entrance!)) I don’t read such press myself!)
Assembly (most important)
Okay, enough scientific analysis.
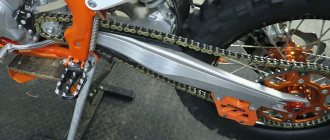
Time to put this thing back together. First, the front sprocket was installed on the motorcycle engine shaft, then the rear sprocket was put in place. Afterwards, the rear wheel was placed in the pendulum and secured with a cleaned and re-lubricated axle so that the wheel would not fly out anywhere. The chain was then stretched from the rear sprocket to the chainring. The direction in which the chain is installed does not matter. There are, of course, those who like to display the chain with inscriptions on the left side, but there is no point in this, except perhaps for aesthetic reasons...
We tighten the chain so that its ends meet on the rear sprocket. The teeth of the rear sprocket will support the chain links, which will make the task of further assembly easier.
The assembly of this type of chain is somewhat different from the standard chain assembly. There is no need to press the pin into it separately using a squeezer. The algorithm of actions in this case is slightly different:
Step one: To assemble the link, first install the O-rings (these are included with the new chain), as shown in the picture:
The purpose of these o-rings is to lubricate the insides of the pins throughout the life of the chain.
Step two: Lubricate the inside of the link with grease.
Step three: link assembly. It happens as shown in the photos below:
First we put on the bracket, then press it in with a squeezer.
It is important not to pinch or undertighten the outer bracket. The link should move easily, without jamming
Compare with other links in the chain. It would also be a good idea to use a caliper to measure the thickness of any link on the chain and the link that you just pressed in. They must be the same thickness unless otherwise specified in the chain instructions.
Measuring link width using a caliper
Is the width the same? Great! Now it's time to flatten the rivets with a special attachment using a rivet press. This way the link will be securely fastened and will not fly off the chain anywhere.
"Flattening" is also an important part of the job. Experienced people advise even checking the heads of the staves after the procedure with a caliper, so to speak, do they correspond to the specification? If the diameter is too small the plate may pop off, if the diameter is too large it may also fall apart as the metal is weakened
The link fell into place.
When both pins are correctly flattened, the chain installation is complete. It wasn't too difficult, was it?
Be sure to tighten the front and rear sprocket bolts and nuts to the manufacturer's required torque specifications. A wooden beam will help you.
Tightening the sprockets
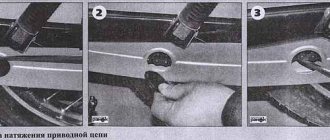
Now comes the fun part of the job - setting the proper chain slack and aligning the rear wheel. I have always found this to be the most time consuming part of replacing a chain. Even if you have the right tools, you'll have to work hard to get it right.
Align the rear wheel, and then adjust the chain slack using the rear wheel tension. Since by centering the rear wheel, you can adjust the slack of the chain by simply turning the axis of the adjusting screws on each side of the pendulum with a certain pitch, tracking it on a special scale.
Rear Wheel Alignment Tool. We put the device on the rear sprocket and use the protruding rod to track the displacements. The goal is to combine the device rod and the chainline.
Once the wheel has been aligned, tighten the wheel axle nut, but not too tight as the axle still needs to be able to move back and forth to allow the chain to be adjusted.
This procedure will take some time to do everything perfectly, but the more often you do it, the faster it will be. Eventually the chain will have the correct slack and the rear wheel will be aligned. Once you've done this, torque the rear axle to specifications and apply lube to the new chain. The work is completed.
Applying chain lube
Calculations
Cost of spare parts: $175 (9 thousand rubles)
Cost of tools: $60 (3,300 rubles)
Working time: 6 hours
Disassembly
To make maintenance easier, place the motorcycle on a stable stand. We begin to remove the old chain drive. First of all, unscrew the front drive sprocket.
On some motorcycles it is secured by a huge nut with a lock washer; on the CBR, the sprocket is screwed to the shaft with a small bolt.
Wood: the choice of a professional.
To loosen this bolt, the front sprocket had to be secured. Simply engaging a gear is not enough to provide engine compression resistance. A specialized tool was used: a wooden wedge installed between the wheel spokes and the swingarm (rear swingarm) as shown in the picture. This locks the rear wheel in place, preventing the chain from moving, thereby keeping the front sprocket from turning. The method doesn't look very aesthetically pleasing, but it worked without damaging anything.
Using a long-arm wrench, the bolt was twisted without any problems. This step is important to do before you begin to remove the chain, since locking the rear wheel is the only cost-effective way to remove the sprocket bolt or nut.
Once you have done what you have planned, it is time to disconnect the chain.
The chain on this motorcycle was of poor quality. This can be easily determined by the type of fastening that fastens the two ends of the chain. The method of fastening is the so-called “lock” on one of the links of the chain.
This type of connection is good for use on low-power machines with a small engine capacity. It is better not to install such a chain on sportbikes with powerful engines. There are cases when the “lock” flew off the pins of the chain and it unraveled. This kind of failure can have serious consequences: injure the motorcyclist and damage the motorcycle.
The chain that will be replaced is called “endless”. In it, the main link is riveted in exactly the same way as the other rollers in the chain. This method, when installed correctly, gives one very important advantage: the chain on the motorcycle cannot come loose. At least at the junction of its two parts.
After the clamp was removed from the master link, the pin was removed by squeezing the chain. The chain is divided. To rivet the chain, you can also use a grinder, which cuts off the axle cap...
Replacing the chain and sprockets of a Honda cb 400 motorcycle with your own hands.
2) Shorten the motorcycle chain to the required size. This point applies only to those who bought a chain “with a reserve”. There are two ways to shorten the chain. Either with a grinder or a Dremel, carefully, trying not to overheat the chain, cut off the rivet, and then knock out the pin. Or, if you have a chain riveter, place the needle exactly in the center of the rivet and twist the nut, squeezing the vice.
For some reason, many people manage to break the needle of the chain riveter, but I can say with complete confidence that it is not the tool that is to blame, but carelessness. Did you feel that the needle is very tight and the nut is not turning? Check whether you are pressing in the center of the rivet or whether the needle has moved. If it has moved, unwind it and start again. If you properly control the process and do everything with due care, the riveting needle will serve you for a long time.
3) Remove the decorative protection of the drive sprocket, loosen and unscrew the mounting bolt. This is also interesting. In order to unscrew the drive sprocket mounting bolt, force must be applied. Moreover, it would be logical if it had a reverse thread, that is, it would twist in the direction of the shaft movement. But no! There is a regular thread and you need to unscrew the motorcycle drive sprocket counterclockwise.
To do this, I get on the motorcycle, press the rear brake with my right foot, hang to the left and pull the crank (what, the Cossacks lift their hats off the ground while galloping!))). But it’s easier, of course, to attract someone who will press the rear brake pedal while you twist) Did you unscrew it?
Let's move on!
4) Loosen the nuts securing the driven sprocket, the hub nut and the rear caliper screws. Actually, everything is simple here, the next step we will have to hang the motorcycle, and in order not to tug on the weight, we will loosen all the nuts and bolts now, while the motorcycle is on the ground with both wheels. Loosen the driven star nuts.
Loosen the hub nut (red) and release the chain tension (green).
Loosen the screws securing the rear brake caliper.
5) We hang up the motorcycle. Come on, my tackle is normal!
6) We cut the old chain and install a new one. Cutting or riveting a motorcycle chain - by analogy with step 2.
Ideally, the new and old chain can be connected into one long chain. Then (the motorcycle is in neutral, the rear wheel is hanging out) we pull out the old chain, tightening the new one in its place. But, as usual, my old and new chains were from different manufacturers, so I couldn’t connect them, and I had to manually lay a new chain
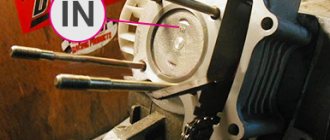
7) Change the stars. Put a new leading star
Attention here! We installed the star, tightened it, and discovered quite a bit of play. This backlash must exist! When it’s not there, it’s bad, the star wears off quickly
Google the physics of the process yourself, my job is to inform and reassure you on this matter. My previous star stood rigidly, without play, and as a result it wore off in one season!
However, read other opinions in the comments. The majority of readers are in favor of the fact that there should be no backlash.
Then we remove the rear wheel and change the driven sprocket. There are also more holes on the driven star than there are seats. And don't worry about it either!
Well, according to tradition, a small illustration of what happened. In my opinion, the result is obvious
This is the leading star. I still had quite a driven star, and I changed it just “for company.” There the difference between the new and the old is almost invisible.
Then we put everything in place and put on the chain.
8) Rivet a new chain. Carefully lubricate the chain lock with the grease that comes with the kit. We rivet using a riveter, turning the needle over and using a rivet die. You can do it the old fashioned way, using a vice and a ball from a bearing. Crazy, but almost as effective.
9) Tension the chain, tighten all the bolts, and assemble the motorcycle.
Well, that's all, we changed the chain and sprockets, you can ride happily ever after. Factory lubrication lasts quite a long time, so there is no need to lubricate the chain immediately after installation. I lubricate the new chain after 800-900 km or after the first rain.
As a result, for your own convenience, it is easier to use chains from the same manufacturer and not save on it. For everything, I spent 7,500 rubles for a sprocket-chain set and 30 rubles for new nuts for fastening the rear sprocket (the splines on one of the old ones were licked off, I had to dent it a little :)). I saved 2,000 rubles on a motorcycle service job by doing it alone in 2 hours. And this takes into account filing the stuck nut. Why am I saying this: the process of replacing sprockets and chains does not take much time, especially if you have an assistant. At the same time, the process is not particularly complicated, so arm yourself with the tool and save your money.
All.
How to replace a chain on a motorcycle? Chain replacement tips
Eh, winter. For a motorcyclist, this off-season period is worse than death! However, if you look at the other side of the coin, it turns out that this period can also be a great time of year for any real biker. Before the snow melts, you can put the chariot in order, clean the “feathers” and prepare the motorcycle for the next season. Many guys sit in their garages in the evenings with their beloved two-wheeled friend.
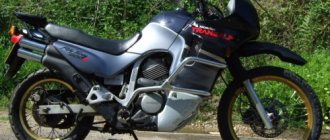
Usually such gatherings lead to unexpected discoveries of things that can, or rather need to be, fixed. Here's a trivial example: chain drive. The patient is an old man with experience – a 1994 Honda CBR900RR. A very interesting specimen. A guinea pig and a bike resurrected from oblivion, which was saved from oblivion by one caring person.
The sportbike was practically scrapped - it was overgrown with dirt, the tires became unusable, technical fluids turned black and began to eat away the insides of the motorcycle. The odometer showed just over 40 thousand miles (64,000 km). According to many, this classic sportbike was irretrievably lost, but not for handy gurus who knew a lot about hardware and how to handle it.
During the restoration work, a field of activity was identified: replacing fluids, restoring electrical equipment, troubleshooting the power unit and a number of others. According to the foreman carrying out the work, there were no parts or places in the motorcycle where problems could not be found. All the more interesting.
One of the items on the agenda was replacing the chain drive. Read more about the progress of the work and its nuances in today’s material.
Rusty, stiff chain links need to be replaced.
The chain looked fairly worn: there was a rusty coating on the metal surface of the links. But external shortcomings were not the main cause of concern.
The technician's attention was drawn to uneven sagging and tension in the chain during operation. This symptom is clearly observed when the rear wheel is raised off the ground and the engine is slowly running in first gear.
As the chain rotates, you can clearly see that its tension is uneven and gradually changes from being loose to being too tight. And this happens with each subsequent revolution of the wheel. Not a good sign.
Motorcycle chains with regular maintenance of their drive components can be used for approximately 30 thousand kilometers. In this particular case, most likely, the motorcycle has not been serviced at all for the last few years of its life. Therefore, based on the irregularity of work on it, it is worthwhile to carry out maintenance on the chain. What is meant by this “service”? Replacement, 100% replacement.
This kind of repair cannot be called complicated, but we will see some nuances that are worth knowing about from the example. Let's get started with the replacement!
Installation
If you are going to change the sprockets, you can do without cutting the chain, since you still have to install the new gear by hand. However, if they are preserved, this operation can significantly reduce the complexity of the work. If you purchased a new chain from a similar manufacturer, you can simply connect it to the old one to achieve the desired result. Otherwise, you can use strong synthetic thread or wire. The resulting long chain must be pulled over the stars, gradually turning them.
To understand how to replace a chain this way, you need to wait until the old gear part is in contact with the sprockets. Be sure to generously lubricate the engaging splines with grease. Now you can remove the old chain and begin installing the new one. The drive sprocket needs to be put in its place and the mount attached. The next step will be riveting the chain, which is considered the most critical process in the entire replacement procedure.
If you're wondering how to rivet a chain using a hammer and chisel, you can read the tips below and do it manually - but the risk of breaking the gear mechanism is very high. Therefore, it is better to take a special riveter that limits the movement of the splines - this will allow you to keep the seals of the part intact. We generously lubricate the pins with a special chain lubricant, after which we put oil seals on them and lubricate them again. Now you need to thread them into the rollers, install another seal, lubricate it again and secure the lock cover on top. We install this link in the riveter so that the pins fall into a special groove - all that remains is to tighten the clamping bolt until they rest against its base.
Now you need to install a special attachment in the tool for riveting the pins. Press it against the surface of the chain - it is almost impossible to miss, since the tool has a special recess that makes aiming easier. Using a torque wrench, tighten the clamp bolt until the end of free play. Depending on the chain manufacturer, this value can be in the range of 15–20 Nm, but you should focus on a sharp increase in the required force to turn the bolt. Do not try to overtighten the bolt, as this will cause the lock to lose mobility, which will lead to accelerated wear of the transmission.
All that remains is to install the rear sprocket and attach the mount. Now you need to reinstall the wheel in reverse order, but also do not tighten the axle. Check that all parts are in place and that you have not lost any fasteners.
Tools
To work with the chain you will need a fairly extensive list of tools. The most important tool in this case will be a special chain riveter - such devices are produced by many companies, so finding one will be relatively easy. The cost of the tool varies between 1000–5000 rubles, depending on the manufacturer and the grade of steel used. From some experienced craftsmen we hear that the riveter is successfully replaced with a hammer, chisel and core. This point of view is completely erroneous - it will not be possible to achieve a reliable connection of the chain with their help, and, most likely, it will soon break.
In addition, replacing sprockets and chain will require the following tools:
- Torque wrench with comfortable handle;
- Set of keys and sockets;
- Compact grinder with a diamond blade for metal;
- Grease as well as cleaner and chain oil.
It is better not to neglect the selection of high-quality tools, since it will be very unpleasant if during the work the key breaks in your hands and the motorcycle remains half disassembled. Remember that you will have to replace the chain regularly, so it is worth purchasing a quality set once and then using it for several years.
Dismantling
First you need to remove the chain cover and unscrew all the bolts holding the drive sprocket cover. After removing the plastic covers, attach all fasteners to their original places to prevent their loss. There is always a considerable amount of dirt under the star cover; it is better to wash it using a special spray. After this, rinse the unit with water and gently wipe off any remaining liquid with a non-abrasive cloth.
If replacing the sprockets is on the agenda, you need to loosen their fastenings by unscrewing the corresponding bolts. Here you will need help, since access to the rear wheel sprocket bolts is usually blocked by the pendulum and the motorcycle has to be moved back and forth. Now all that remains is to loosen the rear axle nut - however, there is no need to completely remove any fastenings yet! The motorcycle is mounted on the center stand or trolley, after which you need to finally unscrew the rear axle nut and remove the wheel. Having completed this operation, begin to remove the stars, completely unscrewing the bolts securing them.
To significantly facilitate the installation of a new chain, it is worth cutting the existing transmission mechanism. Some motorcycle models have a special device called a Chain Breaker - just lower it onto the chain and clamp it to knock the pin out of it. If it is missing, the chain can be riveted using the punch included in the riveting kit. However, experienced mechanics say that such a tool breaks too easily, and advise first sawing off the pin heads with a grinder. After this, it will be very easy to break the link - if you do not have all the above tools, you can cut the chain with a hacksaw, although such work will take a lot of time.
If you are interested in how to change a chain using a special tool, then you should know that you do not have to perform complex actions. A bushing for cutting the chain is installed in the riveter's clamping mechanism, after which it is combined with a pin with a sawn head. The clamping bolt is tightened with a pre-prepared torque wrench with a force of 10–12 Nm. All that remains is to insert the punch and screw it in until the pin falls out and the chain breaks.
Ending
The next step will be to adjust the chain - for road motorcycles, 25-35 mm of sagging in the transmission mechanism is considered normal. Depending on what kind of mechanism is used on your motorcycle, you may need to move the axle through a special slot, controlling it using adjusting bolts, or turn the eccentric device. Once you have the desired level of sag, tighten the rear axle nuts and make sure the rear wheel is completely locked.
Now start tightening all the fasteners to the required torque using a torque wrench - you can find all the values in the motorcycle's owner's manual. You should start with the rear sprocket, tightening its bolts crosswise to avoid damaging the threads, fix the front sprocket and check that the chain rotates without significant sagging in a certain area. Before using the motorcycle, the transmission mechanism will need to be lubricated using a special spray.
If you purchased the wrong chain model and need to know how to shorten it, you should use the recommendations above. Using a punch, break the mechanism and remove the required number of links from it. After this, carefully lubricate all components and install the splines, not forgetting the oil seals and rollers of the friction pairs. However, such an operation should be performed only as a last resort - before purchasing a chain, you need to check whether it is suitable for a particular motorcycle model.
About the brands of chains and sprockets and the chain riveter.
There are quite a lot of chains and sprockets of different manufacturers and models on the market now. I’ll write a separate article about this later, but now I’ll just say that the chain is good - DID, and the sprockets - AFAM I didn’t discover America with this, but let there still be one more positive review addressed to these manufacturers. The combination of DID chain and AFAM sprockets works perfectly, this has been tested in my experience!
The chain riveter/river is an almost indispensable tool. No, of course, you can use a grinder or a Dremel to cut the chain, and rivet the chain using a small vice and a ball from the bearing! And I’ll even say that when I used this method before, it didn’t seem painful to me, I thought that’s how it should be. But with the purchase of a special tool, the process of replacing the chain becomes much easier, so I recommend spending the money and buying one for yourself. Moreover, the cost of such a tool is equal to 2 replacements of a motorcycle chain.
A motorcycle chain riveter looks like this:
..and consists of a vice, a needle for riveting the chain and a die for riveting the chain.
On the Russian market, such instruments are found in German and Chinese. The Chinese one is cheaper, but you should only buy it if you plan to change the chain ONLY ON YOUR motorcycle, that is, once every couple of seasons. If you plan to be kind and responsive to help friends for beer, take the German one, it is more expensive, but the quality is higher, and such a tool can be used more often.
Instructions on how to use the chain rivet/riveter are on the packaging (in German or Chinese, choose for yourself)), but in the article I will also try to illustrate how to use it.
Why do you need a lock on a bicycle chain?
When using a bicycle, unexpected situations can often occur, one of which is the need to disconnect the links on the bicycle chain. There are a considerable number of means that will help you do this, but the simplest means are considered to be the use of bicycle locks. So, perhaps it’s time to figure out how you can disconnect the chain using a lock.
https://youtube.com/watch?v=D55kGUcNRh5
First of all, it should be noted that the lock is selected depending on the number of speeds. The choice of lock is also greatly simplified by the fact that the same option is suitable for six, seven and eight speeds. Therefore, if you have several bicycles and the number of their speeds matches the above, you will not have to buy several locks. The same can be said about chain manufacturers. If the number of speeds on bicycles is the same, but the manufacturers' models are different, then there is nothing wrong with that, the lock will suit all of them, since the chains, as a rule, are identical.
These are quick-release links consisting of two plates. Thanks to its design, it becomes much easier to lock and unlock the links of a bicycle.
When purchasing a lock, you should pay attention to what is written on the package. As a rule, the most important information is reflected there, which will help in the further use of the lock.
Particular attention must be paid to the number of speeds this lock is suitable for. Most likely, more than one indicator will be indicated there, which is beneficial for users.
How to use?
Before you start installing the lock, you need to check whether it already has another lock, which was included directly when purchasing the bike. Finding a lock is usually not difficult, since the manufacturer's name will definitely be stamped on it. Whether to install it or not is everyone’s choice. But if there is a need to frequently remove links, then a lock in this case will be useful. To install the lock, half the link must be removed to make room for it. In order to do this carefully and not damage the links, you need to use a tool called a squeezer. The removed pair of outer links can be discarded, and the lock plates must be installed in their place. After the operation is completed, it is necessary to secure the lock. To do this, you need to stretch the chain until a click appears. If you suddenly need to remove this spare part, then it will be enough to bend the chain and move the hole until it opens.
It should also be noted that not every lock will be easy to push apart by hand, so removing it may require additional force and the appropriate tool. For security reasons, you should not use a lock with an old chain. It would be better if this part is individual for each vehicle, since at the most inopportune moment it can fail, because... was turned to fit the previous chain.
Disadvantages of use
Like any other bicycle parts, the lock mount has its drawbacks. And the most important thing, perhaps, is strength. Since it can be disassembled into two parts, it automatically becomes less reliable than ordinary chain links. In this regard, there is a risk that the chain will most likely break at the exact place where it is installed. But you shouldn’t worry about this, since this happens extremely rarely and after long-term use.
Of course, a chain lock is a very convenient thing. With it, you can easily disassemble and reassemble the chain so that you can easily remove it from the bicycle and then install it. If you install a new copy, it will last much longer and will not be life-threatening. That is, having installed a new one, you don’t have to worry about it breaking at the most inopportune moment. Also, do not forget about the sizes that are suitable for this or that option. In some cases, the same spare part may be suitable for different sizes.
Motorcycle chain tension
To check the chain tension, rotate the wheel and observe the condition of the chain at maximum tension. Now place the motorcycle on a stand and check how much deflection the chain has. The normal position is when there are two to three centimeters between the two parts of the chain, upper and lower.
For qualified chain tensioning, you can contact a service center. But if you want, you can do it yourself.
The main thing is to strictly follow the established rules.
- To adjust the chain, there must be a certain load on it, so during the procedure, ask someone you know to sit on a motorcycle.
- Prepare your tools for work. You will need 17x19 and 13x14 keys.
- The motorcycle is on a stand. Using a 17x19 wrench you need to unscrew the shaft on which the rear wheel spins. The wheel will loosen and can be moved with the tension bolts.
- With the second wrench, 13x14, you need to unscrew the lock nuts, which are located on both sides of the wheel.
- The chain tension on the motorcycle begins directly. To prevent the wheel from moving to the side, the adjusting bolts must be pulled evenly. When tensioning the chain, periodically check with your hand how tight it is. Just press it with a little force to do this. The chain should not be very elastic. This can lead to rapid wear.
- If the tension is correct and sufficient, first tighten the locknuts of the tension bolts. And after that you need to tighten the rear wheel shaft.
All operations have been completed. You can once again ride your motorcycle on an exciting journey without fear that it will let you down.
Look and feel good
The cost of this repair depends greatly on the type of motorcycle you ride and the quality of the parts used. There are chains on sale for 4 thousand rubles , as well as expensive ones costing 11-12 thousand rubles .
The time it takes to complete the job can also vary greatly depending on your experience and how much of a process you want to clean your bike.
Replacing the drive chain is one of those maintenance items that can be performed even by a novice motorcyclist. A minimum number of specialized tools are required to complete the task. If the chain was not in the best condition, a new part can make your motorcycle quieter and smoother to ride.
The season is coming, so prepare your motorcycle in advance so that it doesn’t let you down!
Hard work
Replacing the chain cannot be called particularly easy, although this operation does not require any special technical knowledge. The problem is that there are a huge number of nuances - the transmission mechanism can be overtightened, crushed, or simply mounted incorrectly. Therefore, when performing work, you should check all recommendations and use only high-quality tools. If you do not feel confident that you can perform all the procedures correctly, it is better to entrust the chain replacement to specialists. A motorcycle service station will help you make repairs in the shortest possible time, and will also guarantee the reliability of the transmission.
Buy parts
Before you start disassembling, you should make sure that you have all the necessary tools and parts to carry out the work. At a minimum, you will need the following materials:
New front and rear sprockets
Set of tools for disassembling the chain, squeezing the chain
Vernier caliper for measuring
“Wait, why do I need new stars?” - a beginner may ask this question. The answer is that, as with all components that have metal-to-metal surface contact, friction between the sprockets and chain rollers (pins) wears out the surfaces. This sprocket wear does not bode well if a new chain is placed on the worn sprocket teeth.
If you do not replace the sprockets, you can very quickly find that the rollers of the new chain will be “eaten” long before the deadline set by the manufacturer.
Replacing the sprockets and chain will ensure that these components wear evenly, which will maximize the life of the parts.
Locks, shackles, cables and chains
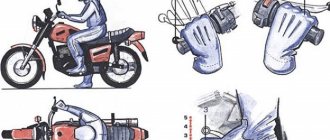
A popular topic among motorcyclists, but for some reason most people only use them at an overnight stay. They say I’ll wrap a chain around my house at night and my hands. They don’t always take it with them, but they do carry it.
All sorts of locks and brackets, with fastenings to the steering wheel and wheel, seem like a trifle, but at least some kind of primary protection against inexperienced thieves or people who simply cannot pass by. Pads for the front and rear wheels are a more powerful argument.
There are individuals who hang carabiners, chaining the nearest wheel spokes with the front fork leg or a chain or pendulum on the rear wheel.
A real-life incident: when an acquaintance at a tourist camp put a carbine on the rear wheel for the night, and in the morning after a sleepless night he simply forgot about it... He started the motorcycle and tried to leave. Actually, he pulled out the spokes and toppled over himself. Happens. Be careful, friends.