Making your own scooter air filter
Making a scooter air filter with your own hands
The background of the creep is quite prosaic. A friend had a “damn the kitten” problem with the piston, crankshaft, connecting rod, pin, in general, everything that makes the moped move, the engine on the 24 died, and seriously. The recently held first races on a seagull on a scooter inspired heroic deeds.
As a result, a friend buys a 65cc piston (Honda Takt AF24), a new crankshaft, and makes capital investments, since everything still needs to be changed. Well, after driving 300 kilometers, he complains that he doesn’t feel like he has 65 cc. Accordingly, I give him a bunch of links to engine tuning.
In short, after sitting in the evening, drinking beer, we decided to fire up his apparatus. Since I’m still calculating the pipe (I’m checking different calculation options - so that they match, otherwise I don’t want to buy Leovinci or something like that - it’s expensive) - but we’ll do it anyway. In the end, we decided to make the intake easier. Again, I’m reluctant to buy a zero-resistance filter for 250-300 g. So I was drawn to the garage to “go crazy.” About two years ago, I installed a homemade filter for a friend of mine on his Yamaha Jog-Sekogd Edition (an old guy with a vertical motor), since my dear one simply got lost. I was guided by an article from the St. Petersburg site moto.km.ru
In general, the reliability of the filter element has been tested the hard way, over 2 years, without replacing the housing. It was decided, based on experience, to assemble a fan that was more practical to use and reliable to install.
As a result, having come to the market, it was purchased: Oil filter for Moskvich KS-71 (411-412 Muscovites) - 4 g.
Siphon for washbasin - from 5g to 21g. (you need to choose from elastic plastic or with polyethylene impurities - in general, pure polyvinyl chloride will not work - it’s too fragile), although the siphon itself is not needed so much as its upper part - and some at the market sell it separately.
The second aspect when choosing a siphon is that a filter should be inserted into its neck diameter.
An M6 hairpin with a length of 220-250mm is selected experimentally. I purchased a mounting anchor of suitable length, since I didn’t have time to look for a hairpin for a long time. For 2.50 UAH.
Well, and, accordingly, a creative accelerator with a capacity of 1 liter. each. — 3.80 UAH each. :O)
I don’t count the mounting silicone and self-adhesive micropork, because it was available in the garage. Oh, and, of course, two clamps with a diameter of 25-32mm for as much as 1 UAH.
As a result, the idea is as follows:
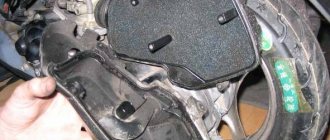
That is, the filter element, without any modifications, is clamped between the neck of the siphon and its counterpart (a metal round flange with a bunch of holes), the whole thing is pulled together with the same hairpin, the length of which is selected according to the location, you should not leave a very long section of the hairpin, it will go into the air intake pipe and may rest against the carburetor.
Next, we make a plug - a plug for the response hole in the filter element.
The procedure is as follows: We take our throat from the siphon and heat its narrow part (that is, the pipe) with a hairdryer, pull it onto a plastic bottle cap (I pulled it onto a Coca-Cola cap, it has a more or less cylindrical shape). We cut off the resulting plug from the throat of the siphon. It should fit as close as possible into the filter hole. Next, we take our siphon in our hands and from under the clamping nut of the siphon neck we take out the silicone sealing ring, which we put on our plug. As a result, this ring ensures reliable sealing of the hole in the filter element. Everything is clear from the photograph:
We make a hole in the center of the cork and string it onto a pin, starting with the flange (lid) of the siphon neck into which our cork is inserted.
To ensure that the ring does not fall off and the structure has a more civil appearance, we fill the gap between the metal lid and the plug with silicone. To ensure an even tighter seal between the cork and the pin, the cavity in the cork can also be treated with silicone and a series of rubber washers can be put on and secured inside the cap with glue or the same silicone.
Air filter on a scooter
As you know, in a scooter engine, during its operation, it is not just gasoline that burns, but a mixture of gasoline and air, prepared in a certain proportion by the carburetor. Without atmospheric oxygen, gasoline simply cannot burn. If the fuel passes through a fine fuel filter before entering the engine, the air is cleaned by the air filter. If air purification is not carried out efficiently, then particles of dust and other contaminants will very quickly lead to wear of engine parts, especially for parts of the cylinder-piston group. In addition to the quality of cleaning, a very important indicator for an air filter is its resistance to air flow. This parameter must match the engine settings, otherwise engine operation will be disrupted.
It is impossible not to mention the so-called zero-resistance air filters, which some scooterists install on their equipment when tuning. Indeed, such filters increase engine power, since the engine “breathes” more freely and does not have to overcome air resistance at the inlet. But, at the same time, such filters filter the air very poorly, therefore, the engine life is reduced. It makes sense to use “nulevik” filters only on sports equipment, where it is important to win a competition, and where the life of the engine is not at issue.
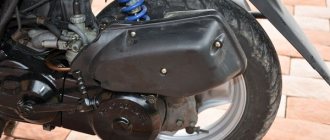
The air filter has another function - reducing engine noise. If you have seen and disassembled the air filter housing of a scooter, you may have noticed that its design is not as simple as it seems at first. Chambers and partitions can be placed inside the case; the shape of the case itself is quite complex. Indeed, the filter housing is specially designed to participate in dampening the sound of the engine, just like the muffler. Any disturbances in the intake or exhaust system can not only “add a decibel” to the running engine, but also change the engine settings, which will disrupt its operation. Two-stroke engines are especially sensitive to interference in the intake or exhaust system.
Now let's look at the types of air filters used on scooters. These can be either foam rubber, paper, or metal filters. Foam filters can be either multi-layer or single-layer. When dirty, such a filter can be easily cleaned by washing it in gasoline or detergent. After this, you must soak the foam filter element in engine oil, or apply a special composition for impregnating air filters to the foam rubber. You can treat foam rubber with oil like this: pour a little oil into a plastic bag, place a clean filter element there, knead the bag with the foam rubber in your hands so that the oil saturates it throughout its entire thickness. After this, squeeze out the foam, removing excess oil from it, and install the filter in place. The foam rubber should be completely saturated with oil, but oil should not drip from it. It is impossible to install a “dry” foam filter without impregnation with oil, since high-quality air purification will not be ensured. Over time, after a certain number of such cleanings, the foam filter element becomes unusable and must be replaced. By the way, make sure that the foam filter element is intact and that it is installed correctly in the filter housing so that even a small amount of unpurified air cannot enter the engine.
When is replacement required?
High-quality scooter maintenance also depends on timely replacement of the air filter. This element performs an important function - it cleans the air that enters the carburetor. Oxygen then enters the engine along with the fuel mixture. If you hesitate a little, the transport will begin to function inferiorly, disobey its owner and become less playful. Another disadvantage is that if the purifier is clogged, the scooter will begin to consume more fuel, which, of course, will affect its maintenance.
Mechanics recommend changing the air filter on a 4 T scooter every 5 thousand kilometers. It will also be important to clean this element from dust and dirt. Cleaning should be done once every six months.
Cleaning the filter, changing the oil or changing individual system parts is required more often if the scooter is used daily for a long time. In this case, an inspection must be carried out every 500 kilometers. Such actions will eliminate costly repairs and the purchase of spare parts.
Signs that you need to replace the air filter in a 4T scooter:
- clogged appearance of the structure;
- change in technical characteristics of transport equipment:
- slow speed development, the engine does not start immediately, etc.
All these signs indicate that the engine is not getting enough air. It does not matter which scooter requires help (Chinese, homemade or Stealth scooter), the procedure for replacing the cleaner will be the same for each vehicle.
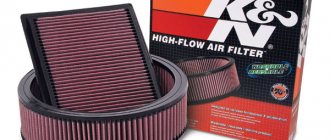
What is a nulevik?
A zero-resistance filter for a motorcycle or scooter is a conventional air filter designed to protect the cylinders from dust, but has less resistance to air flow (almost zero). This is achieved by increasing the filter surface area compared to standard filters, which facilitates the passage of air.
A conventional air filter is a zero resistance filter
Why do you need a zero? When the piston moves back, a vacuum is created in the cylinder, and air is sucked into it, mixing with gasoline. The more air that can be sucked into the cylinder, the more combustible mixture there will be for operation and the greater the power. However, a filter gets in the way of the air. It creates resistance to air flow, so less air enters the cylinder than it could.
It is impossible to do without a filter, because any dust entering the cylinder causes severe wear. A zero resistance filter avoids these problems. The engine begins to “breathe deeply” and at the same time has full protection from dust.
Motorcycle brooches
I'm coming to you with new brooches)
I once showed a brooch in the shape of a motorcycle here. Now I decided to make it in different colors)
The second one I decided to make was a rather popular version with the addition of red. I often see such motorcycles (in terms of color) in my life.
This brooch turned out to be the most successful in terms of shape.
The blue color is also popular, and the color is beautiful.
But green may not be so popular, but it is my favorite color.
I almost got a motorcycle park =)
P.S.: all brooches are made on the basis of a paid MK.
Advantages and disadvantages of use
Advantages:
- The main advantage of tuning the air filter (installing a zero filter) is an increase in engine power. This is the most accessible and inexpensive way to get extra “horses” from the engine. Installation does not require any special modifications and can be done independently.
- There are varieties of zero filters that are installed in place of the standard filter, but they are not very effective and often cost more. The most effective models of zero filters do not coincide in size with the standard ones, because they have a large filtering surface. To install them you will have to choose another place.
Increasing engine power is by installing a zero gear
Negative sides:
- One of the difficulties that arises when installing any zero resistance filter is the need to adjust the carburetor. For more air in the cylinder, which is provided by the filter, more fuel is also necessary, because the air-gasoline mixture must be proportional.
- The operation of the carburetor in transient modes (acceleration), when additional enrichment of the mixture is required, is subject to adjustment. If more air is not supplied with more fuel, the engine will lose acceleration dynamics.
- There is one more problem. A real headache for motorcycle owners are low-quality filters. Companies that produce such products simply reduce the density of the filter material instead of increasing the surface area. With a reduced material density, the air actually encounters less resistance, but the filtering effect is also greatly reduced. As a result, dust still gets into the cylinders.
The Ant motor scooter, indispensable for the Soviet village, took 36 years to assemble
What was considered the most useful thing in rural areas? Of course, it was a means of transportation; the village couldn’t do without it, and everyone understood this. Everyone had their own, some rode and carried loads on a horse, and many preferred cars. But in the USSR, a car was a luxury and not every family had it. Then ingenuity and various devices were used, because the hay would not arrive on its own, and for small things, transport was always needed there. This was also understood by the engineers of the Tula Machine-Building Plant, who in 1959 produced the Ant scooter, which was indispensable for those years. The scooter was a three-wheeled structure with a seat and all controls at the front and a cargo platform at the rear.
The engine on the scooter was single-cylinder, its volume was 199 cubic centimeters and the power was 11 hp. This was enough to transport a load weighing 340 kilograms. The engine was started using a starter or kickstarter. The engine runs on fuel, which consists of a mixture of oil and gasoline. For fuel there is a tank measuring 13 liters. A scooter consumes about 6-7 liters of fuel per hundred kilometers. An ant moves at a maximum speed of 60 km/h. The scooter has a four-speed manual transmission, with one reverse gear.
Maintenance of zero vehicles
In principle, servicing tuning filters is no different from servicing standard ones. The filter element is cleaned by blowing air in the direction opposite to suction.
There are also types of filters that can be washed. It all depends on the material from which the zero is made. The possibility of washing is usually indicated by the manufacturer. It is necessary to make a reservation that most of the zeros are still disposable. It is impossible to completely wash out dust particles from a heavily soiled filter. Even after thorough purging or washing, its throughput will be lower than that of a new one.
For washable filters, maintenance boils down to rinsing it in water with a detergent solution and then drying it. The manufacturer specifies what exactly to use for washing.
Important: washing the filter with products not recommended by the manufacturer can damage it!
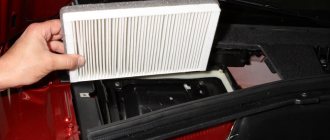
For engines with insufficient power, such a filter is needed
NOT OIL ALONE or WHAT FUCK SUCH PASSENGERS
You must always remember that a motorcycle is a combination of a large number of factors. This includes rubber, a chain with sprockets, pads, the brake system itself, and now oil, filter, clean carburetors, undiluted gasoline and finally CLEAN AIR.
So without further ado, here are the BEFORE and AFTER photos)))
our master jumped back)))
Take care of your horses)))
On which mopeds or scooters should a zero gear be installed?
First of all, such a filter is needed for engines with insufficient power. This category includes:
- spent motors;
- worn-out motors;
- subcompact.
A separate category includes new, powerful equipment, the owners of which strive to achieve maximum speeds. A nulevik on a motorcycle can give it an increase of several km/h to its maximum speed.
In Russia, small mopeds and scooters are extremely popular due to their low cost. Their power is very low, which does not suit the owners very much. A conventional zero-resistance filter installed on the carburetor allows you to compensate for the lack of power.
It is not always advisable to repair heavily worn motors. They are often fitted with new or contract stock (standard) engines. If the owner is already accustomed to increased power, then the standard “stock” characteristics will no longer suit him. To tune such engines, they usually immediately install a zero.
The filter element is cleaned by blowing air
Method four
For home production of a filter device, you can use the following algorithm:
- We take an iron box of suitable size.
- We make a lot of small holes in it, no need to drill the bottom
- We make a fastening for the lid. In a rectangular box, you can attach the lid with screws.
- Cut an oval hole in the bottom corresponding to the hole on the carburetor.
- We take the mesh, cut it to the required dimensions and place it on the bottom of the box.
- We take a sponge, adjust it to the required dimensions, then soak it in a special oil for about 1.5 hours.
- We remove the rubber gasket from the old filter, install it on the carburetor, and attach our box on top.
- Place a sponge on top of the box mesh, having previously wrung it out.
- Close the lid of the box and secure it.
- We put a simple women's stocking on the top of the box of our homemade filter device; it should not come into contact with the carburetor.
Pros and cons of installing in a regular place
The advantages include the absence of changes in appearance and design integrity. The standard location is usually hidden by the manufacturer under covers, and the filter is not visible from the outside.
But there are many more disadvantages:
- Hidden installation of the filter under the housings prevents full access of air to the filter. For zero engines this is especially critical, because their purpose is lost - to give the engine as much air as possible.
- In addition, installing the filter under the housing requires the use of an air duct, which is a flexible rubber pipe that runs from the filter to the intake manifold, which integrates the intake, carburetor and cylinder.
- Due to the design features, the air duct most often has a curved shape, so the air flow in it changes direction. Passing through such a pipe also creates resistance to flow. To improve performance, a direct-flow filter for the carburetor is best suited. This type of zero does not require an air duct, has open access to ambient air and is the most efficient.
Pyrography
Good afternoon. This work is a couple of years old, I decided to put it on public display. Maybe my work will inspire someone, or maybe one of the masters will advise something. Thank you.
The drawing was transferred using tracing paper.
The next stage is burning on a pine board. It is more difficult to burn on pine, because... resin protrudes.
Here I cut out a drawing from plywood with a jigsaw and put it on the board.
This is the picture we got.
The plywood was attached to small nails without heads.
At the end I opened it with varnish. Yes, and burned the edges with a torch.
Is it possible to make a nulevik with your own hands?
On the Internet you can find a lot of information about making a zero-resistance filter with your own hands. Of course, such filters cannot achieve the transmission efficiency and filtration quality provided by factory products.
The modern zero is a high-tech product, and it cannot be assembled in a garage. However, you can make at least a filter with similar parameters yourself. The filter surface area is usually increased by using filters from equipment with a large engine capacity (cars). The point is to connect the carburetor and the large aftermarket filter without allowing contaminated air to be sucked in at the connection. There is a lot of information about such alterations and you can easily find it on the Internet.