With the onset of winter, two-wheelers lose their relevance. Using a car to cover short distances with heavy snow cover is not particularly practical and, in most cases, impossible. A snowmobile copes much better with this task.
In most cases, a winter mechanical vehicle is equipped with tracked rear wheel drive and front steering skis. High cross-country ability, versatility and ease of use make the snowmobile today the most popular means of transportation in the winter season.
Features of homemade snowmobiles
Nowadays you can buy a snowmobile at any motorcycle dealership, both in a large metropolis and a small city, but the prices of this equipment force many winter driving enthusiasts to make a homemade snowmobile on tracks with their own hands.
There are four important advantages of a self-made vehicle over a factory one:
- Price is the most important factor for most. The cost of some units from leading manufacturers of motorcycle equipment can exceed the cost of those assembled from scrap materials by 5-10 times.
- Parameters – the ability to assemble a vehicle of the desired configuration. This applies to both appearance and power reserve, type of chassis, etc.
- Reliability is a point that products from even well-known manufacturers cannot always boast of. In self-manufacturing, a person uses the highest quality materials and pays special attention to the most important components of the mechanism.
- The benefit is the ability to use materials, parts and devices lying around in garages and utility rooms from other devices.
At the same time, homemade snowmobiles find their use both on the streets of populated areas and on off-road areas of suburban expanses and ski resorts.
Manufacturing of individual snowmobile elements
The principle of converting a motorcycle, chainsaw and moped is almost the same. If you learn how to make individual elements, it will be much easier.
Suspension
When converting a vehicle into a snowmobile, special attention is paid to the rear suspension. It definitely needs improvement. To make it you need to prepare:
- chassis;
- two levers;
- connecting rails;
- hinges
After preparation, you can begin making the pendant:
- The front arm is connected to the sliding rails on one side and to the chassis on the other using hinges.
- Do the same with the rear lever.
- Position the torsion springs between the sliding rails and the rear torque rod.
- Place the fastening of two power elements between the suspension arms.
To secure the suspension, use tie rods.
Engine
Choosing an engine for a snowmobile is an important step, since the power of the vehicle and its ability to move on snowy roads depend on it.
The optimal engine power for a snowmobile is considered to be in the range of 6-30 hp. With.
Therefore, most often these vehicles are made with a Lifan engine or with a part from a motorcycle or moped.
Snowmobile lift
This device may be needed if your snowmobile is stuck in the snow or needs repairs. It’s not difficult to make a kind of jack:
- Make a channel-type structure from a metal corner 25 mm wide. Height - 19 cm. Make two holes in the middle for attaching the fork.
- Weld a plate to the bottom that will act as a guide. Place a similar part on top, but do not fix it. The distance between them is 14 cm.
- Make holes in these plates through which to pass the jack pipe. Make the top one spring-loaded.
- Next to the top plate, place another part at an angle, which will act as a hook and hold the spring-loaded part.
- Make a fork for the lift. Its length is 12 cm. Fix one side in the channel. Place the second fastening axis at a distance of 67 mm. Insert a piece of pipe into the fork that passes through the second axle. Weld a metal ring to this pipe (you can take a metal plate in which to make additional holes for rubber bands), through which you pass the jack pipe.
- Secure this ring with motorcycle rubber bands to the area under the spring of the top plate. To prevent the elastic bands from slipping, they can be secured with screws.
Wheels
For good cross-country ability, the vehicle is built on inner tubes. Snowmobile wheels must be large in diameter. But it is better to equip the structure with skis. They can be made from plywood and large diameter pipes. If there is such an opportunity, then they can be taken from another snowmobile, including a children’s one. Additionally, it will be necessary to make rotation bushings for them, while the presence of bearings in this system is not necessary.
Homemade tracked snowmobiles perform well. It is possible to make this part yourself. The caterpillar is driven by wheels that are located inside it, for which wheels from garden equipment are suitable. The part itself can be made of plastic pipes, even if two-track snow scooters are made. Pipes with a diameter of 4 cm are suitable. If they are cut, they can serve as caterpillar lugs.
Regardless of what vehicle is being converted to a snowmobile, how extensive the modification is, or who built the design, it is recommended that it be tested in an open area first. If they passed without problems, then you can go to longer distances.
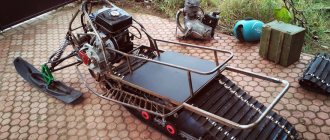
Do-it-yourself homemade snowmobile on tracks: where to start?
1 — rear light; 2 — tow hitch; 3 — body (plywood, s16); 4 — side reflectors; 5 — rear shock absorber (from the Dnepr motorcycle, 2 pcs.); 6 — gas tank (from the starter of the T-150 tractor); 7 — seat; 8 — main frame; 9 — electronic ignition switch (from the Voskhod motorcycle); 10 — ignition coil (from the Voskhod motorcycle); 11 — power plant (from a motorized stroller, 14 hp); 12 — muffler (from a motorized stroller); 13 — steering column; 14 — steering joint in a leather case filled with lubricant (joint from UAZ); 15 — limiter of vertical movement of the steering ski (chain); 16 — steering ski rotation limiter; 17 — steering ski; 18 — side ski (2 pcs.); 19 - generator; 20 — clutch lever (from a motorized stroller); 21 — drive chain guard; 22 — footrest; 23 — drive shaft drive chain; 24 — caterpillar drive shaft; 25 — lower track chain guide (polyethylene, s10, 2 pcs.); 26 — caterpillar chain (from the header of a forage harvester, 2 pcs.); 27, 31 — upper front and rear chain guides (polyethylene s10, 2 pcs.); 28 — shock absorber of the propeller articulated frame (shortened rear shock absorbers of the Dnepr motorcycle, 2 sets); 29 — support ski; 30 — rear spacer frame; 32 - rear axle.
A drawing of a homemade snowmobile is the most important step in the preparatory stage of manufacturing. This is where engineering skills come in , and in the absence of them, superficial sketches are made to create a general image of the future mechanism.
Before creating a drawing, you must determine the list of required components. The basis of a standard configuration snowmobile is:
- Frame - depending on the complexity of the design, it can be borrowed from an ATV, scooter, scooter, motorcycle, etc. If they are not available, the part is usually welded from thin-walled metal pipes with a diameter of about 40 mm.
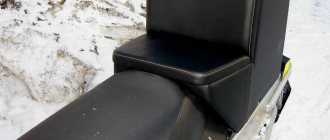
- Seat - given the difficult operating conditions of the equipment, the material of this element must have high water-repellent ability.
- Engine – selected based on the required speed and total weight of the vehicle. The most commonly used engines are walk-behind tractors, scooters, motorcycles, etc.
- Tank – a 10-15 liter metal/plastic container will provide carefree travel over relatively long distances and will not take up much space on the unit.
- Skis - in the absence of ready-made options, for self-production it is recommended to use nine/ten-layer sheets of plywood about 3 mm thick.
- Steering wheel – selected for convenience and practicality. Like the frame, engine and seat are removed from the specified two-wheeled units.
- Drive is a part that transmits rotating motion from the engine to the track. This function is performed well by a motorcycle chain.
- The caterpillar is the most complex and important element. Their types and methods of self-production will be discussed further.
Basic elements of a motorized dog
The most important piece of equipment is the engine. Typically, a single-cylinder carburetor gasoline engine is used to create motorized dogs. An equally important part is the rubber-metal track - the propulsion unit with suspension. With the help of a caterpillar, you can drive on snow, ice, and soft ground in warm weather. It is worth taking a closer look at all the components of a motorized dog.
Car engine
Most often, motorized dogs use engines from Honda, Yamaha (expensive) or Chinese brands (MTR, Lifan and other budget ones). These power units vary greatly in price, although their power is usually equivalent. Lifan engines with a centrifugal (dry) clutch have proven themselves to be excellent. Some people use a motor from a walk-behind tractor to create motorized dogs; they remove the engine from a Ural chainsaw or a Druzhba saw.
The motor from the Sh-58 moped, designed for manual gearbox shifting, is considered popular. Scooter engines can also be used. The main thing is that the product has good traction characteristics, a power of at least 6 hp. With. This is enough to transport one person and a load of 30-50 kg on a motorized dog. For a trip of two people and a load of 150-200 kg, it is better to choose an engine with a power of more than 9 liters. With. A chain tensioner is often used as an engine tuning element.
Motorized dog support frame
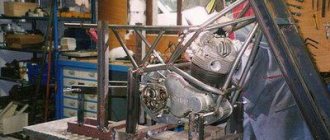
The frame must be of excellent quality, because on the road it experiences high loads, especially when driving off-road. This design is made entirely with your own hands, welded from rectangular metal pipes. Usually a pipe thickness of 3 millimeters is enough; thinner metal is not suitable, it quickly deforms.
You can see how to make a frame with your own hands in the photo and video. Take two pipes with a cross-section of 20*20 mm, add two more sizes of 20*40 mm, and form a frame. Two 40 mm corners are welded into it, and a protective frame for the engine is welded on top, which will prevent it from being damaged when the equipment rolls over. It is also advisable to attach a galvanized sheet to the frame with rivets to cover the track.
Motorcycle dog suspension
The suspension serves as an important indicator of the performance of the chassis. By design, it can be skating or sliding. The skating rink performs worse in the snow, but is ideal for movement in the warm season. The suspension on skids prevents the tracks from clogging, but is used only in winter: it needs snow to cool the system (ski module).
To make a motorized dog at home and travel in any season of the year, you should choose a modern roller suspension, but not with a rigid one, but with a spring support for the rollers. Such a motorized dog will move more smoothly on a frozen road. When driving, you will have to avoid too loose snow.
Motorized dog transmission
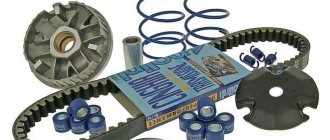
The transmission is responsible for transmitting shaft rotation to the main track sprocket. The gearbox can be CVT, mechanical, automatic gearbox, some have reverse (reverse capability). The advantage of an automatic transmission is a large traction force, the disadvantage is the rapid wear of a number of parts and the need for regular maintenance.
As a mechanical one, you can use a box from a VAZ or other old car. Its advantage is ease of maintenance and no need for frequent repairs, but using such a transmission is less comfortable. The variator ensures smooth transmission of force from the engine to the track, which helps reduce the wear rate of parts and save on gasoline. The downside is a weak drive belt that has to be changed regularly.
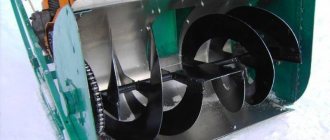
Motorized dog caterpillar
Such devices can be snowmobile or specialized, created specifically for motorized dogs. They differ in width, height, length. There are replacement snowmobile tracks on sale that can be used in the manufacture of motorized towing vehicles. The tracks from Buran are popular, but they are not distinguished by high cross-country ability; motorized dogs will only have to be used on a frozen body of water, on a well-trodden road.
You should purchase tracks that are not too narrow. A 50 cm product is considered optimal, since it makes the motorized dog stable, passable, and maneuverable. There are also “aggressive” off-road tracks on sale, their width is from 55 cm, and they have a special tread pattern. The products have an increased lug height - it is 32 mm (the standard is 21 mm). You can also make your own caterpillars from conveyor belts. Tracks are made of birch planks and other materials.
Electrical equipment and machine control systems
To control motorized dogs, they use a steering wheel that is connected to the gearbox, clutch handle, and gas, which should be taken from any suitable old equipment. Typically, the basic configurations of towing vehicles are equipped with a manual start, but if desired, it can be changed to an electric starter or a lighting coil can be added. All this can be easily constructed independently, but the cost of manufacturing a motorized dog will increase.
It is quite possible to do without an electric starter; besides, a manual start is considered more reliable in terms of breakdown. But without lighting at night it will definitely be bad for a motorized dog; this system must be provided. The car must be equipped with a 7 ampere coil so that problems with recharging the headlights do not arise.
Let's move on to practice
The frame, made of pipes or angles, is primarily equipped with a steering mechanism. Having chosen the height and angle of inclination, spot weld the element. Install and secure the motor according to the drawing, taking care not to tilt too much. A snowmobile should not have a long fuel line, so try to locate the tank close to the carburetor.
The next step is to install the track. Mount the driven axle with the canvas on at the back of the frame (on a fork, suspension, shock absorber, etc., depending on the type of structure), the drive axle - in the middle part of the snowmobile (most often under the driver's seat), in the shortest possible connection with the engine. The gears of both axles are pre-engaged.
Next, minor work is carried out: the fuel tank is connected, the throttle and brake cables are connected, the seat is installed, etc.
How to make an ATV from a scooter?
To assemble an ATV from a light scooter, you need to prepare a number of tools. Welding equipment and a grinder must be used in the work. You will also need a variety of hand tools, from screwdrivers to wrenches.
The workshop is equipped in a heated, well-ventilated room or outdoors under a canopy in the summer.
To make an ATV from a scooter with your own hands, the design drawings will need to be examined in detail before starting work. It is best to develop the scheme yourself, working out every detail of the future system.
You need to start assembly with the frame, which is taken from the donor scooter. It will need to be modified, additionally boiled and a trunk located in the front or rear made.
Additional material will definitely be needed to assemble the frame. It should be a thin-walled pipe with a round or square cross-section. It should not be heavy, otherwise the weight of the ATV will be large. Because of this, it will lose maneuverability and controllability, and too much load will be placed on the engine. Because of this, it can fail quite quickly.
It is not recommended to use water pipes, as they are very fragile and are not suitable for such purposes. To install all the necessary components and mechanisms, brackets are welded to the frame.
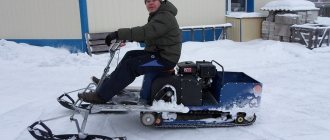
Homemade snowmobile from a walk-behind tractor
This transformation is especially popular today. The walk-behind tractor can be used either partially or completely. In the first case, a supporting frame with a rear axle is welded to the unit (engine with steering fork and wheels). The most difficult stage in this case is the transformation of the working shaft of the walk-behind tractor into a drive gear.
A homemade snowmobile from a walk-behind tractor with partial use of parts is more versatile. In this case, only the engine and steering fork are removed from the “donor”, to the lower part of which skis are attached instead of wheels. The motor itself can be located in the rear part of the structure.
It should be noted that the engines of the main part of the walk-behind tractors are designed for the weight and pressure of the wheels, which is several times less than the caterpillar one. Therefore, in order to avoid increased wear of parts and fuel consumption, it is better to equip such a snowmobile with low-pressure wheels.
Many people living in cities and villages, where there is more snow than asphalt, are concerned about the question of what to get around on. The ideal option is a snowmobile. But not everyone can afford such a purchase. At such a moment, it is worth remembering what our fathers did in such a situation. And they made motor sleighs. Yes, you can buy them ready-made. But the problem is that not all cities have them on sale, since this is a new product on the market, and besides, homemade ones are always better. Therefore, if you have certain skills and experience, you should decide: “We make our own motor sleighs.”
Using a walk-behind tractor
In the design, you can use a walk-behind tractor, which will form the basis. However, it will be possible to achieve a speed of 5 km/h. It is necessary to make two tracks from the conveyor belt, and the cord will be single-layer. By using waste plastic pipes, you can make tracks. Using polyethylene, you will need to cut out the leading stars using a jigsaw.
A do-it-yourself motorized dog from a walk-behind tractor is made using a technology that involves supplementing the equipment with a sedentary sled. The conductor is made from an old door, onto the surface of which it is necessary to fill glazing beads and bars, the distance between them will be 35 mm. The tracks and tension wheel are put on the drive sprocket.
Motor sleigh - what and with what
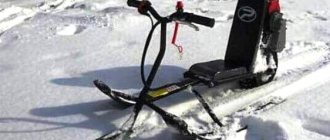
But first, it’s worth understanding what a motor sleigh is and what they are needed for. Motor sleighs are a means of transportation and cargo transportation in snowy conditions. They are basically a very small snowmobile with a wheel. The motor is used either from a scooter or a snowmobile.
For control, there is a handle on which the brake system and fuel supply lever are installed. The seat is small, designed for one person. It is driven by a small wheel with very spiky rubber or a small track. For comfortable movement on snow, skis are installed.
In general, making a snowmobile yourself is not as complicated a process as it might seem at first. Homemade products only seem complicated at first. It is enough to have basic knowledge of how motors work and learn (or ask someone) welding.
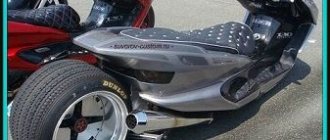
ATV from a scooter: assembly features
An ATV is a useful household, fashionable and functional appliance. Therefore, scooter owners dream of switching from two-wheeled to four-wheeled motor vehicles. It is quite possible to make an ATV from a scooter with your own hands. To do this, you need to prepare the appropriate components and tools. This is a fascinating process that will result in a universal self-propelled vehicle.
The scooter is a lightweight motorcycle that can easily make an excellent ATV. The engine of this scooter is located under the seat, which is an advantage, since the all-terrain vehicle will have to be driven on rough terrain, rocky or muddy roads. The motor in this design will be reliably protected from dirt and moisture entering the system.
The scooter turns into a lightweight ATV that has all the advantages of popular all-terrain vehicles. The low weight is explained by the absence of a heavy body, which guarantees the maneuverability of the motorcycle, as well as its low inertia. Another advantage of an ATV assembled from a scooter is the fact that even one person can pull it out of a hole or sticky mud. This technique is perfect for both entertainment and simple household tasks. For example, with the help of such an ATV it will be possible to transport small loads. The advantage of motor vehicles assembled from a scooter is low fuel consumption.
What you need to know about the design
- A motor sleigh consists of a running gear - a motor, a gas tank, wheels, skis, a fuel supply and ignition system. Control - steering wheel, much like a bicycle. There is also a frame and a seat. Let's take a closer look at each element of the chassis.
- Engine – for making a snowmobile with your own hands, a small engine from a scooter or moped is ideal. It is important that it withstands cold weather well and has the ability to be wound by lever or cable. It was also possible to use the oil-fuel mixture as fuel.
- Gas tank - any container that can withstand the presence of fuel inside will do. Therefore, plastic bottles are canceled - they can melt through. An excellent option would be to use a ready-made gas tank. But if you are itching to make a sled with your own hands inside and out, then you can make the tank yourself. This will be discussed later.
- Almost any wheel will do, but it is best to use a car wheel, as it is easier to find studded tires for it. An excellent option would be a wheel from an enduro motorcycle; even a porcupine might envy its needles.
- Skis – it’s better not to skimp here and use alpine skis. They are stronger and more flexible, so they can bear weight more easily. If they don't fit in length, we make them shorter.
- Fuel supply and ignition - everything will be together with the assembled engine, so there is no need to invent anything here.
Why is it worth making a motorized dog?
The equipment is compact, unpretentious and does not require a separate storage room. If you make such a motorized towing vehicle yourself, it will be able to make your life easier, this especially applies to fishermen and hunters, as well as lovers of active winter recreation. This device can be assembled from available materials; this approach will be more cost-effective compared to purchasing a factory-assembled model.
What can you take ready-made?
To make something like a motorbike, you don’t need to do everything from scratch. You can take some element, design, sold in the store. In order not to buy a new scooter, you can take it from your own hands, it will be even cheaper. An even cheaper option is to look at the disassembly markets, where there is a lot of this extra stuff. You can use a snow scooter for the base of a motorized sled, but you need to choose a completely metal one and additionally change the design with your own hands, otherwise this subtype of sled simply will not withstand the loads.
The wheel is also worth looking at in the store. In addition to the above-mentioned wheel from an enduro motorcycle, you can use standard wheels from a car, and for better grip on snow, simply add chains. There is also an option using dutik – tubeless rubber wheels. But first you should strengthen them with a chain or strips of iron. For wealthy citizens, an excellent option would be to introduce into the design the so-called VGD - off-road tracked propulsion units.
The seat can most often be taken from the same scooter, and if you want to make it yourself, you can use publicly available diagrams. Skis are bought in a store or kept in a garage. It is best to use ultra-light alpine skis; with them, the motor sleigh will not fall into the snow. Some homemade products use now popular modules for motorized towing vehicles as a basis. But if your task is a motor sleigh with minimal investment, then this option is not for you.
Preparation for work
Before you start assembling a motorized dog with your own hands, you must decide on its characteristics. It is important to decide what load capacity the equipment will have, what engine it will power, and what type of transmission will be used in the design. The mechanic needs to decide whether the engine will be started with an electric starter or manually.
When motorized dogs are made with your own hands, they are usually supplemented with devices that will respond to the owner’s needs. This may include:
- winch;
- circuit protection;
- additional light.
You may need a motorized towing vehicle in the form of a pusher. All these characteristics will allow you to determine the required set of tools and materials.
We assemble the sleigh with our own hands
First, you need to decide on the design; to do this, look for photos or videos of motor sleighs and copy them. If you intend to make motorfins yourself, then you should arm yourself with a pencil. First, sketch out on paper what you want to see. After this, begin to sweep aside those parts without which the unit will not lose its qualities. Add stiffeners and fastenings as necessary. Once you finally understand what you want, move on to the drawings. At this stage, it will become clear which bolts and nuts are best to use, which elements will be homemade, as well as the main welding points.
Look for scooters at scrap yards or markets. Any will do, the main thing is that their engine volume is no more than 50 cubic centimeters (otherwise the sled will fall under the A1 license category). Also take into account such a nuance as a stable injection and ignition system. Remaking it yourself and bringing it to mind is for those who want to do absolutely everything with their own hands. A gas tank would be a good idea. But at the same time, you can use a can of gasoline, or make it yourself.
Important: do not solder the tank under any circumstances. Only welding. Otherwise, you can witness the “tin plague” - a process when tin becomes brittle in severe frost and breaks out of the seams.
Start assembling the frame following the drawings. At this stage, the ability to do your own welding will come in handy. Use pipes for the frame. They are easier to bend than rolled profiles. They can also be connected at sharp angles without loss of stability. This will make your sled more aesthetically pleasing. Don't forget to also make a bushing for the snowmobile's steering wheel. Simply weld a piece of pipe larger than the handlebar post at a 90-degree angle to the frame.
Front and rear suspension
Homemade ATVs are equipped with front or rear suspension. It is easier to mount a ready-made front suspension from an old motorcycle. You can use other options:
- Rear axle from the car. It must be shortened to fit the parameters of the quadric. The advantage of this method is the presence of a differential. The disadvantage of the bridge is its large mass.
- Cardan reducer on the rear axle. An independent suspension with high ground clearance is suitable for an all-terrain vehicle. In this case, the suspension arms are fixed to the frame using bolts.
To prevent the ATV from turning over while driving, it is recommended to tilt the front suspension strut. The shock absorbers are from Izha. If you have the financial opportunity, it is better to install gas-oil shock absorbers with pumping. They provide suspension adjustment based on the road surface.
The steering system of an ATV is similar to that of a car. A steering wheel or motorcycle handlebar is installed. Some experts advise combining 2 types:
- motorcycle handlebars, shaft and lever at the top;
- parts of the steering system from the car are below.
You can make the steering shaft with your own hands. For this, a pipe with a diameter of 20 mm and a wall thickness of 3 mm is used. You will need to install a travel stop at the bottom of the part.