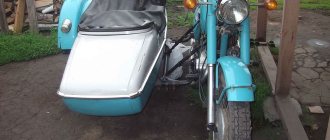
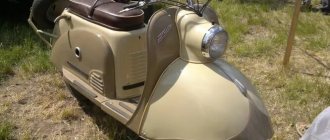
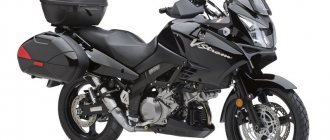
Dnepr is one of the most unique representatives of domestic motorcycle production. Positioned as a unit for moving heavy loads, the MT is also capable of accelerating speeds of up to 120 km/h, and its reliability and reliability are legendary abroad.
The motorcycle also appealed to tuning enthusiasts. Its universal design allows you to easily add and change elements without damage, or rather, on the contrary, with benefit to technical parameters.
Basics and tuning options
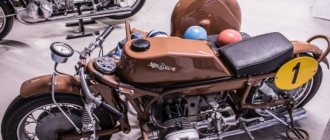
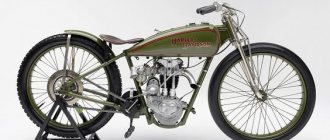
The “King of the Road,” as fans call it, can be converted into either a sport or a classic (chopper). The last option is the most popular, because it better suits the characteristics of the motorcycle.
A distinctive feature of choppers is the elongated frame , with which do-it-yourself tuning of the Dnieper begins. After welding, the frames are usually sandblasted until they are completely shiny. When the pendulum is lengthened, the rear wheel moves back 7-10 cm, and the front fork is lengthened no more than 15 cm from the standard version. The inclination of the latter is selected based on considerations of convenience and safety. Lengthening the pendulum can be done in a tuning workshop, or you can do it yourself using video instructions.
If possible, shock absorbers are replaced with lighter, chrome-plated ones. The fenders and their fastenings, side support, driver's footrests, kick starter and headlight are also chrome-plated. The engine is polished until it fully matches the chrome elements.
Tuning the exhaust system is often achieved by installing nickel-plated elbows and forward flow systems. Such an innovation, firstly, will complement the attractiveness of the appearance, secondly, it will improve (albeit not significantly) the performance of the engine, and thirdly, it will give the engine sound a dense, bassy tone.
Tuning a Dnepr motorcycle also involves installing the following modules:
- The tachometer gives the bike a more “serious” look and gives its owner ease of operation.
- The starter modernizes the unit and adds practicality to it.
- Fifth gear - a new 5-speed gearbox, or replacing reverse gear with a new speed, together with a new gearbox, can raise the speed limit by a couple of tens of km/h.
Increasing the bike's speed limit is also achieved by lightening its structural components. For example, a gas tank from a Honda rebel 250, which will also complement the classic “road monster” style.
Chip tuning in Tula
Recently, more and more people are trying to modernize old Soviet technology. So I got such a project, with the installation of a modern power supply and ignition system on a Dnepr motorcycle. We decided to install an Abit injection system on this motorcycle. What we got is described below. We will look at the features of installing an injector on a Dnepr or Ural motorcycle in a separate article, but in this description there is a detailed description of the project and the features of modernization and tuning of these motorcycles.
This story began when an acquaintance told me that someone had thrown away a Ural and simply needed to pick it up. A couple of days later we got ready and came to inspect the find; in fact, the Ural turned out to be the Dnieper, or rather an engine from the Dnieper, mounted on a rusty Ural frame. Somehow we dragged this miracle home on a rope. Naturally, the condition was so-so, not a trace remained of the wiring, the cables were torn, there was rust all over, the valve covers were broken. In general, a standard situation. Well, having caught my breath, I got to work. We bought all the necessary and unnecessary missing parts, a book on operation and repair, and read all the Internet resources on boxers. Whether long or short, but after three days it came to life. First trip, success. Meanwhile, it was August. After driving around a bit, having suffered with K-68 carburetors with contact ignition, experiments began with installing the BSZ. I must admit, not a single WOOFER circuit I soldered worked. It started to get colder, and somehow the work stopped by itself. But the presence of this device in my garage haunted me. After rummaging around a bit on oppozit.ru, I wanted to do something similar by spring. Well, what else can you make from boxer material if not a chopper? But making the Great Wide Wheel (GWW), another frame and all the attributes of a chopper was daunting. I found myself a new passion - bobbers.
Just in time, an advertisement for the sale of a frame from the Dnieper with documents came in handy... The next day, the frame was already lying on the roof of my car and was driving towards the dacha - the place of all the work described below. For a long time I wondered how I could make something beautiful without changing the frame. In general, the eyes were afraid, but the hands did. In agony and broken fingers, what I now call the Dnieper was born. The engine was the first to go under the knife: after disassembling it turned out that some bad person forgot to put a pressure-retaining ball in the pressure-reducing valve, i.e. the valve was constantly releasing oil pressure. Unfortunately, this was not the first surprise. All the screws that were in the motor were carefully tightened with a chisel with a blow, i.e. there were no slots anywhere. Threads were missing in half of the holes. The play in the piston was such that a screwdriver could go through; oddly enough, the liners were not worn out much, but, nevertheless, there was play. All mating surfaces (such as the plane of the front cover and the crankcase) were separated before me with a screwdriver and a hammer, i.e. were disfigured by deep cavities and risks through which oil flowed. The valves were not only not ground in; a gap of about half a millimeter between the seat and the valve was visible in the light. In general, we could go on and on about the handiness of the previous owners, but that’s not what we’re talking about now. Having removed the piston, I went to the borer, who measured everything with a bore gauge and said: “does it work?” The top of the cylinder was within par, and the bottom too, but the middle was so worn out that we couldn’t find repair pistons for boring. I had to fork out money and buy a new piston. It was decided to immediately treat the pistons with MS - 2000, so to speak, as an experiment. I didn’t replace the crankshaft with a new one (and, unfortunately, I couldn’t find the original in Tula), I just decided to grind the journals for repair. By the way, not every contra wanted to work with him. The heads were beyond the point of destruction, the original bronze guides were worn out by the “egg”, new guides from the VAZ 2108 were bought to replace them, they fit there without modifications, just like the original ones.
I did not put on the valve stem seals. The valves were purchased new and the seats were cut to fit them. After cutting everything fit perfectly. The experiments with valve springs took a long time, at first I installed springs from a VAZ 2112, but as it turned out in vain, after assembling the motor the spring compressed and closed, causing the rod to bend.
They were replaced by springs from a VAZ 2108; the original Dnieper plates had to be sharpened for them. Next came tuning! First of all, I increased the compression ratio, calculating that at E = 11 it was necessary to cut off 3.5 mm from the cylinder liner in the area where the head fits. After the preliminary assembly, I was already glad that nothing stuck anywhere, everything was spinning as it should. Flushing the combustion chambers showed that the actual compression ratio was 10.8, so be it.
Then the flywheel was subjected to torment, a good part of the meat was removed from it, after modifications its weight was 2.5 kg.
Then the heads were used, the inlet channels were bored to ~38mm, the boss under the guide was partially removed, and bored with a drill with a milling attachment.
Here, at an opportune time, a camshaft from an MT10-36 turned up for me (I had an MT 10-32), having measured its phases (240 to 240), I came to the conclusion that more anger was needed. After talking with friends at the plant, one engineer and I drew a template for a new cam profile, discussed the welding procedure with the technologist (for which I heard a lot of Russian obscenities) and finally boiled it down. The procedure, I must say, is not simple, if in short, then first the top hardened layer is ground off, then the shaft is released from the general hardening and steel is welded onto the cams (I honestly don’t remember the brand), then the desired profile is produced on a grinding machine and hardened, and then local hardening is carried out . The company does not deal with this kind of product, so it was just an experiment; time will tell whether such a design will work. The output turned out to be phases of 275 degrees (the data may not be accurate, since I am writing everything from memory, but it happened a year ago).
Well, for such a shaft, the pushers should not be simple, especially since I didn’t like my relatives for two reasons: 1) they work directly on the crankcase 2) they weigh as much as 100 grams. I made the pushers from Ural ones, machined the aluminum housings for tension into the 0.05 bottom crankcase and milled a groove for lubricating the heads.
Afterwards we got to the lubrication system: rubber rings were installed to seal the guitar-crankshaft connection, and an oil filter from Deu-Matiz was embedded into the system (by the way, it fits perfectly with the filter adapter from the Muscovite). The meaning is this: we plug the original channel from the oil pump (for example, we screwed a screw into it perpendicular to the channel), and by screwing in the tube from the gazelle clutch instead of the original technological plug, we divert the oil to the filter, after which, already filtered, we return it to the system through the pressure sensor hole , the channel to which is drilled to 6mm. At the same time, we turn off the centrifuge with a homemade “saucepan”.
Well, that seems to be it, can we collect it? They collected it and I was happy for three weeks. But then I accidentally saw an advertisement for the sale of ECU January 4.1, then I still did not understand what I was getting into and there was no one to stop me. Ebu came to me from Kirov in 2 weeks. Then work began on the injector: the first question was how to make a synchro disk? After looking at all the parts of the motor, I found the simplest option to make windows in the flywheel, and after 2 days it was born just with the help of a file and a drill. DPKV installed from VAZ.
Phase sensor too. In general, then all the sensors were VAZ ones. The next stage was the intake: it was welded from stainless steel pipes with a diameter of 38 and 51 mm.
Then I decided to install the starter. I drew a drawing, and soon they made a ring gear out of 45 steel with a hardened tooth. But horror of horrors, after trying on the starter the intake did not rise... I had to redo it. After the rework, everything began to slowly come together. I also made a tee with an RTD, replacing the fuel rail.
Actually, I’ll stop with those parts for now and switch to appearance. The appearance was also born in suffering, at first it turned out the way it turned out, then the wing was shortened, the shock absorber mounts were overcooked, etc.
I puttyed it for a long time, removed it, welded the fuel pump into the tank, and so on. In general, I’ll post photos of how and what happened. I painted it myself, using Sikkens paint, and picked up a spray gun for the first time. It didn't seem to turn out bad.
Here we go? And so, the first start, everything is connected, we turn on the power, turn on the ignition... and bummer, the fuel pump pumps without stopping, there is no spark, the injectors don’t click either. To say that I’m upset is to say nothing... Well, I have to live somehow, in the box there was a mono-injection from the Niva, prepared for my Volkswagen, well, I decided to try it with it. I assembled everything, after turning on the power, the fuel pump turned off as expected after 3 seconds, the injectors responded to cranking, there was also a spark, but the engine did not start. No matter what I did, no matter how hard I turned it, there were distinct flashes, the engine started, but did not start. I suffered and suffered, but I never started. In general, there was already an idea to switch to carbs, but the Russians don’t give up! Wandering around the Internet, I came across this site, after which, after discussing all the nuances with Sergei, it was decided to continue construction on the Corvette control unit from ABIT. This is what we have today. The receiver is made from a piece of aluminum profile, the throttle is VAZ 2112. Soon the assembly will be completed and the firmware rollback will begin.
Video:
Engine tuning
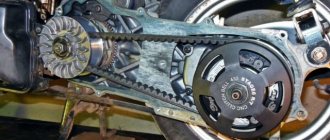
Tuning the Dnepr engine is caused by defects in the ignition and fuel systems. The first is corrected by installing electronics and a carburetor from a VAZ 2106 , the second is by replacing the standard centrifuge with an oil filter.
In the latter case, it is desirable to install additional oil channels, which entails altering the automobile oil pump. To create the pump housing, a metal blank is machined into which a cavity for the gears and axial holes are machined. Next, the fittings are cut in.
An adapter for the filter is also made independently. It contains two pressure reducing valves:
- Dumps excess oil to timing gears.
- By redirecting the oil to additional line, protects the crankshaft from lack of lubrication when the pressure drops to 1-2 atm.
This system allows for trouble-free lubrication of all elements with purified oil.
Messages [1 to 20 of 24]
1↑ Topic from Sergey-1 16-10-2013 13:57:20
Topic: Engine conversion from Dnepr-11
2↑ Reply from YRII 16-10-2013 14:16:20
Re: Engine conversion from Dnepr-11
Edited by YRII (16-10-2013 14:30:49)
3↑ Reply from Sergey-1 16-10-2013 14:29:30
Re: Engine conversion from Dnepr-11
The piston stroke increases with shortened connecting rods. If you set it to 136 mm, the working stroke will increase to 72 mm. But if it’s 129 mm, then the working stroke is up to 80 mm. I WOULD LIKE IT TO BE 80 MM. WITH A 136 MM CONNECTING ROD EVERYTHING IS OKAY. YOU JUST PROBABLY NEED TO MAKE A LAYOUT AND EVERYTHING WILL BE CLEAR ON IT. ONLY 68 MM STROKE ON ORIGINAL CONNECTING RODS. WITH SUCH ALTERATIONS, THE VOLUME OF THE COMBUSTION CHAMBER INCREASES. BUT THIS IS NOT BAD, YOU CAN ALSO RIDE A SUROGATE. There are many pros and cons. Original connecting rod 141 mm (all along the axes)
4↑ Reply from YRII 16-10-2013 14:42:32
Re: Engine conversion from Dnepr-11
The piston stroke increases with shortened connecting rods. If you set it to 136 mm, the working stroke will increase to 72 mm. But if it’s 129 mm, then the working stroke is up to 80 mm. I WOULD LIKE IT TO BE 80 MM. WITH A 136 MM CONNECTING ROD EVERYTHING IS OKAY. YOU JUST PROBABLY NEED TO MAKE A LAYOUT AND EVERYTHING WILL BE CLEAR ON IT. ONLY 68 MM STROKE ON ORIGINAL CONNECTING RODS. WITH SUCH ALTERATIONS, THE VOLUME OF THE COMBUSTION CHAMBER INCREASES. BUT THIS IS NOT BAD, YOU CAN ALSO RIDE A SUROGATE. There are many pros and cons. Original connecting rod 141 mm (all along the axes)
The piston stroke increases with shortened connecting rods. If you set it to 136 mm, the working stroke will increase to 72 mm. But if it’s 129 mm, then the working stroke is up to 80 mm. I WOULD LIKE IT TO BE 80 MM. WITH A 136 MM CONNECTING ROD EVERYTHING IS OKAY. YOU JUST PROBABLY NEED TO MAKE A LAYOUT AND EVERYTHING WILL BE CLEAR ON IT. ONLY 68 MM STROKE ON ORIGINAL CONNECTING RODS. WITH SUCH ALTERATIONS, THE VOLUME OF THE COMBUSTION CHAMBER INCREASES. BUT THIS IS NOT BAD, YOU CAN ALSO RIDE A SUROGATE. There are many pros and cons. Original connecting rod 141 mm (all along the axes)
I may be stupid, but how can you increase the stroke if the axis of the crankshaft pin is shifted from the axis by 34mm, so the stroke will be 68mm, how can you increase the stroke without changing it, without shifting the pin in the crankshaft from the axis without changing the shoulder - I don’t understand the shift, excuse me, I don’t get it at all . The piston offset is yes, but I don’t understand the stroke
Handy tools and tuning of the Dnieper for sports
Tuning the Dnieper for sports primarily involves installing a plastic cladding. In the absence of special cladding panels and panels, the cladding can be made from a foam plastic model. Cheap and abundant material allows you to worry-free experiment with the design of the unit until the best option is found.
After cutting out the model, the foam is coated with a layer of liquid that prevents the fiberglass from sticking to it. The latter is cut to size, soaked in epoxy resin and applied in 4-5 layers to the foam. During the first two layers, it is recommended to add metal shavings to the resin, and, if possible, place a thin metal mesh between the fiber and the foam to strengthen the frame.
To completely dry the structure, you need to wait about a day, after which the foam can be removed. The resulting cladding is puttied, sanded, primed and painted. Painting in most cases is done in bright shades of blue, green, yellow, and red. Airbrushing is not uncommon, and it is performed entirely depending on the owner’s imagination.
Just as in the case of a chopper, tuning for sport involves changing the frame design, only in this case without lengthening or significantly tilting the front fork. A high “rocket” rear fender is installed, and the recessed seat is made to slope towards the high gas tank. The handlebars are shortened to an extremely comfortable length, and the exhaust pipe rises at an angle equal to the rear fender.