Scooters and mopeds are becoming increasingly popular and in demand these days. It is not surprising, because with this type of transport traffic jams and congestion in big cities are not terrible, expensive maintenance and high fuel costs are not required. Perhaps the only drawback of scooters and mopeds, like all similar vehicles on domestic roads, is their fairly frequent breakdowns. The variator is one of the elements of motor vehicles that is most susceptible to malfunctions. Why is this part needed, why does it fail, and where can I buy a variator for a scooter inexpensively?
Working principle of automatic centrifugal clutch
As you know, the clutch is designed to connect and disconnect the engine and the drive wheels. When the clutch is engaged, the engine and wheels are connected, and the engine transmits torque through the transmission to the wheels. When the clutch is disengaged, the engine and wheels are disconnected, the engine continues to operate, but no torque is transmitted to the wheels. To connect the engine and wheels (via a gearbox), the clutch uses friction. Clutch discs or pads, rigidly attached to the engine shaft, are pressed against the gear disc and begin to rotate it using friction. In a mechanical (manual) clutch, powerful springs are used to press and create friction force.
This clutch is normally always engaged. To release the springs and disengage the clutch, you need to press the hand lever.
An automatic transmission uses centrifugal forces to press the pads down and create friction. When the engine is idling, the automatic clutch is always disengaged. The pads, rigidly mounted on the engine shaft, simply slide along the transmission disk, because the friction force is too small. Moreover, they are kept from contact with the disk and springs. As the engine speed increases, the centrifugal force increases, the pads begin to press harder against the transmission disc, the friction force increases, and torque begins to be transmitted from the engine to the transmission and further to the wheels. At the same time, the friction force increases smoothly, therefore the torque also increases smoothly. This explains the soft operation of the automatic clutch, because it is a kind of shock absorber for transmitting torque.
Most scooters have a chain drive from the gearbox to the drive wheel
This is how the clutch on a scooter works. But the transmission consists of more than just the clutch. Not a single engine in the world is capable of turning the drive wheel in one rotation of the crankshaft. In order for the wheel to make one revolution, the engine rotates the crankshaft several times. To ensure this, a gearbox is used in the scooter's transmission. Usually this is a pair of gears. The small one is rotated by the engine and turns the large gear, which transmits torque to the wheel. That is, for the large gear to turn once, the small one will turn along it several times. The ratio of the diameters of these gears is called the gear ratio of the scooter.
Most scooters have a chain drive from the gearbox to the drive wheel. The chain fits on two sprockets. The drive sprocket is located in the engine. The driven sprocket is located on the wheel. In this case, the gear ratio is the ratio of the diameter of these sprockets.
However, some manufacturers or tuning enthusiasts install a rear axle on a scooter. In this case, the gearbox is not located in the engine, but in the rear axle.
The gear ratio is changed not only by gearboxes, but also by the gearbox. In modern engines, a variator is used for this. It allows you to smoothly change the gear ratio smoothly and without jerking. It is this part of the transmission (variator) that the electric starter rotates when starting. However, electrics may not always work. The wiring or generator may fail, and the electric start will be unavailable. Then Kickstarter will help. The kickstarter device on a scooter is based on the use of muscle force. The kickstarter lever is connected to a gear sector, which, when you sharply press the lever with your foot, rotates the variator, and through it the engine.
The transmission is not only made up of the clutch.
Design and characteristics of a scooter's variator
The variator is one of the most important components of a scooter. It is a mechanical continuously variable transmission. This is both a complex and simple knot. The task of the variator is to replace a large and inconvenient gearbox. Thanks to this part, the design of the scooter has been greatly simplified, and it has become easier for the driver to control it. Not the last task of the variator is to transmit torque to the wheel with maximum efficiency. In appearance, this is a rather simple mechanism, but in order to set it up you will need maximum attention and skill. To set it up correctly, you need to remember the following factors: the weight and size of the rollers, the diameter of the pulleys, their amplitude, the length and width of the belt, the stiffness of the torque driver spring, the stiffness of the clutch springs, and so on.
There are many types of different variators, but in scooters, as a rule, V-belt ones are installed, of which there are in turn two: auto-V-belt and mechanical.
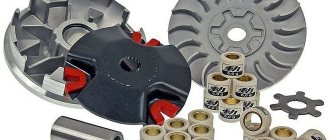
The design of a V-belt variator is as follows: two sliding pulleys and a V-belt connecting them. The two conical surfaces that form the pulley are called “cheeks,” and there is a certain gap between them. The pulley that is rotated by the engine is called the drive pulley, and the one from which the power is taken is called the driven pulley. The drive pulley is attached to the left journal of the crankshaft, and the driven pulley is connected to the rear wheel gearbox through the clutch mechanism. When the crankshaft speed changes, the variator clutch changes the distance between the pulley cheeks.
V-belt variator
The V-belt variator consists of: 1 - fixed cheek of the drive pulley, 2 - V-belt, 3 - movable cheek of the drive pulley, 4 - plate with guide weights, 5 - weights, 6 - fixed cheek of the driven pulley, 7 - movable cheek of the driven pulley, 8 — spring, 9 — centrifugal clutch. Due to the fact that scooters are equipped with V-belt variators, they are quite easy to operate even for people who have never driven a motorcycle.
A scooter's variator can be classified as a mechanical transmission type. To put it in plain language, the variator is capable of providing the optimal transmission ratio at a certain point in time. Inexpensive scooters are equipped with mechanical variators; their operation is carried out by rollers. This solution did not work well. Friction and temperature have a negative effect. Expensive branded models are equipped with CVTs, which are controlled by an on-board computer. In order to maximize the capabilities of a standard mechanical type variator, install rollers that need to be selected according to weight, or it is better to buy a ready-made set and thus the power of the scooter will increase and it will work more smoothly.
The variator is closely related to the operation of the clutch. If one thing does not work correctly, it will affect the work of the other.
There are several parameters by which you can determine the correct operation of the variator and by which you can judge its good tuning. First, the belt should not slip in the pulleys. Slippage should be minimal. Otherwise, it can damage the transmission and parts will wear out much faster. How can you determine that slippage is occurring? You will see that your scooter is "roaring, trying to go, but it is not succeeding." Slippage can also be caused by excessive wear. Second, the engine speed must be constant. Even at the factory, the scooter’s variator is adjusted optimally using special weights. Some experimenters change them to lighter ones in order to increase acceleration, but this should not be done, otherwise you can lose not only the acceleration speed, but also the maximum speed in general. The factory setting of the variator is considered ideal, and changing it is not recommended; it can only worsen the situation. The most optimal setting allows you to ensure smooth acceleration without any failures and, most importantly, in the desired speed zone.
Tuned motor on a scooter
Sooner or later, any owner thinks about tuning the engine to increase its power. However, this does not provide a complete improvement in the desired characteristics. Yes, the scooter accelerates faster and carries more weight, but the speed remains the same. The engine speed, which provides one turn of the drive wheel, remains unchanged. In addition, standard clutch settings become unacceptable as engine power increases. The clutch begins to slip, because the friction force created is designed for standard engine power.
In both cases, it is necessary to adjust the transmission (gearbox, clutch):
- Setting up the clutch involves selecting the springs that press the pads away from the disc, as well as selecting the pads themselves. Heavier pads with more lining surface area will provide more friction force. This allows more torque to be transmitted. Such a clutch will work reliably even with increased engine power.
- Setting up the gearbox involves changing the gear ratio. The gears are replaced with tuning ones.
Today, tuning parts, including gears, can be found without problems. When changing the gear ratio, one revolution of the wheel is provided by fewer engine revolutions. A tuned engine is able to provide such power. At equal engine speeds, the drive wheel of a tuning scooter makes more revolutions, so the speed develops higher. The gear ratio can also be changed by adjusting the chain drive.
Sooner or later, every owner thinks about engine tuning.
Where to buy a variator for a scooter
Many motor vehicle owners ask the question: “Where can I buy a really high-quality and reliable variator?” Some go to regular retail motorcycle parts stores, others prefer online services. And for those who want to save their time and money and, at the same time, buy a CVT from the original manufacturer, there is the MotoArt company. This online store is the official supplier of motorcycle parts for all models of scooters and mopeds. Only at MotoArt - favorable prices, large assortment and fast delivery throughout Ukraine. Detailed information can be found on the website.
How to properly set up a scooter's chain drive?
Setting up a chain drive involves correctly adjusting the chain, as well as selecting the gear ratio. The size of the drive sprocket (on the engine) and the size of the driven sprocket (on the wheel) are different. The difference is in the number of teeth and diameter, which is the gear ratio of the chain drive. Changing it will result in either an increase in speed or an increase in thrust.
Each owner himself determines what is more important:
- if you increase the diameter of the drive sprocket, the speed will increase, but the thrust will decrease;
- If you increase the driven diameter, the thrust will increase, but you will have to sacrifice speed.
Tuning sprockets can be easily purchased in online stores. Most often, replacing sprockets also requires replacing the chain. The chain is selected for specific sizes. The main requirement is that the chain length matches the installed tuning sprockets. The best option is to purchase ready-made tuning kits for a specific scooter model.
The chain drive requires maintenance. It must be cleaned of dirt and dust and lubricated periodically.
Important: the chain tends to stretch during use. Therefore, you need to control its length and periodically tighten it.
Proper chain adjustment involves setting up the chain drive
The need for a tightening is determined by the sagging. The amount of sag in the lower chain branch is set by the manufacturer. On average, it should not exceed 1-2 cm. A sagging chain easily flies off the sprockets when moving.
A tightened chain (without any slack at all) experiences large overloads during suspension operation.
Common CVT malfunctions and causes of their occurrence
The most common breakdowns of the variator on a scooter or moped are:
- wear of variator elements;
- mechanical damage to rollers and pulleys;
- faulty fan blades;
- unreliable connection of parts to each other, etc.
The main reason for the occurrence of such variator malfunctions is a violation of the vehicle operating rules. This includes not only an aggressive driving style, sudden braking and collisions with obstacles, but also the use of low-quality working fluid, irregular replacement of working fluid or filter elements. As a rule, if breakdowns occur, the variator should be completely replaced.
Maintenance and repair of transmission of chain scooters using the example of BM
Link to the clutch assembly: Many owners do not even suspect that the “leg” of their scooter may not be a classic V-belt variator, but a chain drive. The instruction manual says little, and not a word about repairs at all. Let's try to fill the gap. A few words about the design. The transmission consists of two sprockets (driver and driven), a roller chain and two dampers. The drive sprocket is mounted on the centrifugal clutch drum. When the engine is stopped or idling, the drum is not connected to the crankshaft journal. When you increase the engine speed, the clutch pads located on the axle will separate and, through friction, transmit torque to the clutch drum and drive sprocket. The driven sprocket is rigidly fixed to the rear wheel gearbox shaft. The chain connecting the sprockets is bush-roller. To prevent the motor from falling into an indefinite trance and the chain to last longer, the transmission is closed with a sealed casing, and it is partially filled with oil. Your mission is to periodically carry out maintenance, and it comes down to: first, monitoring the oil level, and second, changing it on time. You need to check the oil level after a long period of parking or if you find streaks on the casing. But look into it for the first time immediately after purchasing a scooter.
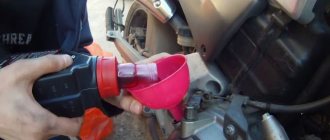
| When you unscrew the bolt from the control hole, oil should flow from there. | To drain the oil, remove the drain plug at the rear of the transmission housing. | The filler neck is closed with a plastic screw plug. Numbers are stamped nearby - the approximate capacity of the casing. |
Place the “stool” on the center stand on a horizontal platform. Unscrew the screw from the inspection hole - it is located just below the middle of the casing cover. If the level is normal, oil should flow out of it in a thin stream. Doesn't it flow? Tilt the scooter towards you slightly. “Dry” again? So, add oil - it should be the same brand that has already been filled. If you change the oil, you can use any engine oil. The only thing that the manufacturer stipulates is its viscosity - 10W40. Unscrew the plug in the upper rear part of the casing. On its casting it is usually indicated how much oil needs to be poured, but approximately. In our case - 450 ml. But if you like, fill the casing until the oil begins to overflow from the control hole. Before disassembling the transmission, drain the oil. Unscrew the plug located at the bottom of its rear part. Unfortunately, this is not the lowest point of the casing. A little oil (about 70 ml) will remain in the front end and flow out as soon as you unscrew the screws securing the cover. Be prepared: move the container into which the oil was drained to this place and stock up on rags or rags in advance to wipe up any puddles. The oil pump for the separate lubrication system is located at the rear of the “leg” under a separate cover. Remove this cover. Without touching the oil hoses, unscrew the pump mounting bolts, remove it from its seat and move it upward. Then remove the transmission housing cover. In principle, you don’t have to touch the kickstarter lever, but we dismantled it - without it it’s more convenient to unscrew the cover screws. These screws are different in length - you won't get them mixed up during assembly.
| Remove the cover of the cavity in which the oil pump is located. | Dismantling the pump. |
| Gearbox cover with kickstarter mechanism (arrow points to it). Don’t take it apart unless necessary: you won’t be able to put it back together. |
After unscrewing the screws of the casing cover, tap it with a mallet or a wooden block - it will come off easier. There is a cardboard spacer underneath - try not to damage it. When you remove the cover, you will see the kickstarter mechanism: examine it. If you don't notice anything that causes concern, set the knot aside. Inspect the chain drive - the chain, its two guides and the sprocket teeth. These parts must not be damaged. Determine the amount of chain play. If it can be pulled more than 10 mm from the conventional straight line, replace it - it cannot be repaired (many people, out of ignorance, shorten it by a couple of links). You can remove the chain in two ways: by dismantling the driven or driving sprocket along with the centrifugal clutch.
| Free running of the new chain. |
To remove the driven one, while holding the protruding end of the bolt with pliers, unscrew the nut (with a 10mm wrench). You need to dismantle the drive sprocket if you want to inspect or replace parts of the centrifugal clutch. To do this, wedge the gear ring of the trigger gear with the tip of a screwdriver and unscrew the nut with a 17mm wrench. Under the nut is the kickstarter ratchet gear and a few other parts. Remember how they are located so as not to confuse the order of their installation during assembly.
| To unscrew the nut securing the drum centrifugal clutch, you need to wedge the drum with a screwdriver. | Chain stabilizers are loosely placed on the crankcase bosses |
| After unscrewing the nuts, remove the driven sprocket and drive gear assembly. |
Remove the drive sprocket, which is integral with the clutch drum, from the crankshaft journal, and then the clutch base with weights. Inspect the parts to make sure that: - the weights are not loose on the axles; — the working surface of the weights is not worn out and without damage; - springs forcefully compress the weights; — there are no cracks or wear on the working surface of the clutch drum; — the sprocket teeth are not worn, without burrs or other damage. Replace parts with the listed defects. Assembly is in reverse order. Before installing the cover, wipe off the oil from the gasket and inspect it. If you find damage, replace it. Tighten the cover fastening screws “in a circle” in several steps, without applying excessive force. How to add oil is described above. Before installing the oil pump in place, inspect the hoses to see if they have rubbed against a sharp corner where they were bent? Please note: with this drive design, the oil pump supplies oil to the engine only while driving, when the rear wheel is spinning. When the scooter is stopped, the running engine is lubricated with residual oil, but it won’t last long. Therefore, do not let the engine run for a long time when the scooter is motionless - turn it off immediately after stopping. In general, the chain transmission is reliable and durable. If you don’t “rape” it by transporting excessive loads and don’t “goat” at every traffic light, and don’t forget to check the oil level, then the “joys” associated with its repair will bypass you.
| This is what the transmission looks like: 1 - electric starter gear, 2 - base with weights, 3 - centrifugal clutch drum, 4 - drive sprocket, 5 - chain, 6 - lever for the rear wheel locking mechanism when starting with a kickstarter, 7 - dampers, 8 - oil pump, 9 — driven sprocket with the drive gear of the gearbox (the gear is not visible in the picture), 10 — driven gear of the gearbox, 11 — cavity where the oil remains when the drain plug is unscrewed | ||