ATV built on the basis of the Dnepr MT-10 motorcycle: photo and description.
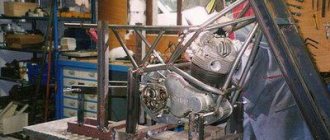
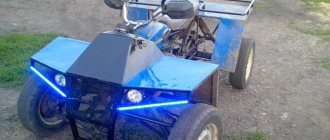
This homemade ATV was made at home; a Dnepr MT-10 heavy-duty motorcycle was used as a donor. The process of converting a motorcycle into an ATV is shown in these photos.
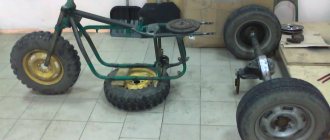
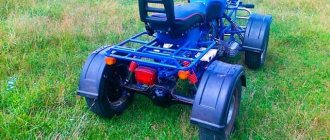
The frame from MT was modified, additional mounts were welded for the front and rear suspensions, homemade suspension arms, shock absorbers from a motorcycle, and a rear axle from a VAZ-2101 (shortened).
VAZ wheels.
Rear suspension.
- Front suspension.
- Steering.
- Front and rear trunk.
- The front bumper is made from motorcycle bars.
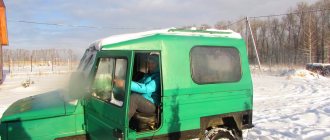
- This is what the ATV looks like after painting.
Source: https://avto-samodelki.ru/samodelnyj-kvadrocikl.html
DIY ATV
An ATV from a store is not a pleasure accessible to everyone. Therefore, many craftsmen make quadrics with their own hands. And in this article we will talk about the most interesting of them.
In making an ATV, everything that can be found in the garage and nearby can be useful. Each vehicle made by hand is unique and individual, so it is difficult to talk about drawings and diagrams.
Few people describe in detail the process of building their brainchild, which makes it extremely difficult to find specific information. But there are also exceptions.
How to make an ATV with your own hands
in 2012, the talented designer S. Pletnev shared the drawings and nuances of building his brainchild.
What was used in the design of the vehicle:
- Front and rear wheels from Niva Chevrolet 15 inches
- Engine a-m Oka
- Oka gearbox
- Inter-wheel gearboxes from the rear axles of the VAZ “classic”
- CV joint from a VAZ-2108 car, 12 pcs.
- Fuel tank 20l canister
- Passenger support from the headrest of the Oka
- Clutches from Oka
- Steering wheel from a Ural motorcycle"
- Instrument panel from Oka car
Main technical characteristics of the ATV:
| Weight | 430kg |
| Length | 2300 mm |
| Width | 1250 mm |
| Handlebar/saddle height | 1250 / 900 mm |
| Ground clearance, | 300 mm |
| Wheelbase | 1430 mm |
| Track | 1045 mm |
| Maximum speed | 65 km/h |
ATV drawings:
The transmission is made from AvtoVAZ units with some modifications. For example, to reduce speed and increase torque, a chain drive was used instead of the main pair.
Inter-wheel gearboxes are borrowed from the classics, the axle shafts are removed and replaced with CV joints from the front-wheel drive VAZ. Constant velocity joints are also used in other transmission units.
The suspension is independent on triangular wishbones. Shock absorbers from Oka.
Homemade muffler of 2 sections, insulated with asbestos.
The body kit is made of fiberglass. The creation of such plastic took 10 kg of epoxy resin, 1 kg of plasticizer and the same amount of hardener. 15 meters of fiberglass and 5 meters of glass mat.
The ATV body kit is made of fiberglass. I glued it for the first time, and therefore first studied the recommendations for performing the relevant work. But as it turned out, this process is painstaking, although the result is worth it.
- The bumpers and guardrails are welded from 20mm round pipes.
- Photo of the finished ATV:
- Material based on the article: https://modelist-konstruktor.com/razrabotki/853
ATV from a motorcycle
- This quad is made on the basis of the Ural motorcycle.
- All the details are in the video.
ATV with IZh Jupiter engine. Transfer case from Ant motorcycle.
ATV Cobra MIX
- Generator, forced cooling, lowering gear, electric starter from tens, engine from a Ural motorcycle.
- Video of a homemade ATV in action:
Homemade buggy "Raptor"
Homemade ATV with an Oka engine
Source: https://anarchymotors.ru/article/kvadrotsikl-svoimi-rukami.html
Description of the vehicle
A modern ATV is equipped with four or six small wheels, but with increased maneuverability. The main technical characteristics include: light weight, all-wheel drive and low gear. Due to the unique configuration, the vehicle can easily travel on country roads. It can be used in summer and winter.
To make a homemade ATV, it is recommended to decide on its type:
- Utilitarian. The model has a lot of weight and good maneuverability. The vehicle easily carries several people and accelerates to 90 km/h.
- Stunt. Equipped with a narrow platform and radiator. The car weighs little and can accelerate to 137 km/h.
Vehicle assembly is carried out taking into account technical characteristics, equipment, and operating conditions. To perform independent work, you will need to have skills in working with a welding machine and a lathe. To build a car, you will need a spacious garage. Taking into account suitable parameters, a do-it-yourself drawing of an ATV is prepared.
Homemade ATV
A quad bike is actually any four-wheeled vehicle, since in Latin “quadro” means “four”. In the CIS, this name most often means an all-wheel drive all-terrain vehicle, representing a symbiosis of a motorcycle and a car.
From a motorcycle, an ATV has adopted mobility, maneuverability, lightness, and speed, and from a car - excellent cross-country characteristics, power and controllability.
The result is a unique vehicle designed for a variety of purposes.
The domestic market provides only foreign models of ATVs, the cost of which is often exorbitant. At the same time, you can easily find used motorcycles and cars on the secondary transport market at an extremely low price.
For example, the Ural motorcycle is large, bulky, heavy and power-hungry, has an excellent four-stroke engine with reverse gear and costs a penny. For this reason, it is much cheaper and more fun for enthusiasts to create their own designs of these SUVs.
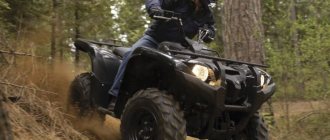
A typical factory ATV - shiny, neatly built, strong and powerful.
Its homemade counterpart, which is slightly inferior in appearance, and even more so in terms of power.
How to make an ATV with your own hands
Before you start assembling, you need to make a detailed list of the units and parts that will be needed to create your own brainchild, develop a work plan and a design drawing.
Engine: the optimal choice
It is logical that first of all it is necessary to find the “heart” of the future “beast” - the power unit. Absolutely anything will do, from a regular walk-behind tractor to a six-liter V12 - there are such precedents. In most cases, motorcycle engines are used - they are economical and small-sized.
To use high gear ratios under normal operating conditions, a Minsk or Ural engine will be sufficient. In summer, the issue of overheating arises, so you should choose air-cooled models. Another good option is Soviet-made boxer engines, the undeniable advantage of which is powerful traction and a completely unpretentious driveline.
Suspensions: rear and front
There are two most common rear suspension solutions for ATVs.
- Gear-cardan system. The design turns out to be as lightweight and simple as possible, but there is no differential, which, in principle, can be sacrificed for the sake of the previously mentioned advantages.
- Using a road bridge. The design turns out to be extremely heavy, and if there is no desire to have an ATV with a car base, it is necessary to shorten the bridge, which is a very non-trivial task. The only advantage worth highlighting is the presence of a differential, which is useful when driving on highways.
There are huge possibilities for front suspension and steering. ATV suspension arms carry significantly less load than automobile ones; accordingly, they can be made independently, using available means. The best option is to create a suspension based on the existing Ural motorcycle.
Frame: drawings and alternatives
The best solution is a durable structure made of pipes or profiles welded together.
Ideally, remove the frame from the donor motorcycle and add the necessary elements - this eliminates a number of problems, but the design may turn out to be unnecessarily complex.
ATV assembly
Having prepared the necessary tools, donor vehicles and freed up time, you can begin to create your own ATV:
- We assemble the frame (frame). We connect the prepared metal beams, according to the drawing, to each other using spot welding. We check the structure and carry out full welding. Alternatively, you can simply remake the frame from the donor motorcycle - it will turn out no worse.
- We install the engine. It can be placed both at the rear and at the front - the main thing is to secure it firmly with bolts to the bottom of the frame.
- We mount the drive and transmission on the rear wheels. The drive does not need to be created independently - it is transferred together with the engine from the donor vehicle and installed on the frame. Again, it is necessary to properly secure the drive and transmission to the frame to prevent play.
- We also install the steering from the motorcycle. Along with the steering wheel, the fuel tank also “migrates” to the ATV. In general, if you imagine the design, it will look like this: 3/4 of the ATV is the same Ural or another motorcycle, 1/4 is a homemade frame and suspension.
- We install wheels from a small-sized vehicle (“Oka” or “ZAZ-968”). The rear wheels can go to the ATV together with the rear axle of the car, or they can be attached as follows: we take ready-made axles with disks, after which we attach a gearbox to the rear one for drive. and we install wheels on the rims, which can even be with low-pressure tires.
- We assemble a single drive with a gearbox on the rear axle and an engine (again, it will be easier if it is completely rearranged from the donor vehicle). We do this as follows: we stretch the chain from the engine to the gearbox and secure it, after which we check the functionality. Ultimately, we fix the entire structure on the frame.
- The front suspension is independent - this is more profitable in terms of time and money, since an all-wheel drive ATV requires significant modification of this unit by a professional turner, welder and electrician, which will take a lot of time. As an option, we purchase ready-made factory components for ATVs.
DIY ATV: 6 assembly options, detailed instructions + video
How to make an ATV with your own hands is a difficult and responsible task, but feasible for a master who has mastered welding and turning. The effort and time spent are paid off not only by large savings, but also by the result obtained - an exclusive, original model of a quadric that no one else has.
Features of assembling a homemade vehicle highly depend on the chosen base - the engine and other elements that are used by the craftsman.
6 best options for a base (“donor”) for those who have set the goal of how to make an ATV.
- Motorcycle "Ural".
- Motorcycle "Izh".
- Motor scooter "Ant".
- Another motor scooter (scooter).
- Car "Niva".
- Oka car.
Most often, some structural elements are taken from a motorcycle, others from a car.
In addition to the parts (components) for the quadric, its creator will need:
- assembly “shop” - a fairly spacious garage equipped with good heating and lighting will be useful in this capacity;
- a set of equipment and tools;
- blueprints.
Preparation for work, tools and equipment
First of all, you need to carefully consider when, where and for what purposes the future ATV will be used - hunting and fishing, motorcycling in nature, transporting goods, etc. It is on this basis that you need to make a choice of a “donor” vehicle, deciding how powerful the engine is needed, what kind of suspension is suitable, what kind of trunk, etc.
- You can take ready-made drawings from the Internet, create them from scratch yourself, or combine both options and ready to remake them at your own discretion.
- List of required tools:
- welding machine;
- Bulgarian;
- drill;
- a set of keys;
- various small tools - calipers, hammer, knife, screwdrivers, pliers, etc.
To make your own frame, you will also need equipment for bending pipes. If you don’t have one, you can rent it or outsource the necessary work to another craftsman. Only with remarkable skill can you bend the pipes manually by heating the bend with a gas cutter or torch.
Quad components:
- engine;
- frame;
- rear and front suspension;
- steering;
- brake system;
- cooling system;
- muffler;
- electrical equipment - battery, headlights;
- body, body kit
It is strongly recommended to purchase a brake system either completely new or from a vehicle with the shortest mileage. Using old brakes is too dangerous.
It is quite possible to make a muffler yourself. Everything else is to purchase used parts on the shadow market.
Parts selection
ATV frame
Depending on the “donor” and the design of the quad, you either have to make the frame yourself, or you can reconstruct a finished, used one.
The most important thing is that the engine is securely bolted to the bottom along the frame, which can be located either front or rear. The transmission and drive should also be firmly attached to the frame to avoid play.
Homemade frame
The material used is ordinary water and gas pipes with a wall thickness of no more than 3 mm:
- for spars - 25 mm;
- for crossbars and struts - 20 mm.
The pipes are connected using spot welding, followed by solid welding. Ears for attaching shock absorbers and levers are welded to the frame immediately. Brackets - during installation of units and components.
Reconstruction of an existing frame
To reconstruct a finished frame, you should remove everything, leaving the frame, dismantle the back part and build up the front. Then weld elements for fastening a complete set of components and assemblies of the ATV. When reconstructing a motorcycle frame, the seatposts should be moved back by 40 - 45 cm.
The front and rear luggage racks are cut out of a metal sheet and welded to the frame. Finally, the finished frame is painted; there is no need to varnish it.
Engine
The engine is suitable for a car, motorcycle or scooter. Some “Lefties” even construct an ATV from a walk-behind tractor with their own hands, since newer models are equipped with four-stroke engines, the power of which in heavy devices reaches 15 “horses” - versus 11 hp. "Ant."
The engine of a scooter has the advantage of low fuel consumption; in addition, the scooter-based quad is the lightest, which makes it easy to pull it out when stuck in mud and sand. But a quad to transport cargo and/or drive off-road requires a more powerful engine.
The engine power of the Izh-1, Izh-2 and Izh Jupiter is 24 hp, the old Ural is 32 or 36 hp, the two-cylinder engine of the old Oka is 35 hp. , a three-cylinder car of a later release - 53.
To travel in hot weather, the ATV needs a cooled engine. Cooling was not installed on older motorcycles, so you will have to pick it up (for example, from a VAZ 2108 will do) and install it.
The suspension can be used both rear and front. The easiest way is to take the front one from a motorcycle.
2 rear suspension options:
- The rear axle of the car, shortened to fit the dimensions of a quad. The advantage is the presence of a differential. Disadvantage - the design will be heavier.
- Cardan-gear design - with a gearbox mounted on the rear axle.
- Please note: the quad all-terrain vehicle requires an independent suspension with high ground clearance.
- The suspension arms are bolted to the frame through rubber-metal hinges - silent blocks.
- The front suspension strut must be tilted, otherwise the ATV may roll over.
- The shock absorbers are suitable from Izha, but if the budget allows you to purchase gas-oil shock absorbers with pumping, the driver will be able to adjust the suspension according to road conditions.
Steering and chassis
The steering system of an ATV can be based on a car - with a steering wheel, or with a motorcycle steering wheel. Some craftsmen combine both types: motorcycle handlebars, levers and shafts at the top, car tie rods at the bottom. It is advisable to take the fuel tank along with the motorcycle handlebars.
Front and rear suspension
Homemade ATVs are equipped with front or rear suspension. It is easier to mount a ready-made front suspension from an old motorcycle. You can use other options:
- Rear axle from the car. It must be shortened to fit the parameters of the quadric. The advantage of this method is the presence of a differential. The disadvantage of the bridge is its large mass.
- Cardan + gearbox on the rear axle. An independent suspension with high ground clearance is suitable for an all-terrain vehicle. In this case, the suspension arms are fixed to the frame using bolts.
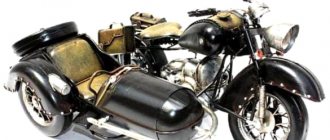
How to make an ATV from a Dnepr motorcycle
Today, Soviet-era motorcycles are not very popular and are increasingly being scrapped. This depends on the fact that it is difficult to get spare parts for repairs, and old equipment tends to break down often and constant repairs are not something any motorcycle enthusiast can withstand.
As a result, such rare units either rust in the yard or are used for spare parts. But some craftsmen have adapted to converting old motorcycles into ATVs. One of the most suitable for these purposes was the Dnepr.
- Assembly steps
- The entire conversion process consists of four stages: • frame improvement; • installation of engine and gearbox; • suspension modernization;
- • installation of body kits, painting.
- Necessary materials
To convert the Dnepr motorcycle into an all-terrain vehicle, you need to acquire some spare parts, without which it is impossible to create an ATV: • steering; • two bridges; • brake system;- • suspension.
The main tools include a grinder and a welding machine. Without them there is no point in starting construction.
Control
Before you start creating an ATV, you should decide on its control. For this purpose, a car or motorcycle can be used. In order not to complicate the design of the all-terrain vehicle, it is recommended to use the existing steering system from the Dnepr. Otherwise, you will have to buy the necessary spare parts.
Not a single project of future technology can be completed without a drawing, on which it is necessary to mark the location of all the main elements of the ATV. This will simplify assembly and make it possible to present the final result. In the end, you may end up with a powerful unit capable of driving on any road.
ATV frame
The first step is to slightly change the existing frame, which will serve as the basis of the ATV. To do this, you need to move the vertical tubes of the struts under the saddle back by 40 mm. Next you need to cut off the rear fork and weld the rear axle to the swingarm. Then you need to assemble the struts from the pipes and install them near the suspension bushings.
The front bumper and trunk can be made from a pipe with thin walls with a diameter of 30 mm. You just need to set the welding machine to minimum so as not to burn through the metal.
Suspension
Initially, you need to pay attention to the back. To modernize it, you can use several options. You can install a universal joint and gearbox from a motorcycle, which will greatly simplify the assembly process, but installing a car axle requires the presence of a differential.
For this reason, many prefer the second option and use bridges from passenger cars. Oka is an excellent donor for these purposes. Its bridge does not have very large weights, which in turn will have a good effect on the driving performance of the ATV. But even that will have to be shortened a little. This will take a lot of time and effort, but the presence of a differential will more than pay for this work on the track.
All-terrain vehicles with such axles perform much better on the road. To bring it to the required size, you need to remove the support cups and spring mounts. After this, you should take out the end flange, cut the bridge and insert it back. We connect the resulting contraction by welding. Axle shafts from Oka can be converted into a driveshaft.
The front suspension gives more design options. It makes no sense to install suspension arms from a car, since the weight of the ATV is not large enough. In this case, you can try to build the front suspension with your own hands.
This makes it possible to choose the required size and slightly reduce the weight of the all-terrain vehicle. In most cases, it is made from a metal pipe with a cross-section of 25 mm. Ball bearings from Zhiguli are used as supports.
Features of frame development
The dimensions of the ATV frame depend on the power of the installed engine and the number of people it will carry. The optimal length is in the range of 1600-2100 mm, and the width is 1000-1300 mm. The long frame will have to be reinforced with additional rigid elements so that it does not break while riding. A frame that is too wide will experience lateral loads, but the ATV will be more stable when cornering.
An increase in the number of stiffeners will lead to an increase in weight, which will negatively affect the dynamic characteristics of the ATV and will require the installation of a powerful engine.
For pleasure walks on asphalt, you can neglect the excessive rigidity of the structure, giving preference to a low-power engine. Lightweight touring ATVs for adults have small dimensions and a lightweight design, but there are more fasteners on the frame to expand functionality - installing luggage racks.
Do-it-yourself ATV - we sort out all the difficulties when creating an all-terrain vehicle
Unfortunately, not every person has the opportunity to purchase an ATV in a store. All more or less interesting models are now quite expensive, and buying a used ATV is always a certain risk.
In this regard, many motorcyclists advise making a four-wheeled all-terrain vehicle with their own hands, using an engine and spare parts from some old Soviet motorcycle. Earlier, we already told you about how to make an ATV from a Ural motorcycle.
In today's article, we will talk about other donors that can be used if you decide to assemble an ATV with your own hands.
Why is it worth assembling an ATV with your own hands?
Assembling a four-wheeled all-terrain vehicle by yourself definitely helps solve several problems. The first reason why people decide to make a homemade ATV is, of course, a small budget.
If you analyze the market prices for ATVs, you can understand that such vehicles can be considered almost a luxury. Prices for the simplest and lowest-power models start from 150 thousand rubles, for example, Yamaha Blaster YFS200.
In principle, such a single-seat “quad” will be enough, but the power will always be in short supply.
But ATV models with engines with a volume of 500-800 cm3 will cost much more, approximately 500 thousand rubles. You can also consider Chinese models, such as the Russian manufacturer Stels, but you will have to carefully monitor them. New all-terrain vehicles of this brand will cost approximately 300-400 thousand rubles, but the engines are much more interesting - 45-70 hp.
Nuances when operating a homemade “quad”
If you definitely decide to make an ATV with your own hands, then you should know about the intricacies of its operation. In principle, if you need an all-terrain vehicle for driving in impassable places where patrol cars have never been, then there’s probably nothing to worry about.
You will have to face problems if you plan to drive even through small settlements, which are sometimes visited by patrol cars. If they catch you without documents for this vehicle, then with a 99% probability they will take it away from you.
The whole difficulty lies in registering a homemade ATV, because the traffic police will most likely refuse you. In a good way, it is possible to register a homemade product, but it is extremely difficult to do.
Therefore, assembling a homemade ATV only makes sense if you operate it in some wilderness.
Making a choice
So, how to make an ATV with your own hands? When creating a homemade ATV, we need to decide on the donor, that is, the motorcycle that will form the basis of our project. Old Soviet motorcycles are perfect for a four-wheeled all-terrain vehicle.
From them we can borrow an engine with a gearbox, a frame, a steering wheel and, if desired, such parts as a tank, a seat and other elements.
Since we already had an article about a homemade ATV from a Ural motorcycle, in this review we will talk about how to make an ATV based on an IZH motorcycle.
For our purpose, almost all models of motorcycles from the Izhevsk plant are suitable for us. The only thing that is important to understand is the engine power.
Still, the end result will be a rather heavy structure, so the best solution would be to use the latest models - IZ Jupiter 5 or IZ Planet 5.
There is no point in considering more interesting models, like the IZH Planet Sport, because they are quite difficult to find, and if possible, it is better to restore them, because the motorcycle is quite rare and interesting. Let's move on to the main thing, how to make an ATV and what you need for this.
Rear suspension
Once you have decided on the donor, in our case it is IZH Jupiter 5, you need to completely disassemble the motorcycle. After disassembly, we will need a frame on which everything was supported, including the engine. It is logical that to increase the reliability of the structure, the frame needs to be strengthened in several places.
Now it is necessary to weld the rear axle so that instead of a wheel, a block of bearings with a chain drive can be installed on the axle. You can see an example in the photo.
As a suspension, you can use ordinary shock absorbers from a motorcycle, and for the rear axle, parts from an old Lada car are suitable.
You can take a more complicated route and install a monoshock absorber, but then again you will have to look for spare parts from a car, for example, from the same Zhiguli or Oka.
Front suspension
Once the rear suspension is finished and installed, you can move on to the front part of the bike, where things get a little more complicated. In the case where we were dealing with the rear suspension, we had the opportunity to choose how much shock absorber was installed. When creating the front suspension, we have only one option - to use two shock absorbers.
Oka's car is perfect as a donor for the front part of the ATV. From it we will need shock absorbers, swivel units and a steering linkage.
However, be prepared for the fact that spare parts will still have to be changed - something must be welded, sawed off, or filed. Also a good and simpler option would be to install a monoblock with fixed wheel planes.
Then you won’t have to look for a steering linkage, couplings, hinges and other spare parts.
A monoblock is a really simple option, because installation will take literally an hour of time. The only disadvantage of this front suspension design is the heavier mechanism. Turning the steering wheel will be somewhat more difficult than with a suspension with shock absorbers.
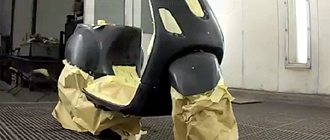
Work on appearance
In conclusion, to bring the ATV into proper appearance, similar to the real thing, you need a body. To do this you will need ED-20 epoxy resin and fiberglass. These components can be purchased at a hardware or hardware store.
To give this shape, you first need to cut out a blank from dense foam, which is also sold in large hardware stores in the form of 1 m2 plates, which is very convenient for creating such projects. Then fiberglass is applied in several layers, with each layer coated with resin. The more layers, the stronger the case. Don’t forget about the metal fasteners that need to be inserted between the layers, which will later secure the body to the ATV frame. After drying, you can prime, sand and paint. This fiberglass body is lightweight and very durable.
If you take the matter seriously, such an ATV will be little inferior to a factory one, and in terms of assembly costs it will be many times cheaper. Despite the fact that you can assemble such a thing for yourself and get a lot of driving pleasure.