Do-it-yourself painting and repair of motorcycle plastic
[sc:ads1]
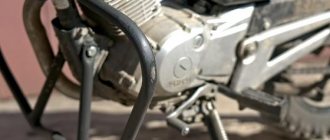
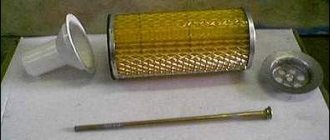
The modern design of ATVs, motorcycles and scooters contains a large number of plastic parts. Their purpose differs for different types of vehicles. For example, sports plastic is installed on a motorcycle in order to improve its aerodynamic properties and handling, and for ATVs, plastic becomes an inexpensive and functional element that is easy to repair.
Unfortunately, motorcycles tend to fall over. The question is not if this will happen, but when. You can injure your bike at high speed, while driving around the city, or even in your own garage. Restoring motorcycle plastic is not a very complicated procedure that allows you to reduce the cost of maintaining and repairing your bike.
In any case, the health and life of a motorcyclist are more expensive than iron and polymers, and if you want to preserve the condition of the motorcycle along with them, you should not accelerate to prohibitive speeds and be childish, unnecessarily exposing yourself to risk.
Most common problems
The more plastic there is on a motorcycle, the more expensive it is, the more expenses and problems the owner will have. Plastic for Chinese motorcycles can be purchased in good condition, used or new, but it is not always possible to quickly select suitable parts for a specific model. Replacing and installing new components will not take much time; more effort will be spent on finding good deals.
The cause of damage may be:
- An accident - serious or not, large-scale or not, the main thing is that the motorcyclist is not injured;
- Loss of control on the highway, resulting in the motorcycle falling and sliding on the asphalt;
- Performing tricks, complex figures, jumping - hitting the ground, pillars tangentially;
- Sports events - plastic for a motocross motorcycle is always in demand due to frequent damage and extreme riding conditions;
- Falling of a parked motorcycle, including in a garage. It's an unpleasant thing.
Recovery methods
The two most commonly used methods for restoring minor damage to plastic are gluing or soldering. Gluing is done with epoxy resin, polymer and synthetic compounds. The hope that a tube of ordinary glue will correct the situation evaporates after the first attempts.
The fact is that while driving a motorcycle encounters a large number of factors affecting the plastic. This includes a headwind, engine vibration, vibration of the entire body due to surface unevenness, mechanical damage from gravel, and pieces of dirt.
Repairing the plastic of a motorcycle with glue also involves the use of fiberglass. The main task is not only to eliminate the breakage site, but also to reinforce the breakage site of the base material, making it flexible and ductile.
The same applies, by the way, to soldering plastic with a soldering iron, only a fine mesh stainless steel mesh is used as a reinforcing base. Gluing usually occurs from the inside. Aerobatics masters manage to make a special groove for fiberglass with a grinder or sandpaper, so that later, after puttying, an ideal surface remains.
In this case, the painting of the motorcycle plastic will be even, smooth, without visible flaws. However, the owner cannot be insured against the appearance of a crack or chipping of the new coating. The solution is to attach a sticker or a fashionable label, which is often used by novice bikers.
Soldering is the level of reliability that can be achieved as much as possible when working with plastic on motocross and sports motorcycles. Of course, this type of work will not prevent cracks from appearing under a strong impact, but if you want to save money and have a couple of extra hours of free time, you can try it. A common mistake is trying to do everything “in a hurry” without following technology.
The boots used are usually very powerful, and the stainless steel mesh is very rigid. The result is poor-quality soldering, seams filled with burnt plastic and the same tear as when using fiberglass.
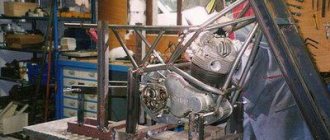
Step-by-step instruction
Before starting work, prepare:
- It is necessary to remove the plastic part and conveniently place it on the table for future soldering;
- Find a soldering iron with power adjustment, preferably a powerful one;
- Test the operation of the soldering iron on a piece of plastic (many people have fragments or pieces of plastic, for example, from a previous body kit);
- Clean the soldering area with a grinder or sandpaper so that there is no debris, paint residue, or chips left there;
Next, a metal mesh , quite strong but elastic, is applied to the plastic. The soldering iron is placed on top and heating begins. You should be able to fuse the metal structure into the plastic so that the part is securely fixed.
Be careful and attentive, because there will be no second chance. If the body kit “walks”, it is necessary to fix it on the machine with a clamp or at least with electrical tape or tape.
There is another method that is often used by more experienced plastic restoration specialists for motorcycles of any type - soldering with a jet of hot air. The essence of the method is to weld plastic using a hair dryer and a special nozzle. This results in a monolithic joint, a diffusion type of welding and a reliable connection.
You can repair plastic on a motorcycle with your own hands using special kits and mixtures for gluing, but the quality of processing and their price cast doubt on the feasibility of such processing.
[sc:ads5]
We recommend reading:
[sc:ads6]
Source: https://MotoHolder.ru/remont/remont-plastika
Motorcycle stand: homemade lift, stand for the car, drawings and manufacturing tips
A motorcycle is a whole philosophy and lifestyle for a large number of people. It represents to its owners freedom, the romance of the road, exciting and unforgettable travel. But for a bike to last for many years, it requires proper care and maintenance. First, you need to figure out what types they come in and how to make a motorcycle mount with your own hands.
Types of motorcycle stands
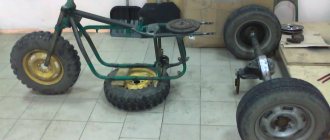
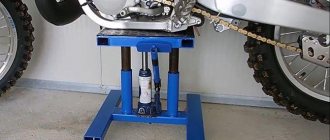
Today, tackles have proven themselves to be very convenient devices for repairing and servicing a bike. Every motorcycle owner who has had to repair their equipment has thought about purchasing such a device. The tackle allows the owner of the iron horse to install it very steadily for repairs. The roller is very convenient when changing a wheel - it allows you to hang the motorcycle and thereby easily remove the wheel.
We can say that a homemade stand is a do-it-yourself motorcycle stand, only without a table. If there are wheels, the lift can easily be moved to a given location for repairs. The small dimensions of the device allow it to be used in places with limited space.
Types of stands:
- rear - for servicing the rear of the motorcycle;
- front - for servicing the front of the motorcycle.
The front type lift comes with an adapter that allows you to hang the wheel for repairs. The adapter is selected for a specific bike model. This tool is suitable for repairing the front fork. A do-it-yourself car tray is ideal for storing cars in the winter. It has a simple design and does not require special knowledge to operate it.
The rear type tackle is a little more structurally complex. It features an L-shaped device with a handle. It is equipped with clamps whose task is to securely hold the wheel. The width of the clamps is selected for a specific wheel. Such tackles are mainly used by repair services, as they allow lifting weights of up to 300 kg. With the help of such a tackle, you can hang the motorcycle in such a way that the suspension is maximally unloaded. Thanks to this feature, it is quite easy to replace the chain.
What should a homemade shield look like?
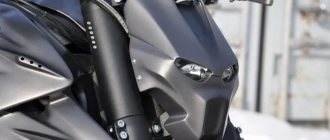
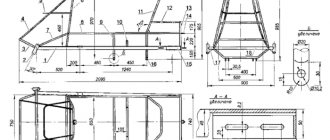
When making a windbreak, it is necessary to take into account that exactly how the oncoming wind will blow will depend on its size and position. Of course, it is best that it is not aimed directly at the driver’s eyes. If the upper edge of the windshield is located significantly below the eyes of the owner of the iron horse, then he is guaranteed to experience inconvenience.
Let's take a closer look at the figure.
In the first version, the shield is straight and installed vertically, which creates a large space between it and the driver himself, into which wind turbulence falls. Such air currents carry with them dirt, dust and midges. All these elements impair visibility, and although there is no direct wind blowing into your eyes, it brings a lot of inconvenience.
To avoid such consequences, it is better to make the shield at an angle of 36-46 degrees (as shown in the second figure). In this case, the edge of the shield will be as close as possible to the driver’s face and lowered below the motorcyclist’s eyes, so there will be no strong turbulence. However, it is worth paying attention that the upper edge of the plexiglass is bent by approximately 10-15 degrees. This is necessary so that the driver of the iron horse does not accidentally hit his face on the shield.
The third photo just shows an unsuccessful option with the glass being too close. In this case, there will also be no problems with aerodynamics, but there is a high risk of injury. If this option still warms your soul more, then you will need to equip the edge with a rubber pad, which will help soften the blow if driving on an uneven road surface. Also don't forget about the helmet. It is able to protect not only in case of a fall, but also from unpredictable wind currents.
DIY motorcycle plastic repair and restoration
Many modern motorcycles are replete with plastic panels; they are needed to create a complete appearance of the bike, improve aerodynamics and protect important components. In order to protect these parts from damage, modern polymers are made flexible and shock-resistant, but even this does not save the motorcycle from falls and accidents. In such cases, the manufacturer offers to replace the part with a new one, which costs a lot of money. We have prepared several affordable options for making plastic for a motorcycle with your own hands.
When is it worth repairing plastic?
First of all, it is worth determining the extent of the damage. With the right approach, you can restore a completely broken part, but sometimes the cost will be the same as buying a new one. If the damage is relatively minor and relates to a non-load-bearing structure, such as part of a motorcycle body (maxi scooters), then cosmetic repair methods are suitable.
Cracks, chips and gluing of several pieces of plastic can be done using soldering with a hot air stream or a soldering iron.
Critical, load-bearing structures, as well as parts with a high degree of damage, are best repaired using methods that involve restoring the mass of the plastic part and its characteristics (rigidity, elasticity, etc.).
In cases where the plastic can no longer be repaired with a patch or gluing, there is an option to make the part from scratch. To do this, you will need to carefully study the entire modeling process and have a lot of combined time and nerves. Often, in such cases, it is easier to purchase a used spare part and repair it, or even buy new plastic.
Hot air soldering
To repair the plastic of a motorcycle with heated air, you will need a hair dryer, but not just any hair dryer, but one with a temperature regulator. You can use the cheapest device, but then there is a risk of overheating the plastic, which will lead to the loss of its basic properties. Overheated material will be brittle and may break due to vibrations from driving on normal roads. You will also need a special nozzle with a thin nozzle, approximately 5-8 mm.
In addition to the hair dryer, you will need a large piece of plastic identical to the one being welded. To do this, you should pay attention to the markings of the part; most likely, you will see a product of the PP, RA or ABS brands. Polypropylene PP, for example, melts at 300 degrees and begins to burn at 350, so it should be welded at a temperature of 300 - 340 degrees. Polyamide or RA should be welded at 410 - 460 degrees, ABS at 360 - 400. Soldering process:
- For greater convenience, remove the part from the motorcycle and wash it from dirt and oils.
- We clean the edges of the parts with medium-sized sandpaper, level the edges, and try to make a hollow in areas close to the surface.
- If we weld broken parts, then we lean the pieces against the base and use a heated hairdryer to grab them in several places (from the inside).
Otherwise, if you weld the parts one by one, some areas may twist and it will be impossible to achieve a flat surface without leveling with additional materials. Advice. If the plastic initially twists a lot, then to make it easier to work with, you can fasten it with staples. - From a piece of plastic with a suitable composition, cut out a strip 0.8 - 1.5 cm thick; this will be our solder.
- From the edge of the crack (it’s better to start from the inside), we begin to heat the seam; as soon as it starts to melt, we lean against the solder and then direct the jet partly to the seam and partly to the solder. As the plastic melts, it will fill the seam; you can help this process by lightly pressing on the plate at the moment when the material has become sufficiently liquid.
- If the fracture shape has many turns, make solder plates with a margin of up to 5 mm, and connect several sections only by complete melting. When the seam is ready, you can begin work on the front part. If you did everything correctly, the internal seam will give the piece of plastic sufficient rigidity, so the external repair will be more of a cosmetic nature. The process itself looks identical, with the exception of the solder strip, which should be made thinner. After welding of the front part is completed, the plastic should be cleaned and, if necessary, a paint coat should be applied to it or the error should be hidden with a sticker that suits the style.
Soldering with a soldering iron
This DIY motorcycle plastic repair is practically no different from the previous one. The main difference will be the tool used. You'll need a high-power soldering iron that you don't mind getting dirty. Here, too, the type of material being welded and the appropriate solder are important. The latter can be found in the form of special tapes in stores. Welding process:
- We dismantle the part, wash it from dirt, clean the edges with sandpaper and degrease it.
- We assemble a puzzle from broken pieces, spot welding them from the inside using a soldering iron. (further work is carried out exclusively on the inside of the product).
- Starting from the edges, we lean the soldering iron against the seam and, melting it almost right through, we form a deep hollow.
- Now the parts are holding, but not yet strong enough. The next step is the direction of the new layer; for this we melt the solder with a soldering iron near the hollow. While the plastic is still liquid, level it with a sting to get an even layer.
Advice. With proper skill, you can simultaneously make a hollow and fill it with solder.
This way the process will take much longer and require greater concentration, but the layers of plastic will stick better, which means the connection will be stronger. If you did everything correctly, then in the end you will get a strong seam, which looks rough on the inside, but with the outside turns out to be almost perfectly smooth. This can be achieved through deep melting of the mass when forming a recess.
Note! Some advise using reinforced metal mesh for strengthening. This option only makes sense if you are working with fragile, low-quality material that is not capable of bending.
How to make a motorcycle fairing with your own hands
November 30, 2021. Category: Motor vehicles.
Today's motorcycles not only look much more stylish than they did half a century ago, but they are also more functional. Modern components and systems of “bikes” continue to be constantly modernized. One example of motorcycle equipment upgrades is a motorcycle fairing.
It is understood that this useful accessory is produced at the factory of the manufacturer of the iron horse, but not all concerns support this policy and motorcyclists have to think about making wind protection themselves.
Making a fairing
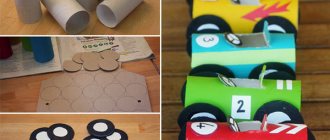
Before you make a homemade moped fairing, you need to think about the design of the future accessory. After this, you need to measure the headlights and, taking into account the dimensions of the future product, prepare a pattern (for this it is best to use cardboard).
Blank
The next step will require a blank. It is best to use penoplex for this (of course, you can also purchase cheaper foam, but this material quickly crumbles, so it will be very difficult to give it the desired shape). The fairing pattern is applied to the material (it is better to leave a margin of 5 cm on the sides), after which we perform the following steps:
- We give the workpiece a streamlined shape (you can use a jigsaw and any available cutting materials).
- We cut the shape in half and cut off a little material at the joints and at an angle (thanks to this, the product will be even more voluminous). After this, both parts are fastened with paper tape.
- We cover the entire fairing with the same tape (so that it covers the entire surface).
- We apply packing (ordinary brown) tape to the model (this will help protect the penoplex from corrosion). We cover the product with cling film on top, this will simplify the process of removing the model from the workpiece.
- We install our fairing in a horizontal position at some distance from the surface so that there is access to all sides of the product.
- We cut the required size of fiberglass (preferably with a margin) and moisten it in a solvent.
- We cover the fairing with fiberglass, straighten it so that there are no folds or creases, and pour epoxy resin over the mold, distributing it evenly.
Healthy! Some people use any available rag material instead of fiberglass.
- We lay another layer of fiberglass and repeat the procedure. In total, you need at least 3 layers (the optimal thickness for the matrix is 10 mm). After this, we leave the workpiece to dry.
- We remove the penoplex.
The resulting semi-finished product, made by hand, already resembles a motorcycle fairing, but there is still a lot of work ahead.
Fitting and preparation for painting
At the next stage we do the following:
- On the inside we glue a plastic element (you can use a piece of plastic and give it the desired shape using a hair dryer) for fastening (its size and shape depends on the motorcycle model).
- We cover the entire surface of the fairing with a large piece of fiberglass and again pour it with epoxy resin.
- We apply several more layers of material, but this time in small pieces, to give strength to the sides and joints (the more pieces of fiberglass that are applied, the stronger the product will be).
- Using a grinder, we cut out holes for the round headlights.
- We cover the motorcycle headlights with polyethylene so as not to damage them and install the manufactured fairing in its rightful place.
- We take fiberglass automotive putty (mix with hardener) and use it to work out the holes for the lighting elements so that there are no unnecessary gaps. You need to work quickly, as this material sets very quickly.
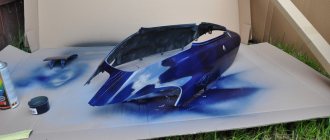
- Remove the fairing and sand it thoroughly.
- We putty the front side of the product with fiberglass automotive putty.
- Sand the surface.
After this, you can work on the fasteners. As a fastening, you can install a metal plate on the motorcycle, to which another metal element mounted on a plastic blank (prepared earlier) will be attached.
Shaping
The body is shaped using 40mm coarse sandpaper. By wrapping it around a stick, you will get an excellent file. An electric knife is a good tool for creating a rough outline. Use a magpie to create a rough shape. Having reached the limit of half a millimeter to the desired result, switch to 80 mm sandpaper.
Regardless of what part of the body kit you are making, you need to make every effort to achieve complete symmetry. Before moving on to the next stage, carefully check that all parts of the body kit fit tightly to the body. This work is the most difficult in the question of how to make a body kit with your own hands. Use 40mm sandpaper for adjustments.
Scooter tuning, making a plastic body kit online instructions
Payment for goods and downloading of the book in electronic form (PDF format) is made on the website.
To do this, you need to find the book you are interested in and click on the “Buy” button. The price of the book is indicated on the button.
For convenience, the price on the website for residents of Russia, Belarus and Kazakhstan is presented in rubles.
For residents of Ukraine in hryvnias, and for all other countries - dollars.
After clicking on the “BUY” button, a payment window will open where you can select a payment system with which you can pay for the selected book using any bank card (Visa, MasterCard, MIR, etc.)
When you click on the “Pay by bank card” button, the Portmone payment system will open, which is the easiest way to make a payment.
In addition, the website offers four payment systems for payment:
- Yandex (payment from any bank cards, Yandex Money account, QIWI Wallet, terminals, etc.);
- Portmone (payment from any bank cards, Portmone account);
- PayPal (payment from any bank cards, PayPal account);
- WebMoney (payment from any bank cards, payment from WebMoney wallets).
Payment via Yandex Cashier
After selecting payment via Yandex, the Yandex Cashier payment system will launch, where you need to select a convenient payment method (bank card, QIWI, Yandex Money account, etc.)
After specifying payment details and confirming payment, payment for the goods will occur.
If you have a bank card in a currency other than the ruble, then the money will be debited from the card at the rate of the Central Bank of Russia at the time of the purchase.
This payment method is optimal for residents of Russia, Kazakhstan and Belarus.
Official website of the Yandex Kassa payment system https://kassa.yandex.ru
Payment via Portmone
After selecting payment through Portmone, the payment system will launch, where you need to select the payment method: bank card or Portmone account.
The price in the Portmone payment system is converted into dollars at the exchange rate of the Central Bank of the country where you are located.
If you have a bank card in a currency other than the dollar, then the money will be debited from the card at the rate of the Central Bank of your country at the time of the purchase.
After specifying payment details and confirming payment, payment for the goods will occur.
Official website of the Portmone payment system https://www.portmone.com
Payment via PayPal
After selecting payment via PayPal, the PayPal payment system will launch, where you need to select the payment method: bank card or PayPal account.
If you already have a PayPal account, then you need to log into it and make a payment.
If you do not have a PayPal account and you want to pay using a bank card via PayPal, you need to click on the “Create an Account” button - shown with an arrow in the picture.
PayPal will then prompt you to select your country and provide your credit card information.
After specifying the information required to make the payment, you must click on the “Pay Now” button.
Official website of the PayPal payment system https://www.paypal.com
Payment via WebMoney
After selecting payment via WebMoney, the payment system will launch, where you need to select the payment method: bank card or WebMoney wallet.
If you already have a WebMoney wallet, then you need to log into it and make a payment.
If you do not have a WebMoney wallet and you want to pay in another way, you need to select any of the methods that WebMoney offers and make the payment
After specifying payment details and confirming payment, payment for the goods will occur.
Official website of the WebMoney payment system https://www.webmoney.ru/
Downloading a book
After successfully completing the payment (by any method) and returning to the KrutilVertel store from the payment system website, you will be taken to the successful payment page:
On this page you need to indicate your e-mail, where access to download the book will be sent.
If you are already registered on our website, then simply follow the link to your personal account.
The book you purchased will be in your personal account, from where you can always download it.
Please note that after making the payment, you need to return back from the payment system website to the KrutilVertel website.
If for some reason you did not return back to the site and closed the payment system tab with a message about the successful completion of the payment, please let us know - we will send you a letter indicating access to download the book.
Problems when paying with bank cards
Sometimes difficulties may arise when paying with Visa/MasterCard bank cards. The most common of them:
- There is a restriction on the card for paying for online purchases
- A plastic card is not intended for making payments online.
- The plastic card is not activated for making payments online.
- There are not enough funds on the plastic card.
In order to solve these problems, you need to call or write to the technical support of the bank where you are served. Bank specialists will help you resolve them and make payments.
That's basically it. The entire process of paying for a book in PDF format on car repair on our website takes 1-2 minutes.
If you still have any questions, you can ask them using the feedback form, or write us an email at
Source: https://krutilvertel.com/tjuning-skuterov-glava3-izgotovlenie-plastikovogo-obvesa-svoimi-silami