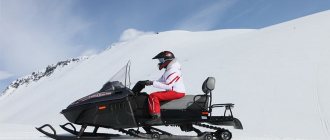
Additional equipment for a snowmobile
Controlling engine temperature is extremely important for air-cooled engines.
Especially for two-stroke engines, piston cooling is significantly worse compared to four-stroke engines.
Which, if overheated from a lean mixture, can lead to burnout of the bottom of the piston.
And if a two-cylinder snowmobile is still able to continue moving for some time after this, then a single-cylinder one will have to be towed or abandoned while going for help.
To detect signs of overheating in time, engine temperature indicators are used. Most of them provide not only a bright digital temperature display, but also indicate overheating both visually and audibly.
The temperature can be taken from either one or two cylinders.
Additional options may include an indication of engine speed and ambient temperature.
Even the latest turbocharged sleds have tuning solutions like the KOSO X-2 Boost Gauge, which shows boost pressure, mixture ratio, and more.
Operating principle of the sensor
The operating principle of many modern sensors is the same as it was previously on Soviet snowmobiles. It consists of the following: a ring was installed under the spark plug, in which a thermocouple was placed, and the “information” was read from it. An interesting fact is that the legendary Lynxes had a factory threaded hole directly on the cylinder. This is where the indicator was installed.
On other snowmobile models, it is necessary to drill holes in the cylinder to install the sensor. On new snowmobiles that are under warranty, this is not the most suitable option. Snowmobiles with dropsy require the installation of a metal pipe (with thread) into which the sensor itself is screwed. This pipe is placed in a pre-cut coolant hose. Thus, the temperature of the snowmobile cylinders will be constantly under control.
Snowmobile Ignition System
LLC "FLAMES Company" is a developer, manufacturer and supplier of unified ignition systems for snowmobiles "BURAN", "LYNX", "TAIGA" and "VARYAG 550" for JSC "Russian Mechanics".
Magdino 26.3749
Works in conjunction with switch 84.3734-01. The use of switch 84.3734 is not allowed. Installed on snowmobiles Buran and Lynx. When purchasing a switch 84.3734-01 as a gift.
2250 rub.
Magdino 26.3749 with AMP connectors
Installed on Buran snowmobiles since 2009.
Magdino 26.3749-09
Installed on Taiga snowmobiles since 2010.
Switch 84.3734-01
(plug connection) is used on snowmobiles Buran and Lynx. Works complete with Magdino base 26.3749, 1111.3749, MD-4.
520 rub.
Switch 84.3734-01 with AMP connectors
Installed on Buran snowmobiles since 2009.
Switch 84.3734-09
Installed on Taiga snowmobiles since 2010. Works complete with Magdino base 26.3749-09.
Voltage regulator 30.3702
Designed to regulate the voltage of the on-board network of Buran snowmobiles. Power 250 Watt.
Voltage regulator 304.3702
Designed to regulate the voltage of the on-board network of snowmobiles Buran, Lynx, Taiga, Varyag and imported snowmobiles. Power 400 Watt. The rectifier is assembled using diodes used in car generators. Not afraid of short circuits.
1200 rub.
Voltage regulator 30.3702A
Designed to regulate the voltage of the on-board network of Buran snowmobiles. Power 350 Watt. Made on a reinforced element base.
1200 rub.
Voltage regulator 309.3702
Designed to regulate the voltage of the on-board network of snowmobiles Vector 551 (carburetor), A1.
6500 rub.
Voltage regulator 307.3702
Designed to regulate the voltage of the on-board network of snowmobiles Taiga and Varyag. Replaces R104.
2300 rub.
Voltage regulator 307.3702D with DEUTSCH connector
Designed to regulate the voltage of the on-board network of snowmobiles Taiga and Varyag of early releases. Replaces R94.
2700 rub.
Switch 84.3734
Installed on Buran snowmobiles. Works with Magdino base 15.3749 and 45.3786 and MD-4B.
520 rub.
Characteristic
The principle of operation of the sensor is the same as in many devices that were found on Soviet-made snowmobiles. The device is located under the glow plug and is a ring, the design of which includes a thermocouple.
The element, detecting the temperature, sends a signal to the device that monitors this indicator.
Using a digital temperature sensor, you can measure not only the temperature of a running engine, but also determine:
- broken belt of the ventilation device;
- presence of snow in the air intake;
- Fuel supply system malfunction.
The latter can be determined by analyzing the temperature difference between the cylinders. The sensor can also indicate engine overload and air leaks into the system. It is noteworthy that it is high temperature that causes many malfunctions.
Therefore, the snowmobile owner should take this point into account
Temperature sensor characteristics:
- operating range – from +50 to +250 degrees Celsius;
- error - 2 degrees in either direction;
- Possibility of use - on snowmobiles with and without batteries;
- body dimensions - on average 45x90 cm.
Some models contain additional elements that ensure more reliable operation of the device.
During operation, the sensor lights up in the standard color declared by the manufacturer. If there is a sudden change in color, the owner of the equipment should take action, as the sensor reports that a critical temperature is approaching.
How to improve snowmobile cooling and reduce cylinder temperatures
Many users will answer without thinking, citing well-known requirements: oil proportions, carburetor and ignition adjustments, engine cleanliness and correct driving style. These facts are undeniable. But what if following these basics does not provide the necessary parameters? The answer, as always, is simple - modify the engine cooling system yourself. What steps can be taken in this direction will become clear as you read the article. The simplest step is to insulate the exhaust system with thermal insulation materials. The idea behind this modernization is to ensure that the air sucked in by the forced cooling system is not warmed up due to heating by the exhaust manifold. Additionally, this method reduces operating noise. Imported snowmobile mufflers, initially in their design, have internal packing made of high-temperature materials with a high degree of sound absorption
Such modernization should be approached carefully, since the exhaust system loses the ability to transfer heat to the external environment and its internal parts begin to experience temperature loads that they were not designed for. As a result, segments inside the muffler begin to burn out, which subsequently move freely and create metallic sounds that are not typical for the operation of a snowmobile. However, in each individual case, the duration of destruction of the muffler is individual and can last for years.
A more correct solution should be considered a separate air supply to the air intake or the use of a heat shield from the influence of the muffler. There is no need to talk about this; all the photographs presented below give a clear idea of how this can be accomplished. There are snowmobiles that normally have air intake through a special channel - a casing - from the external environment. It is undeniable that the possibility of direct air intake from the street helps improve engine cooling and reduce cylinder temperatures
The next effective step to improve engine cooling and reduce cylinder temperatures in general is to install a screen between the exhaust manifold and the engine cylinders. This idea has been used on imported snowmobiles almost since the founding of snowmobile construction in Russia
The purpose of such a screen is to cut off the air flow passing through the cylinders and prevent it from heating up further by coming into contact with the hot exhaust manifold. On the assembled engine it looks something like this. Moreover, as can be seen from the photograph, the cooling casing is practically absent at the exit point of the exhaust pipe
Since about 2001, a similar solution began to be used on Buran snowmobile engines, installing an air flow divider on the inside of the cooling casing
If you do not have such a solution on your snowmobile, we strongly recommend that you adopt this method, make a plate and install it, regardless of the brand of the snowmobile. Moreover, recently a similar design began to be used at the plant when assembling Taiga snowmobile engines. The effect of the design is very noticeable even without the use of electronic engine temperature sensors. The thermal stress of the left cylinder is especially greatly reduced, and the temperature difference between the left and right cylinders is also minimized. An example of using this method yourself is the photo below, where the part of the cooling shroud highlighted in yellow has been removed
There are craftsmen who install two fan impellers on a snowmobile. The method is very controversial, since in theory, the operation of two impellers of unidirectional rotation will be accompanied by excessive air turbulence and interfere with each other. In practice, no one has conducted research and it is impossible to say whether the air flow increases or decreases
The last significant modification to the cooling system is an increase in fan impeller speed. This is achieved by changing the size of the pulleys with the simultaneous use of a non-standard fan belt size. For such modernization, as a rule, it is necessary to contact a turner and be able to select fan belts
Where to start on your journey to lowering engine operating temperature is up to you to decide. The main thing we tried to clearly convey is that there is a vast field for activity. And only you can decide whether to leave everything as is or by improving the cooling of your snowmobile to increase its operational properties, and therefore traffic safety
Don't forget to thank the author by clicking the rating button at the top of the page, or by posting a link to the article on the Internet. Thank you
Source
Tuning of main components
Yamaha cannot always overcome deep and loose snow due to the fact that the engine does not have enough traction, and the heavy weight of the snowmobile does not provide any advantage in this. Thanks to the efforts of Boondocker Performance engineers, it became possible to significantly increase the power of the standard four-stroke engine. This can be done by installing a Yamaha Genesis turbocharger on the power unit.
A kit with compressor equipment for a snowmobile allows you to increase its power to 300 hp. For Nytro engines, the “Boondocker” package is used, which makes it possible to adjust the thrust relative to a given throttle position. This increases and decreases power depending on whether you need to climb or slide downhill.
In this case, the clutch switches when the speed is low, so that the power does not drop when changing gear, and the compressor no longer affects the descent of the device from the slope. Gasoline detonation will occur as required, regardless of whether the driver releases the gas or not: the system itself controls compression. The tuning kit includes lubricant for the turbine and a reservoir for supplying oil to the system, an intercooler, a turbocharger box, and a muffler.
Temperature sensor for spark plug. Correct installation on a SNOWMOBILE
Air-cooled snowmobiles do not have an engine temperature sensor as standard. However, this is a very important indicator, tracking which will help avoid engine overheating. And as a result, prevent costly repairs. Of course, the equipment manufacturer benefits from large sales of spare parts and new snowmobiles in rare cases when the owner is too lazy to restore an engine damaged by overheating. In order to avoid engine overheating, owners install engine temperature sensors on their snowmobiles. There are two types with differences in the type of installation:
1. In the form of a spacer for the spark plug.
2. Installing the thermoelement directly on the cylinder block.
The first type is the most common and easiest to install. However, it has significant drawbacks and poses certain risks. Firstly, careless installation of a spacer under the spark plug can lead to a violation of the tightness of the combustion chamber. And this, in turn, can cause burnout of the pistons and subsequent expensive repairs. Secondly, installing a spacer under the spark plug will inevitably change the height of the electrode in the combustion chamber. And this, in turn, will change the flame propagation front during the working process. As a result, there is a risk of a drop in power, incomplete combustion of the fuel-air mixture with subsequent formation of carbon deposits in the combustion chamber. Carbon deposits can cause the reed valves of a two-stroke engine to malfunction.
The second type of sensor, installed on the cylinder block, has only one drawback. This is inertia. Heat transfer in metal does not occur instantly. Accordingly, there is some delay. Those. In the event of a sudden increase in load or temperature rise, the engine may continue to operate in dangerous modes for several seconds. For example, due to a sudden air leak, an instant increase in the temperature of the working mixture occurs. And the process of overheating begins, which the snowmobiler will notice only with a delay. The same drawback exists with spacers for spark plugs.
Is there a way to protect yourself from overheating?
Notice overheating before the engine temperature increases and avoid irreversible processes in the combustion chamber? The good news is that it is possible. In order to prevent overheating, it is necessary to control not the temperature of the cylinder block, but the temperature of the exhaust gases. Before the overheating process begins, the exhaust gas temperature sensor will instantly show deviations from operating parameters. Thus, the snowmobiler has the opportunity to prevent the irreversible consequences of overheating. It is possible to stop the engine before the damaging effects of high temperatures begin.
The conclusion is very simple.
Measuring temperature with any temperature sensor does not guarantee protection against the harmful effects of engine overheating.
However, in any case, the presence of any of the sensors is better than a complete lack of information about what is happening in the engine. However, the best way to protect yourself from premature overhauls is to install an exhaust gas temperature sensor. Of course this is an expensive solution. With quite labor-intensive installation. However, only an exhaust gas temperature sensor gives a complete picture of what is happening in your snowmobile's engine and will allow you to avoid much more serious expenses in the future. If you don’t have any sensor at all, read the tips
on how to avoid overheating of a two-stroke engine.
Source
Photo gallery
Before purchasing any type of sensor, you need to familiarize yourself with its characteristics, material of manufacture and the possibility of installing it on your snowmobile. We invite you to familiarize yourself with more popular models.
Review of temperature sensors for snowmobiles
Controlling engine temperature is extremely important for air-cooled engines. Especially for two-stroke engines, piston cooling is significantly worse compared to four-stroke engines.
Which, if overheated from a lean mixture, can lead to burnout of the bottom of the piston.
And if a two-cylinder snowmobile is still able to continue moving for some time after this, then a single-cylinder one will have to be towed or abandoned while going for help.
To detect signs of overheating in time, engine temperature indicators are used. Most of them provide not only a bright digital temperature display, but also indicate overheating both visually and audibly.
The temperature can be taken from either one or two cylinders.
Additional options may include an indication of engine speed and ambient temperature.
Even the latest turbocharged sleds have tuning solutions like the KOSO X-2 Boost Gauge, which shows boost pressure, mixture ratio, and more.
CITD and other options for cylinder temperature control
Ratnik.
Active participant
I took two options, first I’ll put it under a candle, after the guarantee I’ll probably drill it, on the Thermiko website there are installation instructions and insertion points.
Installation of an engine temperature monitoring device on snowmobiles such as “Buran” and “Taiga”.
Fig.1 Fig. 2 Rice
3 Attention: The thickness of the cylinder heads is limited to 22-24mm. To avoid through drilling of cylinder heads, drilling must be done carefully
Installation of the TSITD 2-1 engine temperature monitoring device on a snowmobile.
To install a digital engine temperature indicator TSITD-2-1, it is necessary to prepare a cutout measuring 42.5x92mm in the dashboard or hood of the snowmobile Fig. 1Photo1. Install CITD 2-1 into the prepared hole, using the side holders to fix the device in the panel. Lay the measuring cable in the standard electrical wiring fasteners. Connect the connector of the measuring cable to TsITD-2-1. Connect the power output of the measuring cable to the on-board network of the snowmobile, for example: to the headlight size or to the wires on which 12V appears when the ignition is turned on. Note: The device can be powered from both alternating and direct voltage 12V. When connecting the device to a constant voltage (+), the red (-) black wire of the device. Installation of temperature sensors TPT3-6 for snowmobiles “Buran and Taiga”: Drill a hole (not through) 19 mm deep in the cylinder head. in any of the four head mounting stiffeners, at a distance of approximately 12mm. from the stud, so that the sensor is completely recessed in the body of the head, and the pressure washer of the stud does not touch the sensor cable photo2-3. For drilling, use a drill with a diameter of 3.2–3.3 mm. Next, fill the prepared hole with heat-conducting paste (KPT8) and install the sensor in the cylinder head. A core is used to fix the sensor. Photo3. Install the second sensor in the other cylinder head in the same way. Mount the third (air) sensor on the inside of the front bumper (photo 4). Install the cooling casing. Using connectors, connect the sensors to the measuring cable. TPT 3-6R For the Lynx snowmobile: When installing temperature sensors (we recommend), use standard holes in the cylinder heads with a depth of 20 mm. and M6 thread. These holes must be refinished by deepening the hole by 6mm using a drill with a diameter of 3.5mm. Fig.2 The right cylinder head (for older snowmobiles) must be modified so that the left head temperature sensor nut does not interfere with the installation of the right head. To do this, you need to select a vertical axial groove 5 mm deep in the head. and 15mm wide. (Fig. 3 - photo 6). Install the right cylinder head, fill the standard hole with heat-conducting paste (KPT-8) and install a temperature sensor into it. Install the left cylinder head in the same way with a pre-installed temperature sensor. Mount the third (air) sensor on the inside of the front bumper (photo 4). Route the lead of the temperature sensor of the right cylinder so that it goes into the technological hole of the cooling casing on the variator side (photo 7). Secure the air cooling casing. Using connectors, connect the temperature sensors to the measuring cable. Installation of temperature sensors TPT3-6U (under a spark plug): 1) To install temperature sensors, it is necessary to remove the standard sealing rings from the spark plugs. 2) Place the temperature sensors on the spark plugs so that the brown plane is at the bottom, install the spark plugs in the standard places of the heads. When tightening the spark plugs, do not allow the temperature sensor washer to rotate, since the cooling lamellas on some snowmobile models are located very close to the spark plug, and can lead to a break in the temperature sensor cable.
Operating order of the device. Start the snowmobile, the indicator will display the current engine temperature, the upper indicator R (right cylinder) - the lower indicator L (left cylinder). When you press the button, the upper indicator displays the ambient temperature.
*Critical engine temperature: If the instrument display begins to flicker while the snowmobile is moving, then the engine temperature has reached critical (195ºC - 200ºC). It is necessary to immediately stop driving and let the engine idle for about 3 minutes to prevent burnout or jamming of the piston.
Source
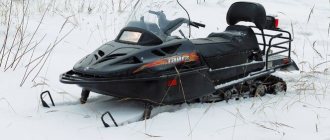
Pros and cons of the Irbis Dingo T-125 snowmobile.
After selling the karakat, I was faced with the question of purchasing equipment that was more modern, reliable and easy to manage and operate. Initially, I planned to buy a motorized dog with a capacity of 12-15 hp. s., but eventually acquired the Irbis Dingo T-125. The decisive factor in the choice for me, I confess, was not the amount of hp. or cross-country ability, but the appearance and illusion of a “real” snowmobile.
Now, after four seasons of operation, we can talk about the pros and cons of this snowmobile. For some reason, most of the advertising articles for this snowmobile begin with the possibility of its quick assembly/disassembly and transportation in a passenger car. So, the pleasure of disassembling and loading a snowmobile into a car is not a pleasant procedure, and for one person it is almost unrealistic. Indeed, the snowmobile can be disassembled, the fastest option is to unfasten the skis and the track, thereby disassembling the snowball into three parts, but the part with the engine is quite heavy and bulky, so I struggled with assembly/disassembly a couple of times, and then began to transport the snowmobile in a trailer, without understanding. But still, having the ability to assemble/disassemble a snowmobile is a definite plus.
My Irbis has a 7 hp engine, quite a bit, but on light snow or on a well-trodden road it goes quite well, I reached speeds of up to 38 km/h. He doesn’t like to carry large loads, the passengers in the sleds feel quite seriously, the speed and maneuverability drop significantly, but at the same time I carried three people in the sled and about forty kilograms of luggage, of course they didn’t fly, but they rode quite confidently along the trail at a speed of 15 km/h . If there is no trace, and the depth of the snow exceeds 30 cm, then it is better not to take a passenger, otherwise you will be pushing the snowmobile every now and then, and you will suffer quite a lot. When there is no “trail”, I break through it without a passenger, and then return for it; it follows my trail just fine even with passengers.
The snowflake really doesn’t like snow-water porridge, the snow begins to stick in the goose and if the area with water is long enough, the snowball simply “chokes”, you have to tilt it and hollow out the snow between the rollers, an unpleasant task, I tell you.
The weakest element of the snowflake is the standard battery. At temperatures below -10 degrees, starting a Dinga is quite difficult. At the dacha, if you have the opportunity to use an electric hair dryer to heat the carburetor, this is not a particular problem, but in my practice there was a case when a snowball started up in the morning without problems, but on the lake, after five hours of fishing, the battery died and a whole special operation had to be carried out to evacuate us together with the snowflake, but this story requires a separate description. Now I always take the battery into the house so as not to have to worry about warming it up.
Briefly about the advantages:
- It’s high-torque, develops a good speed along the “trail”, without any problems drags 1 person in a sleigh or a load (for example, firewood), I noticed that it drags up to 0.35 cubic meters of firewood confidently and with almost no loss of speed.
— Availability of headlights, on-board computer, heated grips.
— A fairly economical and unpretentious engine (the gas tank is 5 liters, enough for a long time, I take one and a half gallons of gasoline in reserve, just in case, and I feel calm).
— Possibility to assemble/disassemble the device and transport it in a passenger car.
— Price (I bought mine for 64 thousand).
Now about the cons:
— Carburetor (does not like frosts).
— Sticking of skating rinks and tracks with snow, if there is water on the lake under the snow.
— Cheap materials used by the manufacturer (cheap iron, especially evident in the quality of the muffler, the weld burst, welded, enough trips for 5, burst again in the same place, apparently due to vibration, had to be replaced with a reinforced one). Poor quality track material, after three years of operation it had to be changed at a mileage of 1450 km.
In general, I am pleased with the technology, since we usually travel together, sometimes I take children, but they don’t weigh much, and the speed and cross-country ability are at a fairly high level. You need to understand that the equipment is budgetary and in no case can it be compared with a Yamaha for 700 thousand rubles, for example, but it does its job honestly (and not 10 times worse than the same Yamaha), it delivers without problems, especially if there are “trace”, quite economical and unpretentious. The Irbis Dingo-T150 model has already been modified taking into account the disadvantages in the T-125, but it also costs almost twice as much. In the summer I want to make a modification, install the so-called “third ski” - engine protection. They say that this upgrade greatly increases the cross-country ability and traction qualities of the snowflake; I will definitely tell you about the corresponding experience in the following articles.
Thank you for reading, subscribe to the channel, press the thumbs up, good luck to everyone!
Source
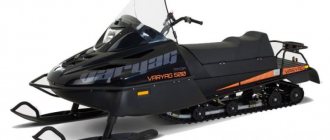
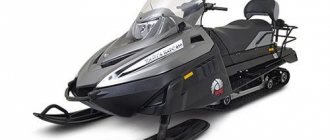
Snowmobile Yamaha Viking 540 III
Yamaha Viking 540 3 is a high-quality snowmobile from a well-known manufacturer from Japan. This car has a classic layout, has a strict and simple design, as well as a high windshield. The model in question comes mainly in a black version, which is considered the most practical. Before us is the fourth model of the Viking family from the famous Japanese brand, known for the production of automobile and motorcycle equipment. The Viking 540 III model turned out to be no less popular than its predecessor, which had unprecedented characteristics for its time, and was significantly different from its competitors in terms of handling, maneuverability, reliability and cross-country ability. That is why the Viking 540 III model deserves special attention, since it has received significant improvements and is more modern and relevant than its predecessor of the same name.
Among the main features of the machine, we note the impressive technical characteristics, the high level of which is not inferior to most famous analogues. In general, this type of transport has absorbed all the best that experienced Yamaha specialists have. First, let's pay attention to the wide track with excellent cross-country ability. In addition, thanks to the special shape of the caterpillar, it was possible to increase directional stability, and thereby reduce the risk of capsizing. Moreover, the durable caterpillar significantly increases the load capacity - by the way, according to this indicator, snowmobiles of the Viking family have always been considered the best. The car overcomes obstacles, rocks and deep snowdrifts without any problems. At the same time, you don’t even have to slow down, since the caterpillar is made of durable components that are resistant to deformation and various damages. This factor is extremely important at low temperatures, including in the northern regions of Russia - in such conditions problems with reliability most often arise. But the Viking 540 III is adapted to the most severe temperature loads.
Secondly, let’s pay attention to several pleasant features that benefit cross-country ability and stability. This is a multifunctional gearbox with forward and reverse positions that can be used under heavy loads - for example, for transporting and towing large and heavy loads. Reliable and uninterrupted starting is ensured by a powerful electric starter, thanks to which the engine starts almost instantly, and for this it does not need to be warmed up. But as a last resort, you can always use a manual starter, which means that the engine will start in any case, and in any weather. All of the listed components are the prerogative of the basic configuration.
Video
Returning to the chassis, we will pay special attention to the tracked chassis. There is one single caterpillar installed at the rear, which is distinguished by its increased dimensions. Its length is 4 meters, while the length of the snowmobile itself reaches three meters. At the same time, the track width is 500 mm, which is an important factor that ensures high-quality maneuverability in deep snow. Among other parameters that benefit off-road qualities, it is worth noting the ski base, which is about 1000 mm.
Of the other positive qualities of the Yamaha Viking 540 III snowmobile discussed above, we separately note the load capacity. In this parameter, the model under consideration is not inferior to most analogues, and in some ways surpasses them. According to official data, this snowmobile is capable of transporting more than 300 kg of cargo, while the permissible speed can reach 60 km/h. Practice shows that with the help of a towbar you can attach any load whose mass exceeds the weight of the snowmobile itself. Especially for such high loads, the gearbox has a reduction gear. Thus, we can talk about the high traction capabilities of the Yamaha Viking 540 III snowmobile without fear of reliability problems. The machine is suitable for absolutely any task and will satisfy the practical user - fisherman, hunter, or lovers of recreation and active adventures with their family.
Specifications
- Engine – petrol, volume 535 cc. cm.
- Power – 46 horsepower
- Cylinders, pcs. – 2
- Cooling system – air
- Cylinder diameter – 73 mm
- Piston stroke – 64 mm
- Intake system/fuel system - reed valves/Mikuni carburetor
- Ignition system - CDI
- Exhaust system - one resonator
- Transmission – YVXC, variator with reduction and overdrive gears, as well as reverse
- Lubrication – separate type, automatic
- Transfers to the checkpoint, pcs. – 3 (including reverse)
- Frame – steel
- Front suspension/front shock absorbers – telescopic/hydraulic
- Ski material – steel
- Front suspension travel – 150 mm
- Rear suspension – Pro Action Plus, 290mm travel
- Dry weight – 290 kg
- Snowmobile dimensions, mm: Length/Width/Height – 3120/1130/1350
- Caterpillar dimensions, mm: Length – 3960, Width – 500 mm
- Fuel tank/oil tank (volume) – 31/2.5 liters
Basic options: electric starter, reverse speed, heated steering wheel, grips and throttle lever; high windshield, rear-view mirrors, tow bar, halogen headlights, speedometer, odometer, tachometer, oil level and engine temperature indicators.
Engine
The Yamaha Viking 540 III snowmobile is equipped with a time-tested engine, which is borrowed from its predecessor, but has significant improvements in terms of efficiency, environmental friendliness and higher power. This power plant impresses with its improvements and advanced characteristics, because it is considered one of the most powerful and energy efficient today - at least in its price category. Thus, the working volume of the power plant is 0.5 liters, and the power is 46 horsepower. This power output is enough to avoid problems with cross-country ability. In addition, 46 forces allow you to move quite quickly on rolled snow, on straight and level roads. The engine is air cooled, which is considered the simplest compared to liquid cooling. The two-stroke, two-cylinder layout is compact and lightweight, which benefits a more rational organization of the engine compartment and also reduces the weight of the snowmobile. High technology is provided by the Mikuni B38 carburetor system, as well as an exhaust system with reed valves. There is an electric start as well as a manual starter. All of the listed components operate reliably and without interruption, and make it possible to achieve high environmental friendliness and low fuel consumption under high loads.
Temperature sensor Buran (electronic motorcycle thermometer −70/+250)
Description: A universal electrical device for taking data from 2-4 stroke engines - snowmobiles, motorcycles, scooters, boat motors, etc... Operating voltage 12 Volts (from 7.5 to 20 volts). Temperature sensor - contact (cylinder-candle) - measured temperature range from −70 to +250 C; Does not have a body. The dimensions are small, it easily fits into any place. It works correctly ± 1C.
To install the sensor under the spark plug, an additional adapter is required.
Delivery within Russia by post with cash on delivery is possible.
Before shipping, the sensors are checked for correct readings.
Recommendations for installing temperature sensors
When mounting the device body into the snowmobile's instrument panel, keep in mind: the installation location should always be in front of your eyes, without obstructing your view, with little exposure to air turbulence (when moving, the snowmobile raises snow dust, which settles differently in different parts of the snowmobile). The laying of wires is carried out using frequent fixing laying or the wires should be placed in additional protection such as a cambric. The insulation of the wires is weak and can fray due to vibration, which will lead to a short circuit. When extending the sensor wires (if necessary), take into account that the temperature sensor is polar and make the connection in accordance with the polarity. The joints should be soldered and insulated. Do not install wires on twists. It is possible to do without soldering by using electric wires to connect them. automotive type connectors. In the future, such a connection is more convenient for repair work, as it allows the components of the device to be easily removable. Note! The sensor wires are heat-resistant - they can withstand the operating temperature of the engine, but not the exhaust manifold. They can be extended using any wire, without exceeding the resistance of each wire of 5 Ohms. Regardless of the sensor installation method, it is useful to isolate the protruding parts of the sensor shell (brass sleeve) from the incoming air flow. For example, by using a piece of cambric that will reduce heat loss, the same method can be used when installing the sensor under the spark plug. Power supply - connect temperature sensors in accordance with the device installation manual. The power connection via the ignition switch is most often used. How? On the ignition switches, there is a terminal on which there is no voltage at the moments when the key is turned off, the key is turned to the electric operating position. starter, but is present when the ignition is on or the engine is running. Thus, the ignition switch functions as a switch. The power supply circuit is quite simple: power is supplied through separate wires from the battery terminals - the ignition switch - the circuit that you soldered - the device. If there is no ignition switch, it is possible to use a separate toggle switch. If there is no battery, it is permissible to connect to the step-down terminals of a standard voltage stabilizer. Please clearly remember that the device is not designed to be connected to an alternating current network, or directly to the engine magneto, bypassing the standard voltage stabilizer. Also, it should not be connected to the old type of rectifier devices of Russian technology such as VU.
The average operating temperature of a serviceable two-cylinder engine, under light and medium operating conditions, is 140 - 150 degrees Celsius. With any of the considered methods of installing sensors, the temperature difference between the left and right cylinders should not exceed 20C. A fully operational, new engine has a temperature difference between the left and right cylinders of 5 - 10 degrees. Up to 20 C is considered acceptable. In this case, the temperature spread between the cylinders may vary depending on the speed of movement.
Installing sensors under the spark plug has undoubted advantages, which include: if the engine is under warranty, such installation will not lead to its loss (requires clarification from the dealer); installation method is less time-consuming; certain accuracy of readings - the sensor is located in close proximity to the epicenter of combustion, it is not affected by heat dissipation in various parts of the engine - with such an installation, when taking readings, it is possible to rely on the generally accepted pattern of 180 - 200 degrees (in accordance with the operating instructions for a particular technical means). The disadvantages of this installation include the high probability of damaging the sensor when installing spark plugs.
Note: The device can be powered from both alternating and direct voltage 12V.
Installation
The process of installing the sensor in the engine head is not difficult. Before carrying out work, you must first determine the place where you can make a recess. To drill a recess for the sensor, preference should be given to drills with a diameter 2-3 hundred parts larger than the diameter of the sensor itself.
It will protect the device from airflow.
If possible, it is better to completely immerse the sensor in the body of the head so that the device does not protrude outward. The advantages of such an installation are obvious:
- more accurate device indicators;
- no need to constantly check the location of the element;
- increase in service life.
In addition, after installing the sensor, you will not need to mount it when you need to change the spark plugs. Thus, completely submerging the device prevents damage.
In most cases, the thickness of the head at the place where the spark plug is mounted coincides with the length of the thread of the elements. Therefore, a recess for the sensor is often drilled next to the spark plug so that the ignition element is located between the fan and the sensor. This arrangement allows the device to be as close to the center of the head as possible.
In this case, it is important to ensure that the key does not touch the sensor
Before installation, you must fill the recess with thermal paste. It helps seal the air gaps, which ensures complete heat transfer to the sensor.
So, to install the device you will need the following tools:
- knife with a thin blade;
- a blade for working with metal or a fine-toothed file;
- wire cutters;
- soldering iron;
- set of drills;
- insulating tape.
The installation process is shown below.
- First you will need to remove the glass of the case. To do this, you need to place a knife blade under each of the four latches with which it is secured.
- Next, you need to secure the indicator to the dashboard using hot glue.
- The third stage is the output of the sensor wires through the rear wall. After this, you can seal the remaining holes and install the glass in place.
- When the indicators are installed and fixed, you can begin installing the product. It is recommended to install under the spark plug. The element is fixed using special fasteners. The process takes no more than ten minutes. If the engine is not under warranty, you can drill an additional hole for the device.
- The next step is to connect the power using a timing circuit.
The installation of a temperature sensor in the head of the Buran snowmobile deserves special attention. In this situation, this location is considered not very good. This is explained by an increase in performance due to exhaust gases affecting the device.
Additionally, it is worth noting that the wires with such an installation remain unprotected. Therefore, problems often arise with their short circuit due to loss of insulation from incoming vibration.
About the sensor for a snowmobile, see below.
Source
About temperature sensors, tuning and repair of snowmobiles!
Hello! You can buy CITD 3 and CITD 4 in the Yetipro.ru store, which is what we did. Having gutted the mailbox and sharing the contents with a friend, we agreed to install the devices in the evening, especially since it was a Friday. At the end of the article there will be a VIDEO of the operation of sensors on a SNOWMOBILE!
And now evening has come! The Yamaha snowmobile was driven into a warm garage, with a temperature of 0 C, but not outside, to install the digital temperature indicator CITD 3. It took about 10 minutes to study the installation instructions, then we started. The work was carried out together, with a friend, taking turns driving their snowmobiles
Having assessed the snowmobile panel and the space under it, the installation location of the TsITD 3 measuring unit was outlined and marked
Then, we began to make a cut along the intended contour. Why was a HITACHI brand screwdriver used - another one will not be suitable for these purposes))
At the work stage, the snowmobile panel began to look like this
Then a sharp knife with a narrow blade was used. The plastic of the Yamaha VK 540 panel turned out to be very soft and cut easily
And so we got a neat cutout. Nearby we drilled a hole for the button for reading the outdoor temperature sensor
Having inserted the measuring unit into the hole, we found that the body of the device rests against the mount for the reverse sound signal
Having thought about this event, the sound signal was unscrewed from its mounting point
Using a metal blade, the fastening was mercilessly sawed off
And a hole was drilled in the hood of the snowmobile for a new location for installing the tweeter
The measuring unit CITD 3 and the button for outdoor temperature readings were installed, and we began laying the device’s wires. The wires of the device are thick, with a good cross-section, which instills confidence. We fastened the snowmobile wiring directly along the spit using plastic ties. The CITD 3 kit includes two plastic ties. This quantity is not enough, it is better to stock up on them in advance, or use improvised materials, such as electrical tape. Outdoor temperature sensor CITD 3, mounted on the bumper, in the area of the left hinge of the snowmobile hood
Having extended the sensor wires to the engine, we were faced with the need to remove the top cover of the airflow casing. Of course, it was possible to insert temperature sensors through the holes in the spark plug wells, but it doesn’t look pretty. And unscrewing the 4 bolts securing the cover is a matter of seconds.
After unscrewing the bolts, shake and pull the cover towards the left side of the snowmobile. It comes off easily. We removed the spark plugs and used pliers to cut the O-rings off of them. The temperature sensors were placed in the spark plug wells in such a way that the sensor wires ran with less bends. The insulation of the temperature sensor wire is thermally resistant and does not melt due to the temperature of the cylinders. Screw the candles into place
Reinstalled the air hood cover
Having finished with the mechanical part, we started connecting the device. As stated in the instructions, CITD 3 can operate on both alternating and direct voltage and it does not matter whether the snowmobile has a battery or not. We connected the plus of the device to the speedometer light bulb, and the minus to ground. (NOTE on Yamaha Viking snowmobiles, without a tachometer, there are two free wires in the headlight area, we had them in black and blue. You cannot connect the CITD or anything else to them - it will burn out. These wires are intended for connecting the tachometer, the voltage is on They are pulsed and increase depending on engine speed.)
On a friend’s snowmobile, also a Yamaha VK 540, but with a battery, the device was connected through the ignition switch. In a nutshell it looks like this! There is a brown wire going to the ignition switch (at least, this was the color on both snowmobiles), we connect the positive wire of the device to it. So we got the following operation of the CITD: the ignition is turned off - the device does not work, the key is on - the device works, the key is in the electric work position. starter - the device does not work, the engine starts and the key is released - the device works. What does this give? The battery provides stable voltage in all modes of engine operation - it absorbs voltage surges and compensates for dips at low speeds, providing stable power to the device, which is the key to long-term performance.
Don't forget to thank the author by clicking the rating button at the top of the page, or by posting a link to the article on the Internet. Thank you
Temperature sensor CITD 3 works on a Yamaha VK-540 snowmobile
Snowmobile Error Codes
Many users of modern Yamaha, Polaris, Arctic Cat, BRP, Ski-Doo and Lynx snowmobiles often deal with breakdowns and malfunctions of their equipment. Of course, it happens that not even all experienced mechanics, let alone an ordinary user, are able to make a correct diagnosis and find a breakdown. But this is precisely the big part of success.
But there are times when a breakdown occurs in an area so remote that there is nothing or anyone nearby. Simple malfunctions are also possible, which even a beginner can handle. And in such cases, in order to figure out the problem independently and without unnecessary expensive inaccessible devices, system self-diagnosis comes to the rescue, which helps to recognize the fault and shows it to the snowmobile owner in the form of an error code or the so-called diagnostic fault code on the display.
Instructions for viewing diagnostic fault codes
For BRP Ski-Doo/Lynx snowmobiles:
You can view the code on BRP/Linx snowmobiles as follows:
1. To display active trouble codes, press and hold the MODE (M) button and press the headlight switch several times.
2. If two or more codes are registered, use the SET (S) or MODE (M) button to view them.
3. To exit DTC viewing mode, press and hold the MODE (M) button.
For Yamaha snowmobiles:
You can view the error code on Yamaha snowmobiles like this:
1. Turn off the ignition, set the engine stop button to the ON position
2. Disconnect the fuel pump connector.
3. Simultaneously press the SELECT + RESET buttons on the dashboard and do not release.
4. Turn on the ignition (still holding the buttons) and wait
8 seconds until “dIAG” appears on the instrument panel.
5. Release the buttons, use the SELECT button to select “dIAG” (in case a different inscription appears on the dashboard).
6. After dIAG is displayed on the screen, press both buttons on the dashboard (SELECT + RESET) on
7. After the diagnostic mode (d01) is displayed on the dashboard, turn off the engine stop button.
1. Entering the diagnostic mode is the same.
2. Turn off the ignition and leave the stop/start button in the OFF position.
3. Press the RESET and SELECT buttons on the dashboard.
4. Turn on the ignition without releasing the button, wait about 8 seconds until DIAG appears on the dashboard. Release the buttons.
5. At this stage, you can switch between testing and setting CO by holding down the SELECT button for a couple of seconds.
6. Next, in DIAG mode, hold down the RESET and SELECT buttons for a couple of seconds. The test result will appear on the screen.
For Arctic Cat Snowmobiles
In order to view error codes on Arctic Cat snowmobiles, perform the following steps:
Note: Each of the following numeric codes will have a single letter prefix C or P. The prefix "C" indicates a chassis fault and the prefix "P" indicates a power train fault. Note: Regular fault codes are cleared from the LCD when a component is replaced or a fault is corrected, however intermittent codes must be cleared as indicated in the code chart. If the ECU, ISC or TPS sensor is replaced, then the following process must be completed.
How to measure snowmobile engine temperature?
Spread the love
It is advisable to purchase sensors from the manufacturer to avoid buying counterfeits. You can, of course, not buy or install anything, thus saving your own money, effort and time. But, as practice shows, such savings can very easily backfire on the owner of a snowmobile - engine repairs cost many times more.
Correct, stable operation of the engine depends on many factors, the most important of which is its temperature, this is especially important for two-stroke air-cooled engines - this fully applies to snowmobiles. At high speeds, as well as under significant or even extreme loads, this parameter can rise to a critical level
Long-term operation in this mode leads to quite serious damage, which means expensive repairs. Therefore, users need to know what the operating and critical temperature of the Taiga 500 snowmobile is.
Options for choosing LED optics for a snowmobile
The main parameters are power, voltage, light temperature, dust and moisture protection class, reflector design and illumination range. Let's look at them in more detail.
Operating voltage
Indicates the range within which the optics can operate normally.
Power
The more powerful, the brighter. But optics with high consumption may not be able to handle the generator, so it is important to take into account the energy costs of all consumers - including headlights, cooling, fuel pump, instrument panel, battery, heated grips, ECU, sensors and relays.