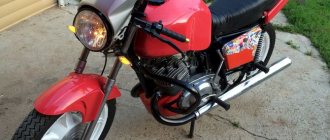
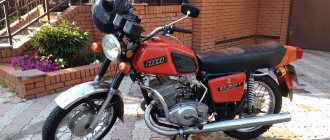
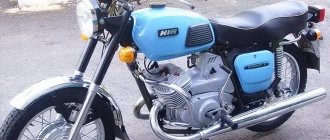
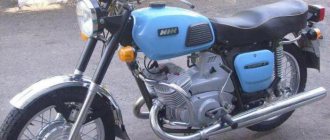
First, you need to understand the features of the motorcycle. IZH Jupiter-5 is a vehicle designed for road travel with different surfaces. You can attach a stroller and a cargo module. The appearance of Jupiter-5 is distinguished by the strict classics inherent in the Soviet era, but at the same time it has its own individuality.
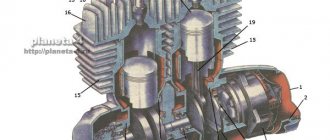
The demand for this model lies in the small dimensions of the motorcycle, as well as decent power for that time. The engine of this motorcycle has two cylinders and two strokes. The cylinders are arranged in-line. The maximum developed power reaches 25 horses, which is 3 more than the single-cylinder IL Planet-5. This engine allows the motorcycle to move at a maximum speed of 120 km/h, while it has low fuel consumption.
What sets the bike apart is its ability to operate even in harsh climatic conditions. It is not at all whimsical: it can start both in -30 degrees and in heat over +40, and is not afraid of rain and dirt. However, moving on the ground during rain is not as easy as we would like. Unlike the “Planet”, during the trip you don’t feel any unnecessary vibration , the movement is dynamic and very smooth.
The Izhevsk Machine-Building Plant began producing IZH Jupiter-5 in 1985, so spare parts are always available. However, the quality leaves much to be desired, which is why parts wear out quickly and the motorcycle requires fairly regular repairs. Sometimes, to find the cause of a breakdown, you have to disassemble half of what you didn’t even know about. Fortunately, in IZh everything is quite simple and the repair can be done at home. Repairing the IZ Jupiter 5 engine is not a difficult task, but if you are going to ride this motorcycle often, then you should not neglect to do the work correctly.
The main problems of Jupiter-5 include the current shock absorbers and cylinders, which alternately refuse to operate the engine. If you have encountered similar problems, then this article may help you in solving one of the annoying problems.
Instructions for assembling and disassembling the IZH Jupiter 5 engine
First, you need to understand the features of the motorcycle.
IZH Jupiter-5 is a vehicle designed for road travel with different surfaces. You can attach a stroller and a cargo module. The appearance of Jupiter-5 is distinguished by the strict classics inherent in the Soviet era, but at the same time it has its own individuality. The demand for this model lies in the small dimensions of the motorcycle, as well as decent power for that time. The engine of this motorcycle has two cylinders and two strokes. The cylinders are arranged in-line. The maximum developed power reaches 25 horses, which is 3 more than the single-cylinder IL Planet-5. This engine allows the motorcycle to move at a maximum speed of 120 km/h, while it has low fuel consumption.
The Izhevsk Machine-Building Plant began producing IZH Jupiter-5 in 1985, so spare parts are always available. However, the quality leaves much to be desired, which is why parts wear out quickly and the motorcycle requires fairly regular repairs. Sometimes, to find the cause of a breakdown, you have to disassemble half of what you didn’t even know about. Fortunately, in IZh everything is quite simple and the repair can be done at home. Repairing the IZ Jupiter 5 engine is not a difficult task, but if you are going to ride this motorcycle often, then you should not neglect to do the work correctly.
The main problems of Jupiter-5 include the current shock absorbers and cylinders, which alternately refuse to operate the engine. If you have encountered similar problems, then this article may help you in solving one of the annoying problems.
Is it possible to replace the crankshaft cheek by taking it from another?
I did it differently, but it is advisable not to change the crankshaft cheek, since there is a slight displacement from the center of the hole and from the center of the crankshaft, so selecting cheeks from different crankshafts is not possible. It is possible to remove the axial displacement of the shafts. But it happens that even different cheeks sit like a family. The crankshafts are drilled on a machine with settings, if the crankshaft is from a different batch, it means it was drilled on a different machine, but there may be a slight shift of hundredths and tenths of a millimeter, this little thing does not affect the engine in any way, and when assembling the crankshaft from different cheeks, it can be bias.
How to disassemble the IZ Jupiter 5 engine
So, disassembling the IZ Jupiter 5 engine includes the following steps:
Now that you have looked at all the parts from the inside and found the problem, we replace the broken part. The easiest way is to look on the Internet at a spare parts sales site. You can also find it at a regular city market (flea market). Before assembling the IZH Jupiter 5 engine, carefully inspect its surface for chips, cracks, and wear again.
After you have thrown out the broken part and stuck a new, shiny one in its place, you need to return everything to the way it was. Assembling the IZ Jupiter 5 engine is a little more difficult than disassembling it. Everything is put together in reverse order.
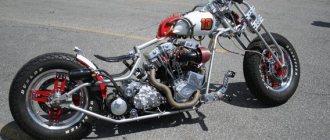
As you can see, there is nothing complicated about this. It's another matter if you want to add a couple of horses to your pet. Then you will have to sweat a little, because tuning the IZ Jupiter engine will require a little patience from you.
Tuning IZ Jupiter 5 – using the bike’s potential to its full potential
[sc:ads1] Bright and unique things have always been a sign of good taste, ingenuity of the owner and his material wealth. The desire to travel on a one-of-a-kind vehicle is even more relevant, since the production of both cars and motorcycles occurs on a mass basis. Hundreds of thousands of identical wheeled units roll off the assembly line every year, making road traffic monotonous and dull. It was especially hard for citizens of socialist countries, where stereotypes were the norm of life.
But resilient drivers, as motorcyclists are by definition, have always very quickly found a way to highlight their vehicle in the gray traffic and make it the envy of others. Everything that was at hand was used - from all kinds of light bulbs, shiny stickers, right down to changes in the frame structure and replacement of the engine . Now, when the domestic motorcycle enthusiast has access to almost unlimited quantities of materials to upgrade his motorcycle, tuning bikes has become a real art.
However, motorcyclists were divided into two groups: some adopted all the features of their Western sister cities without exception, while the other remained faithful to the creations of the Soviet and domestic motorcycle industry. Almost all motorcycles that come to hand are tuned, but some are more popular among those who like to upgrade Soviet two-wheelers. One of these is Izh Jupiter 5.
Tuning the IZH Jupiter engine
Before you start, you need to decide how much power you would like to give to your engine. If you are quite satisfied with the average power, then you will need a ZiD-200 resonator. But if you want to make the IZH Jupiter 5 motorcycle fast and powerful, start tuning the engine by installing a resistor from the SMB-5 “motoblock”.
Replacing the air filter plays a big role in engine modification. The better the air is cleaned, the more horses the engine will be able to produce. After all, the degree of engine overheating depends on the amount of incoming air. It is best to use imported air filters. They provide improved cleaning and longer service life.
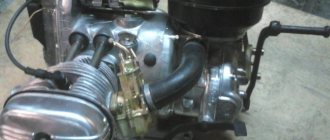
Next you should work hard on the injection system. An excellent option is to install a “Planet” carburetor with a diffuser diameter of 0.32 cm. Two carburetors will provide much greater acceleration and good dynamics. We take the flanges securing the cylinder from the standard tube, grind out the aluminum studs, and cut off the flange from the carburetor from the inlet tube from the Planet.
We grind the ends of the cylinder heads on a machine, and press the cylinders themselves. The maximum permissible volume of PIC is 18 cubic meters. see Install factory copper layers under the cylinder heads. And we adjust the ignition advance angle to increase compression.
We use the second flange from the old carburetor. Then we weld the parts using “cold” welding. And finally, we modify the assembly to be compatible with the inlet channels. all the cracks with epoxy liquid . Voskhod carburetors will provide uniform traction. In this simple way, you can add not only a couple of additional horses to your pet, but also provide more lively dynamics that give a good riding experience. The motorcycle is very reliable for everyday use, and if you take good care of it, breakdowns will occur very rarely.
[sc:ads5]
Source
Technical characteristics of the Izh Jupiter 5 motorcycle engine
Izhevsk motorcycle can certainly be considered one of the most elegant and reliable. Being very light and compact, this motorcycle is capable of carrying incredibly large loads. Thus, the IZ Jupiter 5 engine is capable of withstanding a load of 500 kg !
This is an excellent result. The motorcycle itself looks sporty. Classic minimalism of the Soviet period was intended more for the youth of that time, but was popular among all age groups.
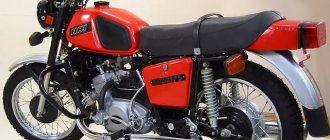
Motorcycle IZH Jupiter with sidecar
Motorcycle IZH Jupiter K with an increased gear ratio in reverse gear. The drive sprocket is installed with a smaller diameter and fewer teeth. The presence of a stroller forced the manufacturer to increase the torque, but reduce the speed to 80 km/h.
The side trailer of the IZ Jupiter K motorcycle is designed for a load capacity of 100 kg. The frame is made of pipes. The body is metal. The wheel suspension is of torsion bar type, spring type. There is no brake on the side trailer wheel.
Electrical diagram of the IZH Jupiter motorcycle with a sidecar.
No major changes have been made to the electrical circuit. Provision is made for installing a marker light 20 on a side trailer. The generator produces 45 watts of power and a voltage of 6 volts. There is a battery and a voltage regulator.
Main problems and their solutions
Disassembling the IZ Jupiter 5 engine, the video of which is presented below, is carried out not only as problems arise, but also for preventive purposes. For example, cleaning the carburetor is one of the conditions for maintaining stable engine operation.
The IZ Jupiter 5 engine diagram is simple even for inexperienced motorists. Therefore, during repairs there will be no difficult issues. In most cases, breakdowns occur due to the negligence of owners who improperly operate the moped and do not perform regular maintenance. For example, incorrect selection of oil for a particular time of year. So, if any part wears out, it must be replaced.
Engine diagnostics and repair
It is sometimes impossible to find the cause of a breakdown after one visual inspection. In some cases, complete disassembly of the IZH Jupiter 5 engine is necessary. But if you find out the reason, you can quickly solve the problem yourself. Here are examples of main faults and repair recommendations:
These are the main problems that may occur during operation. How to disassemble the IZ Jupiter 5 engine is written in detail in the maintenance book issued upon purchase. Everything stated in it is written in clear text, with diagrams and detailed instructions. Not only the repair of a Soviet unit is within the power of any owner.
There are many questions about how to assemble the IZH Jupiter 5 engine yourself, modifying it. For example, installing a more reliable carburetor or a more stylish and loud muffler can be done quickly enough without significant financial investments.
Tuning an IZH Jupiter engine with your own hands is possible if you have enough time and enthusiasm. You just need to be persistent.
The motorcycle has a favorable ratio of cost, build quality and maintenance requirements. An ideal option for people with a small budget and those who want to get universal equipment. However, frequent breakdowns will take a lot of time. It's worth being prepared for this, since some bikes can be 40-50 years old.
[sc:ads5]
Source
How to assemble a Jupiter-5 engine
Independent assembly of the Izh Jupiter 5 engine after its repair is a responsible operation. Inattention and errors during assembly will sooner or later lead to breakdowns during its operation. However, the attention and care shown when disassembling it will allow you to avoid most mistakes.
You will need
Instructions
1. Before starting assembly, clear the surfaces where the parts connect from any blockages. During each process, pay special attention to evenly tighten the mounting screws, avoiding distortions. Before pressing, thoroughly lubricate the bearings. Press the ball bearing into the right half of the crankcase, then install the installation ring into the left half. From the crank chamber side, press the oil seal into the crankcase, then install the second ring.
2. Insert the installation rings into the grooves of the crank chamber covers, press the ball bearings into them and put rubber sealing rings on them. Install the left crankshaft. At the same time, be careful not to damage the oil seal. Use a hammer and help to press in the crank chamber cover. After this, screw the screws and lock washers into it. The tightening force for these screws should be maximum.
3. Insert the crankshaft into the right half of the crankcase. In the same way, using a hammer and support, press in the crank chamber cover. After installing the oil seals on the crankshaft axle shafts and in the crank chamber covers, press them in. Next, insert the installation rings, press the ball bearing into the left half of the crankcase and secure the crank chamber cover with screws with maximum tightening.
4. On both halves of the crankcase, secure the screws securing the crank chamber covers to protect them from being unscrewed for no reason. Place a gasket and a cover with a crankshaft oil seal on the right half of the crankcase. Secure it with screws and cap it in the same way.
5. To assemble the cylinder-piston group of the engine, put the rings on the pistons with the help of plates. In this case, the plate locks must coincide with the piston pins. On the piston bosses, install a retaining ring in one of the grooves, and a piston pin, lubricated with machine oil, in the opposite groove. Place the piston on the upper head of the connecting rod so that the arrow points backward, and the piston ring locking pins forward in the direction of travel of the motorcycle.
6. Align the holes of the piston bosses and the bushings of the upper connecting rod head. Press in the piston pin with the support of the mandrel and hammer. Later, install the second retaining ring on the piston. In the same order, assemble and install the 2nd piston the engine Before installing the cylinder, check the connector planes. Clean these surfaces, install sealing gaskets on them, and place a wooden stand under the pistons. Lubricate the cylinder mirror with oil. Place the piston with pins on the cylinder and carefully fill the piston rings.
7. Remove the support from under the piston. While pushing the cylinder, place it in place and secure it. In this case, the ring locks do not have to fit into the cylinder windows. Correctly also put the 2nd cylinder in place, then install the carburetor pipe, gasket and head. Tighten the fastenings of the heads and pipe as follows: first tighten the middle screws until they stop, then the outer ones. Tighten the outer nuts evenly in a cross pattern.
Pressing the crankshaft
It is not difficult to press the crankshaft, a good crankshaft did not press, I will explain everything in words. It is recommended to compress the crankshaft on an anvil or on an old cast-iron car block. Insert the new pin into the crankshaft cheek where it was when released, this will make it easier to press the second cheek. The new pin is driven all the way from the inside of the crankshaft. Place the new needle bearing and connecting rod onto the pin. Place the crankshaft cheek with the hammered end on the support so that the pin rests against the support. Place the other cheek on your finger and hit it with a heavy hammer, as shown in the photo below.
When driving the second jaw onto the crankshaft, be careful not to touch the threads or taper of the crankshaft axle. You shouldn’t worry too much about the alignment of the crankshafts at this time; it’s enough to get them approximately right.
The roller is pressed, now we check the size between the cheeks with a barbell, if the cheeks are pushed apart less, if more, nail the cheeks to the desired size.
Also be careful that the crankshaft pin does not come out of one of the cheeks, if it comes out with a mandrel, drive it in.
Photo. Squeezing the crankshaft of a motorcycle
Instructions for assembling and disassembling the IZH Jupiter 5 engine
The wiring diagram of IZH Planet 5 has a simple design: a single-wire DC network is provided by a 12-volt battery, which is charged by a generator with a power of 100–140 watts. The role of the negative wire in the electrical circuit is played by the metal frame, and since the rest of the wiring has a positive charge, their short circuit is often the main cause of the malfunction.
Electrical equipment IZH Planet 5
Video: review of IZH Planet 5 wiring
Headlight and dashboard lamps
Wiring diagram IZH Planet 5
Explanations for the diagram
Self-check of the Planet 5 motorcycle generator in case of loss of charge
How to correctly set the gap between the contacts of the breaker?
Troubleshooting the audio signal and improving signal quality
Video: installation of electrical wiring on IZH Planet 5 with description
Comments and Reviews
Electrical equipment IZH Planet 5
Wiring for IZH Planet 5 includes:
Video: review of IZH Planet 5 wiring
Taken by user Agronom.
Generator
IZ Planet 5 generator design:
The generator converts the mechanical energy of a gasoline engine into electrical energy, which charges the battery. Alternating current is generated by 3 windings and fed to a rectifier, which converts it into direct current. An additional coil is used as an exciter.
Photo gallery: IZH Planet 5 generator and its design
Battery
To supply all components, a low-power energy storage device of 12 volts is required, since IZH Planet 5 does not have a starter. The purpose of a lead-acid battery is only to supply voltage to the ignition system and the excitation winding of the generator during startup.
Ignition system
In IZH Planet 5, the ignition coil converts low-voltage voltage into high-voltage and transmits it to the spark plug. That, in turn, is responsible for the spark that detonates the fuel. To ensure that detonation occurs only in the desired piston position, there is an ignition chopper.
From the factory, this model is equipped with a classic ignition system, which requires periodic cleaning of the breaker contacts and adjusting the gap between them.
Installing a contactless SG on a motorcycle gives:
Control devices
The following control devices are installed on the motorcycle:
Headlight and dashboard lamps
Conventional incandescent lamps are installed as lighting equipment and to illuminate the dashboard. Switching elements are responsible for supplying electricity from the battery to the lamps.
The headlight circuit includes lamps:
Switching elements
Switching elements are various types of switches that close or open an electrical circuit. They can be activated using keys on the dashboard (for example, turn signals) or by sensors.
In IZH Planet 5, the switching elements include:
Required Parts
In order for the ignition system to work correctly, a number of auxiliary parts are required. They are listed below:
Modulator
The most difficult stage is the production of the modulator. It is important to maintain the required shape. The more accurately the required dimensions are observed, the lower the likelihood of problems occurring after the system is implemented, that is, there will be no need to adjust it with a file. The ignition timing must match on any cylinder used.
The bolt hole must be located in the middle. Otherwise, the engine operation will not be synchronized. It is also recommended to check the integrity of the crankshaft bearings. If you find defects, you should immediately replace it.
The contact ignition is not able to work normally if the bearings are damaged. The thickness of the part should not exceed one and a half millimeters. If it is thin, it will not be possible to avoid deformation, and if it is thick, it will come into contact with the surface of the hall sensor housing.
To create the plate, it is allowed to use any material except steel. Aluminum and others should not be used as they are not magnetic. The drawing that must be followed can be found in the public domain. The presented diagram will be useful to those people who decide to modernize the vehicle ignition device. Below are methods for installing electrical ignition devices in Jupiter.
It must be turned by a professional turner. He will make a simple disk and draw on it the markings of elementary distances between the corners. Then, in accordance with it, you will cut out the necessary sectors at home. The cost of the modulator is seventy rubles.
It is not advisable to use an ordinary plate, since its width is less than twelve millimeters. This will not be enough to fully accumulate the energy resource in the coil. Of course, it can be installed, but achieving four thousand revolutions per minute will become impossible.
In addition to the above you will need:
Crankshaft alignment
The crankshaft is assembled, all that remains is to eliminate the runout of the shafts (balance), many people think that they cannot do without a lathe, but everything ingenious is simple.
Measure each neck using a barbell as shown in the photo below, they are usually the same size but sometimes vary slightly in size. This dimension must be taken into account when centering the crankshaft.
Photo. We measure the crankshaft cheeks.
All that remains is to attach the rocker arm to the crankshaft cheek as shown in the photo below. It will be like this, first place the barbell on one cheek and press with your finger, the barbell will lie perfectly flat on the cheek, if this cheek is moved up, a gap will appear between the barbell and the second cheek. If the cheek is lower, the bar will be slightly inclined.
Photo. The picture shows a motorcycle crankshaft with a rocker arm, the arrow shows the gap between the rocker arm and the cheek.
Your task is to achieve alignment of the crankshaft cheeks without gaps by applying a rocker arm to each cheek in turn. The photo below shows how you can move the crankshaft cheek using a hammer. Be sure to take into account the strength of the crankshaft cheeks; the crankshaft on which I show from the CHZ section is hot and is not afraid of impacts. But the crankshafts of most road bikes are made of soft metal, so you can only hit where the tire is not applied.
Photo. This way you can move the crankshaft cheek.
If one cheek of the crankshaft turns out to be larger in diameter than the other, then when centering the crankshaft, take into account the gap between the cheek and the connecting rod; visually this gap should be the same by placing the connecting rod against the larger cheek on both sides.
Photo. The crankshaft of the bicycle is centered, the rod rests against the cheeks of the crankshaft without gaps.
Final actions
You should put rubber caps on the armor wires, and insert the latter into the candlesticks or coil above. If you skip this step, the motorcycle will stall when riding in rainy weather, as moisture will get into the battery.
By inserting spark plugs into the tip, it will be possible to maintain excellent contact between the battery and the volume of the vehicle. Now you will need a pre-purchased set of wires. The switch, coil and hall sensor are connected by wiring. She needs to be isolated. Of the entire mass, only a common plus is required.
Maintenance
The owner can independently perform some maintenance procedures:
The need to inspect and adjust the wiring arises if:
Self-check of the Planet 5 motorcycle generator in case of loss of charge
The cause of loss of charge in the IZH Planet 5 battery is most often a breakdown of the generator.
To check it yourself you need:
Step-by-step instruction
The following steps must be followed:
The presence of a short circuit in the 3rd stage or a discrepancy in the indicators in the 4th will indicate problems with the generator.
Photo gallery: stages of checking the IZH Planet 5 generator in case of loss of charge in pictures
How to correctly set the gap between the contacts of the breaker?
In order to set the gap between the breaker contacts, you will need:
Next, you need to follow the steps sequentially:
Photo gallery: adjusting the gap between the breaker contacts
Troubleshooting the audio signal and improving signal quality
Poor sound signal quality is mainly caused by improper adjustment.
The following tools will be needed for setup:
Step-by-step instruction
To adjust, do the following:
Electrical circuits of domestic motorcycles IZH Jupiter-5, Planet, IZH Junker, IZH49. To enlarge the diagram, click on it. You can also download for free and via a direct link an archive with circuit diagrams.
Electrical circuits of the ignition systems of the IZH Jupiter 5 motorcycle
1 - parking light lamp - A 12-4; 2 - high beam - low beam headlight - A 12-45:40; 3 - indicator lamp for generator operation - A 12-1; 4, 5 — speedometer scale illumination lamps — AMN 12-3; 6, 16, 17, 20, 23, 30 — lamps for the direction indicators of the motorcycle and side trailer; 7 - combination switch (right switch); 8 — brake light switch for the front wheel brake; 9 - breaker; 10 — spark plug; 11 — ignition coil; 12 - generator; 13 — rectifier-voltage regulator BPV14-10; 14 — brake light switch for the wheel brake; 15, 19 — side trailer clearance lamps — A 12-5; 18 — brake light lamp for side trailer — A 12-21-3; 21 — motorcycle brake light lamp — A 12-21-3; 22 — motorcycle rear marker lamp — A 12-5; 24 - battery; 25 - fuse; 26 — neutral lamp switch; 27 — ignition switch; 28 — sound signal; 29 — alarm switch (left switch); 31 — turn signal switch; 32 - high beam headlight control lamp - A 12-1; 32 — control lamp “neutral” — A 12-1; 33 - control lamp for direction indicator lights - AMN 12-3; Symbols on the BPV14-10 block (items 12,13): XI - “-” excitation windings; X2 - “-” battery (“ground”); ХЗ - “+” output to the control lamp; X4, X5, X7 - phases of the stator winding of the generator; X8 - “+” of the battery.
Electrical equipment of the IZH Jupiter motorcycle
The electrical equipment of the IZH Jupiter motorcycle differs only in the installation of the G-36M2 generator.
Electrical diagram of the IZH Jupiter motorcycle:
1 — rear light; 2 — neutral lamp switch; 3 - central switch; 4 — neutral indicator lamp; 5 — speedometer lighting lamps; 6 - main lamp; 7 — parking light lamp; 8 — light switch; 9 — sound signal; 10 — brake light switch; 11 - candle; 12 — control lamp; 13 - fuse; 14 - battery; 15 — relay-regulator; 16 - generator; 17 - capacitor; 18 - breaker; 19 - ignition coil.
Electrical equipment IZH Planet 5
The motorcycle uses 12-volt electrical equipment. The electrical wiring of the IZH Planet 5 motorcycle is single-wire, the role of the negative wire is performed by a metal frame.
Among the main components are:
For reference: as is customary in auto and motorcycle construction, modification of components and assemblies allows you to reduce the cost of products. For consumers, the advantage is that the price is low and a number of parts are interchangeable.
Generator
The motorcycle is equipped with a three-phase alternating current generator with an electromagnetic excitation circuit.
The principle of its operation is as follows:
The instructions provided include the following items:
For reference: on three-phase generators of the IZH Planet 5 motorcycle, the windings are connected according to a “star” or “delta” circuit. The rectifier is installed as a separate unit, and the IZH Planet 5 electrical wiring is connected to it.
Headlight
Unlike European countries, where there is a requirement that motorcycles with permanent magnet generators must be equipped with a battery - since a motorcycle with a non-working engine must have side lights - there are no such restrictions in Russia (see also about the Ural motorcycle wiring diagram).
For reference: with such a generator, IZH Planet 5 did not need an external current source when starting the engine. Therefore, the battery was not included in the electrical equipment.
The head light circuit includes:
Control devices
The following control devices are installed on the motorcycle:
Hi all! I take this opportunity to wish everyone a Happy New Year! I have accumulated enough material to write a post about the repair of the IZH-Planet 5-01 motorcycle, which I purchased last September. Things didn't go quite according to plan, which is why this story will stretch into 2 parts. In order to understand what kind of motorcycle this is and how it all started, I advise you to read the previous post about buying a motorcycle and starting to repair it. A short story about how our regiment arrived. Buying a motorcycle IZH-Planet 5-01. Anyone interested is welcome. So, we prepared all the parts for painting and soon took them away. As planned, we welded the frame in some places and strengthened the base of the saddle. While all the parts were being painted, I decided to rebuild the rear shock absorbers. Surprisingly, they were in excellent condition. What I liked was that they had rebound springs, which FINALLY eliminated the knocking noise on reverse. I replaced the silent blocks, seals, oil and everything worked great. Oh yes, I also replaced the shock absorber itself with a chrome one.
And here is heart 5-01. How much work it took me to wash it! I had to buy the most severe chemicals and wash it. What’s interesting is that if you compare the 3 engines of this model that I have, they are not similar to each other in some barely noticeable ways. Take this engine for example - the left engine cover is fastened with 8 screws (I don’t know why there are so many. Previously it held on just fine with 5). There is also an additional screw installed between the crankcase halves. The cylinder jacket now has solid bars. Interestingly, such fins with vibration dampers and an enlarged air filter significantly reduce engine noise, if we take the usual five as an example. In the end, after washing, the engine was wiped dry, preserved until better times and put on a shelf. And here the question is - why? Why remove it? I'll tell you about this now.
In the summer, my Planet-6 behaved extremely disgustingly! As a result, she turned back to Planet 5-01. What did she bring? Ooooh, I'll tell you now.
Of course, I am not a supporter of the perversion of replacing the engine 2 times a season, but this summer the engine showed all its weaknesses, and at once! It all started with a little thing. Well, as a small matter... I decided to go for a ride in the evening. I went far and here you are! Crunching, knocking... I turn off the engine, try to turn it over with the kick starter - to no avail. The culprit was a loose bolt on the clutch basket, which got stuck so conveniently that it popped the engine cover a little and all my oil leaked out... I fixed it.
Further, not far from the house, the oil pump broke down. Although it’s a small thing, drain the oil from the oil tank and change the pump. Unpleasant... Fixed it.
Further. I went to a neighboring village. I’m driving and feel that suddenly the air has started to leak and the engine is barely running. I looked for the reason and found it. It's all because of the rubber connection between the carburetor and the inlet pipe. This PS system has failed. The rubber band cracked, and it was new, less than a week had passed since purchase. I found a package on the side of the road, wrapped it up, and arrived. It was starting to get annoying.
And then the engine did not develop power at all. The break lets absolutely everything pass between the halves. Yep... This means removing the engine, radiator, completely disassembling the engine. Challenge accepted!!! The fears were confirmed. After the engine was cut in half, I was horrified. What kind of game is this!? And not sealant or varnish!? What is this? Everything was shriveled up, the oil was consuming as much as it could! This is a huge disadvantage of a non-serial engine. I don’t know how my engine was assembled, and who assembled it, that I removed all the jambs until the last minute.
The crankshaft is PS, but the left axle is from a regular planet.
Gap after running in. Well, it's really a shame!
Welded plate for installing the cylinder. Such a plate was on the first engines, then they made it more aesthetically pleasing.
I wash everything and examine every millimeter for the presence of something else... you never know there will be more jambs. As a pathologist, only with IZH.
Well, that's it, you can put it back together. Replaced engine seals and rings. And now, slowly, let’s degrease everything, blow it through and assemble it as it should be. No engine has ever driven me as hard as this one. Well, why did it die after the run-in? Well, not completely dead, but damn... Of course, you can understand - the engine is non-serial, semi-tested... Well, it was possible to assemble it normally? So we'll collect it. Before assembly, as always, we washed every screw so that everything was Feng Shui.
To assemble the engine, almost the way it should have been assembled at the factory, I used the factory documentation for this particular engine. Here you can say: forget it already, stop messing with it! I thought so myself at that moment, maybe that’s enough!? But nooo, that would be too easy. Once you get it, do as Mayakovsky wrote: don’t groan, don’t gasp, don’t pull the reins, once you’ve fulfilled the plan...
That's it. Assembled, installed, started, drove off. Well, that's a completely different matter! I went as I should! Ahh... what's that there? Is the cylinder head leaking? Yes, yours... well. That's enough, go on the shelf until better times. Moreover, the trip to Izhevsk was approaching, and driving such an engine was stupid. And on this note, the reliable 5-01 returned to service. This is roughly how the engine finished me off))) And now we’re moving back to repairing the new motorcycle. That's it, I started preparing for assembly. I bought a lot of original new spare parts. I decided to take the trouble and change the knitting needles. We also found another head from the P6 engine - one as a spare.
The second head also had a small jamb, but it didn’t matter. By that time I had calmed down and took both heads to an argon specialist, where they fixed everything for me without any problems. Well, let's begin!
Everything was painted. We begin the assembly procedure
I had another Orion fork in stock and decided to put it here. Moreover, this frame has a different angle of inclination of the steering column and is precisely adapted to this fork. This frame also allows you to install a P6 engine and a radiator, and everything will fit and will not rest against the tank, as on a regular frame. This is what prompted me to return to assembling Planet 6. I don’t know what kind of stubbornness this is, but I want to have such a motorcycle and ride it.
After all the assembled motorcycles, this one was assembled faster, almost automatically.
This fork also has a different type of headlight holders and reflectors. Reflectors have their own mount. I wanted more chrome parts on this bike, and because of this I decided to go with spoked wheels.
Almost new rear casing. The most interesting thing is that almost all the fasteners remained original, since after a week of soaking in gasoline it was like new.
He turns out handsome)) I believe everything will work out!
We begin installing controls, wiring, and a rebuilt instrument panel. I had to tinker with the panel. Here the oil lamp was not used. We ran the wire to the oil tank, wrapped it in heat shrink, put it in the tidy - everything worked.
Like from an assembly line. Maybe a little better)))
All plugs with covers. It’s a pity that there’s no such thing on the fours, there’s nothing scary about the wiring here in the rain.
Here he is) Taking his place of honor.
We ran the wiring and went through all the hydraulics. All that remains is to connect a couple of wires correctly and you can try connecting the battery to check.
Everything is working! You can fasten the wiring to the frame soon.
I wanted to remove the carbon deposits, but there was almost none. A huge plus of separate lubrication is that there is much less carbon deposits.
Here I also sealed the fender liner to prevent dirt from getting in from under the wheel. On another Planet 5-01, this small modification showed itself to be excellent - now there is no dirt at all on the BPV, switch and wiring.
I cleaned the muffler and elbow from carbon deposits. For the first time, I came across a whole muffler, everything was like new, I just had to wash it off the dirt and polish it.
Slowly the motorcycle is acquiring everything it needs.
We reupholstered and assembled the saddle. We put the glove compartment covers on. I'm already starting to like it)))
Another moment when I almost went crazy was replacing the spokes. It seems like I’ve almost removed the figure eight and an oval appears. In 2 weeks I was unable to completely eliminate the runout and straighten the wheel. The front wheel works more or less, but the rear wheel doesn’t want to. This is my first time changing spokes, and to be honest, I didn't have the patience. I will give it to someone who knows. Of course, I have to do it myself, but I hate wasting so much time.
The cable divider also caused problems. The divider itself is from a Honda Dio. I had to make an analogue cable for the throttle grip, since the cable from the carburetor and oil pump were original. An hour of magic with a soldering iron and everything was ready and worked no worse than the original. Another plus of IZH is that it will make you a mechanic, an electrician, teach you how to solder, make the necessary parts, and... ahem, of course it’s no secret, it will teach you to swear.
There are so many wheels missing)) Almost everything is ready. While the wheels are being made, while the new Mitas tires arrive, all the little things can be eliminated and all that remains is to lower it to the ground))
With this I will summarize the first part. This is such a muddy story with the engine. Even though it got on my nerves, I will still do it properly. It would be too easy to leave it on the shelf when the finish line is just around the corner. The most amazing thing is that the assembly time took 2 times less than last year, so you won’t have to wait long for the second part. Still, it was not in vain that I bought this motorcycle, what a beauty it turns out to be, I really like it myself)) This is how our winter garage season goes)) Once again, Happy New Year to everyone, thank you for your attention, see you again!